What is HDD Unlock? A Comprehensive Guide to Reclaiming Access to Your Locked Hard Drive

Encountering a locked hard drive can be a frustrating roadblock, especially when you’re trying to manage partitions, reformat, or even access your valuable data. The error message, often seen in macOS Disk Utility as “This partition contains a locked disk and cannot be resized until it is unlocked,” signals that your Hard Disk Drive (HDD) is intentionally or unintentionally locked, preventing standard operations. Understanding what HDD unlock means and how to navigate this issue is crucial for anyone managing their digital storage.
This guide aims to provide a clear understanding of HDD unlock, exploring the common causes behind a locked hard drive and offering practical solutions to regain control of your storage device. Whether you’re a seasoned tech user or someone just starting to manage your drives, this information will equip you with the knowledge to tackle the “locked disk” problem effectively.
Understanding HDD Lock: Delving into the “Locked Disk” Message
The “locked disk” message typically arises within the macOS environment, often when users attempt to modify partitions on an external HDD or even an internal SSD. This lock is not a physical lock, but rather a software-imposed restriction that prevents changes to the disk’s structure. It’s a security feature, sometimes related to encryption, or a system state that can occur due to software glitches or improper disk handling.
In many cases, this lock is associated with Apple’s Core Storage, a logical volume management system that underpins features like FileVault encryption. When a partition is encrypted or part of a Core Storage Logical Volume Group (LVG), it can become locked to protect the data within. Upgrading macOS, experiencing file system corruption, or improperly disconnecting an encrypted drive can sometimes lead to this locked state.
Common Scenarios Leading to a Locked HDD
Several situations can trigger the dreaded “locked disk” message. Understanding these common scenarios can help you anticipate and potentially prevent the issue, or at least better diagnose the problem when it occurs.
- Encrypted Partitions and Time Machine Backups: As highlighted in user experiences, using an encrypted partition for Time Machine backups and then upgrading macOS can lead to a locked HDD. The system might struggle to recognize or unlock the encrypted volume after the upgrade, resulting in the lock error.
- FileVault Encryption Issues: Problems during the encryption or decryption process using FileVault can leave a drive in a locked state. Interruptions, errors during password changes, or system crashes during these operations can all contribute to this issue.
- Logical Volume Group (LVG) Problems: Core Storage, used for FileVault, organizes storage into Logical Volume Groups. Issues within the LVG structure, such as corruption or inconsistencies, can lead to partitions being reported as locked.
- Disk Utility Limitations: Sometimes, macOS Disk Utility itself may not have the necessary permissions or capabilities to unlock a drive, especially if the lock is deeply embedded within the system’s storage management.
- Improper Disk Handling: Disconnecting an external HDD without properly ejecting it, particularly if it’s encrypted, can occasionally lead to file system errors and a locked state.
Methods to Unlock Your HDD and Restore Functionality
Fortunately, a “locked disk” is not an insurmountable problem. Several methods can be employed to unlock your HDD and regain access and control. Depending on your technical comfort level and the specifics of your situation, one of these approaches should help you resolve the issue.
Method 1: Utilizing Terminal and diskutil (The Command Line Approach)
For users comfortable with the command line, macOS Terminal provides powerful tools to manage disks, including unlocking HDDs. The diskutil command is particularly useful for interacting with Core Storage and removing logical volume groups that might be causing the lock. This method is based on the solution provided by user Eddie Yam in the original forum thread and has proven effective for many users.
Caution: This method involves deleting a Logical Volume Group. All data on the logical volumes within this group will be deleted. Ensure you have backups of any important data before proceeding.
Step-by-step guide to using diskutil:
-
Open Terminal: Navigate to
Finder > Applications > Utilities > Terminalto launch the Terminal application. -
List Core Storage Volumes: Type the following command and press Enter to list all Core Storage volumes and identify the Logical Volume Group (LVG) UUID of your locked partition:
diskutil corestorage listThis command will display detailed information about your Core Storage setup. Look for the section related to your locked HDD. You need to identify the “Logical Volume Group” UUID, which is a long alphanumeric string associated with your locked partition.
Output of diskutil corestorage list command, showing Logical Volume Group UUID -
Delete the Logical Volume Group: Once you have identified the UUID of the Logical Volume Group associated with your locked disk, use the following command to delete it. Replace
<LVG_UUID>with the actual UUID you obtained in the previous step.diskutil corestorage delete <LVG_UUID>Example: If your LVG UUID is
6B88...8BE2, the command would be:diskutil corestorage delete 6B88...8BE2Press Enter to execute the command. Terminal will process the command, and it may take a few moments to complete.
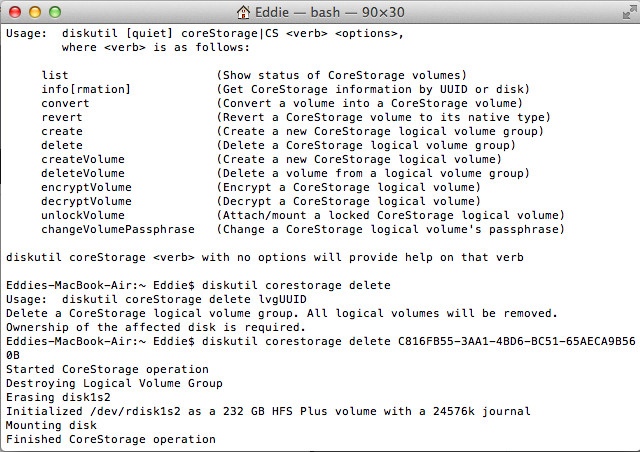 Output of diskutil corestorage delete command, showing successful deletion of LVG
 -
Verify in Disk Utility: After the command completes successfully, open Disk Utility (
Finder > Applications > Utilities > Disk Utility). Your HDD should now be unlocked, and you should be able to repartition and reformat it as needed.
This method directly addresses the Core Storage lock by removing the problematic Logical Volume Group. It’s a powerful solution but requires careful execution due to the data loss risk.
Method 2: Utilizing macOS Recovery Mode (Disk Utility from Recovery)
If you prefer a graphical interface or if the Terminal method seems too daunting, booting into macOS Recovery Mode can provide an alternative way to unlock your HDD. Recovery Mode provides a limited macOS environment with access to Disk Utility, which can sometimes bypass the lock that the standard OS encounters.
Steps to use Disk Utility in Recovery Mode:
-
Boot into Recovery Mode: Restart your Mac and immediately press and hold
Command + Rkeys until you see the Apple logo or a spinning globe. -
Open Disk Utility: In the macOS Utilities window, select “Disk Utility” and click “Continue.”
-
Select the Locked Disk: In Disk Utility, locate and select the locked HDD from the sidebar.
-
Attempt to Erase or Partition: Try to erase or partition the disk. In Recovery Mode, Disk Utility might have elevated permissions that allow it to unlock and modify the drive, even if the standard OS couldn’t.
This method leverages the recovery environment to potentially bypass software locks and allows you to manage your HDD through the familiar Disk Utility interface.
Method 3: Employing Target Disk Mode (Using Another Mac)
If you have access to another Mac, Target Disk Mode offers a unique approach. This mode turns your locked Mac’s drive into an external drive for another Mac, allowing you to use the second Mac’s Disk Utility to manage the locked HDD.
Steps for Target Disk Mode:
-
Enable Target Disk Mode on the Locked Mac:
- Shut down the locked Mac.
- Connect the two Macs using a Thunderbolt or FireWire cable.
- Start up the locked Mac while holding down the
Tkey until the Target Disk Mode icon (a Thunderbolt or FireWire symbol) appears on the screen.
-
Access the Locked Drive from the Second Mac: The locked Mac’s drive should now mount as an external drive on the second Mac.
-
Use Disk Utility on the Second Mac: Open Disk Utility on the second Mac and select the mounted drive (which is the locked HDD from the first Mac).
-
Erase or Partition: Attempt to erase or partition the drive using Disk Utility on the second Mac. The second Mac’s Disk Utility might be able to unlock and modify the drive.
Target Disk Mode can be particularly useful when the lock is system-specific and can be circumvented by accessing the drive from a different macOS environment.
Method 4: Third-Party Disk Utility Software
As mentioned by some users, third-party disk utility programs can sometimes offer more robust disk management features than the built-in Disk Utility. If the above methods fail, exploring reputable third-party disk utilities for macOS might be worth considering. These tools may have specialized functions to unlock and repair problematic drives. However, exercise caution and choose trusted software to avoid potential malware or further complications.
Data Recovery Considerations
It’s crucial to remember that some of the methods, especially using diskutil in Terminal, involve data loss. If you have valuable data on the locked HDD that isn’t backed up, consider data recovery options before attempting any unlocking methods that involve erasing or reformatting the drive. Professional data recovery services or specialized data recovery software might be necessary in such cases.
Conclusion: Reclaiming Control of Your HDD
Encountering a “locked disk” error can be a significant hurdle, but understanding the nature of the lock and the available unlocking methods empowers you to regain control of your hard drive. From using the command-line power of diskutil to leveraging macOS Recovery Mode or Target Disk Mode, you have several avenues to explore.
Remember to prioritize data safety and choose the method that best suits your technical skills and comfort level. By carefully following these steps, you can effectively unlock your HDD, resolve the error, and continue managing your digital storage with confidence.