DIY: Unlock Full-Screen Apple CarPlay and USB Coding on Your BMW NBT EVO (HU_NBT EVO)
Are you looking to enhance your BMW’s infotainment system with full-screen Apple CarPlay and USB coding capabilities? If you’re the proud owner of a BMW F-series with the NBT EVO head unit (HU_NBT EVO), you might be facing the common challenge of an older software version that limits these features. Like many BMW enthusiasts, upgrading to the latest and greatest is a priority, and that often involves diving into the world of DIY car modifications.
This guide is born from firsthand experience, documenting the journey of upgrading an NBT EVO system from version “J” to a later version to enable full-screen CarPlay and explore USB coding functionalities. If you’ve been searching for clear, step-by-step instructions on how to flash your BMW NBT EVO at home, you’ve come to the right place. This DIY guide aims to be the definitive resource, breaking down the process and empowering you to take control of your BMW’s technology.
Ethernet to OBD ENET Cable for BMW Coding
Understanding the Need for NBT EVO Flashing
Many BMW owners with the NBT EVO system, especially those with earlier software versions, discover that features like full-screen Apple CarPlay are locked or unavailable. Often, these systems need to be updated to a newer firmware version (like “N”, “O”, or higher) to unlock these functionalities. This process, known as flashing, essentially updates the software on your NBT EVO unit, bringing it up to par with later models.
While professional services can perform this update, the DIY spirit in the BMW community is strong. Many owners prefer to understand and execute these upgrades themselves, gaining a deeper understanding of their vehicle’s systems and saving on service costs. However, information on DIY NBT EVO flashing has often been fragmented or incomplete, making the process seem daunting. This guide aims to change that, providing a comprehensive and accessible walkthrough.
Gathering Your Tools: Software and Hardware Prerequisites
Before embarking on this DIY journey, ensure you have the necessary software and hardware. This guide utilizes E-Sys software, a powerful tool used for BMW coding and programming.
Software:
- E-Sys Software: Version 3.30.1 or later is recommended. Both Lite and Full versions can be used, with Full versions often providing more comprehensive features.
- PSdZData Full: Data files containing the latest firmware and software for BMW ECUs. Version v.4.26.35_PSdZData_Full or newer is advisable for up-to-date software.
Hardware:
- ENET Cable (Ethernet to OBD): This cable connects your laptop to your BMW’s OBD port, enabling communication with the vehicle’s electronic control units (ECUs). A reliable ENET cable is crucial for a stable connection during flashing. (Example: Amazon ENET Cable)
- ICOM Next (Optional): While an ENET cable is often sufficient for NBT EVO flashing, an ICOM Next interface is a more professional tool that can offer enhanced stability and speed, particularly for more complex programming tasks. However, for this specific NBT EVO flash, an ENET cable is generally adequate and more accessible for DIYers.
- Battery Charger (50 AMP or Higher): Maintaining a stable voltage during the flashing process is critical to prevent ECU damage. A battery charger with a 50 AMP or higher rating is essential to ensure a consistent power supply throughout the procedure.
BMW E-Sys Connection Settings
Step-by-Step Guide to NBT EVO Flashing with ENET Cable
This section provides a detailed walkthrough of the NBT EVO flashing process using an ENET cable.
1. ENET Cable Connection Setup:
-
Network Adapter Settings: On your Windows laptop, navigate to Network Connections and locate your Ethernet adapter. Open its properties and select “Internet Protocol Version 4 (TCP/IPv4)”.
-
Static IP Configuration: Configure the IPv4 settings as follows:
- IP address: 169.254.3.2
- Subnet mask: 255.255.255.0
- Default gateway: (Leave blank)
- Preferred DNS server: (Leave blank)
Ethernet to OBD ENET Cable for BMW Coding -
Connect Cable and Ignition: Plug the ENET cable into your BMW’s OBD port and the Ethernet port of your laptop. Turn on your vehicle’s ignition (engine off).
-
ZGW Search (EDIABAS): Run the
ZGW_SEARCH.exeapplication located inC:/EDIABAS/Hardware/ENET. This tool helps verify the ENET connection and identify the ZGW (Central Gateway Module) IP address.EDIABAS ZGW Search Result
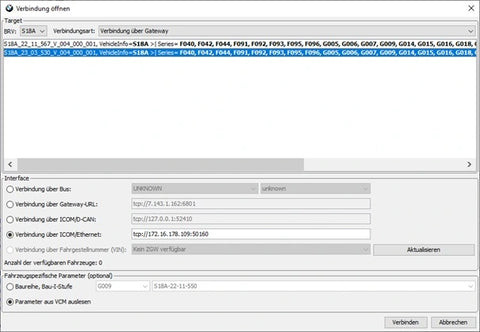
2. E-Sys Connection:
-
Open E-Sys: Launch the E-Sys software.
-
Connection Manager: Click the “Connect” button.
-
Target Selection: Choose “Target Selector” and select your vehicle’s chassis (e.g., “F025” for F85 X5M, or the appropriate F-series chassis for your model). Do not select options ending in “DIRECT”.
-
Connection Type: Select “Ethernet via cable”.
-
Click “Connect”: Initiate the connection to your BMW.
E-Sys Connection Confirmation
3. Checking ECU Dependencies (TAL Calculation Preparation):
-
Expert Mode – TAL Processing: Navigate to “Expert Mode” and then “TAL Processing”.
-
Read FA and Save: Click “Read FA” to retrieve your vehicle’s FA (Vehicle Order) and save it with a descriptive name (e.g., “FA_Order.xml”).
-
Activate FA: Right-click on the saved FA file and select “Activate FA”.
-
Read ECU (or Read SVT): Click “Read ECU” (or “Read SVT” if it works for your chassis) to retrieve the SVT (Vehicle Target) list from your car. Save it as “SVT_ist.xml”.
-
KIS/SVT Target – Select I-Step Shipment and Target:
- Note your vehicle’s “I-Step Shipment” level displayed after connection.
- In the “KIS/SVT Target” section, select the same “I-Step (shipment)” value you noted.
- Then, select the latest available “I-Step (target)” value.
-
Complete Flash: Choose “Complete Flash” on the right side.
-
Calculate SVT_soll and TAL:
- Click “Calculate” to generate the SVT_soll (Vehicle Target Soll) file. Save it as “SVT_soll.xml”.
- Click “Calculation” under the “TAL” menu. Click “OK” if a warning appears.
- Save the TAL calculation as “SVT_tal.xml”.
E-Sys TAL Calculation Dependencies -
Examine Dependencies: This is a crucial step. In “Expert Mode” -> “TAL Processing”, load your saved “SVT_tal.xml” file by clicking “TAL…” and “SVT_soll.xml” by clicking “SVT…”. Click “Read FA” above the FA … (3 dot) to load FA automatically.
-
Identify HU_NBT2 Dependencies: Within the TAL file, locate the “HU_NBT2” module. Expand its “PreRequisite” folder to see if there are any dependencies. Dependencies are marked with a “+”.
-
Include Dependent ECUs in Update: If “HU_NBT2” has dependencies (like BDC_GW in the original example), ensure these dependent ECUs are included in your flashing list. This ensures a consistent and successful update across related modules.
4. Programming (Flashing) Steps:
-
Expert Mode – TAL Processing (Continued): Ensure you are still in “Expert Mode” -> “TAL Processing” and have loaded “SVT_tal.xml”, “SVT_soll.xml”, and “FA_aus_VCM.xml”.
-
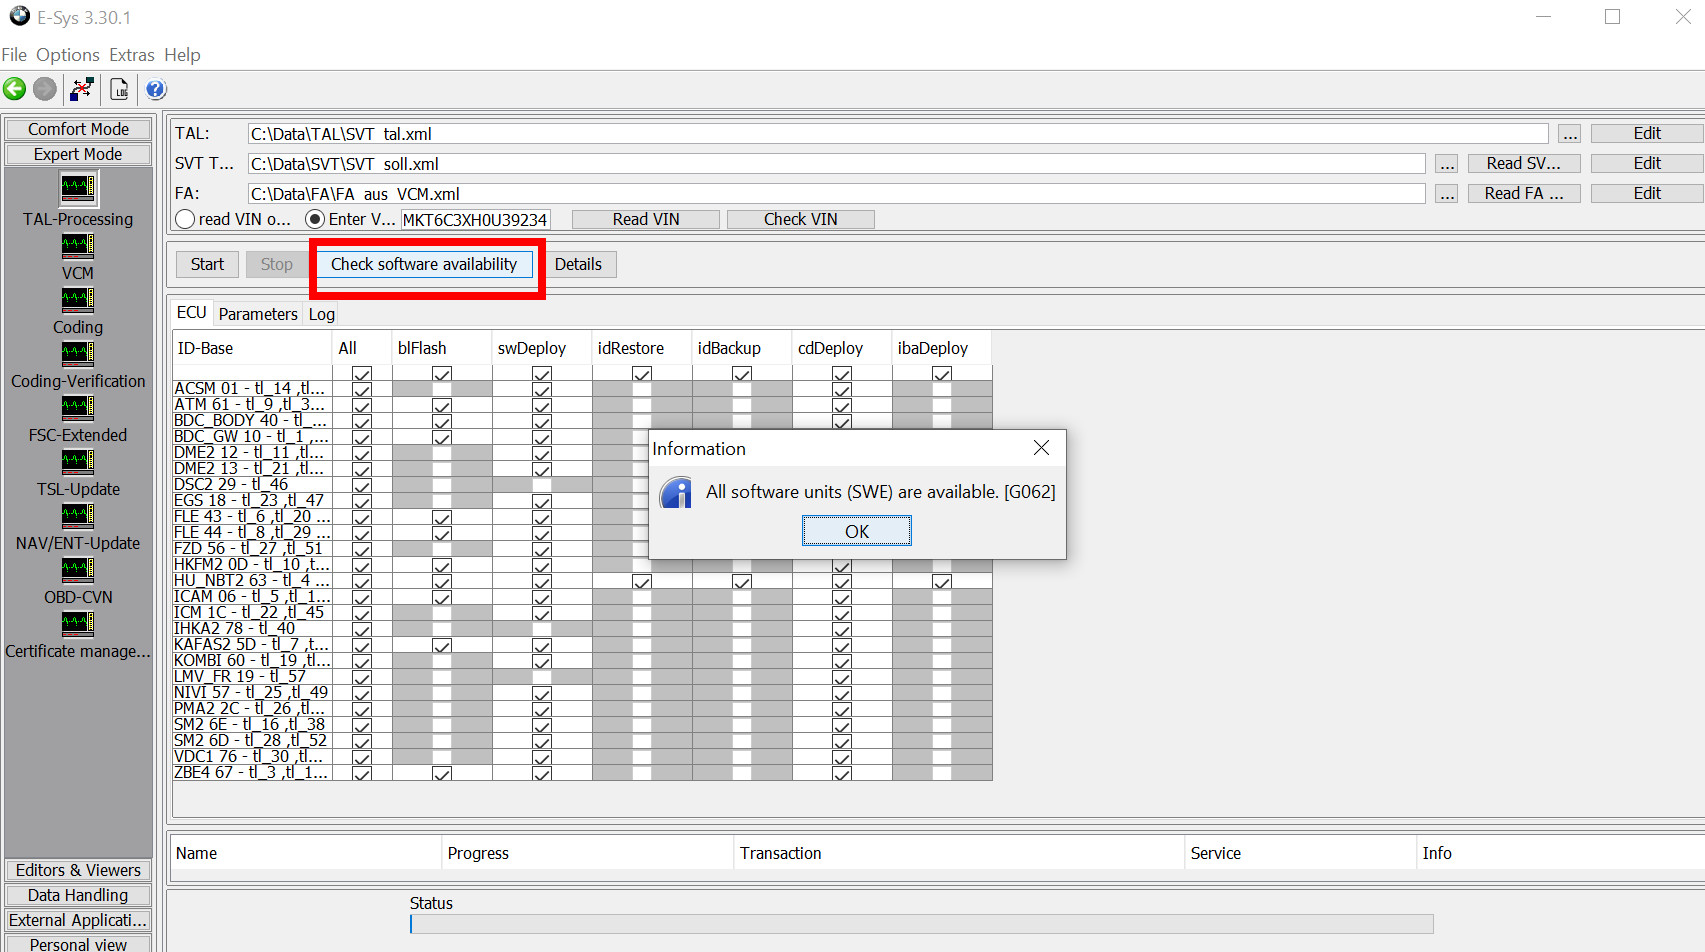
Select Modules for Flashing: In the “ECU” list, by default, all modules will be selected (“ALL”). For this NBT EVO update focusing on CarPlay and USB coding, you can deselect “ALL” and then manually select only “HU_NBT2_63”.
-
Select Flash Operations: Within the “HU_NBT2_63” module, ensure the following operations are checked:
blFlashswDeploycdDeployibaDeploy
E-Sys TAL Processing interface displaying the selected operations for the HU_NBT2 module flash, focusing on essential update components.
-
Check Software Availability: Click “Check Software Availability” to verify that you have the necessary data files for the selected flash operations. You should see a confirmation similar to the image below.
E-Sys Software Availability Check -
Start Flashing: Click the “Start” button to begin the NBT EVO flashing process.
-
Flashing Time: The flashing process can take approximately 40-45 minutes. Maintain a stable battery voltage throughout the entire process using your battery charger. Do not interrupt the flashing process.
5. Post-Flashing and CarPlay Activation:
- ID6 Lite Skin: After a successful flash, your NBT EVO may revert to the ID5 menu style. To activate the ID6 “Lite” skin (visual update), code the following in “Expert Mode – Coding”:
- ECU:
HU_NBT_EVO(or similar, depending on your E-Sys version) - Parameter:
HMI_ID_VERSION - Value:
id6_light
- ECU:
- Enable Apple CarPlay: If Apple CarPlay is not automatically enabled after the flash, code the following parameters:
- ECU:
HMI - Parameter:
HMI_39_39_128(orAPPSsection) - Value:
aktiv(orenabled) - Alternatively (or additionally):
- ECU:
HMI - Parameter:
CARPLAY_FULLSCREEN - Value:
aktiv(orenabled)
- ECU:
Troubleshooting Common Issues During NBT EVO Flashing
Even with careful preparation, you might encounter some issues during the flashing process. Here are two common problems and their solutions:
Issue 1: “FA must not be null” Error
- Error Message:
TAL execution started. [C205] VCM Update: VCM-Update is deactivated. VCM will not be updated. [C197] [Exception - UNKNOWN] FA must not be null when trying to execute a TAL containing coding transactions Fatal error while executing tal! Asynchrone programming failed! [C049] FA must not be null when trying to execute a TAL containing coding transactions [1358] - SYSTEM_ERROR - Cause: This error often occurs because the FA (Vehicle Order) is not properly loaded or activated within the TAL Processing session.
- Solution: After step 18 in the “Programming Steps” section (where you click “Read VIN”), immediately click “Read FA” again. This ensures the FA is correctly loaded into the current session and resolves the “FA must not be null” error.
Issue 2: “Medium in dvd drive” Error
- Error Message:
[] Failed ProgrammingPrecondition ECUId:HU_NBT2_0x63 error ID:128 - Medium in dvd drive. Flash may have problems when updating drive firmware. Please remove medium from drive before flash. Otherwise flash cannot start. [THROWABLE] - Cause: This error indicates that there is a CD or DVD present in the NBT EVO’s optical drive, which can interfere with the flashing process.
- Solution: Physically remove any CD or DVD from the NBT EVO’s drive. Even if you believe the drive is empty, double-check by pressing the eject button multiple times. In some cases, a CD might be stuck or not eject immediately. Once the disc is removed, the flashing process should proceed without this error.
A successful full-screen Apple CarPlay display on the BMW NBT EVO screen, showcasing the result of the DIY flashing and coding process.
Conclusion: Empowering DIY BMW Upgrades
Flashing your BMW NBT EVO to enable full-screen CarPlay and explore USB coding is a rewarding DIY project. By following this comprehensive guide and taking your time, you can successfully upgrade your BMW’s infotainment system from the comfort of your garage. This DIY approach not only saves you money but also provides a deeper understanding of your vehicle’s technology and opens up a world of customization possibilities. With the right tools and information, the power to enhance your BMW is truly in your hands.
Disclaimer: This guide is for informational purposes only. Automotive software modifications can be complex and carry risks. Proceed with caution and at your own risk. CARDIAGTECH is not responsible for any damage that may occur during the DIY flashing process.