How To Fix Lacquer Peel On A Car Effectively
Lacquer peel on a car can be a frustrating issue, diminishing the vehicle’s aesthetic appeal and potentially leading to further damage. CARDIAGTECH.NET provides you with the definitive guide on fixing lacquer peel, restoring your car’s finish, and protecting your investment. Discover effective repair methods and preventative measures to maintain a flawless, head-turning appearance, preventing clear coat failure.
Contents
- 1. Understanding Lacquer Peel
- 1.1. Causes of Lacquer Peel
- 1.2. Identifying Lacquer Peel
- 2. Assessing the Damage
- 2.1. Evaluating the Affected Area
- 2.2. Checking for Underlying Damage
- 3. Essential Tools and Materials
- 3.1. Safety Gear
- 3.2. Sanding Tools
- 3.3. Painting Supplies
- 3.4. Spraying Equipment
- 3.5. Polishing and Buffing Tools
- 4. Step-by-Step Repair Guide
- 4.1. Preparation
- 4.2. Sanding
- 4.3. Priming
- 4.4. Base Coat Application
- 4.5. Clear Coat Application
- 4.6. Polishing and Buffing
- 4.7. Final Inspection
- 5. Professional vs. DIY Repair
- 5.1. DIY Repair
- 5.2. Professional Repair
- 6. Cost Considerations
- 6.1. DIY Repair Costs
- 6.2. Professional Repair Costs
- 6.3. Factors Affecting Cost
- 7. Preventing Lacquer Peel
- 7.1. Regular Washing and Waxing
- 7.2. Parking in the Shade
- 7.3. Applying a Ceramic Coating
- 7.4. Avoiding Harsh Chemicals
- 8. Advanced Techniques
- 8.1. Blending Techniques
- 8.2. Orange Peel Removal
- 8.3. Dealing with Contamination
- 9. Choosing the Right Products
- 9.1. Primer Selection
- 9.2. Base Coat Selection
- 9.3. Clear Coat Selection
- 10. Common Mistakes to Avoid
- 10.1. Inadequate Surface Preparation
- 10.2. Improper Paint Application
- 10.3. Neglecting Safety Precautions
1. Understanding Lacquer Peel
Lacquer peel, also known as clear coat failure, occurs when the clear coat layer of your car’s paint begins to separate from the base coat. This unsightly issue can be caused by several factors, including prolonged exposure to sunlight, extreme temperatures, and improper paint application.
1.1. Causes of Lacquer Peel
Understanding the root causes of lacquer peel is essential for effective prevention and repair.
- UV Radiation: Excessive exposure to sunlight breaks down the chemical bonds in the clear coat, causing it to become brittle and peel. A study by the National Center for Biotechnology Information highlights the damaging effects of UV radiation on automotive coatings.
- Extreme Temperatures: Fluctuations between hot and cold temperatures can cause the clear coat to expand and contract, leading to stress and eventual peeling.
- Poor Paint Application: Inadequate surface preparation, incorrect mixing ratios, or improper spraying techniques during the painting process can result in poor adhesion between the clear coat and base coat.
- Age of the Vehicle: Over time, the clear coat naturally degrades, increasing the likelihood of lacquer peel.
- Environmental Factors: Exposure to pollutants, acid rain, and road salts can accelerate the degradation of the clear coat.
1.2. Identifying Lacquer Peel
Recognizing the early signs of lacquer peel can help you take timely action and prevent further damage.
- Cloudiness or Haze: The clear coat may appear cloudy or hazy, indicating the initial stages of degradation.
- Small Cracks: Fine cracks may develop on the surface of the clear coat.
- Bubbling: Small bubbles may appear under the clear coat, indicating separation from the base coat.
- Peeling: The clear coat starts to peel off in small or large patches, revealing the base coat underneath.
2. Assessing the Damage
Before you start any repair work, it’s crucial to assess the extent of the lacquer peel. This will help you determine the best course of action and ensure a successful repair.
2.1. Evaluating the Affected Area
Carefully examine the affected area to determine the size and severity of the lacquer peel.
- Small Isolated Patches: If the peeling is limited to small, isolated patches, you may be able to perform a spot repair.
- Large Areas: If the peeling covers a large area, such as an entire panel, a more extensive repair or full respray may be necessary.
- Multiple Panels: If multiple panels are affected, consider the overall cost and feasibility of repairing each one individually.
2.2. Checking for Underlying Damage
Inspect the underlying base coat for any signs of damage, such as rust, scratches, or dents. Addressing these issues before repairing the lacquer peel will ensure a long-lasting and professional finish.
- Rust: Remove any rust with a wire brush or chemical rust remover before proceeding with the repair.
- Scratches and Dents: Fill any scratches or dents with body filler and sand smooth before applying the base coat and clear coat.
3. Essential Tools and Materials
Having the right tools and materials is essential for achieving a professional-quality lacquer peel repair. CARDIAGTECH.NET offers a wide range of high-quality automotive repair tools and equipment to help you get the job done right.
3.1. Safety Gear
Protecting yourself is paramount when working with automotive paints and chemicals.
- Respirator: A respirator is essential to protect your lungs from harmful fumes.
- Safety Glasses: Safety glasses will shield your eyes from debris and chemical splashes.
- Gloves: Wear chemical-resistant gloves to protect your skin from paints and solvents.
- Protective Clothing: Wear a long-sleeved shirt and pants to protect your skin from overspray and chemicals.
3.2. Sanding Tools
Sanding is a crucial step in the lacquer peel repair process.
- Sandpaper: You’ll need various grits of sandpaper, ranging from coarse (e.g., 400 grit) to fine (e.g., 2000 grit).
- Sanding Block: A sanding block will help you maintain a flat and even surface.
- Dual Action (DA) Sander: A DA sander can speed up the sanding process and provide a more consistent finish (optional).
3.3. Painting Supplies
Proper painting supplies are essential for achieving a flawless finish.
- Automotive Primer: Primer helps the base coat adhere to the surface and provides a smooth foundation.
- Automotive Base Coat: The base coat provides the color for your car’s paint job.
- Automotive Clear Coat: The clear coat protects the base coat and provides a glossy finish.
- Paint Thinner: Paint thinner is used to thin the paint and clean your spray gun.
- Masking Tape and Paper: Masking tape and paper are used to protect areas you don’t want to paint.
3.4. Spraying Equipment
Investing in quality spraying equipment will greatly improve the outcome of your repair.
- Spray Gun: A high-quality spray gun will provide a consistent and even spray pattern.
- Air Compressor: An air compressor is needed to power your spray gun.
- Air Filter/Dryer: An air filter/dryer will remove moisture and contaminants from the compressed air, ensuring a clean paint job.
3.5. Polishing and Buffing Tools
Polishing and buffing will enhance the gloss and smoothness of the repaired area.
- Polishing Compound: Polishing compound is used to remove swirl marks and minor imperfections.
- Buffing Compound: Buffing compound is used to enhance the gloss and shine of the clear coat.
- Polishing Pad: A polishing pad is used to apply polishing compound to the surface.
- Buffing Pad: A buffing pad is used to apply buffing compound to the surface.
- Dual Action (DA) Polisher/Buffer: A DA polisher/buffer will speed up the polishing and buffing process and provide a more consistent finish.
Table 1: Essential Tools and Materials for Lacquer Peel Repair
| Category | Item | Purpose |
|---|---|---|
| Safety Gear | Respirator | Protects lungs from harmful fumes |
| Safety Glasses | Protects eyes from debris and chemical splashes | |
| Gloves | Protects skin from paints and solvents | |
| Protective Clothing | Protects skin from overspray and chemicals | |
| Sanding Tools | Sandpaper (various grits) | Removes damaged clear coat and prepares the surface for painting |
| Sanding Block | Provides a flat and even sanding surface | |
| Dual Action (DA) Sander (optional) | Speeds up sanding process and provides a more consistent finish | |
| Painting Supplies | Automotive Primer | Helps base coat adhere and provides a smooth foundation |
| Automotive Base Coat | Provides the color for the paint job | |
| Automotive Clear Coat | Protects base coat and provides a glossy finish | |
| Paint Thinner | Thins paint and cleans spray gun | |
| Masking Tape and Paper | Protects areas you don’t want to paint | |
| Spraying Equipment | Spray Gun | Provides a consistent and even spray pattern |
| Air Compressor | Powers the spray gun | |
| Air Filter/Dryer | Removes moisture and contaminants from compressed air | |
| Polishing/Buffing | Polishing Compound | Removes swirl marks and minor imperfections |
| Buffing Compound | Enhances gloss and shine of the clear coat | |
| Polishing Pad | Applies polishing compound to the surface | |
| Buffing Pad | Applies buffing compound to the surface | |
| DA Polisher/Buffer (optional) | Speeds up polishing/buffing and provides a more consistent finish |
CARDIAGTECH.NET offers a comprehensive selection of these tools and materials, ensuring you have everything you need for a successful lacquer peel repair.
4. Step-by-Step Repair Guide
Follow this detailed step-by-step guide to effectively repair lacquer peel and restore your car’s finish.
4.1. Preparation
Proper preparation is crucial for a successful lacquer peel repair.
- Clean the Area: Thoroughly clean the affected area with soap and water to remove any dirt, grease, or contaminants.
- Degrease the Surface: Use a wax and grease remover to degrease the surface and ensure proper adhesion of the new paint.
- Mask the Surrounding Area: Use masking tape and paper to protect the surrounding areas from overspray.
4.2. Sanding
Sanding removes the damaged clear coat and prepares the surface for painting.
- Start with Coarse Grit Sandpaper: Begin by sanding the affected area with 400-grit sandpaper to remove the peeling clear coat and feather the edges.
- Progress to Finer Grit Sandpaper: Gradually progress to finer grits of sandpaper, such as 600-grit and 800-grit, to smooth the surface.
- Wet Sanding: Wet sanding with 1000-grit and 2000-grit sandpaper will further refine the surface and prepare it for polishing.
- Ensure a Smooth Surface: The goal is to create a smooth, even surface without any sharp edges or transitions.
4.3. Priming
Priming provides a smooth foundation for the base coat and helps it adhere to the surface.
- Apply a Thin, Even Coat of Primer: Apply a thin, even coat of automotive primer to the sanded area using a spray gun.
- Allow the Primer to Dry: Allow the primer to dry completely according to the manufacturer’s instructions.
- Sand the Primer: Once the primer is dry, lightly sand it with 800-grit sandpaper to create a smooth surface.
4.4. Base Coat Application
The base coat provides the color for your car’s paint job.
- Mix the Base Coat: Mix the base coat according to the manufacturer’s instructions, using the correct ratio of paint to thinner.
- Apply Several Thin Coats: Apply several thin, even coats of base coat to the primed area, allowing each coat to dry slightly before applying the next.
- Achieve Even Coverage: Ensure even coverage and avoid applying the paint too thick, which can lead to runs or drips.
4.5. Clear Coat Application
The clear coat protects the base coat and provides a glossy finish.
- Mix the Clear Coat: Mix the clear coat according to the manufacturer’s instructions, using the correct ratio of clear coat to hardener.
- Apply Several Thin Coats: Apply several thin, even coats of clear coat to the base-coated area, allowing each coat to dry slightly before applying the next.
- Wet Sanding (Optional): After the clear coat has fully cured (usually 24-48 hours), you can wet sand it with 2000-grit sandpaper to remove any orange peel or imperfections.
4.6. Polishing and Buffing
Polishing and buffing enhance the gloss and smoothness of the repaired area.
- Apply Polishing Compound: Apply a small amount of polishing compound to a polishing pad and work it into the surface using a DA polisher/buffer.
- Remove Swirl Marks and Imperfections: Polish the area until swirl marks and minor imperfections are removed.
- Apply Buffing Compound: Apply a small amount of buffing compound to a buffing pad and work it into the surface using a DA polisher/buffer.
- Enhance Gloss and Shine: Buff the area until a high gloss and shine are achieved.
4.7. Final Inspection
After completing the repair, carefully inspect the area to ensure a flawless finish.
- Check for Imperfections: Look for any imperfections, such as swirl marks, uneven texture, or color mismatch.
- Address Any Issues: If you find any issues, repeat the polishing and buffing steps or consider re-spraying the area.
Table 2: Step-by-Step Guide to Lacquer Peel Repair
| Step | Description |
|---|---|
| 1. Preparation | Clean the area, degrease the surface, and mask the surrounding area to protect it from overspray. |
| 2. Sanding | Remove the damaged clear coat and feather the edges using various grits of sandpaper, starting with coarse and progressing to finer grits. Wet sanding with 1000-grit and 2000-grit sandpaper for further refinement. |
| 3. Priming | Apply a thin, even coat of automotive primer to the sanded area using a spray gun. Allow the primer to dry completely and then lightly sand it with 800-grit sandpaper. |
| 4. Base Coat Application | Mix the base coat according to the manufacturer’s instructions and apply several thin, even coats to the primed area, allowing each coat to dry slightly before applying the next. Ensure even coverage and avoid applying the paint too thick. |
| 5. Clear Coat Application | Mix the clear coat according to the manufacturer’s instructions and apply several thin, even coats to the base-coated area, allowing each coat to dry slightly before applying the next. Wet sanding with 2000-grit sandpaper (optional). |
| 6. Polishing/Buffing | Apply polishing compound to a polishing pad and work it into the surface using a DA polisher/buffer to remove swirl marks and minor imperfections. Then, apply buffing compound to a buffing pad and buff the area to enhance gloss and shine. |
| 7. Final Inspection | Carefully inspect the area to ensure a flawless finish. Check for imperfections such as swirl marks, uneven texture, or color mismatch. Address any issues by repeating the polishing and buffing steps or re-spraying the area. |
By following these steps carefully and using high-quality tools and materials from CARDIAGTECH.NET, you can achieve a professional-quality lacquer peel repair that will restore your car’s finish and protect it from further damage.
5. Professional vs. DIY Repair
Deciding whether to tackle lacquer peel repair yourself or hire a professional depends on several factors, including your skill level, available tools, and budget.
5.1. DIY Repair
Pros:
- Cost-Effective: DIY repair can be significantly cheaper than hiring a professional, especially if you already have some of the necessary tools and materials.
- Convenience: You can perform the repair at your own pace and on your own schedule.
- Learning Experience: DIY repair can be a valuable learning experience, allowing you to develop new skills and gain a better understanding of automotive paint repair.
Cons:
- Time-Consuming: DIY repair can be time-consuming, especially if you’re not experienced in automotive paint repair.
- Requires Skill and Experience: Achieving a professional-quality finish requires skill and experience. If you’re not careful, you could end up making the problem worse.
- Potential for Mistakes: Mistakes can be costly, as you may need to purchase additional materials or hire a professional to fix your errors.
5.2. Professional Repair
Pros:
- Professional-Quality Finish: Professional repair shops have the expertise, tools, and materials to achieve a flawless finish.
- Convenience: You can drop off your car and let the professionals handle the repair.
- Warranty: Many professional repair shops offer a warranty on their work, providing peace of mind.
Cons:
- Expensive: Professional repair can be significantly more expensive than DIY repair.
- Inconvenience: You’ll need to schedule an appointment and be without your car for a period of time.
- Finding a Reputable Shop: It’s important to find a reputable repair shop with experienced technicians.
Table 3: DIY vs. Professional Lacquer Peel Repair
| Factor | DIY Repair | Professional Repair |
|---|---|---|
| Cost | Cost-effective | Expensive |
| Convenience | Convenient, flexible schedule | Inconvenient, requires scheduling |
| Skill/Experience | Requires skill and experience | Professional expertise |
| Time | Time-consuming | Faster |
| Quality of Finish | Can vary, potential for mistakes | Professional-quality finish |
| Warranty | No warranty | Often includes warranty |
Ultimately, the decision of whether to repair lacquer peel yourself or hire a professional depends on your individual circumstances and preferences. If you’re confident in your abilities and have the necessary tools and materials, DIY repair can be a rewarding and cost-effective option. However, if you’re not comfortable with automotive paint repair or want to ensure a flawless finish, hiring a professional is the best choice.
6. Cost Considerations
The cost of repairing lacquer peel can vary depending on several factors, including the size and severity of the damage, the type of paint, and whether you choose to repair it yourself or hire a professional.
6.1. DIY Repair Costs
The cost of DIY lacquer peel repair can range from $50 to $200, depending on the tools and materials you need to purchase.
- Sanding Supplies: $10 – $30
- Masking Tape and Paper: $10 – $20
- Primer: $15 – $30
- Base Coat: $20 – $50
- Clear Coat: $20 – $50
- Polishing and Buffing Compounds: $15 – $30
6.2. Professional Repair Costs
The cost of professional lacquer peel repair can range from $300 to $1000 or more, depending on the size and complexity of the repair.
- Spot Repair: $300 – $500
- Panel Respray: $500 – $800
- Full Respray: $1000+
6.3. Factors Affecting Cost
Several factors can affect the cost of lacquer peel repair.
- Size and Severity of Damage: Larger and more severe areas of lacquer peel will require more time and materials to repair, increasing the cost.
- Type of Paint: Some types of paint, such as metallic or pearl finishes, are more difficult to match and repair, which can increase the cost.
- Location: Labor costs vary depending on your location, so the cost of professional repair may be higher in some areas.
- Shop Reputation: Highly reputable repair shops may charge more for their services, but they are also more likely to provide a high-quality finish.
Table 4: Cost Considerations for Lacquer Peel Repair
| Repair Type | Cost Range | Factors Affecting Cost |
|---|---|---|
| DIY Repair | $50 – $200 | Cost of sanding supplies, masking tape, primer, base coat, clear coat, and polishing/buffing compounds |
| Professional Spot Repair | $300 – $500 | Size and severity of damage, type of paint, location, and shop reputation |
| Professional Panel Respray | $500 – $800 | Size and severity of damage, type of paint, location, and shop reputation |
| Professional Full Respray | $1000+ | Size and severity of damage, type of paint, location, and shop reputation |
When considering the cost of lacquer peel repair, it’s important to weigh the pros and cons of DIY versus professional repair and factor in the potential long-term benefits of a high-quality repair.
7. Preventing Lacquer Peel
Preventing lacquer peel is always better than having to repair it. Here are some tips to help you protect your car’s finish and prevent clear coat failure.
7.1. Regular Washing and Waxing
Regular washing and waxing can help protect your car’s paint from the elements and prevent lacquer peel.
- Wash Your Car Regularly: Wash your car at least once a week to remove dirt, grime, and pollutants that can damage the clear coat.
- Wax Your Car Regularly: Apply a coat of wax every 3-6 months to protect the clear coat from UV radiation and other environmental factors.
7.2. Parking in the Shade
Parking in the shade can help reduce your car’s exposure to sunlight and prevent UV damage.
- Park in a Garage or Carport: When possible, park your car in a garage or carport to protect it from the sun.
- Use a Car Cover: If you must park your car outside, use a car cover to shield it from the sun’s rays.
7.3. Applying a Ceramic Coating
Applying a ceramic coating can provide long-lasting protection against UV radiation, scratches, and other environmental factors.
- Professional Application: Ceramic coatings are typically applied by professional detailers and can last for several years.
- Enhanced Protection: Ceramic coatings provide a durable, hydrophobic layer that repels water and dirt, making your car easier to clean and maintain.
7.4. Avoiding Harsh Chemicals
Avoid using harsh chemicals or abrasive cleaners on your car’s paint, as these can damage the clear coat and accelerate lacquer peel.
- Use Automotive-Specific Cleaners: Use only cleaners that are specifically designed for automotive paint.
- Avoid Abrasive Cleaners: Avoid using abrasive cleaners or scrub brushes, as these can scratch the clear coat.
Table 5: Preventing Lacquer Peel
| Prevention Method | Description | Benefits |
|---|---|---|
| Regular Washing/Waxing | Wash car weekly and wax every 3-6 months | Removes dirt and pollutants, protects against UV radiation |
| Parking in Shade | Park in garage/carport or use a car cover | Reduces exposure to sunlight and prevents UV damage |
| Ceramic Coating | Professional application of a durable, hydrophobic coating | Long-lasting protection against UV radiation, scratches, and environmental factors, easier to clean and maintain |
| Avoid Harsh Chemicals | Use automotive-specific cleaners and avoid abrasive cleaners | Prevents damage to clear coat and accelerates lacquer peel |
By following these preventative measures, you can significantly reduce the risk of lacquer peel and keep your car looking its best for years to come.
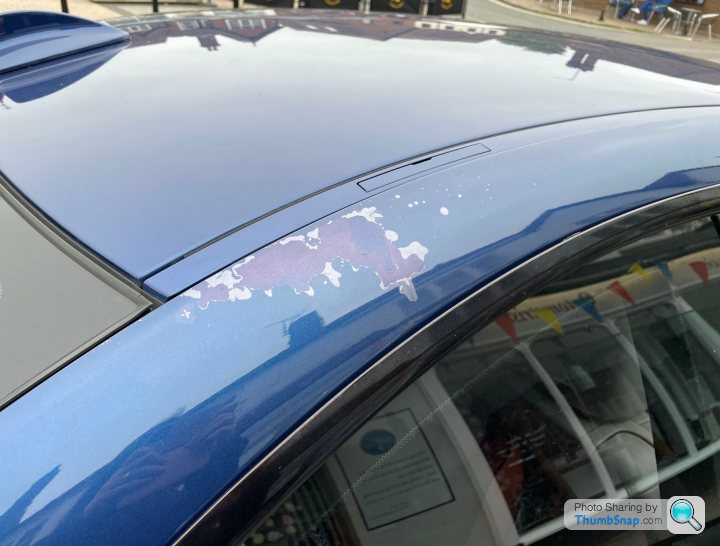
Lacquer peel on a car door, showing the clear coat separating from the base coat.
8. Advanced Techniques
For those seeking to elevate their lacquer peel repair skills, exploring advanced techniques can yield exceptional results.
8.1. Blending Techniques
Blending involves seamlessly integrating the repaired area with the surrounding original paint, creating a uniform appearance.
- Color Matching: Achieving a perfect color match is paramount. Use a paint code reader or consult with a professional paint supplier to ensure accuracy.
- Feathering: Feather the edges of the repaired area by gradually reducing the amount of clear coat applied, creating a smooth transition.
- Blending Clear Coat: Apply a blending clear coat to the entire panel to further minimize the appearance of the repair.
8.2. Orange Peel Removal
Orange peel refers to the uneven, textured surface that can occur after applying clear coat.
- Wet Sanding: Use 2000-grit or 3000-grit sandpaper to gently wet sand the clear coat, removing the orange peel.
- Polishing and Buffing: Follow up with polishing and buffing to restore the gloss and shine of the clear coat.
8.3. Dealing with Contamination
Contamination, such as dust or bugs, can ruin a paint job.
- Tack Cloth: Use a tack cloth to remove any loose particles from the surface before painting.
- Paint Booth: If possible, use a paint booth to minimize the risk of contamination.
- Nib File: A nib file can be used to carefully remove any contaminants that get trapped in the paint.
Table 6: Advanced Techniques for Lacquer Peel Repair
| Technique | Description | Benefits |
|---|---|---|
| Blending Techniques | Seamlessly integrates repaired area with surrounding paint | Creates a uniform appearance, minimizes the visibility of the repair |
| Orange Peel Removal | Removes uneven texture from clear coat | Restores a smooth, glossy finish |
| Dealing with Contamination | Prevents and removes contaminants from paint | Ensures a clean, flawless paint job |
Mastering these advanced techniques requires practice and attention to detail, but the results are well worth the effort.
9. Choosing the Right Products
Selecting the right products is crucial for achieving a durable and aesthetically pleasing lacquer peel repair.
9.1. Primer Selection
- 2K Primer: Offers excellent adhesion and durability, suitable for most lacquer peel repairs.
- Epoxy Primer: Provides superior corrosion resistance, ideal for areas with rust or bare metal.
- Self-Etching Primer: Used on bare metal to promote adhesion and prevent rust.
9.2. Base Coat Selection
- Single-Stage Paint: Combines color and clear coat in one product, easier to apply but less durable.
- Two-Stage Paint: Separate base coat and clear coat, offers better durability and color accuracy.
- Waterborne Paint: Environmentally friendly, low VOC emissions, but may require specialized equipment.
9.3. Clear Coat Selection
- Acrylic Lacquer: Dries quickly, easy to apply, but less durable and prone to chipping.
- Acrylic Enamel: More durable than lacquer, but slower drying time.
- Polyurethane: Excellent durability, chemical resistance, and UV protection, ideal for long-lasting repairs.
- Ceramic Clear Coat: Ultimate protection against scratches, chemicals, and UV damage, but more expensive.
Table 7: Choosing the Right Products for Lacquer Peel Repair
| Product Type | Options | Benefits |
|---|---|---|
| Primer | 2K Primer, Epoxy Primer, Self-Etching Primer | Excellent adhesion, corrosion resistance, promotes adhesion on bare metal |
| Base Coat | Single-Stage Paint, Two-Stage Paint, Waterborne Paint | Easier application, better durability and color accuracy, environmentally friendly |
| Clear Coat | Acrylic Lacquer, Acrylic Enamel, Polyurethane, Ceramic Clear Coat | Quick drying, more durable than lacquer, excellent durability and UV protection, ultimate protection against scratches and chemicals |
When choosing products for your lacquer peel repair, consider the specific needs of your vehicle, the level of durability you require, and your budget.
10. Common Mistakes to Avoid
Avoiding common mistakes can save you time, money, and frustration during the lacquer peel repair process.
10.1. Inadequate Surface Preparation
- Skipping Cleaning and Degreasing: Failing to thoroughly clean and degrease the surface can result in poor adhesion and paint defects.
- Insufficient Sanding: Not sanding enough can leave behind rough edges and uneven surfaces, affecting the final finish.
10.2. Improper Paint Application
- Applying Paint Too Thick: Applying paint too thick can lead to runs, drips, and uneven drying.
- Incorrect Spray Gun Settings: Using incorrect spray gun settings can result in orange peel, overspray, and other paint defects.
10.3. Neglecting Safety Precautions
- Not Wearing a Respirator: Failing to wear a respirator can expose you to harmful fumes and chemicals.
- Poor Ventilation: Painting in a poorly ventilated area can increase the risk of health problems and create a hazardous environment.
Table 8: Common Mistakes to Avoid During Lacquer Peel Repair
| Mistake | Consequence |
|---|---|
| Inadequate Surface Preparation | Poor adhesion, paint defects, uneven finish |
| Improper Paint Application | Runs, drips, orange peel, overspray, uneven drying |
| Neglecting Safety Precautions | Exposure to harmful fumes and chemicals, increased risk of health problems, hazardous environment |
By being aware of these common mistakes and taking steps to avoid them, you can increase your chances of achieving a successful lacquer peel repair.
Lacquer peel doesn’t have to be the end of your car’s beautiful finish. With the right tools, materials, and techniques, you can restore your vehicle to its former glory. CARDIAGTECH.NET is your trusted partner, offering everything you need to tackle this repair with confidence.
Ready to get started? Explore our extensive collection of automotive repair tools and equipment at CARDIAGTECH.NET. Don’t let lacquer peel diminish your car’s value and appearance any longer. With CARDIAGTECH.NET, a flawless finish is within reach.
Don’t let lacquer peel ruin your car’s appearance. Contact CARDIAGTECH.NET today at +1 (641) 206-8880 or visit us at 276 Reock St, City of Orange, NJ 07050, United States for expert advice and top-quality tools. Restore your car’s beauty and protect your investment with CARDIAGTECH.NET!
1. What is lacquer peel on a car?
Lacquer peel, also known as clear coat failure, is when the clear coat layer separates from the base coat, causing a flaking or peeling appearance.
2. What causes lacquer peel?
Common causes include UV radiation, extreme temperatures, poor paint application, age, and environmental factors.
3. Can I fix lacquer peel myself?
Yes, with the right tools, materials, and skills, you can repair lacquer peel yourself. However, professional repair is recommended for a flawless finish.
4. What tools and materials do I need to fix lacquer peel?
Essential items include sandpaper, primer, base coat, clear coat, spray gun, polishing compound, and safety gear. CARDIAGTECH.NET offers a wide range of high-quality options.
5. How much does it cost to fix lacquer peel?
DIY repair can range from $50 to $200, while professional repair can cost between $300 and $1000 or more, depending on the damage.
6. How do I prepare the surface before repairing lacquer peel?
Thoroughly clean the area, degrease the surface, and mask surrounding areas to protect them from overspray.
7. What is the best way to apply clear coat?
Apply several thin, even coats, allowing each coat to dry slightly before applying the next. Avoid applying the paint too thick to prevent runs or drips.
8. How can I prevent lacquer peel in the future?
Regular washing and waxing, parking in the shade, applying a ceramic coating, and avoiding harsh chemicals can help prevent lacquer peel.
9. Is it necessary to sand down to the base coat when repairing lacquer peel?
Yes, sanding down to the base coat is necessary to remove the damaged clear coat and create a smooth surface for the new paint to adhere to.
10. Where can I find high-quality tools and materials for lacquer peel repair?
CARDIAGTECH.NET offers a comprehensive selection of automotive repair tools and materials, ensuring you have everything you need for a successful lacquer peel repair.