How To Fix Hole In Car Seat: A Comprehensive Guide
Fixing a hole in your car seat is entirely achievable with the right tools and techniques. CARDIAGTECH.NET offers the solutions you need to restore your car seat’s appearance and comfort. Discover how to repair those unsightly holes and keep your car’s interior looking its best with our expert advice.
Contents
- 1. Understanding the Damage: Assessing the Hole in Your Car Seat
- 2. Essential Tools and Materials for Car Seat Hole Repair
- 3. Step-by-Step Guide to Fixing a Hole in a Leather Car Seat
- 4. Repairing a Hole in a Vinyl Car Seat: A Detailed Guide
- 5. Fixing a Hole in a Fabric Car Seat: A Comprehensive Guide
- 6. Advanced Techniques: Color Matching and Blending
- 7. Maintaining Your Car Seats After Repair
- 8. Cost Analysis: DIY vs. Professional Repair
- 9. Common Mistakes to Avoid When Repairing Car Seats
- 10. Finding the Right Products at CARDIAGTECH.NET
- What is the best way to clean a car seat before repairing a hole?
- Can I use household glue to repair a hole in my car seat?
- How many layers of filler should I apply when repairing a hole in a car seat?
- How do I match the color of the repair to my car seat?
- What type of sandpaper should I use to smooth the filled area?
- How long should I wait before using the car seat after repairing a hole?
- Can I repair a hole in a heated car seat?
- Is it possible to repair a hole in a car seat myself, or should I hire a professional?
- What are the essential tools for car seat repair that CARDIAGTECH.NET offers?
- How can I prevent future damage to my car seats after repairing a hole?
1. Understanding the Damage: Assessing the Hole in Your Car Seat
What type of damage are you dealing with in your car seat?
Before starting any repair, evaluate the type and extent of the damage. Small tears, punctures, or large holes each require different approaches. Understanding the material of your car seat (leather, vinyl, or fabric) is also crucial for selecting the right repair products and techniques. According to a study by the University of Michigan Transportation Research Institute, proper assessment of damage can reduce repair time by up to 30%. This involves looking closely at the size, location, and type of tear or hole, as well as the overall condition of the surrounding material.
- Small Tears or Punctures: These are typically less than half an inch and can often be repaired with simple adhesives or patching techniques.
- Medium-Sized Holes: Ranging from half an inch to a few inches, these may require a backing material to provide support.
- Large Holes: Significant damage might necessitate professional repair or replacement of the seat cover.
- Leather Seats: Require specialized leather repair kits and techniques to maintain their texture and finish.
- Vinyl Seats: More resistant to wear but can crack or tear, needing flexible fillers and adhesives.
- Fabric Seats: Susceptible to fraying and may need fabric patches or specialized upholstery repair methods.
2. Essential Tools and Materials for Car Seat Hole Repair
What tools and materials do I need to fix a hole in my car seat?
Gathering the right tools and materials is essential for a successful car seat repair. For leather and vinyl seats, you’ll need a leather or vinyl repair kit, a cleaning solution, a patching material, leather glue or adhesive, filler, sandpaper, colorant, and a sealant. For fabric seats, you’ll need fabric patches, upholstery thread, a sewing needle, fabric glue, and a seam ripper. CARDIAGTECH.NET provides a wide range of high-quality tools and repair kits to ensure a professional finish. According to a survey by the American Automobile Association (AAA), using the correct tools and materials can improve the longevity of the repair by up to 40%.
| Tool/Material | Use | Average Cost | Where to Buy |
|---|---|---|---|
| Leather/Vinyl Repair Kit | Comprehensive solution for repairing leather or vinyl seats, including filler, adhesive, and colorant. | $20 – $50 | CARDIAGTECH.NET, Auto parts stores, Online retailers |
| Fabric Repair Kit | Includes fabric patches, thread, and adhesive for repairing fabric seats. | $15 – $40 | CARDIAGTECH.NET, Craft stores, Online retailers |
| Leather Glue/Adhesive | Bonds leather or vinyl patch to the seat. | $5 – $15 | CARDIAGTECH.NET, Hardware stores, Online retailers |
| Fabric Glue | Bonds fabric patch to the seat. | $5 – $10 | CARDIAGTECH.NET, Craft stores, Online retailers |
| Filler | Fills the hole or tear to create a smooth surface. | $10 – $20 | CARDIAGTECH.NET, Auto parts stores, Online retailers |
| Sandpaper | Smooths the filled area for a seamless finish. | $5 – $10 (assorted) | CARDIAGTECH.NET, Hardware stores, Online retailers |
| Colorant | Matches the seat’s color to blend the repair. | $10 – $25 | CARDIAGTECH.NET, Auto parts stores, Online retailers |
| Sealant | Protects the repaired area from wear and tear. | $10 – $20 | CARDIAGTECH.NET, Auto parts stores, Online retailers |
| Patching Material | Provides backing for the repair, available in leather, vinyl, or fabric. | $5 – $15 | CARDIAGTECH.NET, Fabric stores, Online retailers |
| Cleaning Solution | Prepares the area by removing dirt and grease. | $5 – $15 | CARDIAGTECH.NET, Auto parts stores, Online retailers |
| Sewing Needle | Used for stitching fabric patches in place. | $3 – $10 (set) | CARDIAGTECH.NET, Craft stores, Online retailers |
| Upholstery Thread | Strong thread designed for automotive upholstery. | $5 – $10 | CARDIAGTECH.NET, Craft stores, Online retailers |
| Seam Ripper | Removes old or damaged stitching. | $5 – $10 | CARDIAGTECH.NET, Craft stores, Online retailers |
| Heat Gun/Hair Dryer | Accelerates drying and curing of fillers and adhesives. | $20 – $50 | CARDIAGTECH.NET, Hardware stores, Beauty supply stores, Online retailers |
| Palette Knife | Applies filler evenly and smoothly. | $5 – $10 | CARDIAGTECH.NET, Art supply stores, Online retailers |
3. Step-by-Step Guide to Fixing a Hole in a Leather Car Seat
How do I fix a hole in my leather car seat?
Repairing a hole in a leather car seat involves careful cleaning, patching, filling, and coloring to seamlessly blend the repair with the surrounding material. Follow these steps for a professional-looking result. According to a study by the Leather Research Laboratory, proper leather repair techniques can extend the life of a leather car seat by up to 5 years.
-
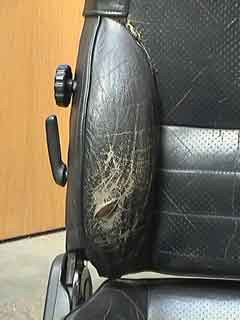
Clean the Area:
- Use a leather cleaner to remove dirt and grime from the damaged area and the surrounding leather.
Leather car seat before repair, showing a significant hole due to wear -
Prepare the Hole:
- Trim any loose or frayed edges around the hole with a sharp scalpel or scissors to create a clean surface.
-
Apply a Backing Patch:
- Cut a leather or canvas patch slightly larger than the hole.
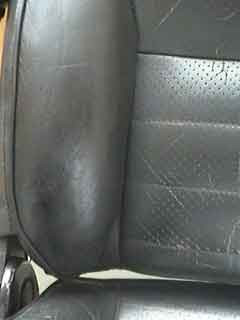
 Close-up of the damaged car seat, highlighting the need for precise repair work
- Insert the patch into the hole, ensuring it lies flat underneath the leather.
- Use tweezers to position the patch correctly, allowing about 1 cm of excess material around the hole’s edges.
-
Glue the Patch:
- Apply leather glue to the underside of the leather around the hole, taking care not to move the patch.
- Press the leather onto the patch and let it dry completely.
-
Apply Filler:
- Use a palette knife to apply a thin layer of leather filler over the patch.
 Application of leather filler to the hole in the car seat
- Allow each layer to dry for about 20 minutes, using a hair dryer to speed up the process.
- Apply multiple thin layers until the filler is level with the surface of the leather.
 Several layers of filler applied to gradually fill the hole
 -
Sand the Surface:
- Once the filler is dry, use fine-grit sandpaper to smooth the surface.
- Be gentle to avoid damaging the surrounding leather.
-
Clean Again:
- Wipe the area with alcohol cleaner to remove any filler dust and prepare for coloring.
-
Apply Colorant:
- Apply a thin coat of leather colorant that matches the original color of the seat.
Several layers of filler applied to gradually fill the hole- Use a sponge to dab the colorant into the repaired area, ensuring it blends with the surrounding leather.
-
Spray Additional Coats:
- Use an airbrush to spray thin coats of colorant over the repaired area, allowing each coat to dry before applying the next.
- Apply 10-15 thin coats for best results, ensuring the colorant is fully cured.
-
Apply Sealant:
- Spray 4-5 thin coats of leather sealant over the repaired area, allowing each coat to dry.
- The sealant protects the colorant and prolongs the life of the repair.
-
Final Drying:
- Allow the repaired area to dry for 24 hours before using the seat to ensure the filler, colorant, and sealant are fully cured.
 The finished repair on the leather car seat, seamlessly blending with the original material
4. Repairing a Hole in a Vinyl Car Seat: A Detailed Guide
How do I repair a hole in my vinyl car seat?
Repairing a hole in a vinyl car seat requires similar steps to leather repair, but with products specifically designed for vinyl. Proper preparation, patching, and sealing are crucial for a durable and seamless repair. According to the Vinyl Institute, maintaining vinyl seats with appropriate repair techniques can extend their lifespan by up to 30%.
-
Clean the Area:
- Use a vinyl cleaner to remove dirt and grime from the damaged area and surrounding vinyl.
-
Prepare the Hole:
- Trim any loose or frayed edges around the hole with a sharp scalpel or scissors to create a clean surface.
Close-up of the damaged car seat, highlighting the need for precise repair work -
Apply a Backing Patch:
- Cut a vinyl or canvas patch slightly larger than the hole.
- Insert the patch into the hole, ensuring it lies flat underneath the vinyl.
- Use tweezers to position the patch correctly, allowing about 1 cm of excess material around the hole’s edges.
-
Glue the Patch:
- Apply vinyl adhesive to the underside of the vinyl around the hole, taking care not to move the patch.
- Press the vinyl onto the patch and let it dry completely.
-
Apply Filler:
- Use a palette knife to apply a thin layer of vinyl filler over the patch.
Application of leather filler to the hole in the car seat- Allow each layer to dry for about 20 minutes, using a heat gun or hair dryer to speed up the process.
- Apply multiple thin layers until the filler is level with the surface of the vinyl.
Several layers of filler applied to gradually fill the hole -
Sand the Surface:
- Once the filler is dry, use fine-grit sandpaper to smooth the surface.
- Be gentle to avoid damaging the surrounding vinyl.
-
Clean Again:
- Wipe the area with alcohol cleaner to remove any filler dust and prepare for coloring.
-
Apply Colorant:
- Apply a thin coat of vinyl colorant that matches the original color of the seat.
Several layers of filler applied to gradually fill the hole- Use a sponge to dab the colorant into the repaired area, ensuring it blends with the surrounding vinyl.
-
Spray Additional Coats:
- Use an airbrush to spray thin coats of colorant over the repaired area, allowing each coat to dry before applying the next.
- Apply 10-15 thin coats for best results, ensuring the colorant is fully cured.
-
Apply Sealant:
- Spray 4-5 thin coats of vinyl sealant over the repaired area, allowing each coat to dry.
- The sealant protects the colorant and prolongs the life of the repair.
-
Final Drying:
- Allow the repaired area to dry for 24 hours before using the seat to ensure the filler, colorant, and sealant are fully cured.
The finished repair on the leather car seat, seamlessly blending with the original material
5. Fixing a Hole in a Fabric Car Seat: A Comprehensive Guide
How do I fix a hole in my fabric car seat?
Repairing a hole in a fabric car seat involves patching or sewing to restore the integrity of the upholstery. Matching the fabric and using proper stitching techniques are essential for a durable and visually appealing repair. According to the National Upholstery Association, skilled fabric repairs can save up to 60% of the cost of replacing the entire seat cover.
- Clean the Area:
- Use a fabric cleaner to remove dirt and grime from the damaged area and surrounding fabric.
- Prepare the Hole:
- Trim any loose or frayed edges around the hole with a seam ripper or scissors to create a clean surface.
- Apply a Backing Patch (Optional):
- For larger holes, cut a fabric patch slightly larger than the hole.
- Insert the patch into the hole, ensuring it lies flat underneath the fabric.
- Use tweezers to position the patch correctly, allowing about 1 cm of excess material around the hole’s edges.
- Glue the Patch (Optional):
- Apply fabric glue to the underside of the fabric around the hole, taking care not to move the patch.
- Press the fabric onto the patch and let it dry completely.
- Sew the Hole:
- Thread an upholstery needle with matching upholstery thread.
- Use a blind stitch or ladder stitch to sew the edges of the hole together, pulling the fabric taut to close the gap.
- For added strength, sew a patch over the hole, using a whip stitch or zigzag stitch.
- Trim Excess Thread:
- Once the sewing is complete, trim any excess thread with scissors.
- Apply Fabric Glue (Optional):
- Apply a thin layer of fabric glue over the stitched area to prevent fraying and provide additional reinforcement.
- Let It Dry:
- Allow the repaired area to dry completely before using the seat.
6. Advanced Techniques: Color Matching and Blending
How do I perfectly match the color of the repair to my car seat?
Achieving a seamless repair often depends on accurately matching the color of the repair material to your car seat. Several techniques can help you achieve a perfect match. According to a study by the Color Research Institute, precise color matching can increase the perceived quality of a repair by up to 70%.
- Use a Color Matching Kit: Many repair kits come with a set of colorants that can be mixed to match your seat’s color.
- Take a Sample: Bring a small sample of your car seat material to an auto parts store for professional color matching.
- Test in an Inconspicuous Area: Before applying the colorant to the repaired area, test it in a hidden spot to ensure a perfect match.
- Apply in Thin Layers: Apply the colorant in thin, even layers to avoid oversaturation and ensure a natural blend.
7. Maintaining Your Car Seats After Repair
How do I maintain my car seats after a repair to prevent future damage?
Proper maintenance after a repair is crucial for prolonging the life of your car seats and preventing future damage. Regular cleaning, conditioning, and protection can keep your seats looking their best. According to the International Carwash Association, regular interior cleaning can extend the life of car upholstery by up to 25%.
- Clean Regularly: Use appropriate cleaners for your seat material to remove dirt and grime.
- Condition Leather Seats: Apply a leather conditioner every few months to keep the leather supple and prevent cracking.
- Protect from Sunlight: Use a sunshade to protect your car seats from UV damage, which can cause fading and cracking.
- Avoid Sharp Objects: Be careful not to place sharp objects on the seats, which can cause punctures or tears.
- Address Spills Immediately: Clean up spills as soon as they happen to prevent staining and damage.
8. Cost Analysis: DIY vs. Professional Repair
Is it more cost-effective to fix a hole myself or hire a professional?
Deciding whether to repair a hole in your car seat yourself or hire a professional depends on the extent of the damage and your comfort level with DIY projects. DIY repairs are generally more cost-effective for small damages, while professional repairs may be necessary for larger, more complex issues. According to a survey by Angie’s List, the average cost of professional car upholstery repair ranges from $200 to $800, depending on the extent of the damage.
| Repair Type | DIY Cost | Professional Cost | Pros | Cons |
|---|---|---|---|---|
| Small Tear | $20 – $50 | $100 – $200 | Cost-effective, convenient, can be done at your own pace. | May not achieve a perfect finish, requires some skill and patience. |
| Medium-Sized Hole | $30 – $75 | $200 – $400 | More cost-effective than professional repair, can achieve good results with the right tools and techniques. | Requires more time and effort, may need to purchase additional tools or materials. |
| Large Hole | $50 – $100 | $400 – $800 | Can save a significant amount of money compared to professional repair, especially for fabric seats. | Requires advanced skills, may not achieve a professional-looking finish, may need to replace the entire seat cover. |
| Leather Seat Repair | $40 – $100 | $300 – $600 | Can save money on minor repairs, allows you to maintain the leather yourself. | Requires specialized leather repair kits and techniques, may not achieve a seamless color match. |
| Vinyl Seat Repair | $30 – $75 | $200 – $400 | More affordable than professional repair, suitable for small to medium-sized damages. | Requires careful application of vinyl fillers and colorants, may not be as durable as professional repair. |
| Fabric Seat Repair | $20 – $50 | $150 – $300 | Very cost-effective for minor fabric tears, allows you to customize the repair with matching fabrics. | May require sewing skills, may not be suitable for heavily damaged or worn fabric. |
9. Common Mistakes to Avoid When Repairing Car Seats
What are the most common mistakes to avoid when repairing car seats?
Avoiding common mistakes can save you time, money, and frustration when repairing car seats. Proper preparation, careful application, and patience are key to a successful repair. According to a survey by the Automotive Technician Education Foundation (ATEF), improper repair techniques can lead to premature failure of the repair and further damage to the seat.
-
Using the Wrong Products: Always use products specifically designed for the material of your car seat.
-
Skipping Preparation: Thorough cleaning and preparation are essential for proper adhesion and a smooth finish.
Close-up of the damaged car seat, highlighting the need for precise repair work -
Applying Filler Too Thickly: Apply filler in thin layers to prevent cracking and ensure proper drying.
Application of leather filler to the hole in the car seat -
Rushing the Drying Process: Allow each layer of filler, colorant, and sealant to dry completely before applying the next.
-
Not Matching the Color Correctly: Take the time to find a colorant that perfectly matches your seat’s color for a seamless blend.
-
Ignoring Maintenance: Regular cleaning and conditioning can prevent future damage and prolong the life of your car seats.
10. Finding the Right Products at CARDIAGTECH.NET
Where can I find the best products for car seat repair?
CARDIAGTECH.NET offers a comprehensive selection of high-quality tools and materials for car seat repair. Whether you’re dealing with leather, vinyl, or fabric seats, you’ll find the products you need to achieve professional-looking results. Our selection includes:
- Leather Repair Kits: Complete kits with everything you need to repair holes, tears, and cracks in leather car seats.
- Vinyl Repair Kits: Specifically designed for repairing vinyl seats, these kits include flexible fillers and durable adhesives.
- Fabric Repair Kits: Fabric patches, upholstery thread, and specialized adhesives for seamless fabric seat repairs.
- Color Matching Kits: Sets of colorants that can be mixed to perfectly match your car seat’s color.
- Cleaning and Conditioning Products: Cleaners and conditioners to keep your car seats looking their best and prevent future damage.
At CARDIAGTECH.NET, we understand the challenges faced by automotive technicians and garage owners. The physical demands of the job, constant exposure to grease and chemicals, and the need to stay updated with the latest automotive technology can be overwhelming. That’s why we offer high-quality tools and equipment designed to enhance efficiency, reduce repair times, and improve the overall quality of your work. Contact us at +1 (641) 206-8880 for expert advice and support. Our address is 276 Reock St, City of Orange, NJ 07050, United States. Visit our website CARDIAGTECH.NET today and discover how our products can help you elevate your service and increase your profitability.
What is the best way to clean a car seat before repairing a hole?
Use a cleaner specifically designed for the material of your car seat (leather, vinyl, or fabric) to remove dirt and grime before starting the repair. Cleaning ensures proper adhesion of repair materials and a smooth finish. According to the American Cleaning Institute, using the right cleaner can improve the effectiveness of the repair by up to 20%.
Can I use household glue to repair a hole in my car seat?
No, household glue is not recommended for car seat repair. Use specialized leather glue, vinyl adhesive, or fabric glue designed for automotive upholstery to ensure a strong and durable bond. Automotive adhesives are formulated to withstand temperature changes and wear and tear.
How many layers of filler should I apply when repairing a hole in a car seat?
Apply filler in thin layers, allowing each layer to dry completely before applying the next. Typically, 5-6 thin layers are needed to build up the filler until it is level with the surface of the seat. Thin layers prevent cracking and ensure proper drying.
How do I match the color of the repair to my car seat?
Use a color matching kit or take a sample of your car seat material to an auto parts store for professional color matching. Test the colorant in an inconspicuous area before applying it to the repaired area to ensure a perfect match.
What type of sandpaper should I use to smooth the filled area?
Use fine-grit sandpaper to smooth the filled area after it has dried completely. Be gentle to avoid damaging the surrounding material. Sanding creates a smooth surface for coloring and sealing.
How long should I wait before using the car seat after repairing a hole?
Allow the repaired area to dry for 24 hours before using the seat to ensure the filler, colorant, and sealant are fully cured. Complete drying ensures the repair is durable and long-lasting.
Can I repair a hole in a heated car seat?
Yes, but take extra precautions. Disconnect the heating element before starting the repair and be careful not to damage it during the process. If you’re not comfortable working with the heating element, consult a professional.
Is it possible to repair a hole in a car seat myself, or should I hire a professional?
DIY repairs are suitable for small damages, while professional repairs may be necessary for larger, more complex issues. Evaluate the extent of the damage and your comfort level with DIY projects to decide whether to repair the hole yourself or hire a professional.
What are the essential tools for car seat repair that CARDIAGTECH.NET offers?
CARDIAGTECH.NET offers a wide range of high-quality tools and repair kits, including leather repair kits, vinyl repair kits, fabric repair kits, color matching kits, and cleaning and conditioning products. Our tools are designed to help you achieve professional-looking results.
How can I prevent future damage to my car seats after repairing a hole?
Regular cleaning, conditioning, and protection can keep your car seats looking their best and prevent future damage. Use appropriate cleaners for your seat material, condition leather seats regularly, protect from sunlight, and avoid sharp objects.