Fixing a broken car seat is essential for safety and comfort. At CARDIAGTECH.NET, we offer solutions to repair and reinforce your car seat, enhancing your driving experience and protecting your well-being. Discover professional-grade tools and techniques for automotive seat repair, ensuring a secure and comfortable ride.
Contents
- 1. Understanding the Problem: Identifying Common Car Seat Issues
- 2. Essential Tools and Materials for Car Seat Repair
- 3. Step-by-Step Guide: Removing Your Car Seat
- 4. Repairing Worn or Torn Car Seat Fabric
- 5. Fixing Broken Car Seat Springs: A Detailed Guide
- 6. Repairing Car Seat Frames: Welding and Reinforcement
- 7. Restoring Car Seat Foam Padding for Enhanced Comfort
- 8. Fixing Faulty Reclining Mechanisms in Car Seats
- 9. Leather Car Seat Repair: Restoring Luxury and Elegance
- 10. Preventing Future Car Seat Damage: Tips and Best Practices
- 11. When to Seek Professional Help: Recognizing Complex Repairs
- 12. Cost Analysis: DIY vs. Professional Car Seat Repair
- 13. Maximizing Comfort: Adding Custom Features to Your Car Seat
- 14. Safety First: Ensuring Your Car Seat Repair Meets Standards
- 15. Where to Buy Car Seat Repair Kits and Supplies
- FAQ: Frequently Asked Questions About Car Seat Repair
1. Understanding the Problem: Identifying Common Car Seat Issues
Car seat problems can range from minor discomfort to significant safety concerns. Identifying the issue is the first step toward a successful repair. Let’s examine some common problems:
- Worn Fabric: Tears, fading, and general wear can make a seat uncomfortable and unsightly.
- Broken Springs: Springs provide support and cushioning. When they break, the seat can sag or become uneven.
- Damaged Frames: The underlying frame can bend or break, leading to instability and potential safety risks.
- Faulty Reclining Mechanisms: If your seat won’t recline or stay in position, the mechanism may be damaged.
- Foam Degradation: Over time, the foam padding can compress and lose its cushioning ability.
Addressing these issues promptly can prevent further damage and ensure your car seat remains safe and comfortable.
2. Essential Tools and Materials for Car Seat Repair
Having the right tools and materials is crucial for effective car seat repair. Here’s a list of essential items:
| Tool/Material | Description | Use |
|---|---|---|
| Socket Set | A variety of sizes for removing seat bolts and hardware. | Removing and installing seats and components. |
| Screwdriver Set | Both Phillips head and flathead screwdrivers in multiple sizes. | Disassembling and assembling seat parts. |
| Pliers | Needle-nose and regular pliers for gripping, bending, and cutting. | Manipulating springs and wires. |
| Hog Ring Pliers & Rings | Specialized pliers and rings for attaching upholstery to the seat frame. | Securing fabric to the seat frame. |
| Upholstery Fabric | Matching or complementary fabric for repairing tears or replacing worn sections. | Covering and repairing seat surfaces. |
| Foam Padding | High-density foam for replacing worn or compressed padding. | Restoring seat cushioning and support. |
| Spring Repair Kit | Includes replacement springs and hardware for repairing broken springs. | Fixing sagging or uneven seats. |
| Sewing Machine | For sewing new fabric and repairing existing upholstery. | Creating seamless repairs and custom modifications. |
| Heavy-Duty Thread | Strong thread suitable for upholstery work. | Ensuring durable seams and repairs. |
| Leather Repair Kit | Specifically designed for repairing leather seats, including fillers, dyes, and sealants. | Restoring the appearance and integrity of leather seats. |
| Safety Glasses | Protecting your eyes from debris and sharp objects. | Ensuring safety during the repair process. |
| Work Gloves | Protecting your hands from cuts, scrapes, and chemicals. | Maintaining a firm grip and preventing injuries. |
| Measuring Tape | Accurate measurements for cutting fabric and foam. | Ensuring precise fitting and alignment. |
Equipping yourself with these tools and materials will make the repair process smoother and more effective. CARDIAGTECH.NET provides high-quality tools and kits to help you tackle any car seat repair project. Contact us at +1 (641) 206-8880 for expert advice and product recommendations.
3. Step-by-Step Guide: Removing Your Car Seat
Before you can begin any repairs, you’ll need to remove the car seat from your vehicle. Here’s a step-by-step guide:
- Gather Your Tools: You’ll need a socket set, screwdriver, and possibly a trim removal tool.
- Disconnect the Battery: This is a crucial safety step to prevent accidental deployment of airbags. Disconnect the negative terminal of your car battery.
- Locate the Seat Bolts: These are usually found at the front and rear of the seat, securing it to the vehicle floor.
- Remove the Bolts: Use the appropriate socket to loosen and remove the bolts. Keep them in a safe place.
- Disconnect Electrical Connectors: Carefully disconnect any electrical connectors under the seat. These may be for seat warmers, airbags, or seatbelt sensors.
- Lift the Seat Out: With all bolts and connectors removed, carefully lift the seat out of the vehicle. It may be heavy, so get help if needed.
- Protect Your Vehicle: Place a blanket or towel on the door sill to prevent scratches during removal.
Safety Tip: Always consult your vehicle’s repair manual for specific instructions and safety precautions.
4. Repairing Worn or Torn Car Seat Fabric
Worn or torn fabric can detract from the appearance and comfort of your car seat. Here’s how to repair it:
- Assess the Damage: Determine the size and location of the tear. For small tears, a simple patch may suffice. For larger areas, you may need to replace the entire section of fabric.
- Clean the Area: Use a mild detergent and water to clean the area around the tear. Allow it to dry completely.
- Choose Your Repair Method:
- Patching: Cut a patch of fabric slightly larger than the tear. Apply fabric glue to the back of the patch and carefully position it over the tear. Press firmly and allow it to dry.
- Sewing: For a more durable repair, use a sewing machine to stitch the patch in place. Use a zigzag stitch for added strength.
- Replacing: If the damage is extensive, remove the old fabric and use it as a template to cut a new piece. Sew the new fabric in place, ensuring a snug fit.
- Finishing Touches: Trim any excess fabric and use a seam sealant to prevent fraying.
Tip: For best results, use fabric that matches the original material of your car seat. Visit CARDIAGTECH.NET or call us at +1 (641) 206-8880 to find high-quality upholstery fabrics and repair kits.
5. Fixing Broken Car Seat Springs: A Detailed Guide
Broken springs are a common cause of sagging and discomfort. Here’s how to fix them:
- Access the Springs: Remove the seat cushion and upholstery to expose the springs. This may involve removing hog rings or other fasteners.
- Identify the Broken Springs: Look for springs that are visibly broken or detached.
- Repair or Replace:
- Repair: If the spring is only slightly damaged, you may be able to repair it using a spring repair kit. This typically involves attaching a metal brace or clip to reinforce the broken area.
- Replace: If the spring is severely damaged, it’s best to replace it. Measure the length and diameter of the old spring and purchase a replacement that matches.
- Attach the Springs: Use pliers to attach the new or repaired spring to the seat frame. Ensure it is securely fastened and properly aligned with the other springs.
- Reinforce Weak Areas: Consider adding additional springs to reinforce areas that are prone to weakness.
- Reassemble the Seat: Replace the upholstery and seat cushion, securing them with hog rings or other fasteners.
Expert Advice: When working with springs, wear safety glasses to protect your eyes from flying debris.
6. Repairing Car Seat Frames: Welding and Reinforcement
A damaged car seat frame can compromise the seat’s structural integrity and safety. Here’s how to repair it:
- Inspect the Frame: Look for cracks, bends, or broken welds.
- Welding: If the frame is cracked or has broken welds, welding is the most effective repair method. Clean the area around the crack and use a MIG or TIG welder to join the broken pieces.
- Reinforcement: For added strength, consider adding reinforcement plates or gussets to the frame. These can be welded in place to provide extra support.
- Straightening: If the frame is bent, use a hydraulic press or other straightening tool to restore its original shape.
- Rust Prevention: After welding or straightening, apply a rust-resistant coating to protect the frame from corrosion.
Note: Welding requires specialized skills and equipment. If you’re not comfortable welding, it’s best to take the frame to a professional welder.
7. Restoring Car Seat Foam Padding for Enhanced Comfort
Over time, car seat foam can compress and lose its cushioning ability. Here’s how to restore it:
- Remove the Old Foam: Carefully remove the old foam padding from the seat cushion.
- Measure and Cut New Foam: Measure the dimensions of the old foam and cut a new piece of high-density foam to match.
- Shape the Foam: Use a sharp knife or foam cutter to shape the new foam to fit the contours of the seat cushion.
- Attach the Foam: Use spray adhesive to attach the new foam to the seat cushion.
- Add Additional Padding: For added comfort, consider adding a layer of memory foam or gel padding on top of the high-density foam.
- Reassemble the Seat: Replace the upholstery, ensuring a snug fit.
Pro Tip: Choose high-density foam for maximum support and durability. CARDIAGTECH.NET offers a variety of foam padding options to suit your needs. Contact us at +1 (641) 206-8880 for personalized recommendations.
8. Fixing Faulty Reclining Mechanisms in Car Seats
A malfunctioning reclining mechanism can make it difficult to adjust your seat for optimal comfort. Here’s how to fix it:
- Inspect the Mechanism: Examine the reclining mechanism for signs of damage, such as broken levers, worn gears, or loose cables.
- Clean and Lubricate: Clean the mechanism with a wire brush and apply a lubricant to all moving parts. This can often resolve minor issues.
- Tighten Loose Components: Tighten any loose bolts or screws that may be causing the mechanism to malfunction.
- Replace Damaged Parts: If any parts are broken or worn, replace them with new ones. You may be able to find replacement parts online or at an auto parts store.
- Adjust Cables: If the reclining mechanism uses cables, adjust them to ensure they are properly tensioned.
- Test the Mechanism: After making repairs, test the reclining mechanism to ensure it is working smoothly and securely.
Warning: When working on reclining mechanisms, be careful not to pinch your fingers or get them caught in the moving parts.
9. Leather Car Seat Repair: Restoring Luxury and Elegance
Leather car seats require special care to maintain their appearance and durability. Here’s how to repair common leather seat issues:
- Clean the Leather: Use a leather cleaner to remove dirt, oil, and grime from the surface of the seat.
- Repair Scratches and Scuffs: Use a leather repair kit to fill in scratches and scuffs. Apply the filler according to the manufacturer’s instructions and allow it to dry.
- Dye the Repaired Area: Use a leather dye that matches the color of your seat to dye the repaired area. Apply the dye in thin layers, allowing each layer to dry before applying the next.
- Condition the Leather: Apply a leather conditioner to moisturize the leather and protect it from cracking and fading.
- Protect the Leather: Use a leather protectant to shield the leather from UV rays and other environmental factors.
Tip: For best results, use a leather repair kit specifically designed for automotive leather. CARDIAGTECH.NET offers a range of leather care products to keep your seats looking their best.
10. Preventing Future Car Seat Damage: Tips and Best Practices
Preventing damage is always better than repairing it. Here are some tips to keep your car seats in good condition:
- Regular Cleaning: Clean your car seats regularly to remove dirt, oil, and grime.
- Use Seat Covers: Protect your seats from wear and tear with seat covers.
- Avoid Sharp Objects: Be careful not to place sharp objects on the seats, as they can cause tears and punctures.
- Park in the Shade: Protect your seats from fading and cracking by parking in the shade whenever possible.
- Condition Leather Seats: Regularly condition leather seats to keep them moisturized and prevent cracking.
- Address Issues Promptly: Address any minor issues, such as small tears or loose seams, as soon as they arise to prevent them from becoming larger problems.
By following these tips, you can extend the life of your car seats and keep them looking and feeling their best.
11. When to Seek Professional Help: Recognizing Complex Repairs
While many car seat repairs can be done at home, some require professional expertise. Here are some situations where it’s best to seek professional help:
- Airbag Issues: If your car seat contains airbags, any repairs involving the airbag system should be done by a qualified technician.
- Complex Frame Damage: Extensive frame damage may require specialized welding and fabrication skills.
- Electrical Problems: If your car seat has electrical components, such as seat warmers or power adjustments, electrical repairs should be done by a trained electrician.
- Upholstery Replacement: Replacing the entire upholstery of a car seat can be a complex and time-consuming task that may require professional skills.
- Safety Concerns: If you are unsure about how to safely repair a car seat, it’s always best to seek professional help.
Important: Safety should always be your top priority. If you have any doubts about your ability to safely repair a car seat, consult a professional.
12. Cost Analysis: DIY vs. Professional Car Seat Repair
Deciding whether to repair your car seat yourself or hire a professional often comes down to cost. Here’s a cost analysis to help you make the right decision:
DIY Repair:
- Materials: $50 – $200 (depending on the extent of the damage and the quality of materials)
- Tools: $0 – $100 (if you already own the necessary tools)
- Time: 2 – 10 hours (depending on the complexity of the repair)
Professional Repair:
- Labor: $100 – $500 (depending on the complexity of the repair and the hourly rate of the technician)
- Materials: Included in the labor cost
- Time: 1 – 3 days (depending on the shop’s schedule)
Factors to Consider:
- Your Skill Level: If you have experience with car repairs and upholstery work, DIY repair can save you money.
- The Complexity of the Repair: For complex repairs, such as frame welding or airbag issues, professional help is essential.
- The Value of Your Time: If you are short on time, hiring a professional may be worth the extra cost.
Bottom Line: DIY repair can be a cost-effective option for simple repairs. However, for complex repairs or if you lack the necessary skills, professional help is the best choice.
13. Maximizing Comfort: Adding Custom Features to Your Car Seat
Once you’ve repaired your car seat, why not add some custom features to enhance your comfort? Here are some ideas:
- Seat Warmers: Add a seat warmer kit to keep you warm and cozy on cold days.
- Lumbar Support: Install a lumbar support system to improve your posture and reduce back pain.
- Massage Function: Add a massage function to your car seat for a relaxing driving experience.
- Adjustable Headrest: Replace your fixed headrest with an adjustable one for better neck support.
- Custom Upholstery: Personalize your car seat with custom upholstery in your favorite colors and materials.
Tip: CARDIAGTECH.NET offers a variety of custom car seat accessories to enhance your comfort and style. Visit our website or call us at +1 (641) 206-8880 to learn more.
14. Safety First: Ensuring Your Car Seat Repair Meets Standards
When repairing your car seat, safety should always be your top priority. Here are some tips to ensure your repair meets safety standards:
- Use Quality Materials: Use high-quality materials that are designed for automotive use.
- Follow Instructions: Follow the manufacturer’s instructions carefully when repairing or replacing parts.
- Secure Fasteners: Ensure all fasteners are properly tightened and secured.
- Test Your Repair: After completing the repair, test the car seat to ensure it is functioning properly and securely.
- Consult a Professional: If you are unsure about any aspect of the repair, consult a professional.
Disclaimer: Car seat repairs should be done with caution and care. CARDIAGTECH.NET is not responsible for any injuries or damages resulting from improper repairs.
15. Where to Buy Car Seat Repair Kits and Supplies
Finding the right repair kits and supplies is essential for a successful car seat repair. Here are some places to buy them:
- CARDIAGTECH.NET: We offer a wide range of high-quality car seat repair kits, upholstery fabrics, foam padding, and tools. Visit our website or call us at +1 (641) 206-8880 to find everything you need for your repair project.
Address: 276 Reock St, City of Orange, NJ 07050, United States. - Auto Parts Stores: Local auto parts stores often carry basic car seat repair supplies, such as seat covers, foam padding, and spring repair kits.
- Online Retailers: Online retailers like Amazon and eBay offer a wide variety of car seat repair kits and supplies from different manufacturers.
- Upholstery Shops: Local upholstery shops can provide custom fabrics, foam padding, and repair services.
Tip: When buying car seat repair kits and supplies, read customer reviews and compare prices to ensure you are getting the best value for your money.
FAQ: Frequently Asked Questions About Car Seat Repair
Here are some frequently asked questions about car seat repair:
- How much does it cost to repair a car seat? The cost of car seat repair can range from $50 to $500, depending on the extent of the damage and whether you do it yourself or hire a professional.
- Can I repair a car seat with airbags? Repairs involving airbags should be done by a qualified technician to ensure safety.
- How do I clean car seats? Use a mild detergent and water to clean fabric seats. Use a leather cleaner and conditioner for leather seats.
- How do I remove stains from car seats? Use a stain remover specifically designed for car upholstery.
- Can I replace the upholstery on my car seats? Yes, you can replace the upholstery on your car seats, but it can be a complex and time-consuming task.
- How do I fix a sagging car seat? Sagging car seats are often caused by broken springs or worn foam padding. Repair or replace the springs and padding to restore the seat’s support.
- How do I repair a tear in my car seat fabric? Use a patch, sewing, or fabric replacement to repair tears in car seat fabric.
- Can I add seat warmers to my car seats? Yes, you can add seat warmer kits to your car seats for added comfort.
- How do I maintain leather car seats? Regularly clean and condition leather seats to keep them moisturized and prevent cracking.
- Where can I find car seat repair services near me? Search online for local auto upholstery shops or car repair services that offer car seat repair. Contact CARDIAGTECH.NET at +1 (641) 206-8880 for expert advice and product recommendations.
Don’t let a broken car seat compromise your safety and comfort any longer. Contact CARDIAGTECH.NET today at +1 (641) 206-8880 for expert advice on car seat repair solutions tailored to your needs. Our team of professionals can guide you through the best tools and techniques to restore your car seat to its optimal condition. Whether you’re a seasoned mechanic or a DIY enthusiast, we have the resources to help you succeed.
Why choose CARDIAGTECH.NET?
- Expert Guidance: Our experienced technicians provide personalized advice and support.
- Quality Products: We offer a wide range of high-quality car seat repair kits and supplies.
- Customer Satisfaction: Your satisfaction is our top priority.
Don’t wait – transform your driving experience today!
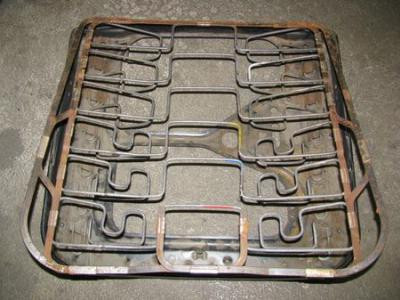
Broken car seat spring, showing common break points
 Close up of broken car seat spring, highlighting torsion spring failure
 Damaged driver's seat in a Mercedes-Benz wagon before repair
 Broken spring in Mercedes-Benz car seat identified as source of sagging
 Spring steel splices added to repair broken points in car seat spring
 Working in confined space to repair car seat without removing upholstery
 Reinforcement springs added to strengthen fatigued and weakened car seat springs
 Car seat being tested on the floor to ensure proper feel and modifications
 Car seat reinstalled in the car and tested again for firmness and height
 Clock showing total time for car seat repair project: 2 hours and 15 minutes
 Happy driver after successful car seat repair, noting improved visibility
 Sagging car seat in a 123 240D before repair
 Removing car seat from car to begin the repair process
 Broken spring identified in car seat
 Additional reinforcement springs added to enhance car seat support
 Comparison showing car seat height before and after repair
 Time of completion for car seat repair project
 Satisfied customer after car seat repair

