How to Fix Scraped Paint on Your Car: A DIY Guide

Your car’s paint job is often the first thing people notice, reflecting your care and attention to detail. Scraped paint, even minor, can detract from your vehicle’s appearance and value. Fortunately, fixing scraped paint on your car is a manageable task you can tackle at home. This guide will walk you through identifying the type of damage and the step-by-step processes to restore your car’s finish, making it look its best again.
Understanding Car Paint Scratches
Before you grab any repair tools, it’s crucial to understand the anatomy of your car’s paint and the type of scratch you’re dealing with. Modern car paint typically consists of three layers:
- Clear Coat: This is the top, protective layer that gives your car its shine and protects the color coat from UV rays and environmental damage.
- Base Coat (Color Coat): This layer provides the actual color of your car.
- Primer Coat: This is the foundation layer that adheres to the metal body and helps the base coat bond properly.
Scratches are categorized by which layers they penetrate.
Types of Car Paint Scratches:
-
Clear Coat Scratches: These are the most superficial and common type of scraped paint. They only affect the clear coat layer. Often caused by minor brushes with branches, car washes, or keys, they appear as light, hairline scratches on the surface.
-
Base Coat Scratches: These scratches are deeper, penetrating through the clear coat and into the base coat (color layer). They are typically caused by slightly more abrasive contact, like shopping carts or larger debris. You’ll usually notice the color of your car paint is visibly scratched away, sometimes revealing a different shade underneath.
-
Primer Coat Scratches (Deep Scratches): These are the most severe type of scraped paint, going through all layers of paint – clear coat, base coat, and reaching the primer layer. These are often caused by significant impacts like collisions or scraping against posts. Deep scratches are easily identifiable as they may expose the gray or black primer underneath the paint layers, or even bare metal.
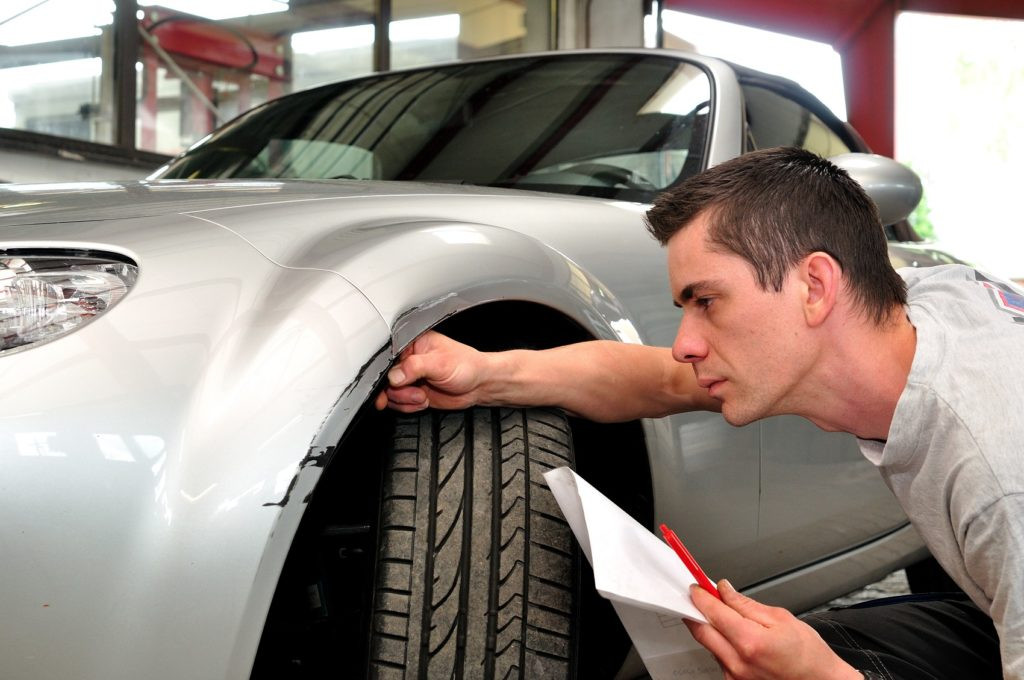
 Close up of a car scratch showing damage to the paint.
Identifying the Depth of Your Car Paint Scratch
Knowing the type of scraped paint you’re dealing with is crucial for choosing the right repair method. Here’s how to determine the scratch depth:
-
The Fingernail Test: Gently run your fingernail across the scratch, perpendicular to its direction.
- Clear Coat Scratch: If your fingernail doesn’t catch, or barely catches, it’s likely a clear coat scratch.
- Base Coat Scratch: If your fingernail catches slightly, it’s probably a base coat scratch, meaning it has penetrated the clear coat.
- Primer Coat Scratch: If your fingernail catches significantly and you can feel depth, it’s likely a deep scratch reaching the primer or even the metal.
-
The Polish Test: Apply a small amount of car polish to a microfiber cloth and gently rub it into the scratched area in a circular motion.
- Clear Coat Scratch: If the scratch disappears or significantly diminishes after polishing, it’s a clear coat scratch.
- Base Coat or Primer Scratch: If the scratch remains visible after polishing, it’s deeper than the clear coat and will require more involved repair techniques.
Step-by-Step Guide to Fix Scraped Paint on Your Car
Once you’ve identified the type of scratch, you can proceed with the appropriate repair method. Here’s a breakdown for each type:
Fixing Clear Coat Scratches
These minor scraped paint issues are the easiest to fix and often require just a few basic supplies.
Tools You’ll Need:
- Car wash soap and water
- Microfiber cloths
- Scratch remover compound
- Car polish
- Applicator pads (foam or microfiber)
Step 1: Thoroughly Clean the Area
Begin by washing the scratched area and the surrounding paint with car wash soap and water. This removes dirt and debris that could further scratch the paint during the repair process. Rinse thoroughly and dry completely with a clean microfiber cloth.
Step 2: Apply Scratch Remover
Apply a small amount of scratch remover compound to a clean applicator pad. Gently rub the compound onto the scratch using circular motions, applying light to medium pressure. Work in small sections and follow the product instructions. The abrasives in the scratch remover will gently level out the clear coat, removing the shallow scratch.
Step 3: Buff and Inspect
Buff away the scratch remover with a clean microfiber cloth. Inspect the area to see if the scratch has disappeared or significantly diminished. You may need to repeat step 2 if the scratch is still visible.
Step 4: Polish to Restore Shine
After removing the scratch, apply a small amount of car polish to a clean applicator pad. Buff the polished area using circular motions to restore the clear coat’s shine and remove any haze left by the scratch remover. Buff off the polish residue with a clean microfiber cloth.
Repairing Base Coat Scratches
Fixing scraped paint that has reached the base coat requires a slightly more involved process, often including touch-up paint.
Tools You’ll Need:
- Car wash soap and water
- Microfiber cloths
- Touch-up paint (matching your car’s color code)
- Fine-tipped applicator brush or toothpick
- 2000-grit sandpaper (wet/dry)
- Rubbing compound
- Car polish
- Applicator pads
- Water spray bottle
Step 1: Clean and Prepare the Scratch
Wash and dry the area around the base coat scratch as described for clear coat scratches. Ensure the area is completely clean and dry for proper touch-up paint application.
Step 2: Apply Touch-Up Paint
Carefully apply a thin layer of touch-up paint directly into the scratch using a fine-tipped brush or toothpick. Apply in thin coats to avoid drips and allow each coat to dry completely according to the paint manufacturer’s instructions. You may need multiple thin coats to build the paint up to the level of the surrounding paint.
Step 3: Wet Sand to Level the Touch-Up Paint
Once the touch-up paint is fully dry, lightly wet sand the area with 2000-grit sandpaper. Use a spray bottle to keep the sandpaper and the area wet. Gently sand the touch-up paint to level it with the surrounding clear coat. Be careful not to sand into the surrounding clear coat unnecessarily.
Step 4: Use Rubbing Compound to Refine
Apply a small amount of rubbing compound to an applicator pad and buff the sanded area using circular motions. Rubbing compound is more abrasive than scratch remover and will help to further level the paint and remove sanding marks.
Step 5: Polish to Restore Shine
After using rubbing compound, follow with car polish to restore the gloss and shine to the repaired area. Buff with a clean microfiber cloth to reveal the final result.
Fixing Primer Coat Scratches (Deep Scratches)
Repairing deep scraped paint that reaches the primer is the most challenging DIY task and may sometimes require professional help. However, for minor deep scratches, you can attempt a repair at home.
Tools You’ll Need:
- Car wash soap and water
- Microfiber cloths
- 1000-grit and 2000-grit sandpaper (wet/dry)
- Rust remover (if necessary)
- Primer (touch-up primer)
- Touch-up paint (matching your car’s color code)
- Fine-tipped applicator brushes
- Rubbing compound
- Car polish
- Applicator pads
- Water spray bottle
Step 1: Thoroughly Clean and Assess the Damage
Clean the area around the deep scratch with car wash soap and water. Dry thoroughly and inspect the scratch closely. If there is any rust present (especially if the scratch has reached bare metal), use a rust remover according to the product instructions before proceeding.
Step 2: Sand the Edges of the Scratch
Using 1000-grit wet sandpaper, carefully sand the edges of the scratch to smooth out any rough edges and prepare the surface for primer. Keep the area and sandpaper wet while sanding. Follow up with 2000-grit wet sandpaper to further refine the area.
Step 3: Apply Primer
Apply a thin layer of touch-up primer to the scratch, ensuring it covers the exposed primer or metal. Let the primer dry completely as per the product instructions. You may need to apply multiple thin coats for proper coverage and build-up.
Step 4: Apply Touch-Up Paint
Once the primer is dry, apply thin coats of touch-up paint over the primed area, as you did for base coat scratches. Allow each coat to dry completely. Build up the paint in thin layers until it is slightly higher than the surrounding paint.
Step 5: Wet Sand, Compound, and Polish
After the touch-up paint is completely dry, wet sand the area with 2000-grit sandpaper to level the paint. Follow with rubbing compound to remove sanding marks and then car polish to restore the shine. Buff each product off with a clean microfiber cloth.
Important Note: For severely deep scratches, large areas of scraped paint, or if you are uncomfortable with any of these steps, it’s always best to consult with a professional auto body shop for repair.
Tips to Prevent Car Paint Scratches
Prevention is always better than cure. Here are some helpful tips to minimize the risk of scraped paint on your car:
-
Regular Waxing: Apply a quality car wax regularly. Wax adds an extra layer of protection to the clear coat, making it more resistant to minor scratches and environmental contaminants.
-
Park Smart: Whenever possible, park in garages or carports to shield your car from the elements and potential hazards like tree branches or shopping carts.
-
Avoid Risky Parking Spots: Be mindful of parking near bushes, trees, or in narrow spaces where your car is more likely to be scraped.
-
Wash Your Car Regularly and Properly: Wash your car frequently to remove dirt and grime that can act as abrasives and cause scratches. Use quality car wash soap and microfiber cloths or wash mitts.
-
Gentle Drying: Always dry your car with soft microfiber cloths. Avoid using paper towels or abrasive cloths that can scratch the paint.
-
Consider Paint Protection Film (PPF) or Ceramic Coating: For maximum protection, consider professional application of paint protection film or ceramic coating. These provide a durable, sacrificial layer that significantly reduces the risk of scratches and damage.
-
Be Cautious with Automatic Car Washes: Some automatic car washes with brushes can be abrasive and cause swirl marks and scratches, especially on softer paints. Opt for touchless car washes or hand washing whenever possible.
Final Thoughts
Fixing scraped paint on your car at home is achievable with the right knowledge, tools, and patience. By understanding the types of scratches and following these step-by-step guides, you can effectively restore your car’s finish and maintain its value and appearance. While DIY repairs can handle many minor to moderate cases of scraped paint, remember that professional auto detailing and body shops are always available for more complex or extensive damage, ensuring a flawless repair and finish.