How to Fix Leather Car Interior: A Comprehensive Guide
Leather car interiors exude luxury and comfort, but they are also susceptible to wear and tear. From unsightly stains to bothersome cracks, various issues can detract from your car’s interior appeal. Knowing How To Fix Leather Car Interior problems is essential for maintaining your vehicle’s value and your driving pleasure. This guide provides expert advice and DIY solutions to address common leather car interior issues, ensuring your seats look and feel their best for years to come.
Common Leather Car Interior Problems and How to Identify Them
Before diving into repairs, understanding the specific type of damage is crucial. Each issue requires a tailored approach to ensure effective and lasting results. Here are some of the most common problems you might encounter with your leather car interior:
Fading Leather
Fading is a prevalent issue, often caused by prolonged exposure to harsh sunlight and heat. You’ll notice the once rich and vibrant leather color becoming dull, washed out, or lighter in certain areas, particularly on seats and dashboards exposed to direct sunlight.
Cracked Leather
Cracking occurs when the leather loses its natural oils and moisture, becoming dry and brittle. Look for fine lines or deeper fissures appearing on the surface of your seats, steering wheel, or door panels. Areas that experience frequent flexing and pressure, like seat bolsters, are particularly prone to cracking.
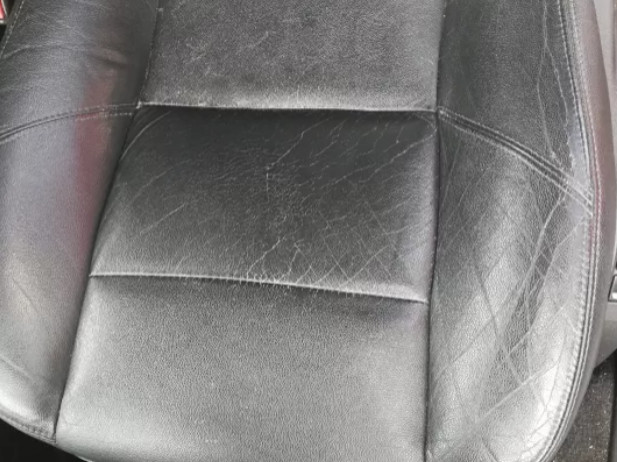
Cracked Leather Car Seats
Alt Text: Close-up of severely cracked and damaged car leather seats, illustrating typical wear and tear.
Scratched Leather
Scratches are surface-level damages often caused by sharp objects, pets, or even clothing rubbing against the leather. They appear as thin lines or abrasions on the leather surface, varying in depth and visibility depending on the severity of the scratch.
Stained Leather
Stains are discoloration marks caused by spills, food residue, dyes from clothing, or sweat. They can range from minor spots to large, noticeable blemishes that detract from the overall appearance of your leather interior. Identifying the type of stain is important as different stains require different cleaning approaches.
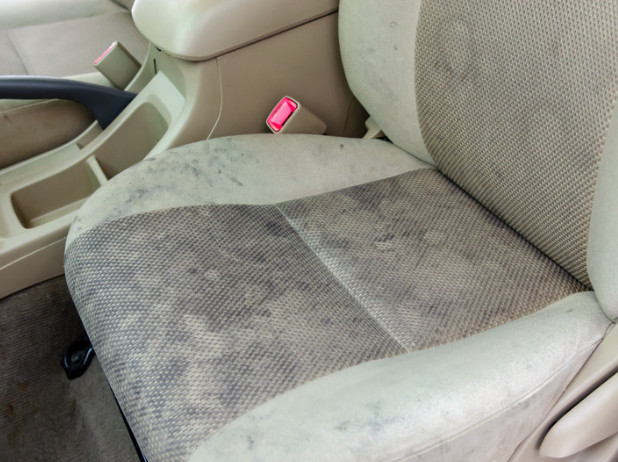 Stained on Car Leather Seats
Alt Text: Example of heavily stained light beige leather car seats, showcasing common stains from spills and use.
Discolored Leather
Discoloration is an uneven change in the leather’s original color, often resulting from sun exposure, cleaning product misuse, or dye transfer. It can manifest as patches of different shades or an overall uneven tone across the leather surface, making the interior look patchy and aged.
Peeling Leather
Peeling is a more severe form of damage where the top protective layer of the leather separates from the underlying material. This is often due to age, dryness, or wear and tear, especially in high-contact areas. Peeling leather not only looks bad but can also lead to further damage if left unattended.
Torn Leather
Tears are physical rips or holes in the leather, usually caused by sharp objects or excessive stress. Tears can range from small punctures to large rips and require immediate attention to prevent them from worsening and compromising the integrity of the seat.
Step-by-Step Guides: Repairing Your Leather Car Interior
Once you’ve identified the specific issues affecting your leather car interior, you can proceed with the appropriate repair methods. Here are detailed guides for tackling each common problem:
Restoring Faded Leather Car Seats
Faded leather can lose its luxurious appeal, but restoring its color is achievable with the right techniques.
- Clean the Leather: Begin by thoroughly cleaning the faded area with a quality leather cleaner to remove dirt and grime. This ensures the colorant adheres properly.
- Apply Leather Re-Coloring Balm or Dye: Choose a leather re-coloring balm or dye that closely matches your original leather color. Apply it sparingly with a sponge or soft cloth in thin, even coats.
- Test in an Inconspicuous Area: Before applying to the entire faded area, test the colorant in a hidden spot to ensure color match and desired results.
- Build Color Gradually: Apply multiple thin coats, allowing each coat to dry completely before applying the next. This gradual approach prevents over-saturation and ensures a natural-looking finish.
- Condition the Leather: After re-coloring, apply a premium leather conditioner to replenish moisture and protect the newly restored color.
Fixing Cracked Leather Car Seats
Cracked leather requires filling and conditioning to regain its smooth appearance.
- Clean and Prepare the Area: Clean the cracked leather thoroughly and trim any loose leather fibers around the cracks with sharp scissors or a trimming tool.
- Apply Leather Filler: Use a leather repair filler paste, applying it into the cracks using a palette knife or applicator. Ensure the filler reaches the bottom of the cracks.
- Smooth the Filler: Smooth out the filler with the palette knife, removing any excess and ensuring it’s level with the surrounding leather surface.
- Allow to Dry and Sand: Let the filler dry completely according to the product instructions. Once dry, gently sand the filled area with fine-grit sandpaper to create a smooth, even surface.
- Re-Color and Condition: If necessary, re-color the filled area to match the surrounding leather. Finish by applying a leather conditioner to restore moisture and flexibility.
 leather repair filler paste
Alt Text: Close-up of leather repair filler paste being applied to cracked leather, demonstrating the crack filling process.
Repairing Scratches on Leather Car Seats
Minor scratches can often be buffed out or concealed with simple techniques.
- Clean the Scratched Area: Clean the area around the scratch with a leather cleaner to remove any dirt or debris.
- Apply Leather Conditioner: In many cases, a good leather conditioner can minimize the appearance of light scratches. Apply conditioner to a soft cloth and gently buff the scratched area in a circular motion.
- Use a Leather Scratch Repair Kit (If Necessary): For deeper scratches, a leather scratch repair kit can be highly effective. These kits often include color-matched creams or liquids that fill and conceal scratches.
- Apply Colorant and Sealant: Follow the kit’s instructions to apply the colorant to the scratch, blending it seamlessly with the surrounding leather. Once dry, apply a sealant to protect the repaired area.
Removing Stains from Leather Car Seats
Removing stains requires prompt action and the right cleaning agents.
- Identify the Stain Type: Determine the type of stain (oil-based, water-based, ink, etc.) to choose the appropriate cleaning solution.
- Gentle Cleaning: Start with a mild leather cleaner and a soft cloth. Gently blot the stain, working from the outside inwards to prevent spreading. Avoid rubbing aggressively.
- Specialized Stain Removers: For stubborn stains, use specialized leather stain removers formulated for specific stain types. Always test in an inconspicuous area first.
- Alcohol-Based Cleaner for Ink Stains: For ink stains, isopropyl alcohol on a cotton swab can be effective. Dab gently and avoid saturating the leather.
- Condition After Cleaning: After stain removal, always condition the leather to restore its moisture and prevent drying.
 Leather Cleaner and Protection Kit
Alt Text: Leather cleaner and protection kit displayed with spray bottles and cloths, showcasing essential products for leather car interior maintenance.
Revitalizing Discolored Leather Car Seats
Discoloration can be addressed through cleaning, re-coloring, and protection.
- Thorough Cleaning: Begin with a deep cleaning of the discolored area to remove surface dirt and contaminants.
- Leather Dye or Re-Coloring: Use a leather dye or re-coloring product to even out the color. Choose a color that matches the original leather or opt for a complete re-dye for a uniform look.
- Apply Evenly: Apply the dye in thin, even coats, working in sections and blending carefully to avoid streaks or patches.
- Condition and Protect: After re-coloring, apply a high-quality leather conditioner to restore moisture and suppleness. Follow with a leather protector to shield against future discoloration.
Repairing Peeling Leather Car Seats
Peeling leather requires adhesion and filling to restore its surface.
- Clean and Remove Loose Peeling: Carefully clean the peeling area and gently remove any loose or severely peeling pieces of leather.
- Apply Leather Glue: Use a specialized leather glue to re-adhere the peeling leather back to the base material. Apply glue sparingly to both surfaces and press them firmly together.
- Use Leather Filler for Gaps: For areas where leather has completely peeled away, use a leather filler to fill the gaps and create a smooth surface.
- Re-Color and Condition: Once the glue and filler are dry, re-color the repaired area to match the surrounding leather and apply conditioner for protection.
 Peeling Car Leather Seats
Alt Text: Close-up view of car leather seats with significant peeling and damage, highlighting the need for repair and restoration.
Fixing Tears in Leather Car Seats
Tears require patching or stitching, depending on their size and location.
- Assess the Tear: Determine the size and location of the tear to choose the best repair method. Small tears can be glued, while larger tears may require patching or stitching.
- Clean the Tear Area: Clean the area around the tear thoroughly to remove dirt and debris.
- Apply Leather Glue for Small Tears: For small, clean tears, carefully apply leather glue to the edges of the tear and press them together, holding firmly until bonded.
- Patching for Larger Tears: For larger tears, you may need a leather patch. Cut a patch slightly larger than the tear and insert it underneath the leather using tweezers or a spatula. Apply glue to the patch edges and press the torn leather onto the patch.
- Stitching for Stress Points: For tears in high-stress areas, stitching may be necessary for added strength. Use a leather needle and thread to carefully stitch the tear closed after gluing or patching.
- Re-Color and Condition: After repairing the tear, re-color the area if needed and apply leather conditioner to finish.
 Cleaning Car Leather Seats
Alt Text: Interior view of a person cleaning car leather seats with a cloth, emphasizing the importance of regular cleaning in leather care.
Essential Tools and Products for Leather Car Interior Repair
Having the right tools and products is crucial for successful leather car interior repair. Consider investing in a comprehensive leather repair kit and these essential items:
- Leather Cleaner: A pH-balanced leather cleaner to safely remove dirt and grime.
- Leather Conditioner: A high-quality conditioner to moisturize and protect leather.
- Leather Repair Filler: For filling cracks, holes, and gaps in damaged leather.
- Leather Dye or Re-Coloring Balm: To restore faded or discolored leather.
- Leather Glue: A strong adhesive specifically formulated for leather repair.
- Leather Scratch Repair Kit: For concealing and repairing scratches and scuffs.
- Palette Knife or Applicator: For applying filler and colorants smoothly.
- Soft Cloths and Sponges: For cleaning and applying products.
- Fine-Grit Sandpaper: For smoothing filler and preparing surfaces.
- Leather Needles and Thread (Optional): For stitching larger tears.
Maintaining Your Leather Car Interior After Repair
Once you’ve successfully repaired your leather car interior, consistent maintenance is key to preventing future damage and keeping it looking its best.
- Regular Cleaning: Clean your leather car interior regularly (every 1-2 months) with a leather cleaner to remove dirt and prevent buildup.
- Conditioning: Apply leather conditioner every 3-4 months to keep the leather supple and prevent drying and cracking.
- Sun Protection: Park in shaded areas or use sunshades to minimize prolonged sun exposure, which can cause fading and cracking.
- Prompt Spill Cleanup: Clean up spills immediately to prevent staining.
- Avoid Harsh Chemicals: Do not use harsh household cleaners or solvents on leather, as they can damage the material.
- Professional Detailing: Consider professional leather detailing services periodically for deep cleaning and maintenance.
Conclusion: Take Pride in Your Leather Car Interior
Knowing how to fix leather car interior issues empowers you to maintain the beauty and value of your vehicle. By understanding common problems and utilizing the appropriate repair techniques and products, you can effectively address fading, cracking, stains, tears, and more. With proactive care and maintenance, your leather car interior will continue to provide luxury and comfort for years to come, making every drive a pleasure.