How to Fix Key Scratches on Your Car: A DIY Guide to Restore Your Vehicle’s Paint
Discovering key scratches on your car is an unwelcome surprise for any vehicle owner. These unsightly marks not only detract from your car’s aesthetic appeal but can also compromise its paint integrity, potentially leading to rust and further damage. If you’re wondering how to fix key scratches on your car yourself, you’ve come to the right place. This comprehensive guide, brought to you by the auto repair experts at CARDIAGTECH, will walk you through the steps to effectively repair those frustrating key scratches and bring back your car’s flawless finish. Whether you’re dealing with minor surface-level blemishes or deeper gouges, understanding the right techniques is crucial for a successful DIY repair.
Understanding the Depth of Key Scratches
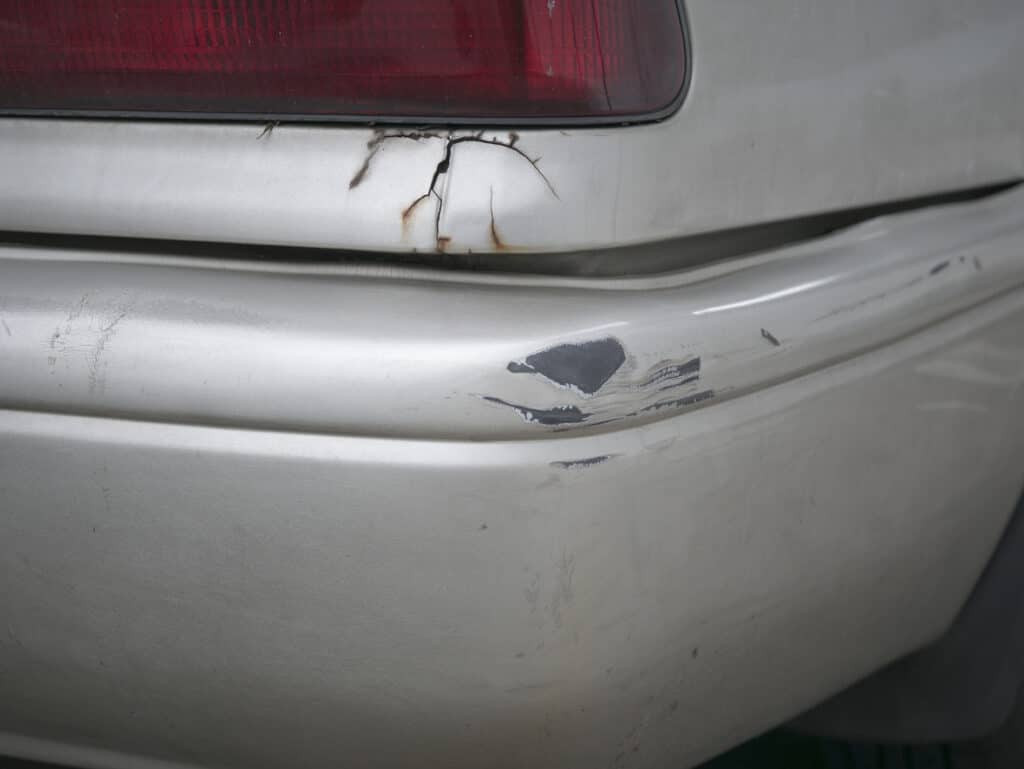
Before you grab your tools, it’s essential to accurately assess the damage. Key scratches aren’t all the same; they vary in severity, and the repair method will depend on how deep they are. Generally, key scratches fall into two categories:
- Superficial Scratches: These are light scratches that only affect the clear coat layer of your car’s paint. You might be able to feel them with your fingernail, but they don’t go deep into the color coat. These are typically easier to fix at home.
- Deep Scratches: Deep key scratches penetrate through the clear coat and the color coat, sometimes even reaching the primer or bare metal. If you can easily feel the scratch with your fingernail and it catches, it’s likely a deep scratch. These may require more intensive repair methods or professional intervention.
Assessing the Damage and Planning Your Approach
Carefully examine the key scratches on your car. Wash and dry the affected area to get a clear view of the damage. Determining the depth of the scratch is crucial as it will dictate whether you can effectively fix it yourself or if professional help is needed. For superficial scratches, a DIY approach is often sufficient. However, for deeper scratches that expose metal or primer, while you can still attempt a DIY fix, keep in mind that achieving a perfect, seamless repair might be challenging without professional equipment and expertise.
Step-by-Step Guide: DIY Key Scratch Repair
For minor to moderate key scratches, you can often achieve excellent results at home. Here’s a step-by-step guide on how to fix key scratches on your car:
1. Gather Your Materials
Having the right tools and products is essential for an efficient and effective repair. Here’s what you’ll need:
- Microfiber cloths: For cleaning and buffing, ensuring a scratch-free finish.
- Automotive soap or car wash shampoo: To thoroughly clean the area.
- Water: For washing and rinsing.
- Rubbing alcohol (isopropyl alcohol): To degrease the area for better paint adhesion.
- Sandpaper (various grits):
- 1500-grit and 2000-grit: For leveling and refining the scratch area.
- 3000-grit (optional): For ultra-fine finishing.
- Touch-up paint (matching your car’s color code): Ensure it’s an exact match for seamless blending. You can usually find your car’s color code on a sticker in the driver’s side door jamb or owner’s manual.
- Clear coat touch-up: To protect the color coat and restore shine.
- Paint applicator: Fine-tipped brushes or paint pens for precise application.
- Buffing pad or applicator: For applying polishing compound and wax.
- Polishing compound: To smooth out imperfections and restore gloss.
- Wax or paint sealant: To protect the repaired area and enhance shine.
- Detailing clay (optional): To remove contaminants for a smoother surface.
- Masking tape: To protect surrounding areas.
2. Thoroughly Clean the Scratched Area
Start by cleaning the area around the key scratch with automotive soap and water. This removes dirt, grime, and any wax buildup that could interfere with the repair process. Rinse thoroughly and dry with a clean microfiber cloth. After washing, use rubbing alcohol on a microfiber cloth to degrease the area. This ensures that the touch-up paint will adhere properly.
Alt text: Cleaning car door panel with soapy water and microfiber cloth to prepare for scratch repair.
3. Sanding the Scratch (For Deeper Scratches)
If the scratch is superficial and only in the clear coat, you may be able to skip aggressive sanding and start with polishing compound. However, for deeper scratches where the edge is uneven, careful sanding is needed.
- Wet Sanding: Wet sanding is crucial to minimize scratching and dust. Soak your 1500-grit sandpaper in water for a few minutes.
- Gentle Sanding: Lightly sand the scratched area using the wet 1500-grit sandpaper in straight, even strokes, following the direction of the scratch. Avoid pressing too hard. The goal is to level the edges of the scratch, not to remove paint from the surrounding area.
- Refine with Higher Grit: After the 1500-grit, switch to 2000-grit wet sandpaper to further refine the surface and remove any sanding marks from the 1500-grit. You can optionally use 3000-grit for an even smoother finish.
- Clean and Dry: Frequently rinse the area with water during sanding and wipe clean with a microfiber cloth to check your progress. Once sanding is complete, thoroughly clean and dry the area.
4. Applying Touch-Up Paint
- Shake Well: Shake the touch-up paint bottle vigorously for a minute or two to ensure the paint is properly mixed.
- Apply Thin Coats: Use a fine-tipped brush or paint pen to apply the touch-up paint into the scratch. Apply very thin layers, just enough to fill the scratch. Avoid applying too much paint at once, as this can lead to drips and an uneven finish.
- Layering: Allow each coat of touch-up paint to dry for the time recommended by the paint manufacturer (usually 10-30 minutes). Apply multiple thin coats rather than one thick coat to build up the paint level gradually to match the surrounding paint.
Alt text: Applying thin layers of touch-up paint to a car key scratch with a fine brush.
5. Leveling the Touch-Up Paint (If Necessary)
If the touch-up paint is slightly raised above the surrounding paint (which is common), you’ll need to level it for a smooth finish.
- Wet Sanding (Again): Wait for the touch-up paint to fully cure, usually 24-48 hours depending on the paint and environmental conditions. Then, use 2000-grit (or 3000-grit) wet sandpaper to gently level the touch-up paint. Sand lightly, focusing only on the raised paint, until it’s level with the surrounding clear coat. Be very careful not to sand into the surrounding clear coat.
6. Buffing and Polishing
- Polishing Compound: Apply a small amount of polishing compound to a foam buffing pad or microfiber cloth.
- Buffing: Buff the repaired area using circular motions with moderate pressure. If using a machine polisher, use a low speed. Buff until the sanding marks are removed and the area becomes glossy. This step blends the touch-up paint with the original paint and restores shine.
- Clean Residue: Wipe off any polishing compound residue with a clean microfiber cloth.
Alt text: Buffing car scratch with polishing compound and pad to restore gloss and blend paint.
7. Applying Clear Coat (If Necessary)
If you sanded through the clear coat or used a base coat touch-up paint that requires a clear coat, apply a thin layer of clear coat touch-up over the repaired area. Follow the same thin coat application method as with the color touch-up paint. Allow it to dry completely.
8. Waxing and Sealing
- Wax Protection: Once the clear coat (if applied) is fully cured, apply a coat of car wax or paint sealant to the entire repaired panel. This will protect the repaired area from the elements, enhance the shine, and help blend the repair seamlessly with the surrounding paint.
- Buff to Shine: Buff off the wax according to the product instructions to achieve a glossy, protected finish.
Alt text: Applying car wax with a microfiber cloth to protect and shine repaired car scratch.
Tips to Prevent Future Key Scratches
Prevention is always better than cure. Here are some tips to minimize the risk of key scratches on your car:
- Park Smart: Whenever possible, park in well-lit, populated areas or secure parking garages. Avoid parking in isolated or dimly lit spots where vandalism is more likely.
- Use a Car Cover: Consider using a car cover, especially if you park outdoors regularly. A car cover adds a physical barrier, protecting your car from scratches and other environmental damage.
- Install Security Cameras: If you have a dedicated parking space at home, consider installing security cameras to deter potential vandals.
- Paint Protection Film (PPF) or Ceramic Coating: Investing in paint protection film or ceramic coating can provide a significant layer of defense against scratches. These coatings are durable and can absorb minor scratches, protecting your factory paint.
When to Seek Professional Help
While DIY methods can be effective for minor key scratches, certain situations warrant professional auto detailing services. Consider seeking professional help if:
- Deep and Extensive Scratches: If the key scratches are very deep, wide, or numerous, achieving a flawless DIY repair can be challenging. Professionals have specialized tools and paints to handle extensive damage.
- You’re Uncomfortable with DIY: If you’re not confident in your DIY skills or prefer a guaranteed professional finish, it’s best to consult with auto detailing experts.
- Color Matching Issues: Matching the exact color of your car’s paint, especially for older or custom colors, can be tricky. Professionals have access to paint mixing systems to ensure a perfect match.
Professional mobile detailing services, like Big’s mobile, offer expertise in paint correction and scratch repair, ensuring your car’s finish is restored to its original glory. They can assess the damage accurately and use professional-grade products and techniques for a seamless repair.
Conclusion
Fixing key scratches on your car doesn’t have to be a daunting task. With the right tools, patience, and this step-by-step guide, you can effectively repair minor to moderate scratches yourself and save money. By understanding how to fix key scratches on your car and taking preventative measures, you can maintain your vehicle’s appearance and protect its value. Remember, for deeper or more complex damage, consulting a professional auto detailing service is always a wise choice to ensure the best possible outcome. Regular car maintenance and prompt scratch repair are key to keeping your car looking its best for years to come.
FAQs
1. How long does it take to fix key scratches on a car?
The duration of repair varies based on the scratch severity and repair method. Minor scratches can be fixed in a few hours, while deeper scratches requiring touch-up paint and multiple steps may take a day or two, including drying and curing times.
2. Can I use a scratch remover for key scratches?
Scratch removers can be effective for very superficial clear coat scratches. However, for key scratches that penetrate deeper, a scratch remover alone may not be sufficient. You might need to use touch-up paint and polishing compound for more noticeable results.
3. Is it possible to completely remove a deep key scratch?
While significant improvement is possible, completely removing a deep key scratch without professional bodywork might be challenging. Touch-up paint and careful sanding and polishing can greatly minimize its appearance, making it much less noticeable, but depending on depth, it might still be slightly visible upon close inspection. Professional services can offer more advanced techniques for near-perfect removal.
4. How much does it cost to fix key scratches on a car professionally?
Professional key scratch repair costs vary widely depending on the scratch depth, size, location, and the type of service. Minor scratch repairs by mobile detailers can range from $100 to $300. More extensive repairs at body shops, especially for deep scratches requiring panel repainting, can cost several hundreds to over a thousand dollars. Get quotes from local professionals for an accurate estimate based on your specific damage.