How to Fix Interior Car Scratches: A DIY Guide for a Flawless Finish
It’s a common frustration for car owners: those unsightly scratches that appear on your car’s interior trim. Whether it’s from daily wear and tear, kids, pets, or just general use, interior car scratches can make your vehicle look tired and reduce its overall appeal and resale value. Nobody wants a scratched-up cabin, but fortunately, learning How To Fix Interior Car Scratches is a DIY task you can easily tackle at home.
In this comprehensive guide, we will walk you through practical steps and expert tips on how to fix interior car scratches yourself. From identifying the type of scratch to the step-by-step repair process, you’ll gain the knowledge and techniques to restore your car’s interior to its former glory.
Identifying Types of Interior Car Scratches for Effective Repair
Before diving into the repair process, it’s important to understand the different types of interior car scratches. Knowing the type will help you determine the best approach for effective removal and ensure you use the right techniques for your specific situation.
Scuffs: The Surface Marks
Common Causes:
Scuff marks are typically superficial blemishes that occur when an object rubs against the plastic surfaces inside your car. These are often caused by the transfer of dirt or color from shoes, clothing, bags, or other items brushing against the interior panels as people get in and out of the vehicle.
How to Address Scuffs:
Scuffs are usually the easiest type of scratch to deal with. Often, they are simply surface-level dirt or residue. In many cases, a good quality interior car cleaner and a microfiber cloth are all you need. Regular cleaning and being mindful of what rubs against interior surfaces can prevent scuffs from accumulating.
Deep Scratches: Beyond the Surface
Common Causes:
Deep scratches penetrate beyond the surface layer of the plastic. They are commonly caused by sharp objects like keys, tools, water bottles, or even seatbelt buckles accidentally scraping against interior plastic panels.
Repairing Deep Scratches:
Deep scratches require a more involved approach than scuffs. They often necessitate techniques like sanding, heating, and retexturing to effectively minimize their appearance and restore the original look of the plastic.
Chips: Damage to the Material
Common Causes:
Chips involve actual material loss from the plastic panel. Daily wear and tear, impacts from objects, or even age-related brittleness of the plastic can lead to chips. They are more frequently seen in older vehicles where interior components may have become more susceptible to damage over time.
Fixing Chips:
Chips are more challenging to repair seamlessly. Preserving any broken pieces is beneficial, as finding exact replacements can be difficult. Repairing chips might involve filling the damaged area and then retexturing to blend with the surrounding plastic.
Cracks: Structural Weakness
Common Causes:
Cracks in interior plastic panels are often a result of prolonged exposure to direct sunlight, which can cause the plastic to become brittle and fracture. Stress points, such as door panels or areas under tension, are also more prone to cracking over time.
Addressing Cracks:
Cracks can be the most serious type of damage. Prevention is key – using windshield shields and protective covers can minimize sun exposure. Repairing cracks might require specialized plastic repair fillers and techniques to reinforce the damaged area and prevent further propagation.
Close up of person cleaning car interior with microfiber cloth
Alt text: Cleaning car interior plastic panel with microfiber cloth to remove scuff marks.
Step-by-Step Guide: How to Remove Interior Car Scratches with DIY Methods
There are two primary paths to how to fix interior car scratches: using specialized scratch repair kits or employing a more hands-on approach with sanding, heating, and texturing techniques. While scratch repair kits can be effective for minor surface scratches, deeper scratches often require a more direct DIY method for optimal results. Here’s a detailed step-by-step guide for tackling those more significant scratches yourself.
Essential Tools and Materials for DIY Scratch Repair
To achieve a professional-looking finish when repairing interior car scratches, gather these essential tools and materials:
- Heat Gun: Used to carefully heat and soften the plastic for reshaping and scratch reduction.
- Interior Grain Pad Set: For retexturing the plastic surface to match the original grain and texture of your car’s interior. Choose a set with various textures to find the best match.
- Superfine Grit Sandpaper (3000+ grit): For smoothing out the repaired area and ensuring a seamless finish.
- Plastic Scratch Polish Kit (Optional): For very light scratches and final polishing after deeper repair.
- High-Quality Interior Car Cleaner: To thoroughly clean the area before and after repair, removing dirt and grime that can interfere with the process.
- Microfiber Cloths: For cleaning and buffing.
- Masking Tape: To protect surrounding areas and create clean edges.
- Applicator Pads: For applying cleaning solutions and polishes.
The DIY Scratch Repair Process: Step-by-Step
Step 1: Thoroughly Clean the Scratched Area
Begin by cleaning the area around and including the scratch with your interior plastic cleaner. This crucial step removes dirt, dust, and debris that can hinder the repair process. A clean surface allows for better adhesion of any repair materials and prevents dirt from becoming embedded in the plastic during heating. Ensure the area is completely clean and dry before proceeding.
Step 2: Gently Heat the Plastic with a Heat Gun
Using a heat gun set to a low or medium setting (around half power to start), carefully apply heat to the scratched plastic. Move the heat gun in a sweeping motion and avoid concentrating heat on one spot for too long. The goal is to gently soften the plastic, not melt or burn it. You’ll notice the plastic become slightly glossy and lose some of its texture as it softens, indicating it’s ready for the next step. Caution: Overheating can cause warping or irreversible damage.
Step 3: Apply the Grain Pad for Texture Restoration
While the plastic is still warm and pliable, firmly press an interior grain pad onto the affected area. Use light to medium pressure and hold it for a few seconds. The grain pad will re-texture the softened plastic, helping to smooth out deeper scratches and restore a texture that matches the surrounding original plastic. Experiment with different grain pads from your set to find the closest match to your car’s interior texture. Use the hard-plastic applicator pad that typically comes with the grain pad set for even pressure.
Step 4: Cool and Sand for a Smooth Finish
Allow the heated area to cool and harden completely. Once cooled, the texture should be closer to the original. However, to achieve a truly seamless finish, you’ll need to lightly sand the area. Use superfine grit sandpaper (3000 grit or higher) and gently sand to smooth out any remaining imperfections or unevenness. Sand lightly and check frequently to avoid over-sanding and altering the texture too much.
Step 5: Final Clean and Inspection
Clean the repaired area again using your interior plastic cleaner to remove any sanding dust and reveal the final result. Inspect your work. For very light remaining scratches or to enhance the shine, you can optionally use a plastic scratch polish kit at this stage, following the kit’s instructions.
For Light Scratches: Utilizing a Plastic Scratch Polish Kit
For very minor surface scratches or scuff marks that remain after cleaning, a plastic scratch polish kit can be sufficient. These kits usually contain a plastic cleaner, polishing compound, microfiber cloths, and buffing pads. The process typically involves cleaning the area, applying the polishing compound with a buffing pad using back-and-forth motions to fill in the light scratches. Multiple applications may be needed. Always follow the specific instructions provided with your chosen scratch polish kit.
Restoring Faded Interior Plastic Trim for a Like-New Look
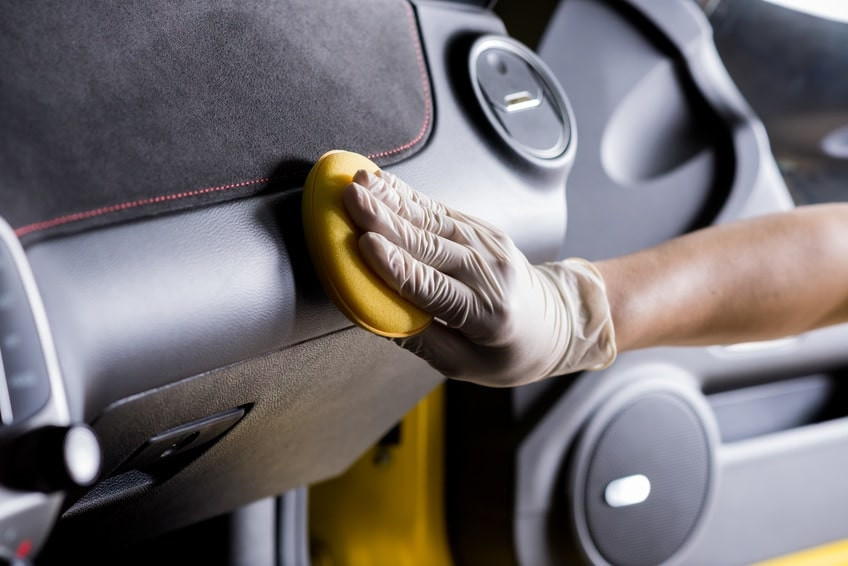
Beyond scratch repair, if your car’s interior plastic trim is showing signs of aging, fading, or discoloration (perhaps due to sun exposure or the heat gun process), a plastic restorer can revitalize its appearance.

Alt text: Applying plastic restorer to car interior trim to refresh and protect the plastic surface.
Plastic restorer products come in pads, sprays, or liquids. Apply the restorer using a gentle, circular motion with an applicator pad or microfiber cloth. Avoid excessive scrubbing, as this can sometimes lead to an uneven finish. Keep a restorer pad or spray in your car for quick touch-ups to maintain the refreshed look of your interior trim regularly.
By following these detailed steps and tips, you can confidently tackle how to fix interior car scratches and restore your car’s interior to a more pristine condition. A little DIY effort can make a significant difference in the overall look and feel of your vehicle, helping to maintain its value and your pride of ownership.