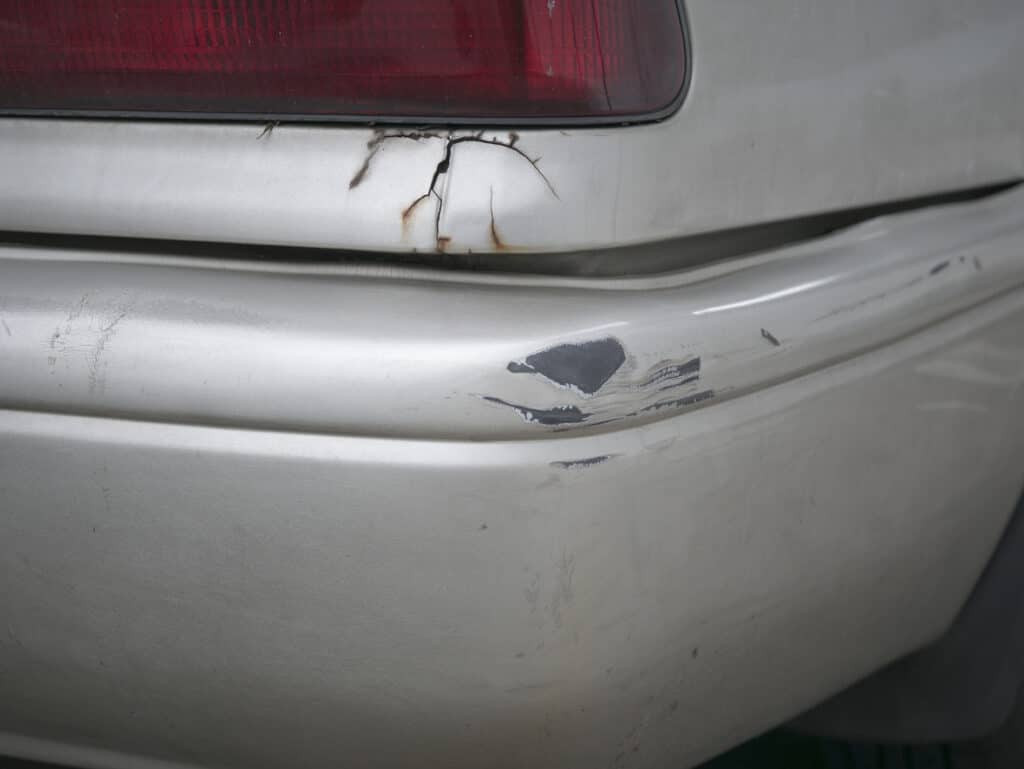
How to Fix Deep Scratches on Your Car Plastic Bumper
Deep scratches on your car’s plastic bumper can be an eyesore and diminish your vehicle’s appearance. While professional repairs can be costly, fixing them yourself with touch-up paint is a viable option for many car owners. This guide will walk you through the process of effectively repairing deep scratches on your plastic bumper at home.
Assessing the Damage
Before you start, it’s crucial to properly assess the scratch. Determine the depth and width of the scratch. If the scratch has penetrated the clear coat and base coat, revealing the plastic underneath, it’s considered a deep scratch. For these types of scratches, touch-up paint can be an effective solution to improve the appearance.
Gathering Your Supplies
To tackle deep scratches, you’ll need to gather the right tools and materials. Here’s what you’ll need:
- Touch-up paint: Obtain touch-up paint that precisely matches your car’s color code. You can usually find this code on a sticker inside your driver’s side doorjamb or in your car’s owner’s manual.
- Microbrushes: Unlike regular brushes, microbrushes are tiny and ideal for applying paint precisely into narrow scratches without excess application to the surrounding area. These are available at hobby shops or online retailers specializing in model making supplies.
- Rubbing alcohol or car detailer spray: For cleaning the area around the scratch.
- Clean microfiber cloths: For cleaning and wiping.
- Acetone (optional): May be used for thinning metallic touch-up paint or removing mistakes, but use with caution.
Step-by-Step Repair Process
Now, let’s move on to the repair process itself. Follow these steps carefully for the best results:
Cleaning the Scratch Area
Thoroughly clean the area around the scratch using rubbing alcohol or a car detailer spray and a microfiber cloth. This removes any dirt, wax, or contaminants that could interfere with paint adhesion. Ensure the area is completely dry before proceeding.
Applying Touch-Up Paint
This is where precision is key. Using a microbrush, carefully apply a thin layer of touch-up paint directly into the deep scratch. Work in thin coats, allowing each coat to partially dry before applying the next. This prevents paint from blobbing or running. For deep scratches, multiple thin coats are better than one thick coat.
- For Solid Colors: Touch-up paint works exceptionally well on solid, non-metallic colors.
- For Metallic Paints: Metallic paints can be more challenging due to the metallic flakes within them. These flakes can sink (metallic drop out), leading to a slightly darker finish in the repaired area. To mitigate this, shake the touch-up paint bottle frequently during application to keep the metallic particles suspended. Some suggest diluting metallic touch-up paint slightly with acetone to improve application, but this can worsen metallic dropout. Proceed with caution if considering dilution.
Drying and Finishing
Allow the touch-up paint to dry completely according to the paint manufacturer’s instructions. Drying times can vary depending on temperature and humidity. Once fully dry, you can lightly polish the area with a very fine polishing compound if needed to level the surface. However, be extremely cautious when polishing metallic paints, as excessive polishing can remove metallic particles and darken the finish.
Important Considerations
- Metallic Paint Challenges: Be aware that achieving a perfect color match with metallic paints using touch-up methods can be difficult due to metallic dropout.
- Working Time: Touch-up paints tend to dry quickly. Working in a cool environment can extend the working time and improve application, especially for beginners.
- Acetone Use: Acetone can be used to thin paint or clean up mistakes, but it should be used sparingly and with caution, particularly with metallic paints, as it can exacerbate metallic dropout. You can also use acetone on a cloth to remove the touch-up paint if you are not satisfied with the initial result.
Conclusion
Fixing deep scratches on your car’s plastic bumper with touch-up paint is a cost-effective DIY solution that can significantly improve your car’s appearance. By carefully following these steps, using the right tools like microbrushes, and understanding the nuances of different paint types, you can achieve professional-looking results at home. Give it a try – it’s a low-risk way to address those unsightly scratches and maintain your car’s value.