How to Fix a Deep Scratch on Your Car: A DIY Guide
Discovering a deep scratch on your car can be frustrating, especially when it penetrates beyond the clear coat and reaches the color or even the primer. These types of scratches, often caused by keys or sharp objects, might seem daunting to repair. However, with the right tools, materials, and a bit of patience, you can effectively fix a deep car scratch yourself and restore your car’s flawless finish. This guide will walk you through a step-by-step process to repair deep scratches, saving you money and maintaining your vehicle’s appearance.
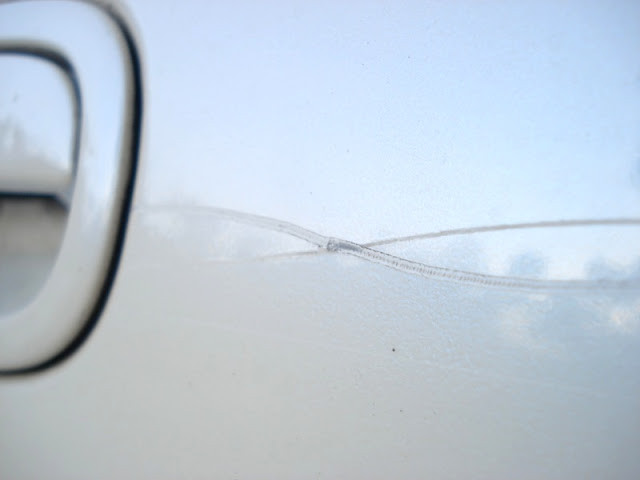
First, let’s assess the damage. Deep scratches are characterized by their depth, often being visibly wider and deeper than surface-level scratches. You can usually feel the scratch with your fingernail; if your nail catches in it, it’s likely a deep scratch that requires more than just polishing. In the original scenario, the car owner returned to find a significant scratch extending from the driver’s door to the back of the vehicle, clearly penetrating multiple layers of paint.
Car scratch extending from door to rear panel, showing depth and severity.
 Close-up of a deep car scratch, highlighting the penetration through clear coat and color layers.
Materials You’ll Need:
Before you begin, gather the necessary supplies. For repairing a deep car scratch, you will typically need:
- Automotive Touch-Up Paint: Ensure it matches your car’s paint code. For pearl white cars, like in the original example using Kansai 2k pearl white paint, precise color matching is crucial.
- Touch-Up Applicators: Toothpicks, fine-tipped brushes, or paint pens for precise application within the scratch.
- Rubbing Compound: For leveling the touch-up paint and removing excess paint.
- Polishing Compound & Polish: To refine the surface and restore shine.
- Wet Sandpaper: Various grits (e.g., 800, 1000, 1200, 1500, 2000 grit) for sanding down the touch-up paint.
- Detailing Spray or Lubricant: To use with wet sandpaper, like ONR QD (Optimum No Rinse Quick Detailer) mentioned in the original post.
- Microfiber Towels: For cleaning, wiping, and buffing.
- Rotary Polisher (Optional): Can expedite compounding and polishing, as used in the original repair with a rotary polisher and wool/polishing pads.
- Safety Gear: Gloves and eye protection are recommended.
Step-by-Step Guide to Fixing Deep Scratches:
-
Clean the Scratch: Thoroughly clean the scratched area and the surrounding paint surface. Use car wash soap and water to remove dirt, wax, and contaminants. Dry the area completely.
-
Apply Touch-Up Paint: Carefully apply thin layers of touch-up paint into the scratch using a toothpick or fine applicator. The goal is to fill the scratch, bringing the new paint level with the original paint surface. Apply paint in thin coats, allowing each coat to dry completely before applying the next. This might take several coats, as demonstrated in the original example where four coats were applied over three days with 12-hour drying intervals.
 Applying touch-up paint to a deep car scratch using a fine applicator for precision.
 -
Allow Paint to Cure: Let the touch-up paint dry and cure completely. This can take anywhere from a few hours to overnight, depending on the paint type and environmental conditions. Patience is key for proper curing and to avoid issues in the next steps.
-
Wet Sand the Area: Once the paint is fully cured, begin wet sanding to level the touch-up paint with the surrounding original paint. Start with a higher grit sandpaper (e.g., 800 grit) and progressively move to finer grits (e.g., 1000, 1200, 1500, 2000 grit). Use detailing spray or lubricant to keep the area wet during sanding. Sand lightly and evenly, focusing on leveling the new paint without damaging the surrounding clear coat. The original post details using 800 to 2000 grit sandpaper for wet sanding.
 Wet sanding the touch-up paint to level it with the original car paint surface.
 -
Compounding: After wet sanding, use a rubbing compound to remove sanding marks and further level the surface. Apply compound to a microfiber cloth or polishing pad and work it into the sanded area using circular motions. For deeper sanding marks or quicker results, a rotary polisher with a wool pad can be used initially, followed by a polishing pad, as shown in the original example using Optimum Hyper Compound.
 Compounding the sanded area to remove scratches and begin restoring gloss.
 -
Polishing: Follow up with a polishing compound and then a fine polish to refine the finish and bring back the high gloss. Use clean polishing pads and microfiber towels. This step removes any remaining haziness and enhances the shine, blending the repaired area seamlessly with the surrounding paint.
-
Final Inspection and Cleaning: Inspect the repaired area in good lighting, ideally sunlight, to ensure the scratch is no longer visible or is significantly minimized. Clean the area with a car detailer and admire your work. As the original author noted, upon close inspection, traces might still be visible, but the improvement should be substantial and satisfying.
 Close-up after polishing, showing the significant reduction and near elimination of the deep scratch.
Before and After Results:
The transformation from a deep, unsightly scratch to a nearly invisible repair is significant. As demonstrated in the before-and-after photos from the original repair, the DIY method can yield impressive results.
 Before and after comparison showing the deep scratch before repair.
 Before and after comparison showing the car after deep scratch repair, highlighting the improved finish.
Conclusion:
Fixing a deep scratch on your car is achievable at home with dedication and the right techniques. By following these steps, similar to the detailed process shared in the original post, you can effectively minimize or eliminate deep car scratches, preserving your car’s appearance and value. While professional repairs are always an option, this DIY approach offers a cost-effective and rewarding solution for car enthusiasts and everyday owners alike. Remember to always prioritize safety and take your time to achieve the best possible results.