How to Fix Car Leather Scratches: A Simple DIY Guide

Scratches and scuffs on your car’s leather seats can be frustrating. They detract from the luxurious feel of your vehicle’s interior and can make even a well-maintained car look prematurely aged. Fortunately, you don’t need to be a professional detailer to restore your leather seats to their former glory. With the right tools and a bit of patience, learning How To Fix Car Leather Scratches is a straightforward process you can easily accomplish at home.
This guide will walk you through a simple, step-by-step method to effectively repair minor scratches and scuffs on your car leather. Using readily available products, you can save money and achieve professional-looking results, restoring the beauty and value of your car’s interior. Let’s dive into how to tackle those unsightly blemishes and bring your leather back to life.
Damaged leather car seat with a noticeable scratch
The leather car seat pictured above shows a typical scratch, resulting in visible damage and color loss. Many car owners believe this type of damage requires professional and costly repair. However, the reality is that fixing these issues is quite manageable. With a few user-friendly products and the following steps, you can eliminate the nightmare of leather scratches and scuffs.
Step 1: Thoroughly Clean the Scratched Leather Area
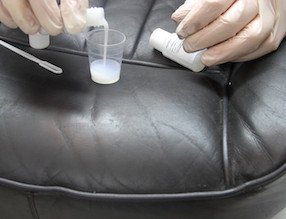
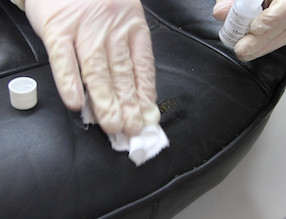 Cleaning the leather car seat scratch with alcohol cleaner
Just like any quality leather restoration, the first crucial step in fixing car leather scratches is to ensure the damaged area is completely clean and free from any dirt, dust, or contaminants. This will allow for proper adhesion of repair products and ensure a long-lasting fix.
To clean the area, take a specialized leather alcohol cleaner and apply a small amount to a soft, clean cloth. Gently wipe down the scratched area and the surrounding leather. This cleaner effectively removes surface dirt, oils, and any previous treatments that might hinder the repair process.
After cleaning, allow the area to air dry naturally for about 5-10 minutes. Ensure the leather is completely dry before proceeding to the next step. This preparation is essential for achieving optimal results in your leather scratch repair.
Step 2: Smooth Down Rough Edges by Sanding
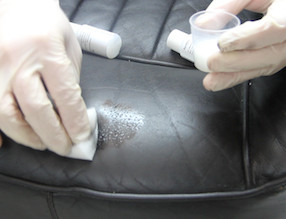
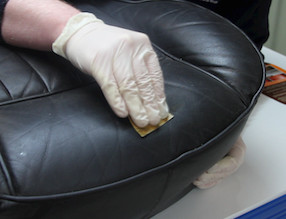 Sanding the rough edges of the car leather scratch
Often, scratches on car leather seats leave behind rough edges or raised areas that can be felt to the touch. In cases where the damaged area feels uneven, it’s important to smooth these rough patches down through gentle sanding. This step is crucial for achieving a seamless and professional-looking repair.
Using a fine-grit sandpaper, specifically 1200 grit or similar, lightly sand the scratched area. The key is to apply very gentle pressure and focus on smoothing the rough edges rather than aggressively removing material. Sand in the direction of the scratch and avoid excessive sanding, which could further damage the leather.
Continue sanding until the area feels smooth to the touch and the rough edges are no longer noticeable. This step ensures that the subsequent filler application will create an even surface, resulting in a much more refined and professional final repair.
Step 3: Apply Leather Heavy Filler to the Scratches
Once the scratched leather is cleaned and smoothed, the next step in how to fix car leather scratches involves addressing any loss of material within the scratch itself. For the best possible repair, it’s essential to fill these areas of loss to create a level surface.
Take a small amount of heavy leather filler and apply it directly to the scratch using a spatula or a similar applicator. Smooth the filler over the damaged area, ensuring it fills the scratch completely and slightly overlaps the surrounding leather. Any excess filler can be easily wiped away with a clean, damp cloth.
Allow the filler to dry completely. Natural drying typically takes around 25-30 minutes, but you can expedite the process using a hairdryer on a low heat setting. For deeper scratches, you might need to build up the filler in thin layers, allowing each layer to dry before applying the next. Ensure each layer is fully dry before proceeding to the next step, as insufficient drying can compromise the repair quality.
Step 4: Sand the Dried Filler Until Level
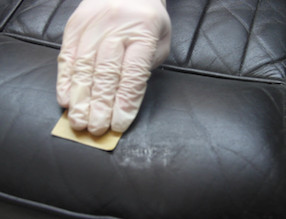 Sanding the dried leather filler to level the surface
After the leather filler has thoroughly dried and hardened, the next step is to ensure it is perfectly level with the original surface of the car leather seat. This step is critical for creating a seamless and invisible repair.
Reusing the same 1200 grit sandpaper from Step 2, gently sand the applied filler. Focus on leveling the filler to match the surrounding leather surface. Use light, even strokes and periodically check the surface by feel to ensure it’s becoming smooth and flush.
Continue sanding until the filler is completely level and no longer protrudes above the surrounding leather. The goal is to create a smooth, uniform surface that is ready for the color restoration process. This meticulous sanding step is key to achieving a professional-quality finish when fixing car leather scratches.
Step 5: Apply Leather Colorant to Restore Color
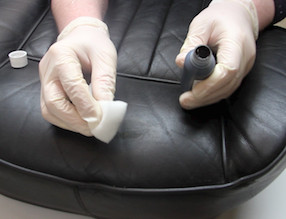 Applying leather colorant to restore the color of the repaired scratch
With the scratch filled and leveled, the next crucial step in how to fix car leather scratches is to restore the color to seamlessly blend the repaired area with the surrounding leather. This involves using a specialized leather colorant that matches your car seat’s original color.
Using a leather colorant that is either pre-matched or custom-mixed to your leather (often available in leather repair kits), apply a small amount to the repaired area. Use a sponge or a soft cloth to gently dab or brush the colorant onto the filler and slightly overlap onto the surrounding original leather. Ensure the entire repaired area is evenly covered with colorant.
After applying a coat of colorant, use a hairdryer on a low setting to dry it. Apply multiple thin coats of colorant, drying between each coat, until the scratch is completely concealed and the color seamlessly matches the surrounding leather. Remember to test the color match in an inconspicuous area first to ensure accuracy before applying it to the visible scratch. The colorant will initially dry with a slightly glossy finish, which will be addressed in the next step.
Step 6: Prepare the Leather Finish for Desired Sheen
 Mixing leather finish to achieve the desired gloss level
To finalize the repair and achieve the correct look and feel for your car leather seats, it’s necessary to apply a leather finish. Leather finishes are available in different sheens, from matte to gloss, and this step allows you to match the finish of your car’s original leather.
Typically, leather repair kits provide both gloss and matte leather finishes. You can use them individually or mix them to achieve the desired sheen level.
- High Gloss Finish: Use gloss finish only for a shiny look.
- Matte Finish: Use matte finish only for a non-reflective look.
- Satin Finish (Medium Sheen): Mix equal parts of gloss and matte finish for a balanced, satin appearance, which is common for car leather.
Use a small mixing cup to prepare your desired finish by combining gloss and matte finishes as needed. As with the colorant, test the finish mixture in an inconspicuous area first to ensure it matches the surrounding leather’s sheen before applying it to the repaired scratch.
Step 7: Apply the Leather Finish for Protection and Uniformity
 Applying leather finish to the repaired car leather scratch
The final step in how to fix car leather scratches is applying the prepared leather finish. This not only provides the correct sheen but also seals and protects the repaired area, ensuring durability and longevity.
Take a soft, clean cloth or sponge and apply a generous coat of the prepared leather finish to the entire repaired area, slightly overlapping onto the surrounding leather. Ensure even coverage for a uniform look.
Allow the finish to dry completely. You can let it air dry naturally or use a hairdryer on a low setting to speed up the drying time. Once the first coat is dry, apply a second coat of finish using the same method. Two coats provide enhanced protection against wear, fading, and help to seal in the color, ensuring a long-lasting repair.
After the final coat of finish has dried, your repaired leather scratch should be virtually invisible.
Final Result: Leather Scratch Repair Complete
As demonstrated in the “after” image, with a few easy-to-use products and a straightforward process, car leather scratches and scuffs can be effectively repaired quickly and economically. Achieving professional-quality results is within reach, even for those new to DIY leather repair.
If you’re dealing with scratches or scuffs on your car leather, investing in a leather repair kit and following these simple steps is an excellent way to restore your car’s interior and maintain its value. Purchase the necessary products today and say goodbye to unsightly leather damage!
Related Products