How to Fix Car Alignment at Home: A DIY Guide
Maintaining proper car alignment is crucial for optimal tire wear, handling, and overall driving safety. While professional alignment services are readily available, understanding How To Fix Car Alignment At Home can save you money and provide a deeper understanding of your vehicle’s mechanics. This guide focuses on how to adjust toe, a critical alignment parameter that you can effectively manage in your garage.
Car alignment refers to the angles of your vehicle’s wheels relative to each other and the vehicle’s body. The key components of wheel alignment are toe, camber, and caster. Toe describes whether the front of your tires points inward (toe-in) or outward (toe-out). Camber is the inward or outward tilt of the tire when viewed from the front. Caster is the angle of the steering pivot point when viewed from the side of the vehicle. While camber and caster adjustments often require specialized tools and a deeper understanding of suspension geometry, toe adjustments can be effectively performed at home with the right tools and approach.
For DIY toe adjustments, two popular methods involve using toe plates and a string box. Toe plates are relatively straightforward for measuring changes, especially if you know the initial toe settings. A string box setup, although potentially more complex to initially configure, allows for individual wheel toe measurements, offering greater precision.
To use toe plates, ensure they are properly placed against your tires. By measuring the difference at the front and rear of the plates, you can determine the toe angle. This method is particularly useful for tracking changes and making incremental adjustments, especially at the track.
Toe plates setup for DIY car alignment, showing measurement points.
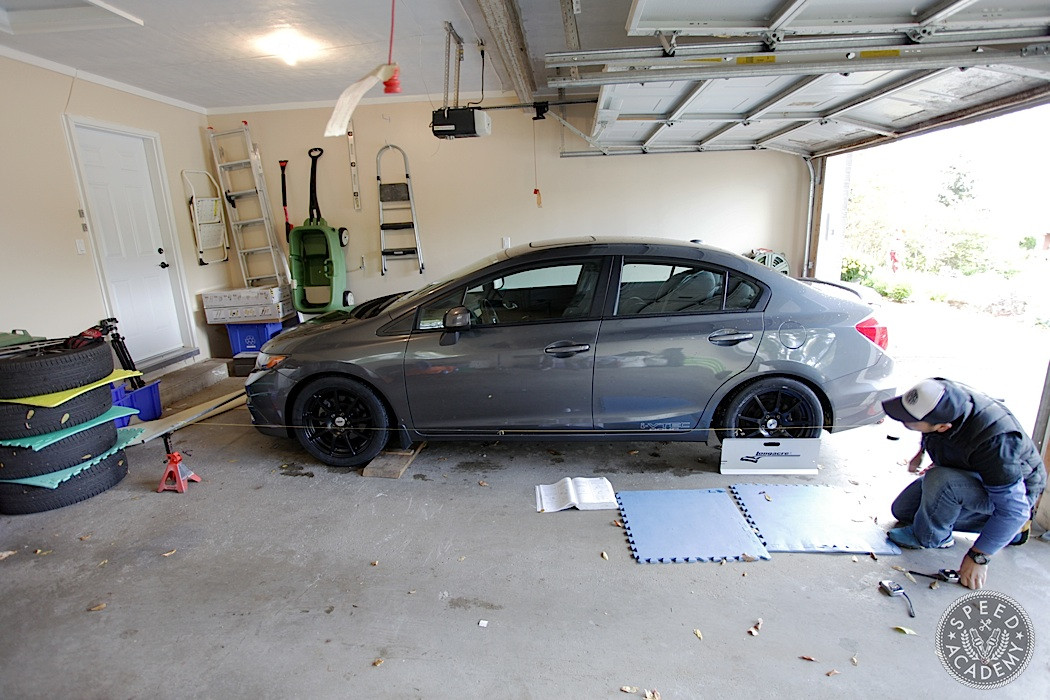
For individual wheel toe measurements, a string box provides a comprehensive solution. This setup involves running strings along both sides of the car, parallel to the vehicle’s centerline and equidistant from each wheel’s center. You can construct a string box using jack stands, metal tubing, and string, or purchase a commercially available kit.
 String box setup using jack stands and string for individual wheel toe measurement.
When setting up a string box, it’s essential to account for differences in track width between the front and rear axles. If the rear track is narrower, the string needs to be positioned further out from the rear wheels’ center to maintain a square and accurate measurement box. For instance, if the rear track is one inch narrower, set the string 1/2 inch further out on each side at the rear.
 Diagram illustrating track width difference compensation in string box setup.
Once your string box is squared and leveled, measure from the front and rear of each tire to the string, similar to using toe plates. This provides individual toe readings for each wheel. This capability is crucial for setting toe precisely at each corner or ensuring balanced total toe across an axle, particularly the front, where uneven toe can cause pulling during acceleration.
Remember to re-verify the string box’s squareness after jacking up the car for adjustments, as it may shift slightly upon lowering. After each toe or camber adjustment, roll and bounce the car to allow the suspension to settle before remeasuring. Also, confirm the front wheels are pointing straight ahead before taking readings.
 Measurement being taken from tire to string box for DIY toe alignment.
Adjusting front toe is typically done using the tie rods. Loosen the jam nut on the tie rod, and then rotate the rod itself within the threaded rod end. Lengthening or shortening the tie rod alters the toe angle. Measuring the tie rod length on both sides can serve as a reference point and help ensure symmetrical adjustments.
 Close-up of tie rod adjustment point for front toe setting.
For rear-wheel drive cars, rear camber and toe are often adjusted using eccentric bolts on the control arms. Rotating these bolts changes the arm’s position relative to the chassis, thus adjusting camber or toe. Many eccentric bolts feature degree markings to aid in visualizing and quantifying adjustments. Front-wheel drive cars like Hondas might use different mechanisms; rear toe might be adjusted at the toe-arm anchor point, while camber adjustments might require aftermarket upper control arms similar to tie rods. Before starting, familiarize yourself with your vehicle’s specific adjustment mechanisms and apply penetrating oil to jam nuts and eccentric bolts to prevent seizing.
 Eccentric bolts on control arms for rear camber and toe adjustment.
Typical track car setups often utilize slight toe-out in the front for enhanced turn-in response. Rear toe preferences vary; toe-out can aid rotation in front-wheel and all-wheel drive vehicles, while rear-wheel drive cars might benefit from slight toe-in for added stability. Optimal toe settings depend heavily on driving style, suspension setup, and desired handling balance. A front-wheel drive race car will have vastly different alignment needs compared to a rear-wheel drive drift car.
 Example of tie rod and jam nut for front toe adjustment.
Experienced tuners often have baseline alignment settings, but each car is unique. Monitoring tire temperatures and wear patterns is crucial for fine-tuning alignment for optimal grip and handling. Wheel alignment, particularly toe settings, is a powerful tool for maximizing tire performance and adjusting handling characteristics. Don’t hesitate to experiment with alignment settings to find what works best for your driving needs.
 Illustration of different toe settings: toe-in, zero toe, and toe-out.
DIY car alignment, especially toe adjustment, is achievable with patience and the right tools. While it may take time initially, mastering this skill provides valuable insights into your car’s dynamics and allows for personalized performance tuning in your own garage. Remember to always prioritize safety and double-check your work.