How to Fix Wet Back Seats in Your Car: A DIY Guide
Discovering a damp or soaking wet back seat in your car is more than just unpleasant – it can lead to mold growth, unpleasant odors, and even damage to your vehicle’s interior. Water leaks into your car can be tricky to pinpoint, but with a systematic approach, you can identify the source and learn How To Fix Back Of Car Seat water leaks yourself. This guide, inspired by a real-world repair, will walk you through the common causes of wet back seats and provide step-by-step instructions to resolve them.
The first sign of a problem is often noticing moisture or dampness on the rear seats, sometimes discovered when a passenger sits in the back. The wetness might be localized to one side, often behind the driver or passenger. Upon closer inspection, you might find a pool of water under the rear seat bench and the seat foam itself saturated. While online searches might suggest general areas like trunk seals or rear lights, a more hands-on approach is needed to accurately diagnose and fix the issue.
Identifying the Water Leak Source
To effectively fix wet back seats, you need to become a water leak detective. The most reliable method is using a hose to simulate rain and observe where water enters your vehicle.
-
Initial Hose Test & Interior Strip Down: Begin by hosing down different sections of your car exterior, starting with the suspected area around the back of the car. Pay close attention to areas like the tailgate/trunk, rear window seals, and taillights. If you notice water entering the cabin, try to narrow down the area. In many cases, water intrusion around the wheel arch area, tracking along seams, can lead to wet back seats.
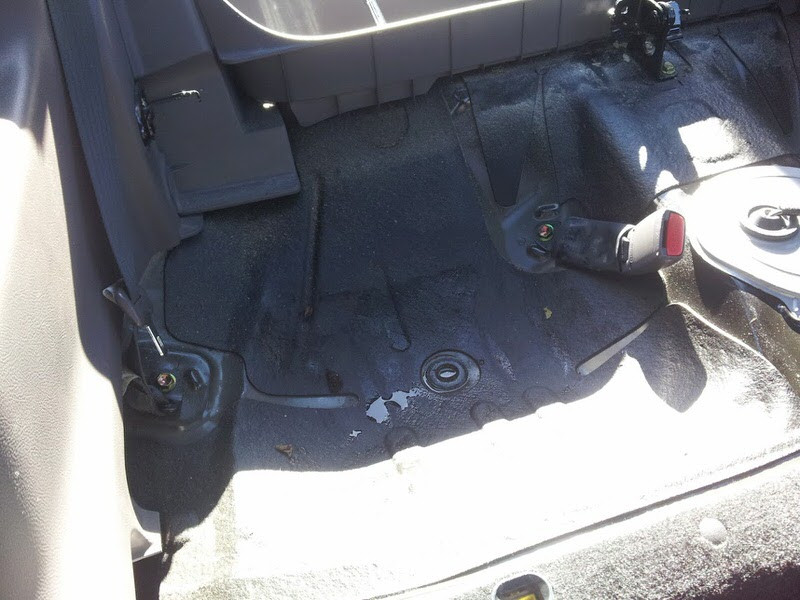
Water pool under the rear bench seat, indicating a leak.To get a clearer view, it’s necessary to strip out some of the interior trim. Remove the rear seat bench and any easily removable interior panels in the back seat and trunk area. This will allow you to see water trails more clearly and pinpoint the exact entry point.
-
Targeted Hose Spray & Leak Observation: With the interior partially stripped, have someone spray water with a hose on specific sections of the car while you are inside, observing for leaks. Focus on areas identified in your initial hose test. Use a flashlight to help you see in darker areas and trace water droplets back to their source.
Common Leak Locations and How to Fix Them
Based on common vehicle construction and leak points, here are typical areas to investigate and repair when addressing how to fix back of car seat water issues:
-
Tailgate/Trunk Gutter Bung: Check the rubber bungs or grommets located in the trunk gutter or tailgate opening. These rubber seals can degrade over time, becoming loose or brittle, allowing water to seep through.
 Loose rubber bung in the trunk gutter, a potential water entry point.
Fix: If a bung is loose or damaged, remove it. Clean the surrounding area and apply a sealant like VW sealing cord or butyl rubber sealant around the perimeter of the bung before firmly pressing it back into place. Alternatively, you can replace the old bung with a new one from the car manufacturer.
-
Rear Quarter Light Seam: Inspect the seams where body panels join together, particularly around the rear quarter lights (small side windows in the rear). Factory seams can sometimes fail over time, especially in older vehicles, creating pathways for water ingress.
 Water dripping from a rear quarter light seam inside the car.
Fix: Clean the seam area thoroughly. Apply a seam sealant designed for automotive use over the affected seam, both inside and outside if accessible. For a more durable fix, use a brush-on seam sealant. Once dry, you can paint over it for a more inconspicuous finish.
-
Trunk Seal: Even if the trunk seal (weather stripping around the trunk opening) appears to be in good condition, it can still leak, especially underneath where it contacts the body. Trapped water in the trunk can also contribute to moisture in the back seat area.
 Rust under the trunk seal lip due to trapped water.
 Rust removal and preparation on the trunk lip.
 Applying rust prevention paint to the trunk lip.
 Applying rust prevention paint to the trunk lip, close up.
Fix: Carefully remove the trunk seal. Inspect the metal lip underneath the seal for rust. If rust is present, remove it with a wire brush or Dremel tool, clean the area, and apply rust converter and paint to prevent further corrosion. Apply a bead of RTV silicone sealant along the body lip where the seal sits. Refit the trunk seal, pressing firmly to ensure a good seal against the new silicone.
 Applying RTV silicone to the trunk lip before refitting the seal.
 Refitting the trunk seal after applying silicone.
Final Checks and Reassembly
After addressing the identified leak sources, re-test with a hose to confirm the leaks are resolved. Leave the interior trim removed initially to easily check for any remaining water intrusion. Once you are confident the leaks are fixed, you can begin reassembling the interior.
 Interior partially reassembled after leak repairs.
By following these steps, you can effectively diagnose and fix wet back seats in your car, preventing further damage and ensuring a dry, comfortable interior for years to come. Addressing these leaks promptly will also help prevent rust and maintain the value of your vehicle.