How to Fix Alignment on Your Car: A DIY Guide
Proper car alignment is crucial for optimal handling, tire wear, and overall driving safety. Misalignment can lead to uneven tire wear, pulling to one side, and decreased fuel efficiency. While professional alignment services are available, understanding how to fix alignment on your car at home can save you money and provide a deeper understanding of your vehicle’s mechanics. This guide will walk you through the basics of DIY car alignment, focusing on toe adjustment, a key aspect you can manage at home.
Understanding the basics of wheel alignment is the first step in learning How To Fix Alignment On Car. Wheel alignment essentially refers to the adjustment of your vehicle’s suspension components to ensure that your wheels are positioned correctly relative to each other and the road. The primary angles involved in wheel alignment are:
- Toe: This refers to the direction in which your tires point relative to the centerline of your vehicle. Toe can be either “toe-in” (tires pointing inward) or “toe-out” (tires pointing outward). Toe adjustments are often the most accessible for DIY mechanics and can significantly impact tire wear and handling.
- Camber: This is the vertical angle of your tires as viewed from the front of the vehicle. Positive camber means the top of the tire leans outward, while negative camber means it leans inward. Camber is more complex to adjust at home and often requires specialized tools or aftermarket parts.
- Caster: This is the angle of your steering axis relative to the vertical, as viewed from the side of the vehicle. Caster affects steering stability and handling. Like camber, caster adjustments are typically more involved and less commonly adjusted in DIY settings.
For home mechanics looking to learn how to fix alignment on car, toe adjustment is the most practical starting point. This guide will focus primarily on toe, as it is the most readily adjustable angle and can be effectively managed with basic tools and techniques.
To embark on DIY alignment and learn how to fix alignment on car, you’ll need some essential tools. For toe adjustments, toe plates and a string box are invaluable tools that allow for accurate measurements and adjustments.
-
Toe Plates: These are designed to attach to your wheel and provide a flat, vertical surface for measuring toe. By measuring the distance between the plates at the front and rear of the tire, you can determine the toe angle. Toe plates are particularly useful for tracking changes and making incremental adjustments.
DIY toe plates setup for wheel alignment -
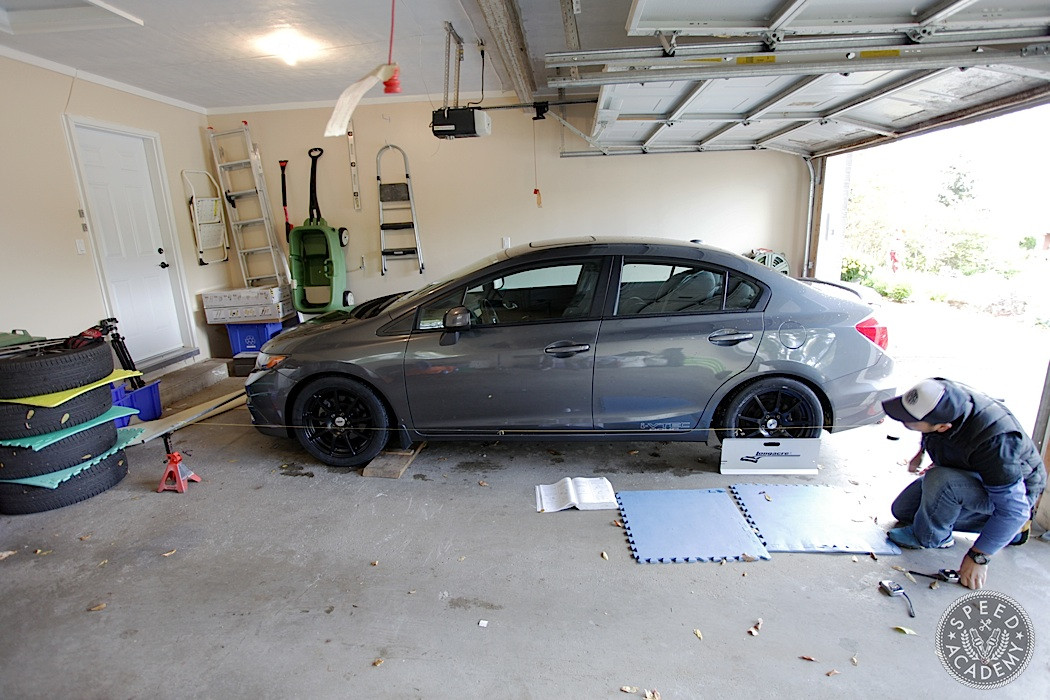
String Box: For individual wheel toe measurements, a string box setup is highly effective. This involves creating a rectangular frame around your car using strings, ensuring it’s parallel to the vehicle’s centerline and equidistant from each wheel’s center. You can construct a string box using jack stands, metal tubing, and string, or purchase a pre-made kit. The string box allows you to measure the distance from the string to the front and rear of each tire, providing individual toe readings.
 String box setup for DIY car alignment measurement
 -
Wrenches and Penetrating Oil: You’ll need wrenches to loosen and tighten jam nuts and adjustment bolts on your tie rods and control arms. Penetrating oil, like PB Blaster, is crucial for loosening rusted or seized bolts, especially on older vehicles.
 Close up of tie rod and jam nut for toe adjustment
 -
Level and Measuring Tape: A level is needed to ensure your string box is level, and a measuring tape for accurate distance measurements.
Now, let’s delve into the step-by-step process on how to fix alignment on car, specifically focusing on toe adjustment using these tools:
-
Preparation: Park your car on a level surface. Ensure the tires are properly inflated. It’s also helpful to bounce the car a few times to settle the suspension.
-
Setting up Toe Plates (Optional): If using toe plates, attach them securely to each front wheel according to the manufacturer’s instructions. Take initial measurements and record them.
-
Setting up the String Box: If using a string box, position jack stands around your car and attach the metal tubing. Run strings along each side, ensuring they are parallel to the car’s centerline. Account for any difference in front and rear track width by adjusting the string position accordingly to create a square box. Level the strings to ensure accurate measurements.
 Accounting for track width difference in string box setup
 -
Measuring Toe:
- With Toe Plates: Measure the distance between the toe plates at the front and rear of the tires. The difference indicates the toe.
- With String Box: Measure the distance from the string to the front and rear sidewall of each tire. Compare these measurements for each wheel to determine individual toe.
-
Adjusting Front Toe: Front toe is typically adjusted using the tie rods.
- Locate the tie rods behind the front wheels.
- Loosen the jam nuts on the tie rods.
- Turn the tie rod itself to adjust toe. Turning it one way will increase toe-in, and the other way will increase toe-out. Make small adjustments and remeasure after each adjustment.
- Keep track of tie rod length changes as a reference point for equal adjustments on both sides.
 Tie rod adjustment for front wheel toe alignment
 -
Adjusting Rear Toe: Rear toe adjustment varies depending on the vehicle. Many rear-wheel-drive vehicles use eccentric bolts on the control arms for both camber and toe adjustments. Front-wheel-drive vehicles may have separate toe arms or require aftermarket camber kits.
- Identify the toe adjustment mechanism for your vehicle’s rear suspension.
- Loosen the appropriate bolts or nuts.
- Make small adjustments to the eccentric bolts or toe arms and remeasure.
 Eccentric bolts for rear camber and toe adjustment
 Rear suspension eccentric bolt adjustment
 -
Checking and Fine-Tuning: After each adjustment, roll the car back and forth and bounce the suspension to let it settle. Remeasure toe and continue adjusting until you achieve your desired settings. Remember to check the squareness of your string box after each adjustment.
-
Finalizing: Once you are satisfied with the toe settings, tighten all jam nuts and bolts to the manufacturer’s specified torque. Double-check all measurements one last time.
 Checking string box level during DIY alignment
While this guide focuses on toe, it’s important to understand that alignment settings are not one-size-fits-all. Toe settings can influence handling characteristics. Generally, a slight toe-out in the front can enhance turn-in response, while rear toe settings vary depending on the vehicle type and driving style. For front-wheel-drive cars, a bit of rear toe-out can aid rotation, whereas rear-wheel-drive cars might benefit from slight toe-in for stability. Experimentation, along with monitoring tire wear and temperature, can help you fine-tune your alignment for optimal performance and handling.
{width=1050 height=700}
*Alt Text: Using a pyrometer to measure tire temperature across the tread, a technique used for fine-tuning car alignment settings.*Learning how to fix alignment on car, especially toe, through DIY methods can be a rewarding experience. It provides a hands-on understanding of your vehicle’s suspension and allows for precise adjustments tailored to your driving preferences. While it may take time and patience initially, with practice, DIY alignment becomes a valuable skill for any car enthusiast or home mechanic. Always prioritize safety and accuracy, and when in doubt, consult a professional alignment specialist.

