How to Fix a Small Hole in Your Leather Car Seat: A Step-by-Step Guide

Leather car seats, while luxurious and comfortable, are susceptible to wear and tear over time. Accidental scratches, scuffs, and even small holes can detract from the overall appearance of your car’s interior. Fortunately, repairing a small hole in your leather car seat is a DIY project you can tackle at home, saving you the expense of professional upholstery services. This guide will walk you through each step of the process, ensuring a seamless and durable repair.
Products You’ll Need
Before you begin, gather the necessary supplies. A comprehensive leather repair kit is highly recommended as it includes most, if not all, of the essential items. Look for a kit that contains:
- Leather Prep or Cleaner: To prepare the leather surface.
- Abrasive Pad: For gentle surface abrasion.
- Alcohol Cleaner: To remove residue and contaminants.
- Leather Repair Sub-Patch: A backing material for support.
- Leather Glue: To secure the backing patch.
- Heavy Leather Filler: To fill the hole.
- Palette Knife or Spatula: For applying filler and glue.
- Tweezers: For precise placement of the backing patch.
- Leather Colorant (matched to your car seat color): To restore the color.
- Sponges: For applying colorant.
- Airbrush (optional but recommended): For even color application.
- Leather Finish: To seal and protect the repair.
- Scalpel or Scissors: To trim frayed edges.
- Hair Dryer (optional): To speed up drying time.
You can find these products individually or, more conveniently, in a complete Leather Car Seat Repair Kit.
Step-by-Step Leather Car Seat Hole Repair Method
Follow these detailed steps to effectively repair a small hole in your leather car seat and restore its original look.
STEP 1. Preparing the Leather Car Seat for Repair
Leather car seat preparation using leather prep and abrasive pad
The first crucial step is to thoroughly prepare the leather surface. This ensures proper adhesion of the repair materials and a long-lasting fix. Using the Leather Prep and abrasive pad from your kit, gently rub the area around the hole. This process removes surface grease, oils from skin contact and cleaning products, and any accumulated dirt.
This step is also important for removing loose leather fibers around the damaged area and lightly stripping away the original manufactured finish. By removing the finish, you create a better surface for the leather colorant to bond with in later steps, leading to a more durable and natural-looking repair.
After prepping the area with the abrasive pad and Leather Prep, use the Alcohol Cleaner to wipe down the area. This removes any remaining dirt, dust, or residue from the prepping process, ensuring a clean surface for the next repair steps. A clean surface is vital for optimal adhesion of the backing patch and filler.
STEP 2. Tidying Up the Damaged Area
 Trimming excess leather around the hole with a scalpel
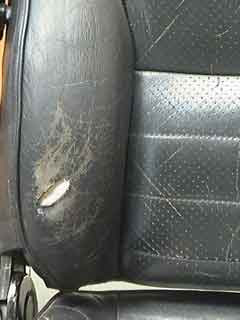
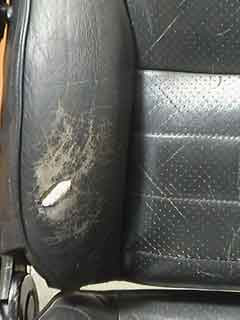
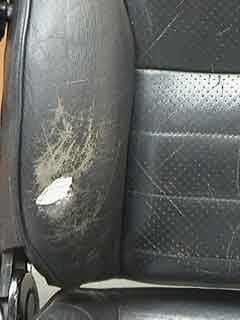
Carefully inspect the hole. You’ll likely notice that the leather edges around the hole are sticking outwards, forming a lip. This raised lip can compromise the smoothness and overall quality of the repair, making the repaired area noticeable. It’s essential to remove this lip for a flush and professional finish.
Using a sharp scalpel or a pair of small, pointed scissors, carefully trim away this lip. Cut at the base of the raised edge, taking extra precaution not to cut into or damage the surrounding undamaged leather. The goal is to create a clean, even edge around the hole for a seamless fill.
STEP 3. Applying the Backing Patch for Support
 Inserting the leather repair sub-patch under the hole using tweezers
To provide a solid foundation for the filler and ensure a robust repair, a leather repair sub-patch is essential. This patch acts as a backing, preventing the filler from sinking or pushing through the hole over time.
Take the backing patch material from your repair kit and cut a piece that is slightly larger than the hole. It should be large enough to completely cover the hole with an extra approximately 1cm (half an inch) of material extending beyond the hole’s edges on all sides. This extra material will be tucked under the existing leather to secure the patch.
Using tweezers, carefully insert one edge of the cut patch underneath the leather surrounding the hole. Hold this edge in place with slight pressure and gently feed the rest of the patch under the remaining edges of the hole. The aim is to position the patch flat underneath the hole, with the 1cm border tucked beneath the leather all around the perimeter of the hole.
Once the patch is positioned correctly, apply a small amount of Leather Glue onto the spatula provided in the kit. Carefully feed the spatula underneath the edges of the hole to apply glue to the underside of the leather that will be in contact with the backing patch. Work your way around the hole, coating the underside of the leather edges with glue, being careful not to shift the canvas patch.
After applying glue to all edges, press down firmly around the repaired area to bond the leather to the backing patch. Hold pressure for a few minutes to allow the glue to grab and then allow the glue to dry completely according to the manufacturer’s instructions. This creates a secure backing for the filler.
STEP 4. Filling the Hole with Leather Heavy Filler – Initial Layers
 Applying thin layers of heavy filler to the hole with a palette knife
With the backing patch firmly in place, you can now begin filling the hole. Use the Heavy Leather Filler to gradually build up the repair in thin layers. This is crucial because applying thick layers of filler can lead to shrinkage, cracking, and improper curing.
Using the end of the palette knife, take a small amount of Heavy Filler and apply a very thin layer into the hole, directly over the backing patch. Ensure this initial layer is just enough to cover the sub-patch and the immediate edges of the hole. Allow this thin layer to dry for approximately 20 minutes. You can speed up the drying process using a hair dryer on a low heat setting, but be careful not to overheat the filler.
Continue applying the heavy filler in thin layers. Aim for at least 5-6 thin layers to gradually build up the filler level. With each layer application, smooth the surface with the sharper edge of the palette knife before drying. This helps to remove excess filler and create a smoother, more even surface as you build up the repair. Remember, thin layers are key to a strong and durable repair.
STEP 5. Filler Build-Up – Achieving Near Level Surface
 Leather hole filled with 5-6 layers of heavy filler, almost level with the surface
After applying 5 or 6 thin layers of the heavy filler, the hole should be nearly filled. As shown in the image, at this stage, the filled area might not be perfectly smooth, but it should be significantly built up, almost reaching the level of the surrounding leather surface. This stage sets the foundation for the final, level layer of filler.
STEP 6. Applying the Final Layer of Filler for Leveling
 Applying the final layer of heavy filler to level the repair with the leather surface
Now, apply the final layer of Heavy Filler to completely fill the hole. The goal is to bring the filler level even with the surrounding leather car seat surface. Take your time with this step to ensure a smooth, flush finish.
Allow this final layer to cure thoroughly. Keep in mind that the filler may shrink slightly as it cures. If, after curing, you notice the filler has sunk below the level of the surrounding leather, apply another thin layer of filler to bring it level and allow it to cure again.
If you accidentally get filler on the surrounding leather during application, immediately remove it with the palette knife before it dries.
Your aim is to achieve a perfectly level fill, neither overfilled nor underfilled. If you slightly overfill the hole, you can carefully reduce the excess filler once it’s fully cured using fine-grit sandpaper, being very gentle to avoid scratching the surrounding leather.
Once you are satisfied with the level of the filler and can no longer feel any ridge or unevenness between the filler and the original leather, clean the entire repair area again with the Alcohol Cleaner. This removes any dust or unwanted filler residue from the surrounding leather, preparing it for the colorant application.
STEP 7. Applying the Initial Colorant Coat
The leather colorant included in your repair kit should be a custom match to your leather car seat’s original color. If you are undertaking a complete recoloring project, you would use your chosen new color at this stage.
Take one of the sponges from the kit and apply a small amount of the leather colorant to it. Thoroughly rub the colorant into the repaired area. This initial application method, using a sponge and rubbing motion, helps the colorant penetrate into the texture and grain of the leather, ensuring good coverage and adhesion, especially in any creases or subtle valleys within the leather’s surface. This technique provides a better foundation for the subsequent sprayed color coats.
STEP 8. Finishing the Repair with Spray Colorant and Finish
 Spraying thin coats of leather colorant with an airbrush
For the most professional and seamless finish, using an airbrush to apply the leather colorant is highly recommended. Spray thin coats of colorant over the repaired leather car seat area, blending the repair into the surrounding original leather color.
The key to a successful color blending is to apply multiple very thin coats, rather than one or two thick coats. Allow each coat to dry sufficiently before applying the next. This prevents the colorant from running, ensures even coverage, and avoids trapping uncured colorant underneath subsequent layers. Depending on the extent of the initial damage, the color being used, and the desired level of concealment, it is not uncommon to apply 10-15 thin coats of colorant to achieve a perfect color match and blend.
Once you are satisfied that the repair is completely concealed, the colorant is fully cured, and it is well blended with the surrounding leather, it’s time to apply the leather finish. Using the airbrush again, spray 4 or 5 thin coats of the leather finish over the repaired area. Allow each coat of finish to dry completely before applying the next.
The leather finish is crucial as it seals the colorant, protecting it from wear and tear and significantly prolonging the life of your leather car seat repair. It also helps to restore the original sheen and feel of the leather.
After applying the final coat of finish, allow the repaired car seat to sit for at least 24 hours before using it. This ensures that the filler, colorant, and finish are all completely cured and hardened, providing a durable and long-lasting repair.
For larger repairs or complete recoloring projects, consider using the Small Leather Colorant Kit, which provides a larger quantity of colorant suitable for spraying larger areas.
Repairing a small hole in your leather car seat is a rewarding DIY project. By following these steps and using the right products, you can restore the beauty and comfort of your car’s interior, saving money and gaining satisfaction from a job well done.
Spraying thin coats of leather colorant with an airbrush
Related Products