How to Fix a Broken Remote Control Car Antenna
Remote control cars are a fantastic source of fun for kids and adults alike, but they can be prone to damage, especially their delicate antennas. Telescoping antennas, common in many RC models, are particularly vulnerable to bending or breaking if not handled carefully. If you’ve found yourself with a snapped antenna on your любимый RC car, don’t worry! Fixing it might be easier than you think. This guide will walk you through a simple DIY repair to get your RC car back in action.
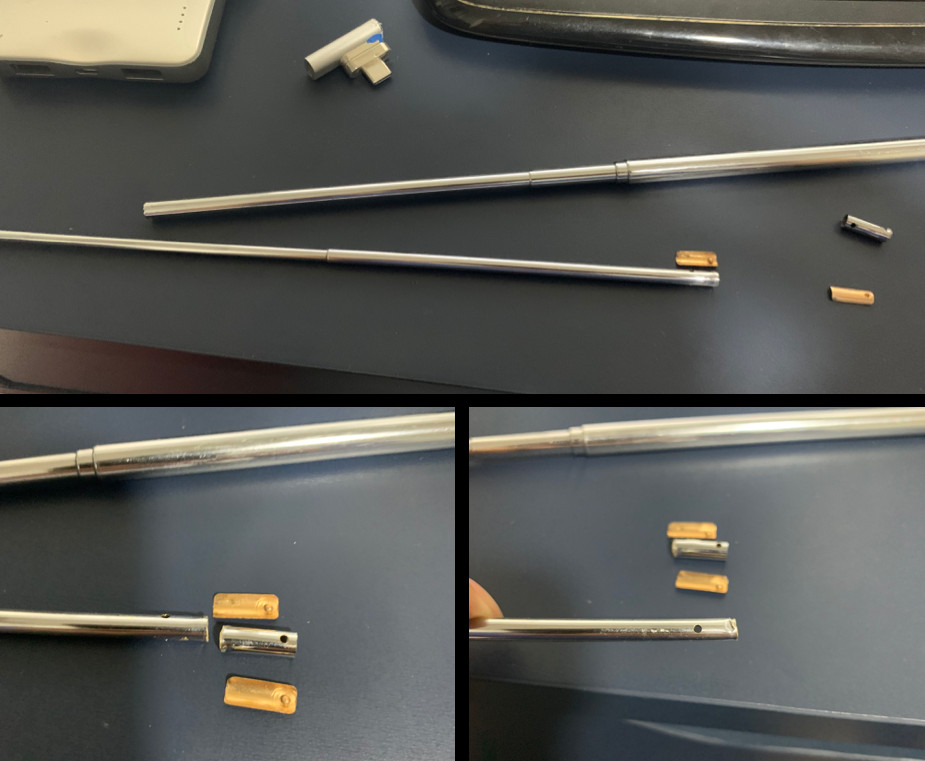
Telescoping antennas are designed with segmented sections that extend and retract. Each segment contains small copper plates at its base. These plates are crucial for the antenna’s function as they have a dual purpose. First, a small protrusion on the plate prevents the next smaller segment from collapsing too far inwards. Second, the slightly thicker base of the segment, created by the copper plates, stops it from being overextended when pulled outwards. Understanding this mechanism is key to repairing a broken antenna effectively.
Close-up of a broken telescoping antenna segment, highlighting the copper plates and the point of breakage.
Step-by-Step Guide to Repairing Your RC Car Antenna
If your antenna has broken near the base of a segment, as often happens, you can follow these steps to attempt a repair. This method focuses on fixing a break in the second top-most segment of a telescoping antenna, but the principles can be adapted for breaks in other segments.
-
Accessing the Broken Segment: Carefully extend the antenna until you can access the segment where the break has occurred. In many cases, like the one described in the original article, this might be the second segment from the top.
-
Removing the Top Segments: To work on the broken segment, you’ll likely need to remove the segments above it. Using a small screwdriver or a similar tool, gently pry open the segment just below the broken one. This should allow you to slide out the broken segment and any segments above it. Be careful not to damage the segments or lose any small parts, especially the copper plates inside.
-
Inspecting and Preparing the Broken Segment: Once you’ve removed the broken piece, examine the remaining part of the segment still attached to the antenna. You’ll need to create new holes in this part to accommodate the copper plates that were originally positioned at the base of the now-missing section.
-
Drilling New Holes: This step requires precision. Using a Dremel or a small drill, carefully create new holes in the remaining portion of the broken segment. These holes need to be positioned correctly to allow the copper plates to function as stoppers for the segment above. It’s better to err on the side of drilling the holes a little further from the edge to avoid tearing the segment, especially if you’re freehanding the Dremel.
-
Reassembling the Antenna Segments: After drilling the new holes, carefully reinsert the copper plates into their correct positions within the segments. Then, slide the segments back together, starting from the smallest segment at the top and working your way down. Ensure that the copper plates are correctly aligned to allow smooth extension and retraction of the antenna.
-
Securing the Segment End: The final challenge is to slightly roll the top of the segment below the repaired one inwards. This is crucial to prevent the newly-fixed segment from being over-extended when the antenna is pulled out. A plastic model sprue cutter or even pliers can be used for this. Gently press the end of the segment inwards, taking care not to close the gap too much, which could hinder retraction. You want to create just enough of a lip to catch the copper plates and prevent over-extension.
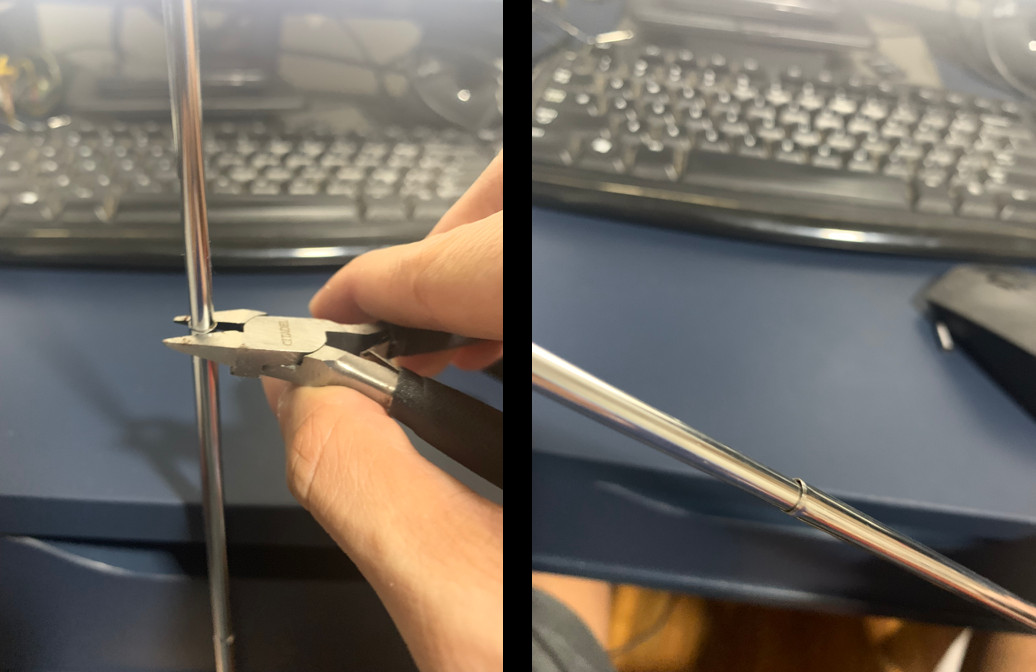 Using a sprue cutter to carefully bend the edge of the antenna segment inwards to secure the repaired section.
- Testing the Repair: Once reassembled, gently extend and retract the antenna to test the repair. It should now function smoothly, with the repaired segment extending and retracting without overextending or collapsing too far. You might notice a slight gap between segments where the break occurred, which is normal and shouldn’t affect performance significantly.
Conclusion
While telescoping antennas on RC cars can be delicate, they are often repairable with a bit of care and some basic tools. By understanding how these antennas work and following these steps, you can often fix a broken antenna yourself, saving the cost of a replacement and getting your RC car back in action quickly. Remember to handle your RC car’s antenna with care in the future to prevent similar damage and prolong its lifespan, especially if young children are using it.