How to Fix a Crack in Your Leather Car Seat: A Comprehensive Guide
Leather car seats, while luxurious and comfortable, are prone to wear and tear, especially cracking. A crack in your leather car seat can detract from your car’s interior appeal and reduce its overall value. Fortunately, fixing a crack in a leather car seat is a manageable DIY project that can save you money and restore your car’s interior. As an expert at CARDIAGTECH in automotive repairs, I’m here to guide you through the process of effectively repairing those unsightly cracks, focusing on using quality products for a durable and professional finish.
Understanding the Repair Process
Before diving into the repair, it’s crucial to understand that proper preparation and the right materials are key to a successful outcome. Rushing the process or using subpar products can lead to unsatisfactory results and potentially further damage. This guide emphasizes a step-by-step approach using a reliable leather repair kit, similar to the Leather Magic products highlighted previously, known for their color-matching and comprehensive solutions.
Step-by-Step Crack Repair
-
Thorough Cleaning: Start by cleaning the cracked leather seat thoroughly. Use a dedicated leather cleaner or a mild car wash soap with water and a nylon brush. Gently scrub the area to remove dirt, grime, and any previous leather treatments. This ensures the repair products adhere properly.
-
Sanding the Damaged Area: Once the seat is clean and dry, lightly sand the cracked area using 220-grit sandpaper. This step roughens the surface, creating a better bonding surface for the leather filler. Be careful not to over-sand, as you only want to smooth out rough edges around the crack.
-
Applying Leather Filler: Apply a leather filler paste to the crack. This is a crucial step to restore the leather’s surface. Use a small applicator to carefully fill the crack, ensuring the filler is level with the surrounding leather. For deeper cracks, you may need to apply the filler in layers, allowing each layer to dry slightly before applying the next. Sanding between applications with fine-grit sandpaper (if needed) will help achieve a smooth, even finish. Patience is key here – taking your time to create a smooth surface before coloring will significantly impact the final appearance.
-
Coloring and Matching: After the filler is completely dry and sanded smooth, it’s time to apply the leather colorant. Leather repair kits like Leather Magic offer custom-matched colors based on your vehicle’s make and model, ensuring a seamless blend. Apply thin, even coats of the colorant using a sponge or applicator, allowing each coat to dry before applying the next. Multiple thin coats are better than one thick coat to prevent drips and ensure even coverage. Take your time with this step to achieve a natural, blended look.
-
Curing Time: Allow the repaired area to cure for at least 48 hours before using the seat. This curing time is essential for the filler and colorant to fully set and bond with the leather, ensuring a durable and long-lasting repair.
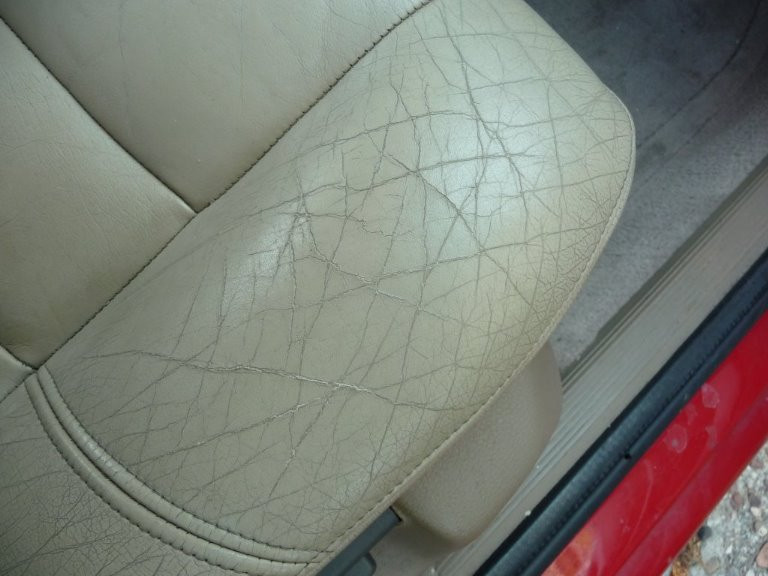
Before leather car seat crack repair
Alt text: Close-up of a cracked leather car seat before repair, showing damage and wear.
Addressing Tears and Missing Material
For more significant damage, such as tears or missing leather pieces, you might need additional materials like linen subpatch material and leather insert filler.
- Linen Subpatch Material: This material is ideal for reinforcing the repair from underneath, especially for tears. It acts as a backing to provide support and prevent the crack or tear from reopening. Think of it as a foundation for your repair.
 Linen subpatch material for leather repair
Alt text: Linen subpatch material used for leather car seat repair, showing texture and application.
- Leather Insert Filler: If there’s missing leather, leather insert filler can be used to bridge gaps and provide a base for the leather filler paste. Cut the insert slightly larger than the missing area and trim it for a snug fit. Secure it in place before applying the leather filler paste over it.
 Leather insert filler for car seat repair
Alt text: Leather insert filler used to patch a hole in a leather car seat, demonstrating material and size.
Remember to use these materials meticulously to ensure a level surface before applying colorant. An uneven foundation will be noticeable in the final result.
Conclusion
Fixing a crack in your leather car seat is a rewarding DIY task that can significantly improve your car’s interior. By using quality products and following these detailed steps, you can achieve professional-looking results and extend the life of your leather seats. Taking your time, especially during the filling and coloring stages, is crucial for a seamless and durable repair. With the right approach, you can effectively restore the beauty and comfort of your leather car seats.
Disclaimer: Always read and follow the safety precautions provided by the manufacturer of the repair products you choose.