How to Fix Dents in Your Car: A Comprehensive Guide
A flawless car exterior boosts its aesthetic appeal and your pride of ownership. However, everyday driving inevitably exposes your vehicle to dents and dings. These imperfections not only diminish your car’s appearance but also decrease its resale value and can lead to rust formation over time. Repairing car dents promptly is crucial for maintaining your vehicle’s condition and value.
For minor dents, bumper damage, and door dings, DIY solutions, including dent repair kits and body fillers, can often suffice. However, more significant dents might necessitate the expertise of a paintless dent repair (PDR) technician or a visit to a professional auto body shop to achieve a factory-like finish.
This guide provides a comprehensive overview of how to repair car dents, exploring various methods, associated costs, and payment options.
Understanding Car Dents and Why Repairing Them Matters
Numerous incidents, even for meticulous drivers, can result in car dents.
Small dents frequently arise from hail, road debris, or runaway shopping carts in parking lots.
Door dings typically occur when car doors bump into other vehicles, walls, or obstacles.
Larger dents are often the consequence of car accidents, falling tree branches, or substantial impacts.
Various terms describe damage to a car’s paint, bumper, or body panels. While “dent” and “ding” are sometimes used interchangeably for minor damage, distinctions exist.
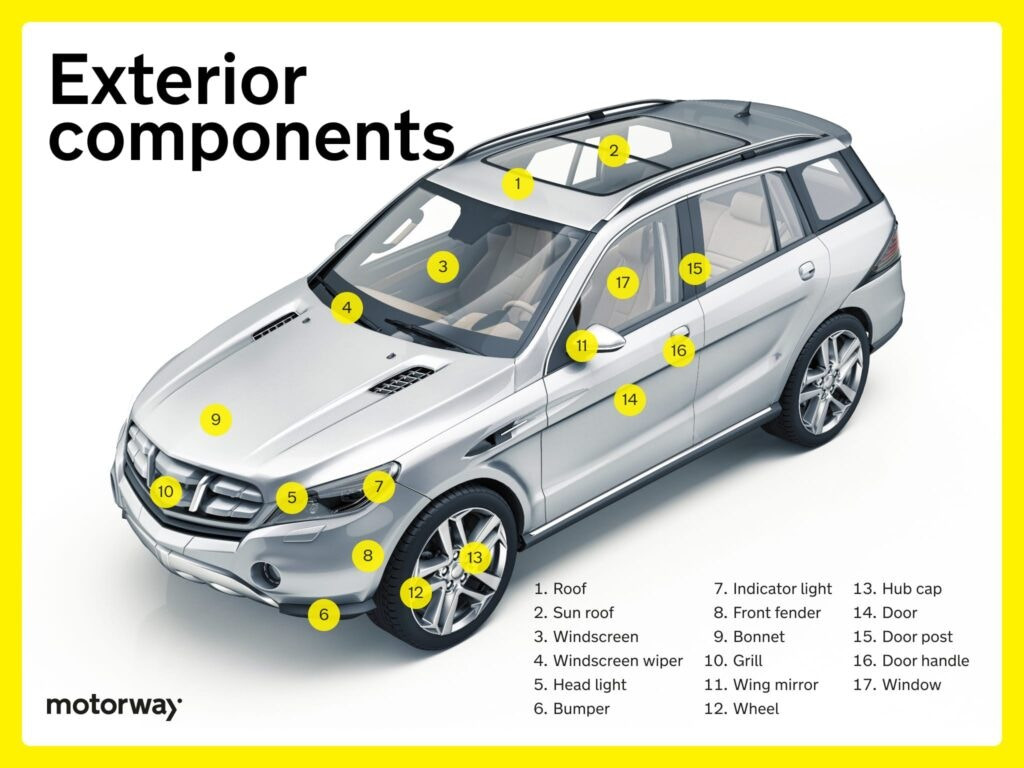
Beyond size and shape, the dent’s location is important. Vehicle body panels are typically constructed from metal, either steel or aluminum. Repairing dents on these panels requires different techniques than addressing dents on bumpers, which are usually made of plastic.
Here’s a breakdown of common dent types:
| Type | Description | Removal Information |
|---|---|---|
| Ding | A small, shallow area of damage | Often easily fixed with DIY methods |
| Round Dent | A circular indentation | May be “popped” back into shape |
| Sharp Dent | Small, deep, and pointed indentation | More challenging to repair, may need special tools |
| Crease Dent | Long, folded dent with paint damage | Professional repair is usually recommended |
| Serious Dents | Large or multiple dents, structural damage | May indicate structural issues, professional assessment needed |
Addressing car dents promptly is not just about aesthetics; it’s also about practicality and safety. While DIY dent repair can cost under $100, professional repairs can range from hundreds to thousands of dollars.
Leaving dents unrepaired, especially those with paint or body panel damage, can lead to moisture intrusion, resulting in rust and paint flaking. Larger dents, such as crease dents from tree branches, might conceal structural damage to the car’s body, posing a significant safety risk. Furthermore, numerous dents can even negatively impact fuel efficiency by disrupting airflow and increasing drag. These factors underscore the importance of timely dent repair. Fortunately, various options are available to effectively restore your car’s surface.
DIY Car Dent Repair: Getting Started at Home
For minor dents, door dings, or bumper damage, DIY repair can be a cost-effective and straightforward solution.
DIY Repair for Plastic Bumper Dents
Plastic bumpers are prone to dents, especially in low-speed impacts. Luckily, plastic is flexible and often responds well to heat-based DIY methods. Here’s how to repair plastic bumper dents:
- Heat Application: Use a hairdryer to gently heat the dented area. Apply heat evenly until the plastic becomes warm and pliable to the touch. Be careful not to overheat and melt the plastic.
- Cooling and Shaping (For Small Dents): For smaller dents, once the plastic is warm, immediately spray compressed air over the heated area. The rapid cooling can cause the plastic to contract and pop back into its original shape. You can purchase compressed air at most office supply or electronics stores for around $20 or less.
- Dent Puller Assistance (For Larger Dents): If the dent is larger or doesn’t pop out with compressed air alone, use a suction cup dent puller. These are available online and in auto parts stores for about $20 or less. Attach the puller to the center of the dent and apply firm, steady pressure to pull the dent outward.
- Refinement: After pulling the dent, inspect for any remaining minor imperfections or new small dents that may have appeared during the pulling process. Gently smooth these out with your hands or the dent puller.
DIY Repair for Metal Dents
Repairing metal dents typically requires a dent repair kit, which includes specialized tools to pull the metal back into shape. These kits range in price from $40 to $99 and are available online and at auto parts stores.
Here’s the process for fixing metal dents using a repair kit:
- Pre-Heating (For Some Dents): For larger or more stubborn metal dents, pre-heating the area with a hairdryer can make the metal more malleable. Heat the dent until it’s warm to the touch. For very small, shallow dents, you might be able to skip this step.
- Initial Pull with Dent Puller: Use a suction cup dent puller (often included in repair kits) to attempt to pull the dent outward slightly. The goal here isn’t necessarily to remove the dent completely at this stage, but to reduce its depth and make the subsequent steps easier.
- Surface Preparation: Clean the area around the dent with a microfiber towel to remove any dirt or debris. This ensures proper adhesion for the next steps.
- Bridge Puller Setup: Most metal dent repair kits include a “bridge puller,” a tool that uses leverage to pull dents out. This involves gluing a plastic “head” or “bolt” to the deepest point of the dent. Apply the special glue from the repair kit to the head.
- Head Attachment: Firmly press the glued head onto the deepest part of the dent. Allow the glue to dry completely according to the kit’s instructions, usually around 4-8 minutes. This is crucial for the head to adhere strongly.
- Using the Bridge Puller: Once the glue is dry, attach the bridge puller tool, hooking its arms around the glued head. Turn the dial or screw mechanism on the bridge puller slowly and gradually. This applies controlled pressure to pull the dent outward. Stop tightening when the dent is removed or significantly improved and the metal is close to its original position. Avoid over-pulling, which can create a bulge.
- Removal of Head and Puller: Detach the bridge puller. To remove the glued head, use the hairdryer to gently heat the glue again until it softens. Then, carefully pry off the head. Clean any remaining glue residue with a microfiber towel or the adhesive remover provided in the kit.
- Paint Touch-Up (If Necessary): If the dent repair process caused any paint damage or if there were pre-existing scratches, use a paint repair kit to touch up the area. These kits, like those from Dr. ColorChip, range from $45-$65 and provide color-matched paint. Clean the area, apply primer if included, and then carefully apply thin coats of paint, allowing each coat to dry before applying the next until the damage is concealed.
Using Body Filler for Imperfect Dents
Sometimes, despite your best efforts, a dent might not be completely removable. In these cases, body filler, commonly known as Bondo® (starting at around $13), can be used to fill in the remaining imperfection and create a smooth, even surface. Body filler is a putty-like substance that, when hardened and painted, becomes virtually undetectable. Even professional auto body technicians use body filler to achieve flawless repairs.
Here’s how to use body filler effectively:
- Cleaning the Dented Area: Thoroughly clean the area around the dent with soap and water to remove dirt, grease, and wax. Rinse and dry completely with a microfiber cloth.
- Paint Removal by Sanding: Use a sander with 80-grit sandpaper to remove the paint from the dent and about 2-5 inches surrounding it. This creates a rough surface for the body filler to adhere to.
- Dent Minimization (Optional but Recommended): If possible, use DIY dent removal techniques (as described above) to minimize the dent as much as possible before applying body filler. This reduces the amount of filler needed and results in a more durable repair.
- Body Filler Application: Mix the body filler and hardener according to the product instructions. Apply the filler firmly into the dent, using a plastic spreader. Apply enough filler to slightly overfill the dent, making it flush with or slightly higher than the surrounding body panel. Work quickly, as body filler hardens relatively fast. Let it dry for about 15-20 minutes, or as directed by the product.
- Initial Sanding and Shaping: Once the filler is dry, use 80-grit sandpaper to begin shaping and leveling the filled area. Sand down the excess filler to match the contour of the surrounding body panel. Focus on achieving the desired shape.
- Fine Sanding for Smoothness: After achieving the general shape with 80-grit, switch to 180-grit sandpaper to further refine the surface and remove deeper sanding scratches.
- Glazing Putty Application: Apply a thin layer of glazing putty or spot putty (like Bondo® Glazing & Spot Putty, starting around $11) over the entire filled area and slightly beyond. Glazing putty fills in pinholes and minor imperfections, creating an ultra-smooth surface for painting.
- Final Sanding: After the glazing putty is completely dry, sand it first with 180-grit sandpaper, and then with 320-grit sandpaper to remove any fine scratches and ensure a perfectly smooth finish. The surface should be ready for priming and painting at this stage.
- Priming and Painting: Use a paint repair kit with color-matched primer and paint. Apply primer to the sanded area in thin, even coats, allowing it to dry completely between coats. Once primed, apply the color-matched paint in thin, even coats, blending it into the surrounding original paint for a seamless finish. Follow the paint kit instructions for drying times and clear coat application if included.
Professional Car Dent Repair Services
For dents that are beyond the scope of DIY repair, or if you prefer professional results, consider these options:
Auto Body Repair Shops
For extensive damage, dents with paint damage, or if you want your car to look brand new, an auto body repair shop is the best choice. Professional technicians have the expertise, tools, and equipment to handle all types of dent repairs, from minor dings to major collision damage.
Body shops can perform traditional dent repair, which involves hammering out dents, using specialized tools, and often applying body filler and repainting. They can also handle structural repairs if the dent has affected the vehicle’s frame or chassis.
When choosing an auto body shop, it’s advisable to get quotes from 2-3 shops in your area to compare pricing and turnaround times. This allows you to select a shop that meets your budget and schedule.
Paintless Dent Repair (PDR)
Paintless dent repair (PDR) is a specialized technique for removing dents without affecting the car’s paint finish. PDR technicians use specialized tools to gently massage and manipulate the metal from behind the dent, pushing it back to its original shape. PDR is ideal for minor to moderate dents where the paint is intact.
PDR offers several advantages: it’s typically faster and more affordable than traditional body shop repairs, and it preserves the original factory paint finish. PDR technicians often offer mobile services, coming to your location for convenient repairs.
The cost of PDR varies based on dent size, location, and complexity. Here’s a general cost guideline:
- Small, Light Dents: $50-$100
- Medium Dents: $75-$300
- Large Dents: $300-$500
When to Choose Each Option
- DIY: Best for small, shallow dents, door dings, and minor bumper dents where you are comfortable with hands-on work and want to save money.
- PDR: Ideal for minor to moderate dents without paint damage, where you want a professional repair that is faster and more affordable than traditional body work.
- Auto Body Shop: Necessary for large dents, dents with paint damage, structural damage, crease dents, or when you desire a flawless, factory-quality repair and are willing to pay for it.
Understanding the Costs of Car Dent Repair
The cost of car dent repair varies greatly depending on the method and severity of the damage.
DIY Costs: DIY dent repair is the most budget-friendly option. The cost primarily involves purchasing repair kits and materials.
- Plastic Bumper Repair: Compressed air ($20), Dent puller ($20)
- Metal Dent Repair Kit: ($40-$99)
- Body Filler and Supplies: (Bondo $13+, Glazing Putty $11+)
- Paint Repair Kit: ($45-$65)
Total DIY costs can range from under $50 for simple repairs to a few hundred dollars for more involved DIY projects with body filler and painting.
PDR Costs: PDR costs are generally higher than DIY but lower than traditional body shop repairs. As mentioned earlier:
- Small Dents: $50-$100
- Medium Dents: $75-$300
- Large Dents: $300-$500
Auto Body Shop Costs: Auto body shop repairs are the most expensive option, especially for significant damage. Repair costs at a body shop can easily reach $2,000 or more, particularly if panel replacement, extensive bodywork, and repainting are required. For very large or complex dents, it’s worth asking if panel replacement might be more cost-effective than extensive dent repair.
Financing Options
Car dent repair, especially professional services, can be an unexpected expense. The Synchrony Car Care™ Credit Card offers a financing solution to manage these costs. You can use the card at participating auto repair shops and take advantage of promotional financing options on purchases of $199 or more, making it easier to handle repair expenses and restore your car’s condition without delay.
Conclusion
Repairing car dents promptly is essential for maintaining your vehicle’s appearance, value, and structural integrity. Whether you choose the DIY route for minor imperfections or opt for professional services like PDR or auto body shops for more significant damage, addressing dents quickly prevents further complications like rust and ensures your car remains in top condition. By understanding the different repair methods and costs, you can make informed decisions to effectively fix dents and keep your car looking its best.