How Do You Fix Alignment On A Car: A Comprehensive DIY Guide
Car alignment, often known as wheel alignment, is a crucial aspect of vehicle maintenance that significantly impacts tire wear, handling, and overall driving safety. Improper alignment can lead to uneven tire wear, pulling to one side while driving, and reduced fuel efficiency. While professional alignment services are readily available, understanding how to perform a basic alignment at home can save you money and provide a deeper understanding of your vehicle’s mechanics. This guide will walk you through the process of checking and adjusting your car’s alignment, focusing primarily on toe adjustment, a common and impactful aspect of wheel alignment.
Understanding Car Alignment and Toe
Before diving into the “how-to,” it’s essential to grasp the basics of car alignment. Alignment refers to the angles of your car’s wheels relative to each other and the vehicle’s body. The primary angles are:
- Toe: This is the inward or outward angle of your tires when viewed from above. Toe-in means the front of the tires are closer together than the rear, while toe-out is the opposite.
- Camber: This is the inward or outward tilt of the tires when viewed from the front. Negative camber means the top of the tire tilts inward towards the car, and positive camber is outward.
- Caster: This is the angle of the steering axis when viewed from the side. It influences steering stability and self-centering.
For DIY alignment, toe adjustment is the most accessible and frequently adjusted parameter. Toe settings greatly influence turn-in response and handling balance.
Tools You’ll Need for DIY Car Alignment
To perform a DIY car alignment, specifically focusing on toe adjustment, you’ll need the following tools:
- Toe Plates: These are specialized tools designed to measure toe accurately. They attach to the wheels and provide a clear visual reading of toe angle.
- String Box (or String and Jack Stands): An alternative to toe plates, a string box utilizes strings stretched around the car at wheel center height to create a reference plane for measuring toe. You can purchase a professional string box setup or create your own using jack stands, metal tubing, string, and clamps.
- Wrench Set: You’ll need wrenches to loosen and tighten the jam nuts on your tie rods and potentially eccentric bolts depending on your car’s adjustment mechanism.
- Penetrating Oil (like PB Blaster): Essential for loosening rusted or seized jam nuts and bolts.
- Measuring Tape: For measuring distances and ensuring your string box is square.
- Level: To ensure your string box is level.
- Jack and Jack Stands: To safely lift and support your vehicle.
- Wheel Chocks: For safety, place wheel chocks behind the wheels that are staying on the ground.
- Notebook and Pen: To record measurements and adjustments.
Method 1: Using Toe Plates for Toe Adjustment
Toe plates offer a straightforward method for measuring and adjusting toe, especially if you are primarily concerned with toe settings and have a general understanding of your car’s initial alignment.
-
Preparation: Park your car on a level surface. Ensure the steering wheel is centered and locked. Slightly loosen the lug nuts on the wheels you’ll be working on.
-
Mount Toe Plates: Carefully attach the toe plates to the wheels, following the manufacturer’s instructions. Ensure they are securely mounted and parallel to the wheel.
DIY Toe Plates Setup for Car Wheel Alignment -
Take Initial Toe Measurements: Read the toe measurement on the toe plates for each wheel. Record these measurements. Toe plates usually display toe in fractions of an inch or millimeters.
-
Adjust Toe (Front Wheels – Tie Rods):
- Locate the tie rods on the front wheels. These are adjustable rods connecting the steering rack to the wheel hubs.
- Loosen the jam nuts on the tie rods.
- Use a wrench to turn the tie rod itself. Turning it one way will increase toe-in, and the other way will increase toe-out. Make small adjustments and observe the change on the toe plates.
- Aim for equal toe adjustment on both sides of the axle to maintain steering center.
- After each adjustment, tighten the jam nuts securely.
 Adjusting Front Toe Using Tie Rods for DIY Wheel Alignment
 -
Adjust Toe (Rear Wheels – Eccentric Bolts or Adjustable Arms):
- Rear toe adjustment methods vary depending on the vehicle. Many rear-wheel-drive cars use eccentric bolts on control arms. Front-wheel-drive cars may use adjustable toe arms or shims.
- Eccentric Bolts: Loosen the eccentric bolt and rotate it to adjust toe. Many eccentric bolts have markings to indicate the degree of adjustment.
- Adjustable Arms: Some vehicles use adjustable toe arms, similar to tie rods, which can be lengthened or shortened.
- Make small adjustments and monitor the toe plates.
- Tighten all bolts and nuts after adjustment.
 Rear Wheel Alignment Adjustment Using Eccentric Bolts on Control Arms
 -
Re-measure and Refine: After each adjustment, re-measure toe with the toe plates. Roll the car back and forth a short distance and bounce the suspension to allow it to settle before taking new measurements. Repeat adjustments until you achieve your desired toe settings.
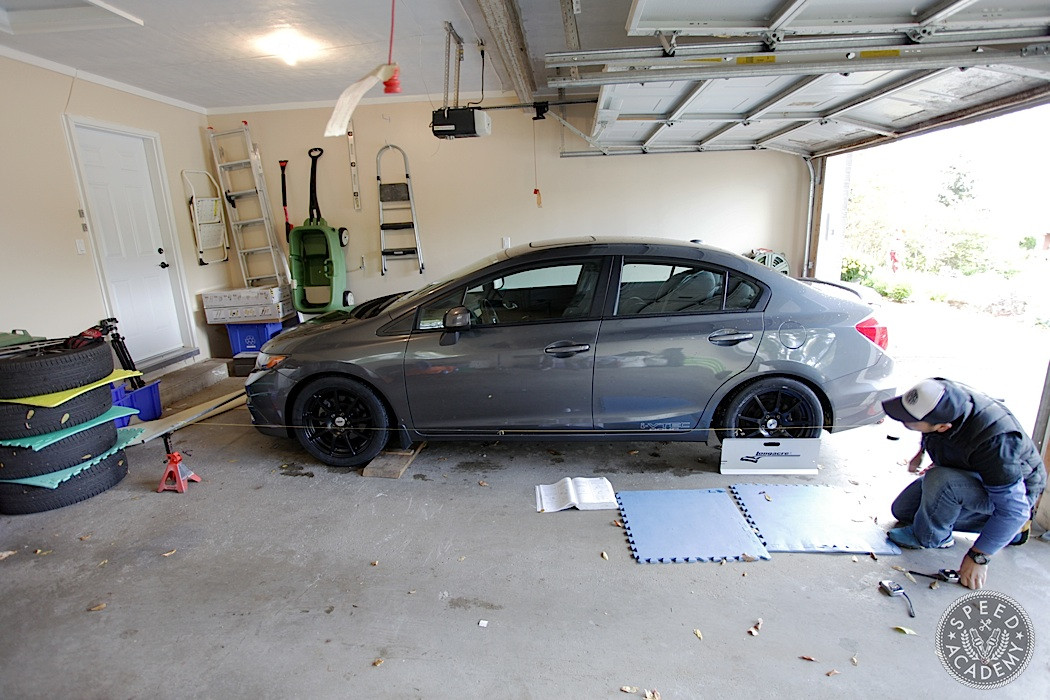
Method 2: Using a String Box for Individual Wheel Toe Measurement
For more precise individual wheel toe measurements and adjustments, especially when you need to account for differences in front and rear track width, a string box is an excellent method.
-
Set Up the String Box:
- Place jack stands around the car, positioned at the horizontal centerline of the wheels.
- Attach metal tubing to the jack stands using clamps or vice grips. Drill holes in each end of the tubing.
- Run string through the holes in the tubing, creating a rectangular “box” around the car, parallel to the wheels.
- Ensure the string is at an equal distance from the center point of each wheel horizontally.
 DIY String Box Setup for Measuring Individual Wheel Toe
 -
Square the String Box: Measure the distance between the strings at the front and rear of the car. Adjust the string box until these distances are equal, ensuring the box is square.
-
Compensate for Track Width Difference: If your car has a narrower rear track width than the front, you need to compensate for this to get accurate readings. For example, if the rear track is 1 inch narrower, set the string 1/2 inch farther out from the center of the rear wheels on each side.
 Compensating for Track Width Difference in String Box Setup
 -
Measure Toe at Each Wheel:
- Measure the distance from the front edge of the tire to the string and the rear edge of the tire to the string for each wheel.
- The difference between these measurements indicates the toe at each wheel.
 Measuring Toe at Each Wheel Using a String Box
 -
Adjust Toe Based on String Box Measurements: Follow the same toe adjustment procedures as described in Method 1 (tie rods for front, eccentric bolts or arms for rear). Use the string box measurements to guide your adjustments.
-
Re-check String Box and Measurements: After each adjustment, re-check the string box for square and level. Roll and bounce the car to settle the suspension before re-measuring toe.
Toe Settings and Handling
Toe settings significantly influence your car’s handling characteristics.
- Toe-out (Front): Often used for track cars to improve turn-in response. It makes the car feel more agile and responsive to steering input.
- Toe-in (Front): Provides better straight-line stability but can make turn-in feel slightly slower.
- Toe-out (Rear – FWD/AWD): Can help the rear of the car rotate and follow the front, improving agility.
- Toe-in (Rear – RWD): Often used for added mid-corner rear stability in rear-wheel-drive cars.
Your ideal toe settings will depend on your driving style, vehicle type, and intended use (street, track, drift). Experimentation and observation of tire wear patterns are crucial for fine-tuning your alignment.
 Examples of Different Toe Settings for Car Handling
Conclusion
Performing a DIY car alignment, particularly toe adjustment, is a rewarding skill that can enhance your car’s performance and save you money. While it requires patience and attention to detail, using toe plates or a string box allows you to accurately measure and adjust toe settings at home. Remember to always prioritize safety, double-check your work, and consult your vehicle’s repair manual for specific adjustment procedures. By understanding and mastering DIY alignment, you gain valuable control over your vehicle’s handling and tire life.