DIY Guide: Enabling AUX Input on Porsche PCM 3.0 & 3.1 Systems
For Porsche enthusiasts looking to bridge the gap between classic car aesthetics and modern audio functionality, the PCM 3.0 and PCM 3.1 systems present a unique challenge. While these systems offer a period-correct look for your vehicle, they lack the convenience of a standard AUX input for connecting smartphones or portable music players. Many owners find themselves wanting to integrate their digital music libraries or utilize smartphone navigation apps through their car’s audio system without compromising the original interior. If you’re one of them, you might have considered aftermarket head units. However, for those who, like many purists, wish to maintain the originality of their Porsche, retrofitting an AUX input is the perfect solution.
This guide will walk you through the process of enabling the AUX input on your PCM 3.0 or PCM 3.1 system. We’ll delve into a DIY approach that not only saves you a significant amount compared to the official Porsche retrofit kit but also provides a satisfying hands-on experience. This method focuses on utilizing readily available parts and activation codes, making it accessible for car enthusiasts with some technical inclination. Whether you’re aiming to connect a Bluetooth dongle for wireless streaming, integrate a CarPlay retrofit kit, or simply have a direct audio input, enabling the AUX function on your PCM is the crucial first step.
Why Retrofit AUX Input to Your PCM 3.0/3.1?
The question might arise: in an age of advanced infotainment systems, why bother with a seemingly outdated AUX input? The answer lies in versatility and cost-effectiveness, especially when aiming to modernize your Porsche’s audio capabilities without a full system overhaul.
- Maintaining Originality: For many Porsche owners, preserving the original look and feel of their vehicle is paramount. Replacing the PCM unit with a modern aftermarket option can drastically alter the car’s interior aesthetics. Retrofitting AUX input allows you to keep the original PCM while adding a crucial modern feature.
- Cost-Effective Modernization: The official Porsche “Universal Audio Interface” kit, designed to add AUX input, can be prohibitively expensive, often exceeding $500 for the parts alone, plus dealer coding costs. A DIY approach significantly reduces these expenses, making it a budget-friendly upgrade.
- Seamless Integration with Bluetooth and CarPlay: Enabling AUX input opens the door to various modern integrations. A simple Bluetooth dongle plugged into the AUX provides wireless audio streaming from your smartphone. Furthermore, many popular CarPlay and Android Auto retrofit kits for PCM 3.0/3.1 systems require the AUX input to be enabled for audio output. This DIY method is a prerequisite for these more advanced upgrades.
- Versatile Audio Connectivity: While Bluetooth streaming is convenient, AUX input offers a direct, wired audio connection, which can be preferred by audiophiles for potentially higher fidelity and is essential for devices without Bluetooth capabilities.
In essence, enabling the AUX input is a foundational upgrade that unlocks a range of possibilities for modernizing your PCM 3.0 or 3.1 system while respecting the car’s original design.
Understanding the Official (Expensive) vs. DIY Approach
Porsche does offer an official solution for adding AUX input to PCM 3.0/3.1, the “Universal Audio Interface” kit (part # 997 044 902 034). While this kit provides a factory-standard solution, it comes with a hefty price tag. Purchasing the kit and having it installed and coded at a Porsche dealership can easily exceed $1000.
The official kit includes:
- The AUX input interface module
- Wiring harness
- Necessary hardware for installation
- Software coding to activate the AUX function in the PCM
The DIY approach, on the other hand, leverages the fact that the PCM 3.0/3.1 hardware is inherently capable of supporting AUX input. It’s simply a matter of:
- Wiring: Creating or sourcing the necessary wiring harness to connect an AUX input jack to the PCM unit.
- Coding: Activating the AUX input function within the PCM software through coding, typically using a PIWIS (Porsche Integrated Workshop Information System) tool.
By sourcing the components separately and performing the wiring and coding yourself, you can achieve the same functionality as the official kit for a fraction of the cost. This guide focuses on this cost-effective and empowering DIY method.
Parts You’ll Need for DIY AUX Retrofit
To embark on this DIY AUX retrofit, you’ll need to gather a few essential parts. The beauty of this method is that it avoids the expensive official kit and instead utilizes individual components, some of which you can even source as free samples!
Here’s a detailed breakdown of the parts, drawing from service bulletins and online resources, including cost-effective alternatives where available:
| Part Number | Description | Approx. Cost (USD) | Notes |
|---|---|---|---|
| 997 642 465 00 01C | Adaptor Multimedia interface, satin black | ~$90 | This is the physical AUX input socket that fits into your center console. |
| 997 553 613 00 | Rubber mat for the center console | ~$15 | The rubber mat that surrounds the AUX input socket in the center console, providing a clean factory finish. |
| 997.044.902.43 | Wiring Harness Multimedia interface | ~$500 | (Official Kit Part – Expensive to Purchase Separately) This is the complete wiring harness from the official kit. We will be DIY-ing this harness to save cost. |
| 999 073 429 01 | Tapping screw, 4.2 x 25 | ~$1 | Screws for mounting the AUX input socket. |
| 999 507 908 01 (or 999 507 922 01) | U Clamp | ~$5 | U-clamps to secure the AUX input adapter in the center console, preventing it from being pushed up. |
| 997 612 471 01 | Connecting cable, iPod | ~$35 | (Optional) This is an iPod connection cable included in the official kit. Not necessary if you are primarily adding AUX for Bluetooth or other audio sources. |
| 997 612 049 75 | Connecting line, Multimedia interface (Coax) | ~$65 | Porsche Coax Cable: This is the coaxial cable with a yellow connector, essential for audio signal. Buying this genuine Porsche part simplifies the DIY wiring as coax connectors are difficult to DIY. |
| TE Connectivity Connectors (DIY Harness) | Free (Samples) | Key to DIY Harness: Instead of buying the expensive full harness (997.044.902.43), we will source connectors from TE Connectivity. Request free samples from their website. | |
| 1394048-1 | PCM Head Unit Connector Block | Sample | Connector block that plugs into the back of the PCM unit. |
| 2-1355524-3 | PCM Head Unit Connector Sleeve | Sample | Sleeve for the PCM connector block. |
| 1534125-1 | Arm Rest Connector Block | Sample | Connector block for the AUX input end in the center armrest. |
| 1534172-1 | Arm Rest Connector Sleeve | Sample | Sleeve for the armrest connector block. |
| 5-9289991-1 | Connector pins | Sample | Connector pins to crimp onto the wires and insert into the connector blocks. You’ll need several of these. |
| Activation Code | PCM AUX Input Activation Code | ~$20-50 | Obtainable from online vendors like Fast-Code. This code is necessary to enable the AUX input function in your PCM software after wiring is complete. |
| PIWIS Clone | Porsche Integrated Workshop Information System | ~$300-500+ | (If you don’t already own one): A PIWIS clone is needed for coding the PCM to activate the AUX input. While an investment, it’s a valuable tool for Porsche DIY enthusiasts for various diagnostics and coding tasks. Alternatively, find a local specialist for coding. |
Tools You’ll Need:
- Soldering iron and solder
- Wire stripper and crimping tool
- Multimeter (optional, but helpful for continuity testing)
- Basic hand tools (screwdrivers, sockets, etc.) for console removal
- PIWIS clone and laptop for coding
With parts and tools in hand, you’re ready to start the DIY AUX retrofit process.
Step-by-Step DIY Installation Guide
This section provides a detailed walkthrough of the DIY AUX input installation. It’s crucial to follow these steps carefully and refer to the images for visual guidance.
1. Preparing the Wiring Harness:
This is the most intricate part of the DIY process, where you’ll create a custom wiring harness using the TE Connectivity connectors and the Porsche coax cable.
-
Gather Components: Collect the TE connectors (blocks, sleeves, and pins), the Porsche coax cable (997 612 049 75), and shielded twisted pair wire (for the additional connections).
-
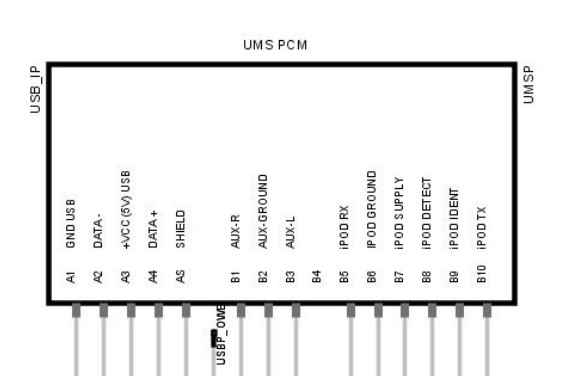
Refer to Wiring Diagrams: Utilize the wiring diagrams available online (often found in PIWIS software or service bulletins) to understand the pinouts for both the PCM connector and the center armrest connector. The diagrams from the original article are helpful references:
Center Armrest Pinout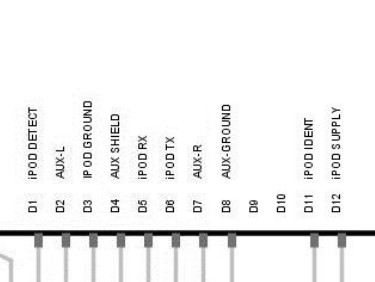 PCM Connector Pinout
 -
Solder Connector Pins: Solder wires to the TE connector pins. It’s easier to solder the wires to the pins before inserting them into the connector blocks. Use the Porsche coax cable for the audio signal wires and twisted pair for the remaining connections as per the wiring diagrams. Mimic the original wiring colors as closely as possible if desired, but focus on correct pin assignments.
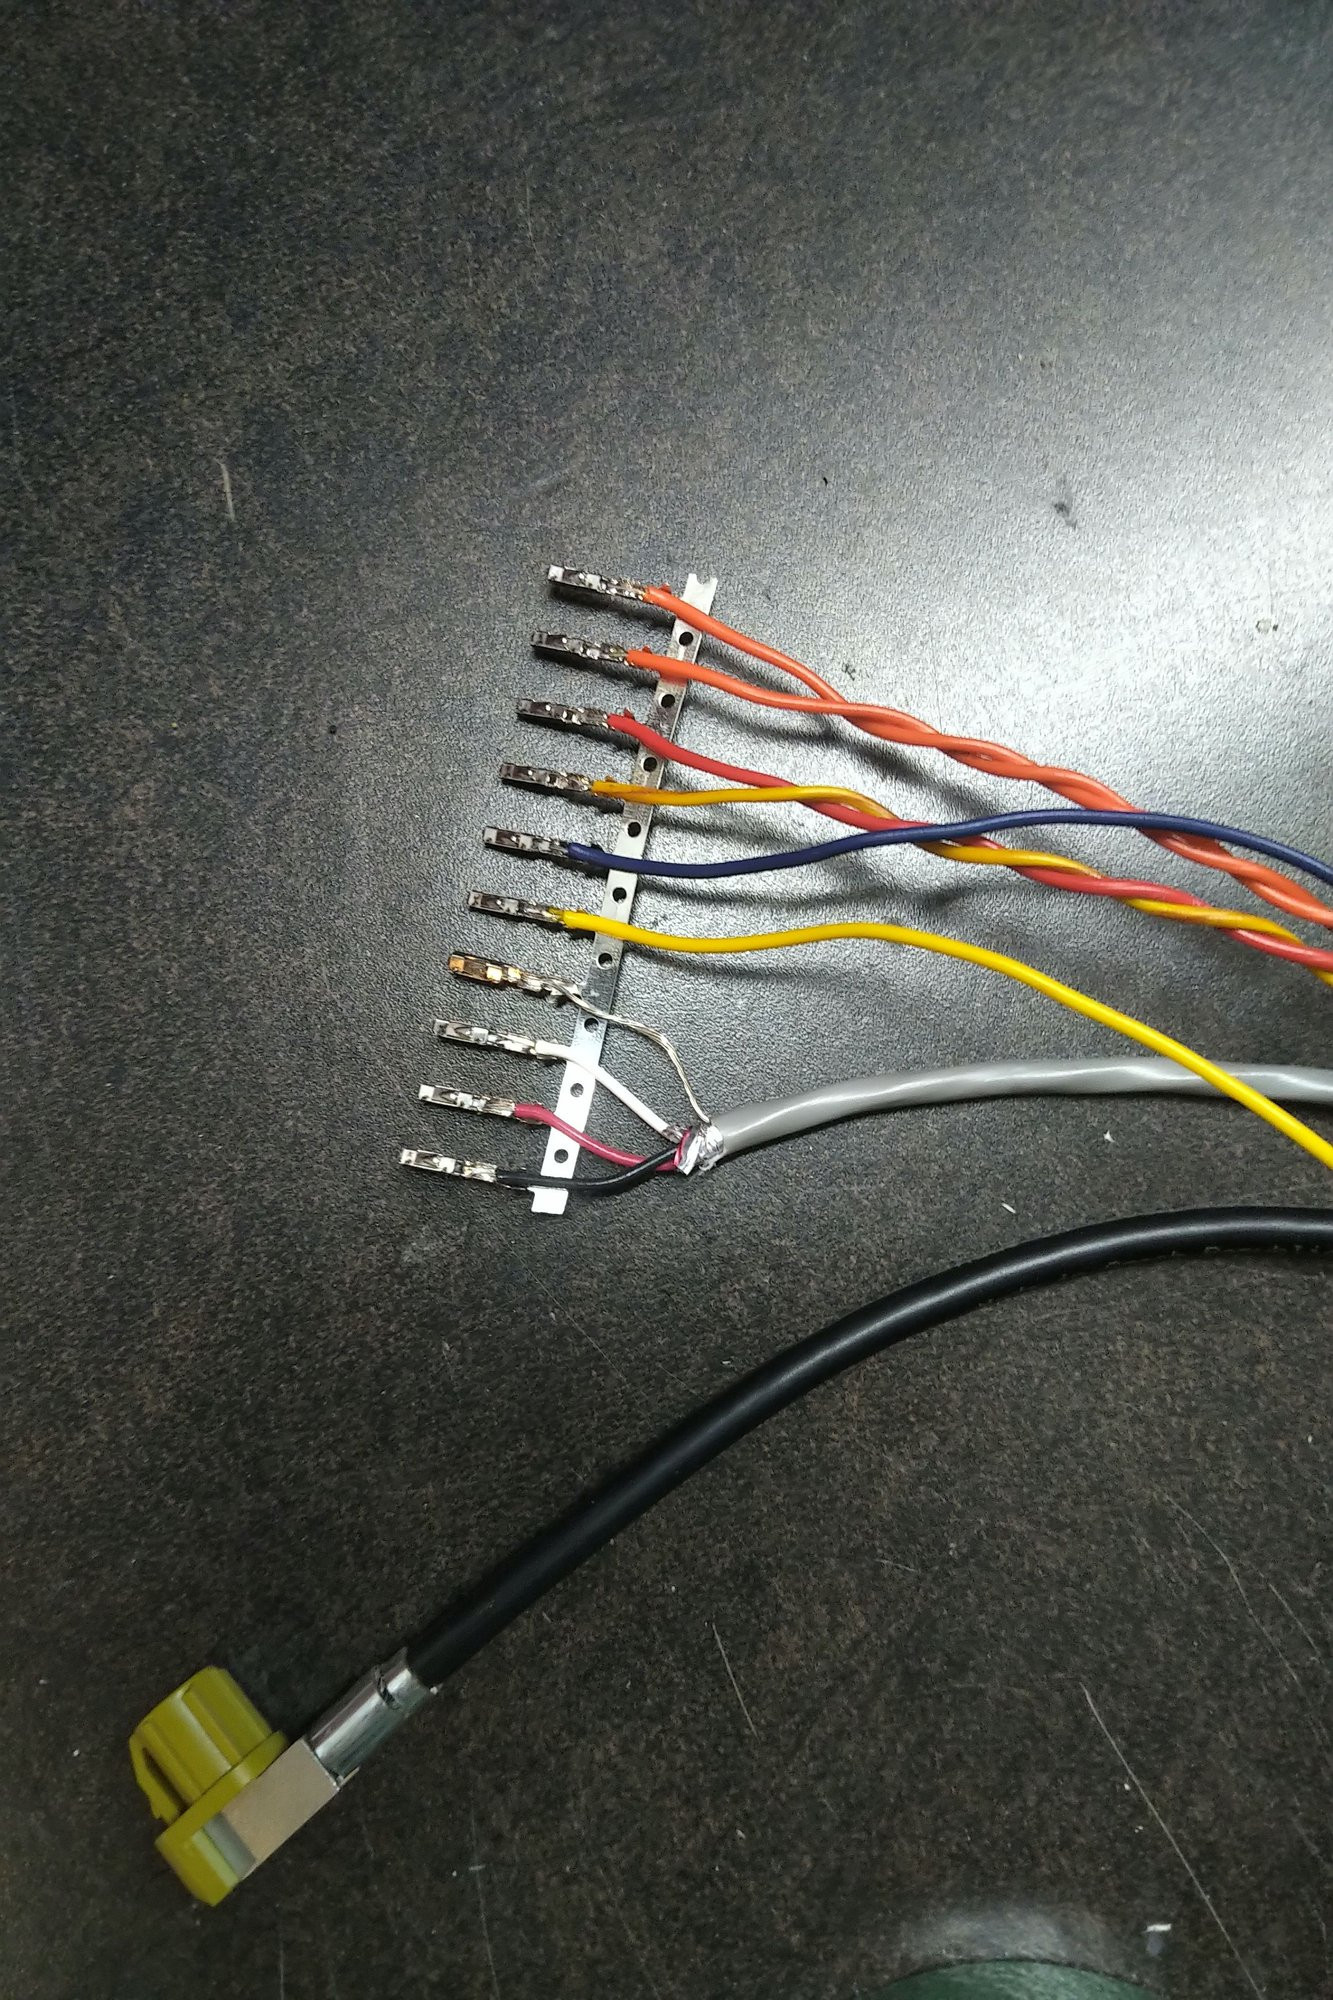 Cable Soldering
 -
Assemble Connectors: Insert the soldered pins into the correct positions within the TE connector blocks, and then slide on the connector sleeves to secure them. You’ll have two assembled connectors: one for the PCM end and one for the center armrest AUX input socket.
-
Harness Assembly: Bundle the wires together, using electrical tape to create a neat wiring harness. Leave some slack at each end for connecting to the PCM and the AUX input socket.
2. Center Console Removal and Cable Routing:
-
Remove Center Console: Carefully remove the center console. Refer to online guides and videos specific to your Porsche model (e.g., 997, 987, Cayenne) for detailed instructions. Be cautious with airbag wiring if you choose not to fully disconnect the console. A helpful guide for 997 console removal can be found on Rennlist: https://rennlist.com/forums/997-gt2-…moval-diy.html
-
Remove Lighter Socket and Coin Holder: Remove the lighter socket from the armrest cubby (this can be tricky) and the coin holder (usually held by one screw and clips). The AUX input wiring will pass through the lighter socket hole.
-
Install U-Clamps: Install the U-clamps (999 507 908 01) onto the coin holder. These clamps are essential for securing the AUX input adapter and preventing gaps.
 U-Clamps Installed
 -
Route Wiring Harness: Thread the DIY wiring harness from the center console area towards the PCM location behind the center stack. Route it through the lighter socket hole and loop it through the clamps on the AUX input interface unit as shown in the service bulletin diagrams.
 Cable Routing
 -
Install AUX Input Socket: Place the AUX input socket (997 642 465 00 01C) into the center armrest, secure it with the rubber mat (997 553 613 00), and use the longer screws (999 073 429 01) to fasten it. Reinstall the coin holder.
3. PCM Unit Connection:
-
Remove PCM Unit: Carefully remove the PCM unit from the center stack. There are usually release mechanisms on the sides of the unit.
-
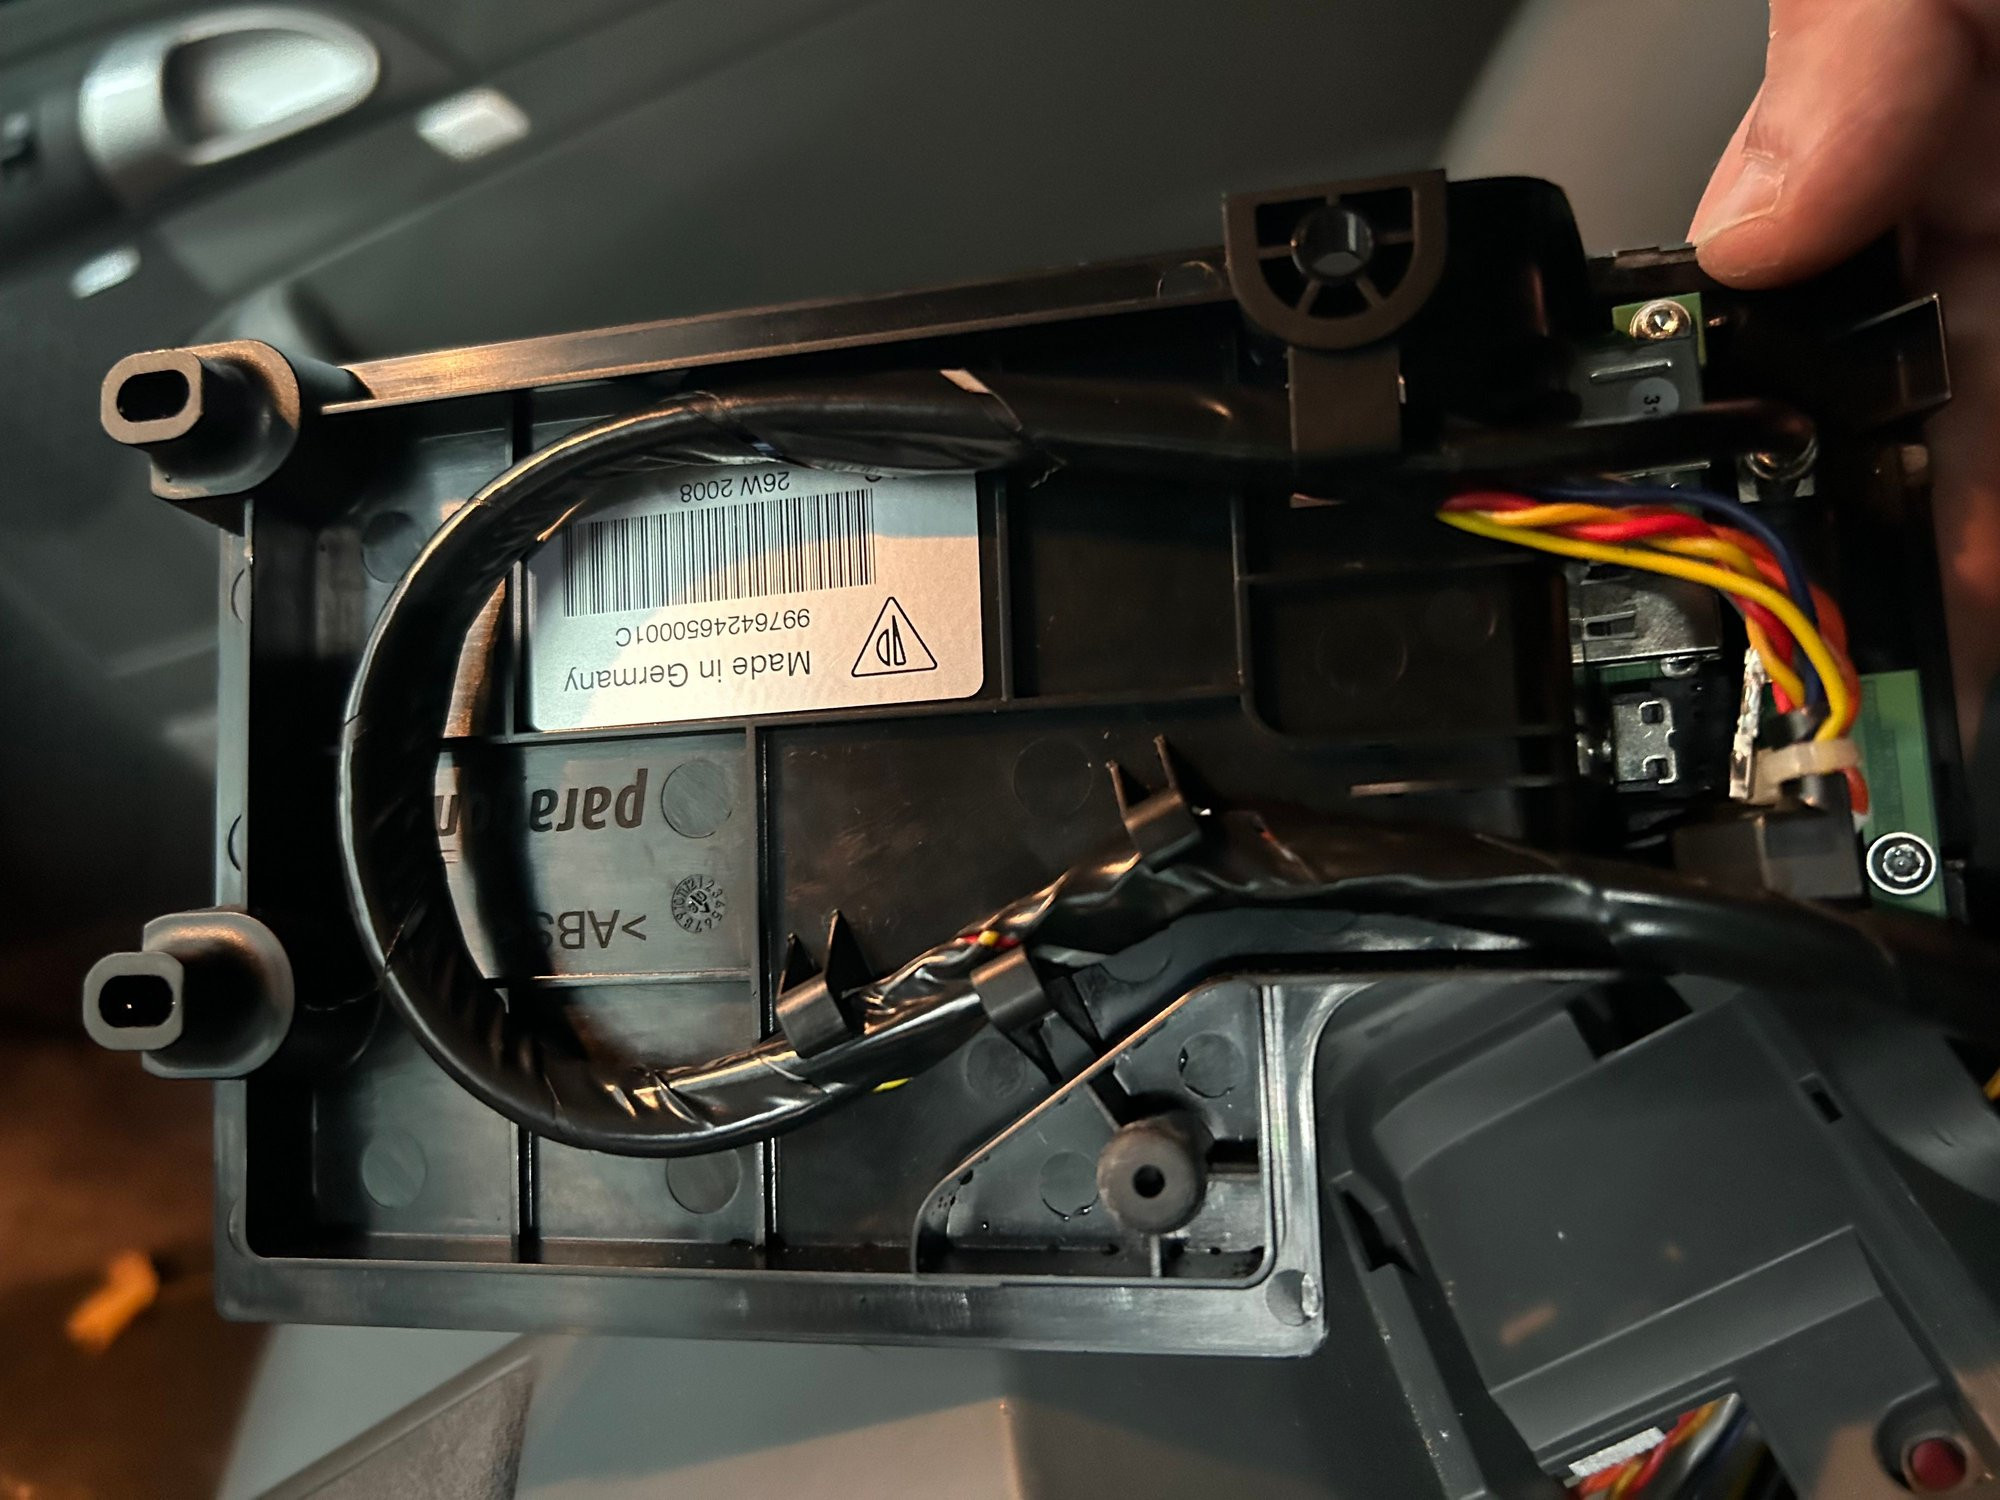
Connect DIY Harness to PCM: Connect the PCM end of your DIY wiring harness to the large connector block at the back of the PCM. Refer to the pinout diagrams to ensure you plug the connector into the correct location (bottom left as viewed from the back, black block to the left of the blue one). Connect the Porsche coax cable to the corresponding coax connector on the back of the PCM (black connector in the image).
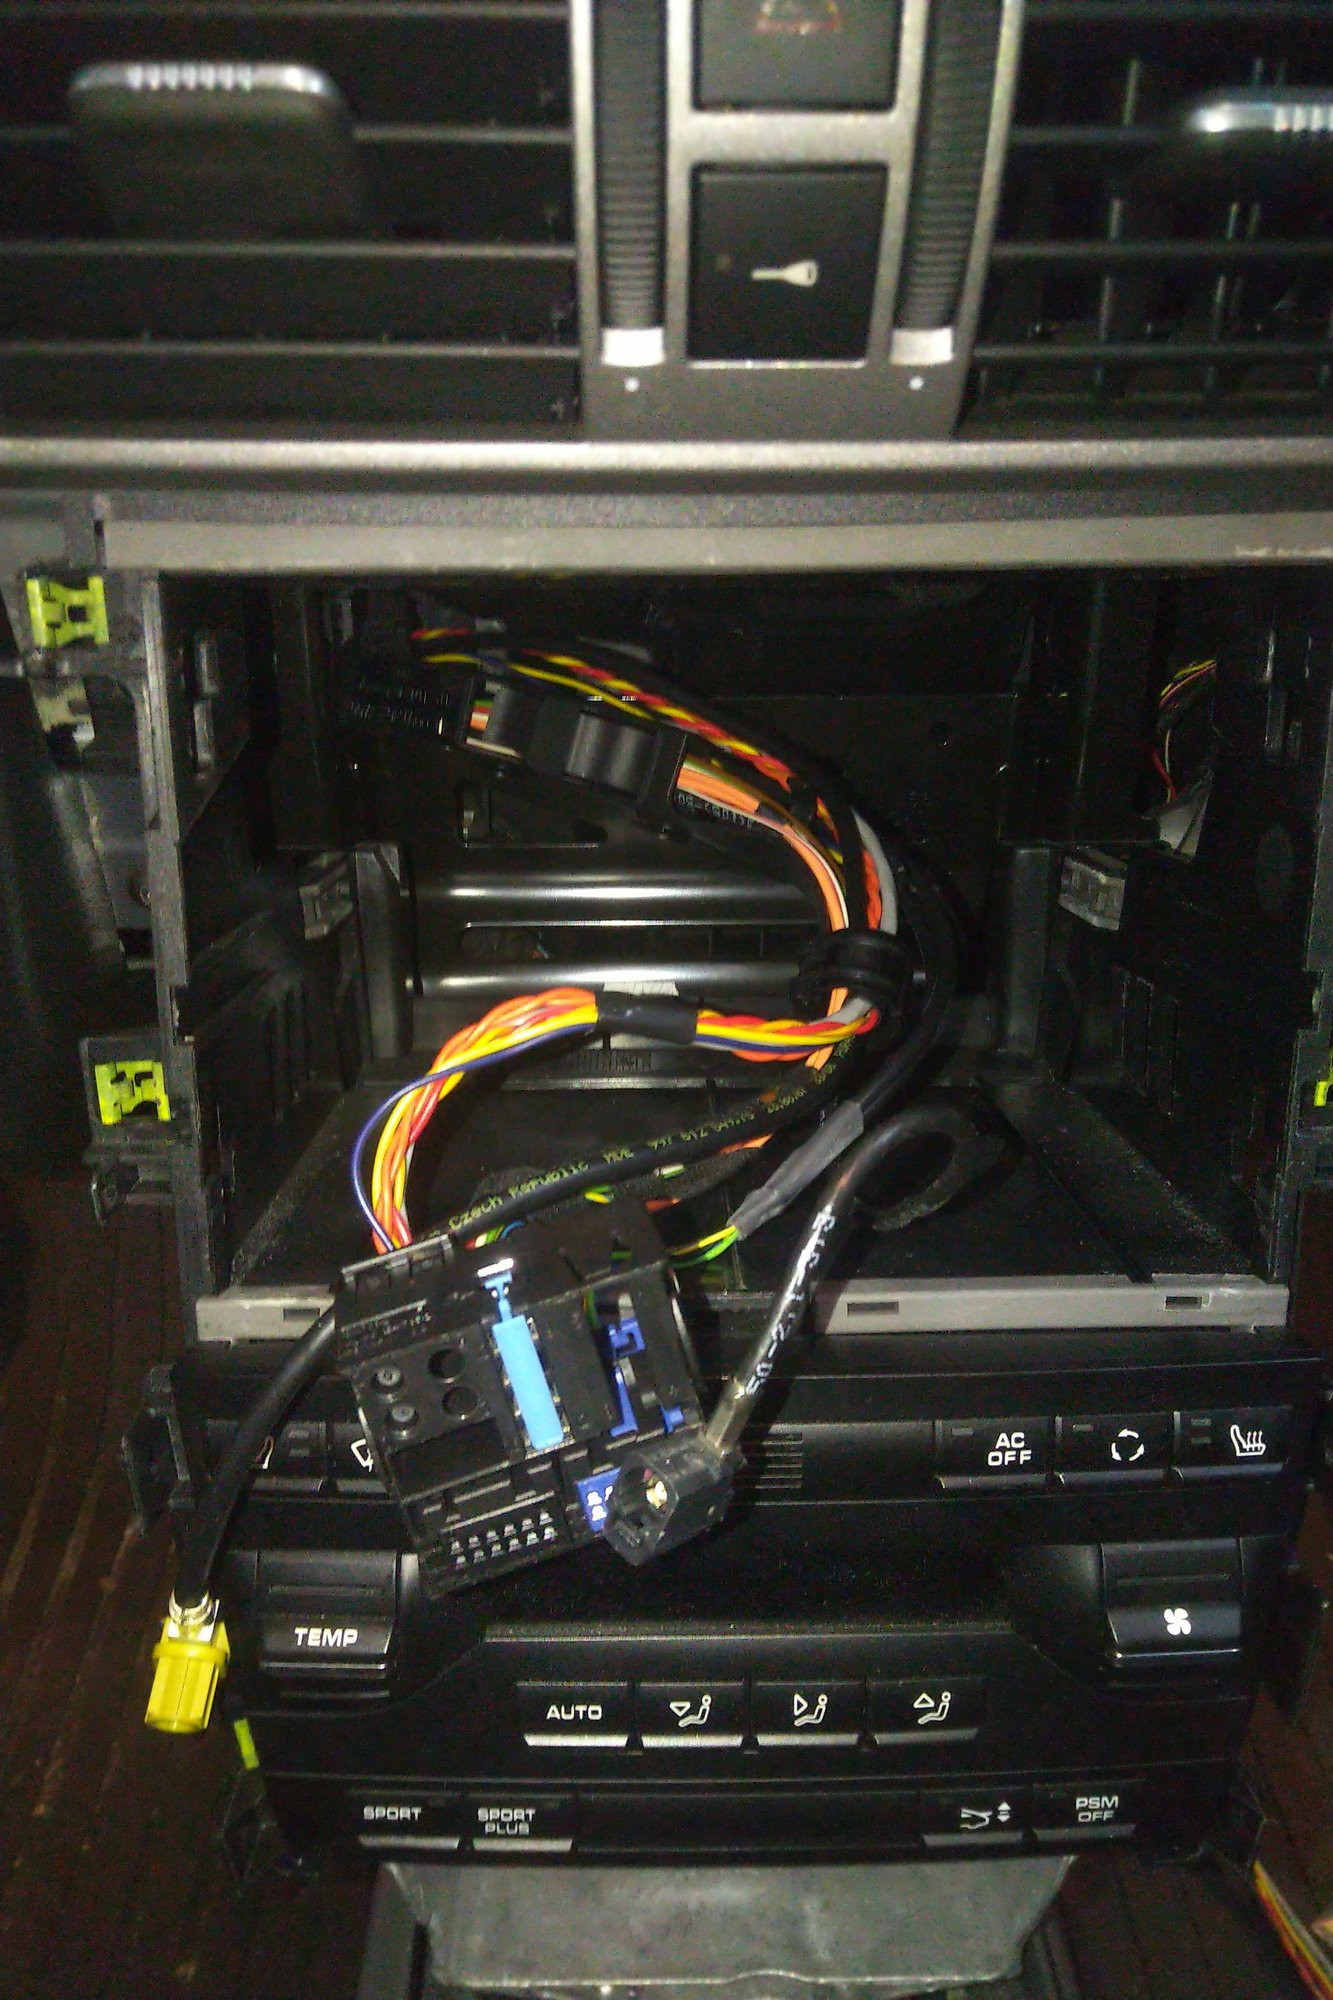 PCM Connector
 -
Reinstall PCM Unit: Carefully reinstall the PCM unit back into the center stack, ensuring all connections are secure and the wiring is neatly routed.
-
Reassemble Center Console: Reassemble the center console, reversing the removal process.
4. PCM Coding for AUX Activation:
- Obtain Activation Code: Purchase an AUX input activation code from a reputable online vendor specializing in Porsche coding (e.g., Fast-Code).
- Connect PIWIS: Connect your PIWIS clone to your Porsche’s OBD-II port and power it up.
- Navigate to PCM Coding: Using PIWIS, navigate to the PCM control unit and access the coding/programming functions. The exact menu path may vary slightly depending on your PIWIS version, but you’ll typically look for “PCM,” then “Coding” or “Adaptations.”
- Enter Activation Code: Enter the purchased activation code into the PIWIS system when prompted. Follow the PIWIS instructions to apply the coding and activate the AUX input function.
- Enable AUX in PCM Menu: After coding, navigate through the PCM menu settings (usually under “Source” or “Audio”) and ensure the “AUX” input option is now available and enabled.
5. Final Check and Enjoy!
-
Test AUX Input: Connect an audio source (smartphone, MP3 player) to the newly installed AUX input jack in your center armrest.
-
Select AUX Source on PCM: Select “AUX” as the audio source on your PCM.
-
Verify Audio Output: Play audio from your connected device and confirm that sound is playing through your Porsche’s speakers.
 Finished AUX Input
Congratulations! You have successfully enabled AUX input on your Porsche PCM 3.0 or PCM 3.1 system through a cost-effective DIY method. You can now enjoy your favorite music and audio through your original PCM, bridging the classic and modern worlds in your Porsche.

