Upgrade Your BMW G Series with ACC Features: A Comprehensive Retrofit Guide
Are you looking to enhance the driving experience of your BMW G series with advanced driver assistance features? Retrofitting the BMW ACC Features Remote Coding Package For G Series, specifically the Driving Assistant Professional (5AU), is a groundbreaking upgrade that brings cutting-edge technology to your fingertips. This guide provides an in-depth look into the world’s first fully detailed 5AU retrofit, transforming your BMW with features like Adaptive Cruise Control (ACC) with Stop&Go, Lane Keeping Assistant, and more.
Originally, my 2019 BMW 330i (G20), with iLevel 11/2023.50 and features S544, S5AL, 5AS, 5AV, 5DN, lacked even basic functionalities like Android Auto. However, after updating the software and navigating BMW ConnectedDrive services, I unlocked these features and set my sights on a more ambitious upgrade: the Driving Assistant Professional. Given my vehicle already possessed an omnidirectional camera system, the 5AU retrofit seemed like the next logical step to elevate its capabilities.
Project: Retrofitting Driving Assistant Professional (SA5AU)
The Driving Assistant Professional (SA 5AU) package is a suite of advanced driver assistance systems designed to provide a safer and more comfortable driving experience. This retrofit project aims to integrate these features into BMW G series models, even if they were not originally equipped. The core functionalities of SA 5AU include:
- Distance Control (ACC with Stop&Go): Automatically maintains a set speed and distance from the vehicle ahead, even in stop-and-go traffic.
- Traffic Light Detection: Recognizes traffic lights and assists in adhering to signals.
- Front Collision Warning with Brake Intervention: Warns the driver of potential frontal collisions and can automatically apply brakes to mitigate or avoid impact.
- Evasion Assistant: Supports evasive steering maneuvers to avoid obstacles.
- Automatic Speed Limit Assist: Adjusts vehicle speed based on detected speed limits.
- Rear Collision Prevention: Monitors rear traffic and takes preventative measures in case of an impending rear collision.
- Crossroads Warning with Brake Intervention: Alerts the driver to crossing traffic at intersections and can apply brakes if necessary.
- Steering and Lane Control Assistant: Provides continuous steering assistance to keep the vehicle centered in its lane.
- Hazard Alert (with BMW Live Cockpit Professional SA 6U3): Warns of detected hazards on the road ahead.
- Emergency Stop Assistant: Can bring the vehicle to a controlled stop in case of driver incapacitation.
- Crossing-traffic Warning: Detects and warns of cross-traffic when reversing or at junctions.
- Emergency Lane Assistant: Guides the vehicle to the emergency lane in critical situations.
- Speed Limit Display with No-overtaking Indicator: Shows current speed limits and no-overtaking zones.
- Speed Limit Device: Allows setting a maximum speed limit.
- Lane Keeping Assistant with Active Side Collision Protection (with BMW Live Cockpit Professional SA 6U3): Actively keeps the vehicle in the lane and provides collision avoidance for side impacts.
- Lane Departure Warning with Lane Return: Warns if the vehicle drifts out of its lane and can steer it back.
- Lane Change Assistant: Assists in changing lanes safely when initiated by the driver.
- Lane Change Warning: Warns of vehicles in the blind spot during lane changes.
- Road Priority Warning: Alerts to priority road situations.
Note: The exact features and functionalities of Driving Assistant Professional (SA 5AU) can vary based on your BMW’s country of delivery, model year, software version, and existing equipment.
Key Features of BMW Active Driving Assistant Professional
The BMW Active Driving Assistant Professional significantly enhances highway driving with features designed for convenience and safety:
- Lane Keeping Assistant: Utilizing cameras, the system identifies lane markings and ensures the vehicle stays centered. It provides gentle steering corrections if drifting is detected.
- Adaptive Cruise Control (ACC): Goes beyond maintaining a set speed by using radar to dynamically adjust speed based on traffic flow. It keeps a safe distance from the car ahead, enhancing safety and comfort in varying traffic conditions.
- Automatic Lane Change Assistant: A standout feature that allows the vehicle to autonomously change lanes. After the driver indicates intent with the turn signal, the system checks for safe gaps in traffic and executes the lane change maneuver.
- Evasion Aid: In critical situations where a frontal collision is imminent, this system actively assists the driver in steering around obstacles, while also considering adjacent lanes to avoid further hazards.
- Traffic Jam Assistant: Designed for congested traffic scenarios, this feature takes over acceleration, braking, and steering at speeds up to 40 mph, drastically reducing driver fatigue in stop-and-go conditions.
Implementing SA5AU also involves considerations for existing options like 5DF and 5AS. During coding, it’s crucial to remove 5AS and/or 5DF from the vehicle order (VO) after adding 5AU to ensure proper system integration and avoid conflicts. Furthermore, 5AU utilizes the FRR-02 Long Range Radar sensor, a more advanced component compared to the FRR-01 Short Range radar used in older systems like 5AT (Active Driving Assistant Plus).
Essential Components for the Retrofit
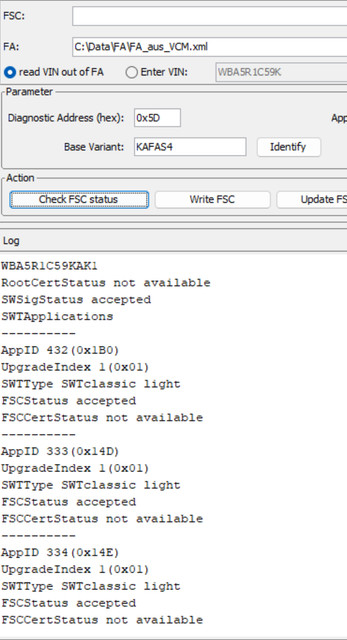
Achieving this comprehensive retrofit requires specific hardware components and, crucially, Functional Software Certificates (FSC) injection. Obtaining the correct FSCs for the KAFAS4 High camera system is paramount for enabling the full suite of features.
Required FSC Codes for KAFAS4 High:
- AppID 432 (0x1B0) – High-Beam assistant (Required)
- AppID 333 (0x14D) – Lane departure warning (Required)
- AppID 334 (0x14E) – Speed Limit Info (Required)
- AppID 335 (0x1AD) – Right way warner (Optional)
- AppID 336 (0x150) – High assist premium (Optional)
These FSC codes are essential for activating the core functionalities of the Driving Assistant Professional system after hardware installation.
BMW KAFAS4 High FSC Codes and App IDs for Driving Assistant Professional Retrofit
Detailed Parts List for BMW ACC Retrofit:
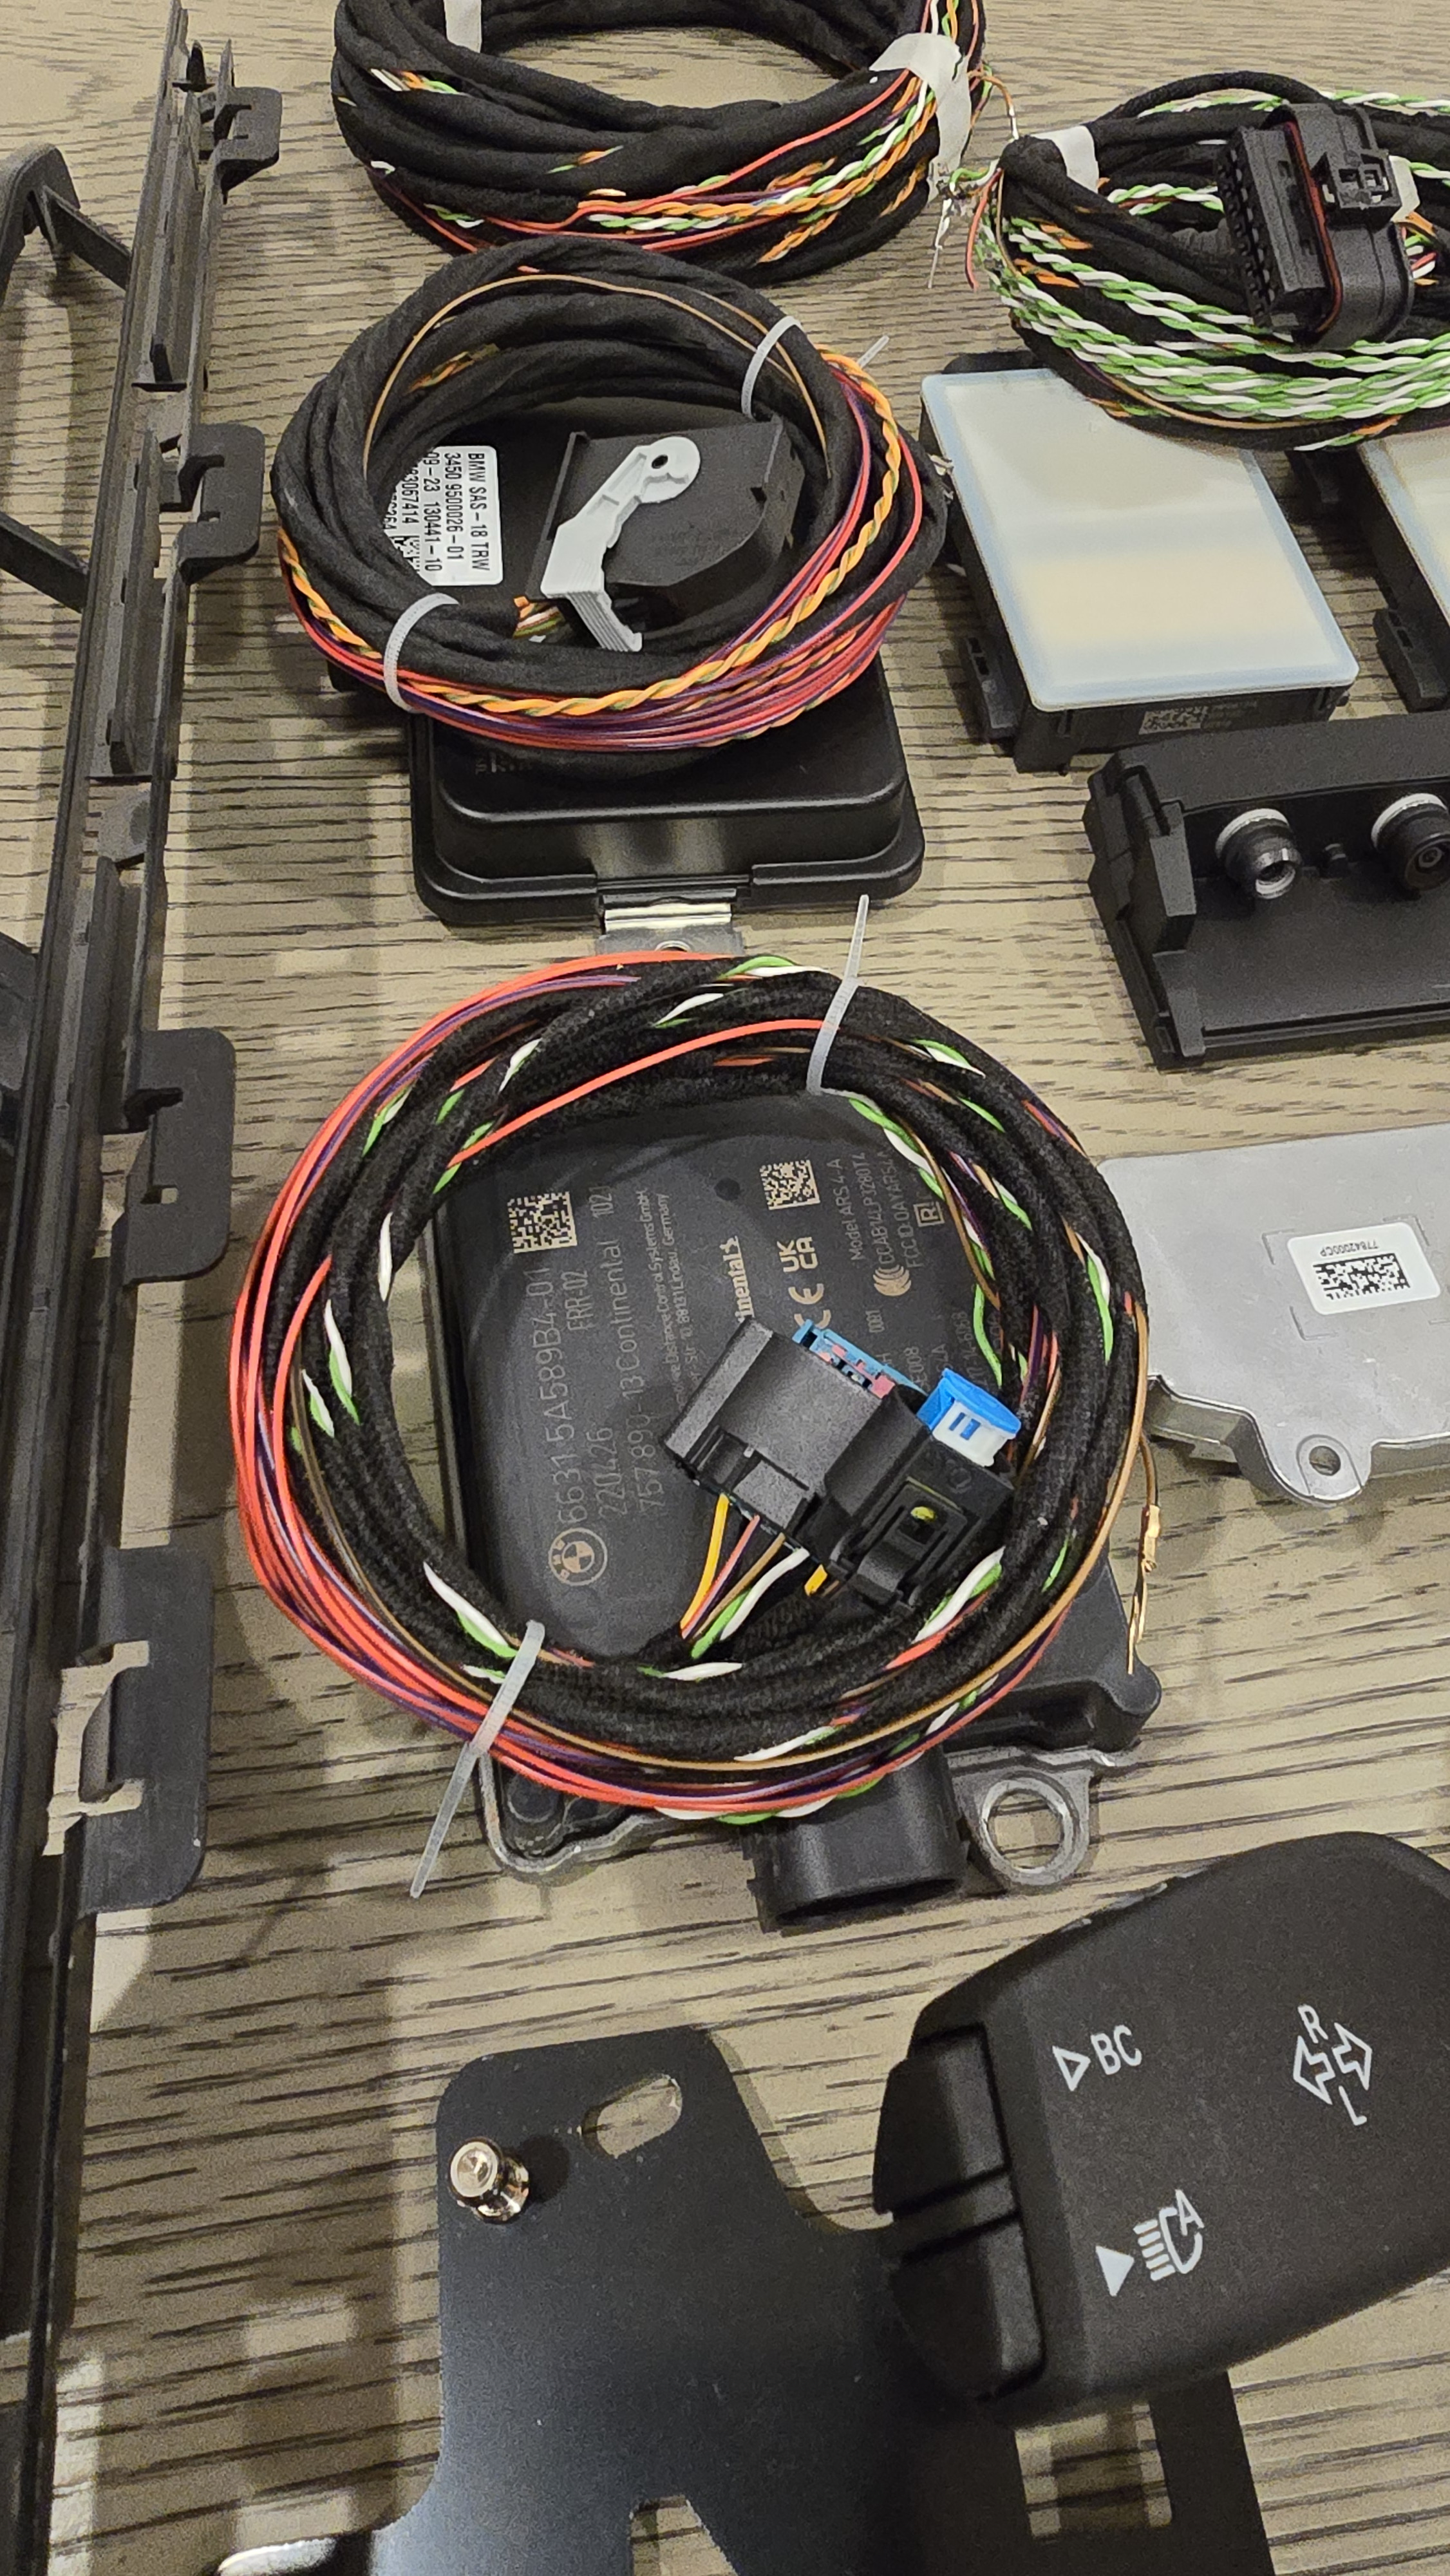
To successfully retrofit the BMW ACC Features and Driving Assistant Professional, you will need the following components:
- ACC Long Range Radar (FRR-02) (Part Number: 66316897034)
- Front Short Range Radar (x2) (Part Number: 6893736)
- Kafas4 High Camera (Part Number: 66515A5A1E3)
- Front Mesh for mid part of the front bumper (for ACC radar installation) (Part Number: 51117464270)
- Steering Wheel Buttons (for ACC control) (Part Number: 9873222 / 61319461220)
- HOD Emulator (Hands-On Detection Emulator, if your steering wheel is not HOD-equipped)
- DCS (Driver Camera System) (Part Number: 8715836)
- Auto High Beam Stalk (Part Number: 61319437977)
- Kafas4 High Trim for windshield (upper and lower) (Part Numbers: 51169108982 + 51169108979)
- SAS Module (Steering Angle Sensor, SAS3) (Part Number: 34509500025)
- Front Radar Bracket (Part Number: 6882544)
- Steering wheel trim for LED + buttons
- Wiring Harness (for Front Short range radars, Long Range radar, DCS, SAS3, Rear Radar, PMA, TRSVC)
- Kafas High Windshield (with necessary cutouts for the camera system) (Part Number: 51317477267)
All of these parts can be acquired from specialized vendors like DriverAssistPro, which offers complete retrofit kits for convenience.
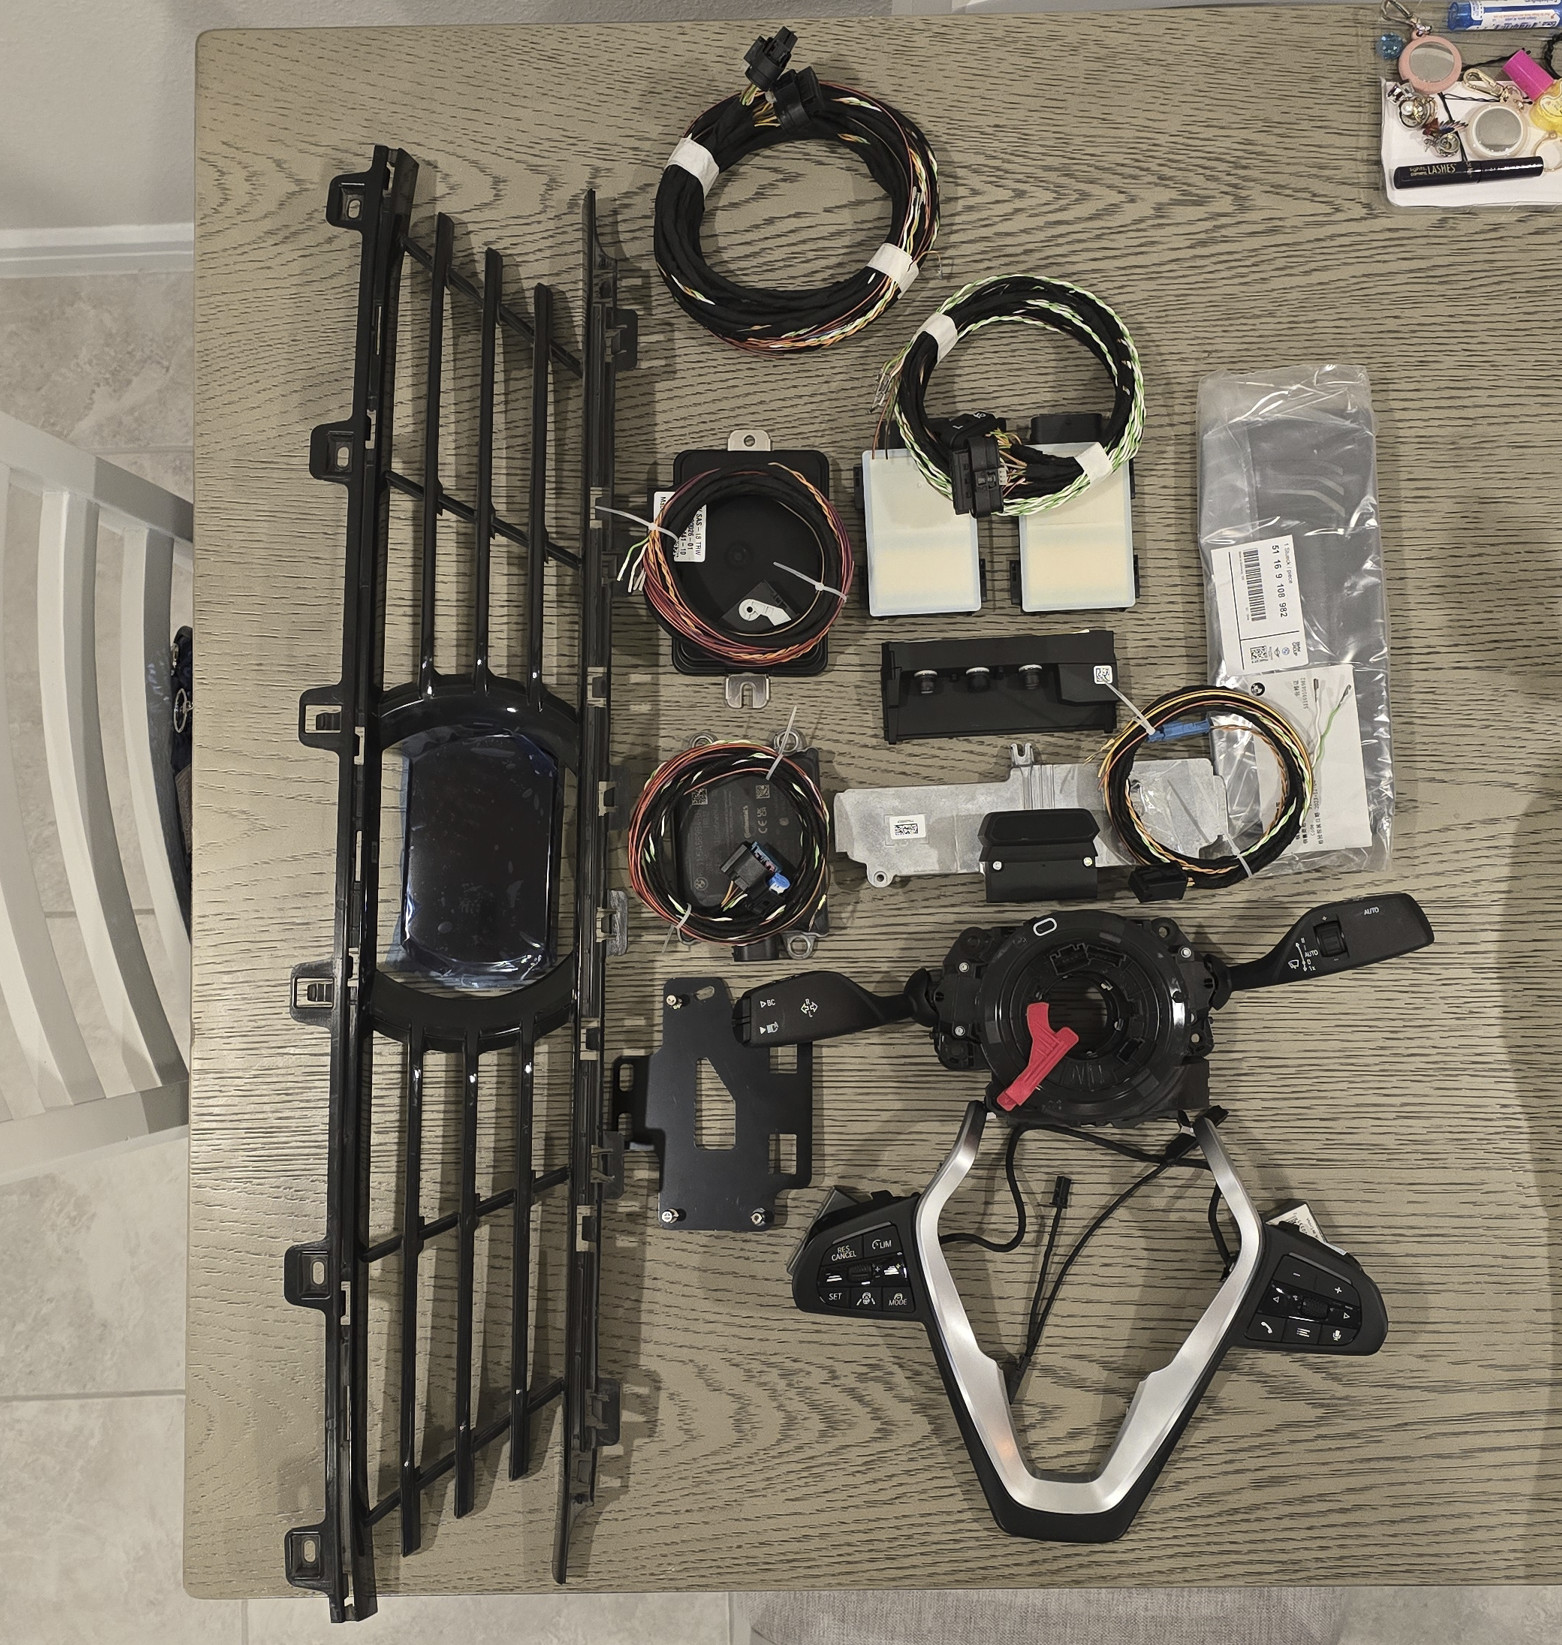 BMW G Series ACC Retrofit Parts Kit
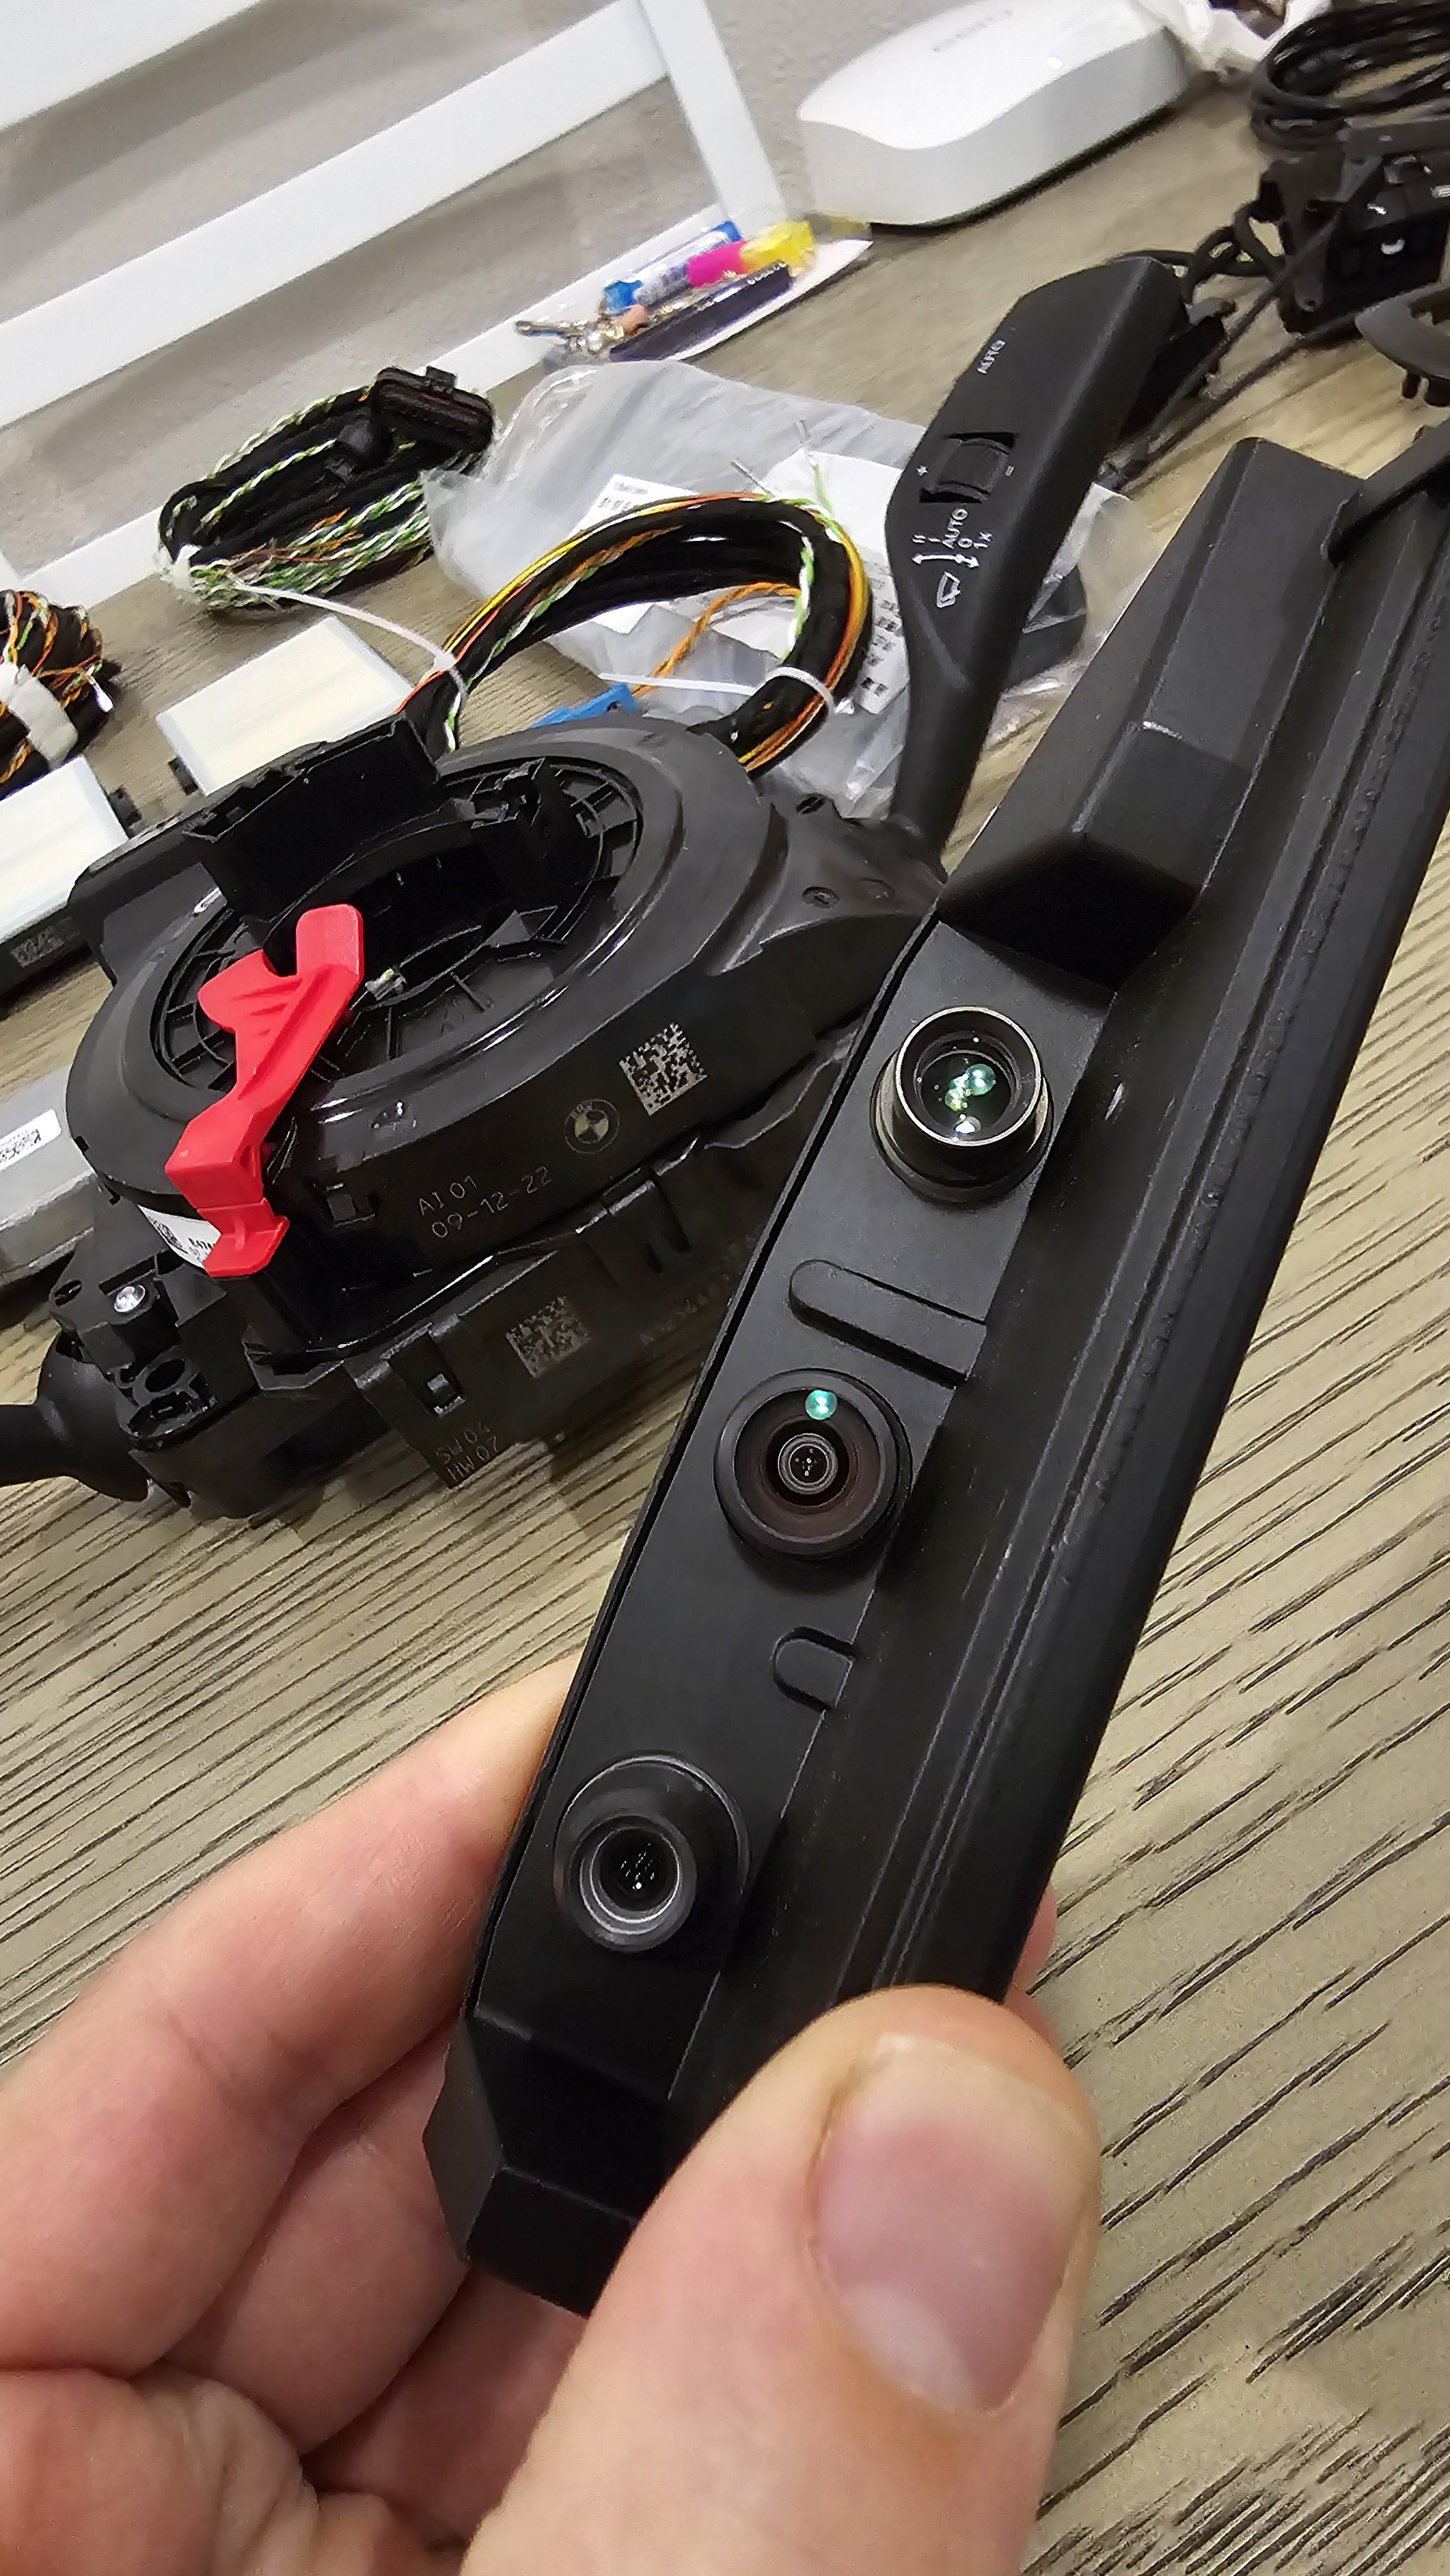 BMW G Series ACC Radar Sensors and Camera
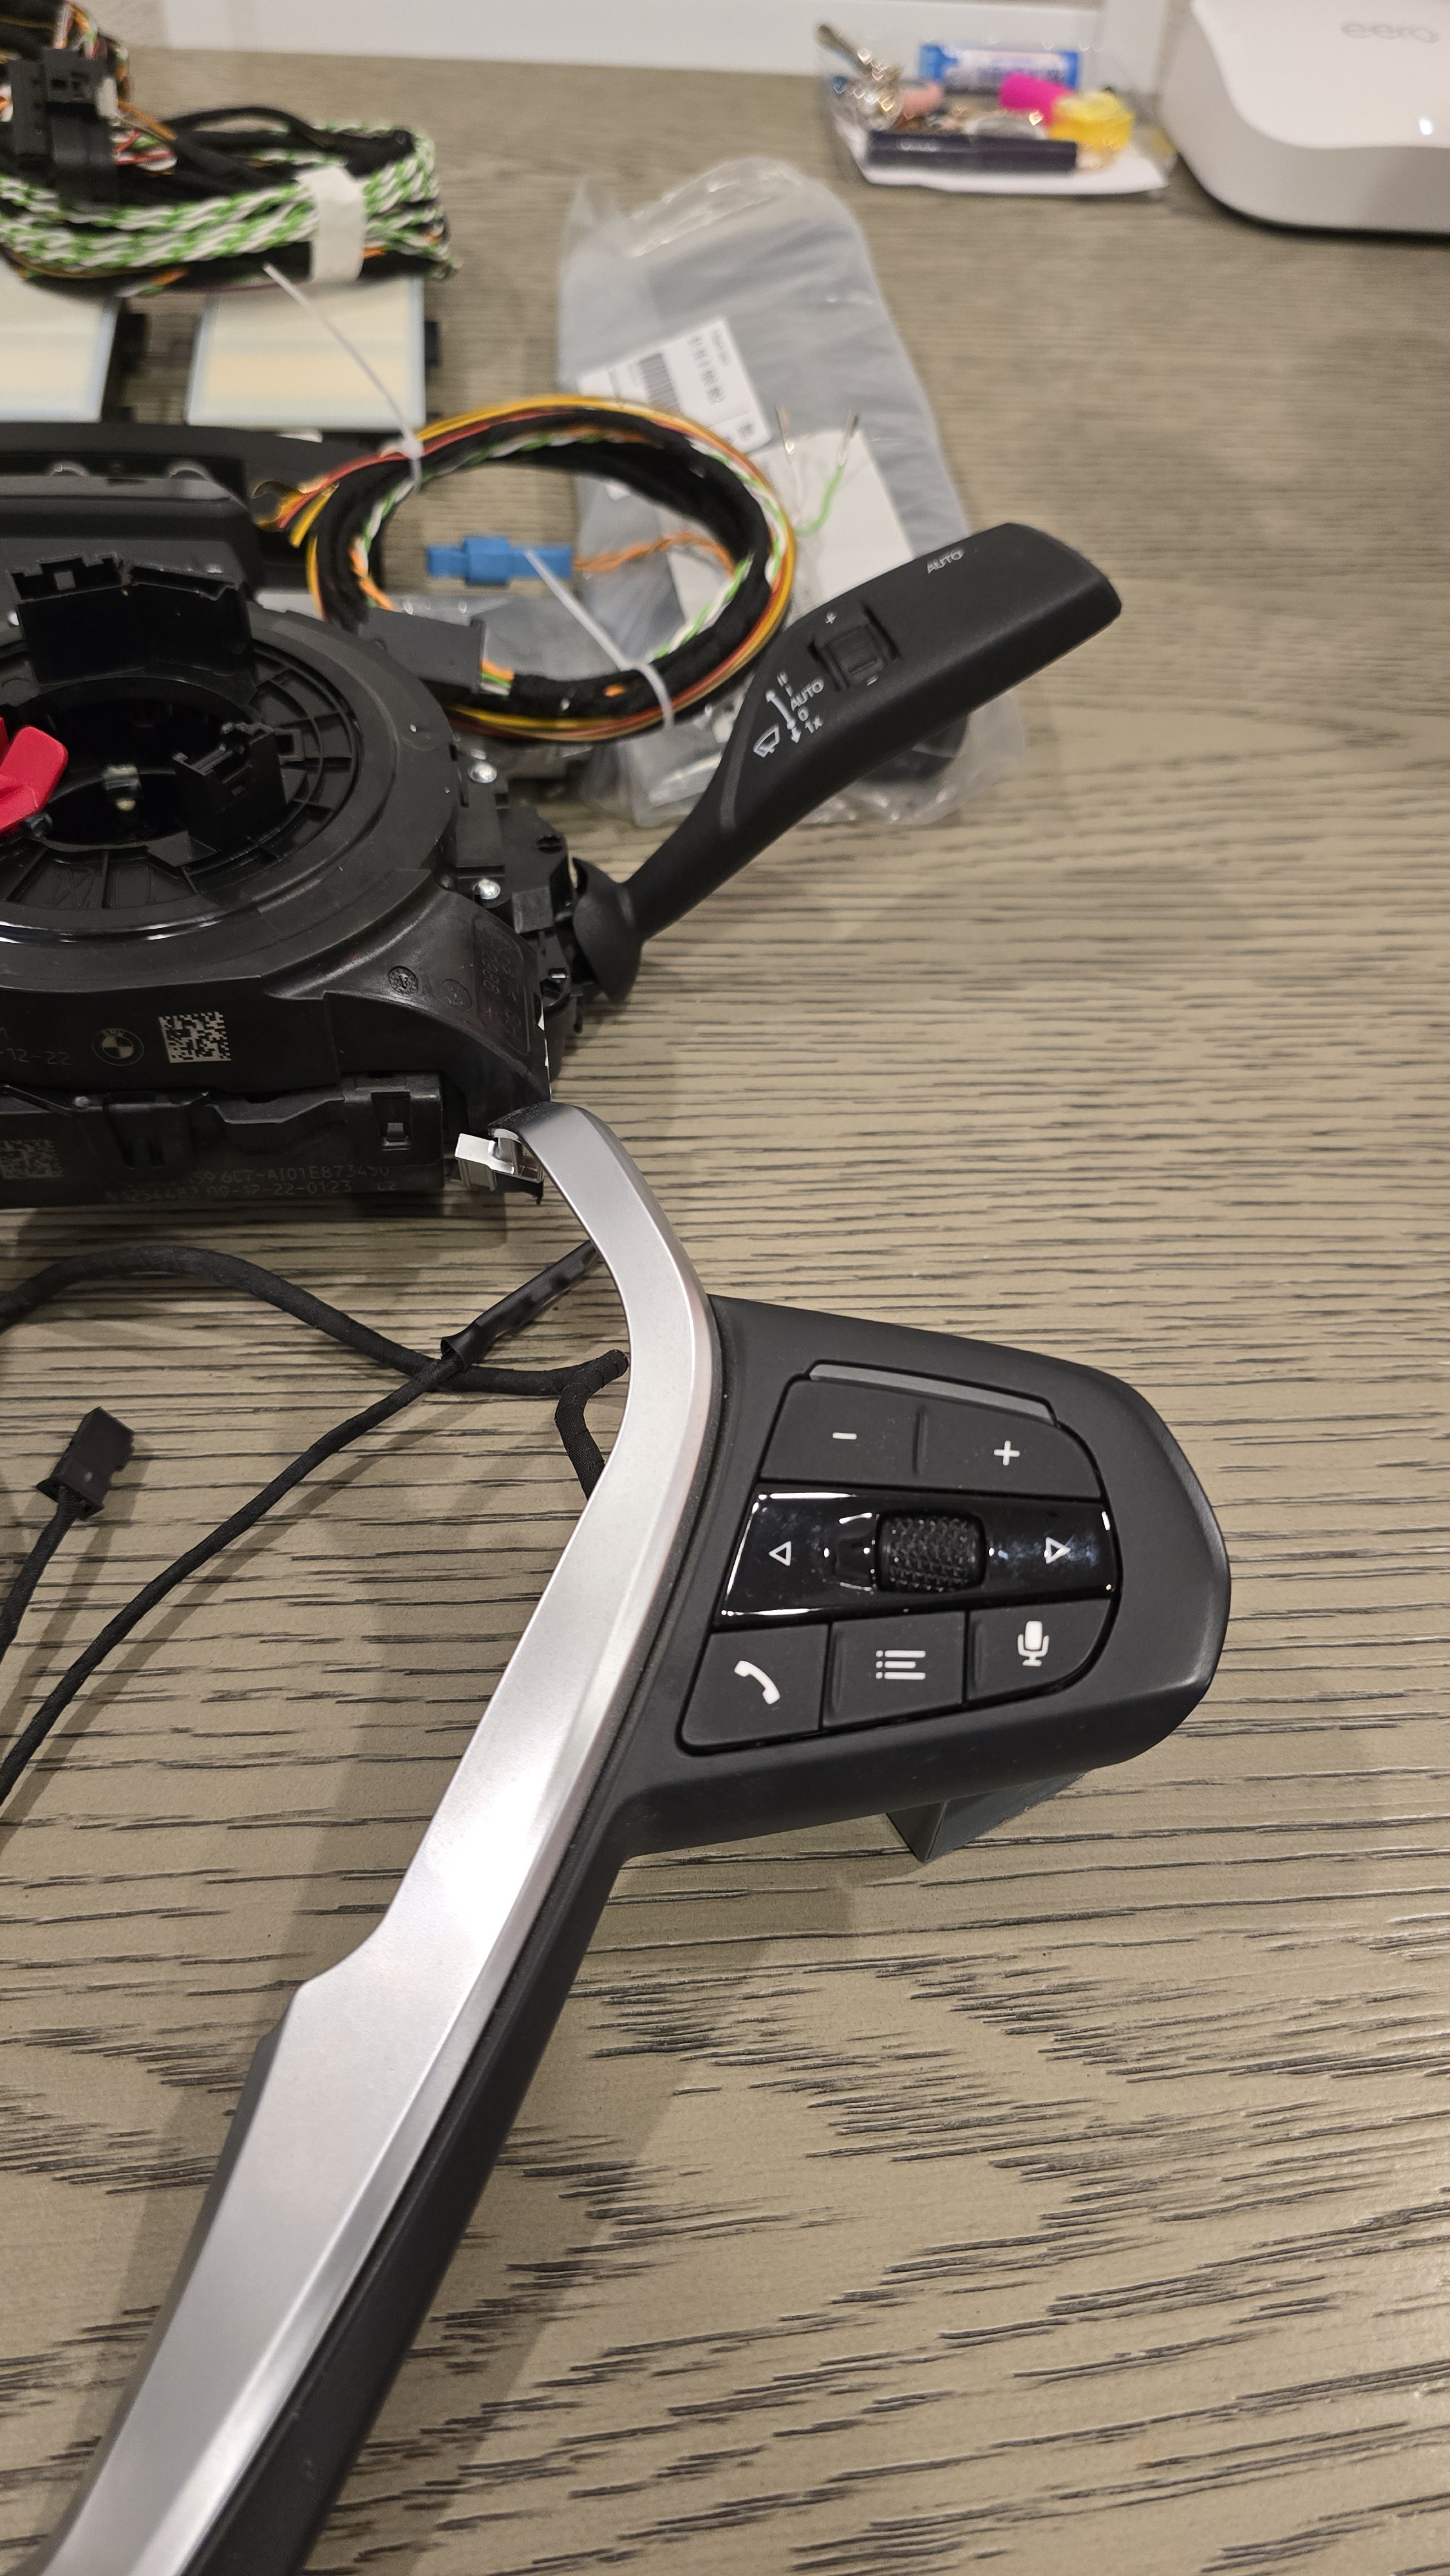 BMW G Series Steering Wheel with ACC Buttons
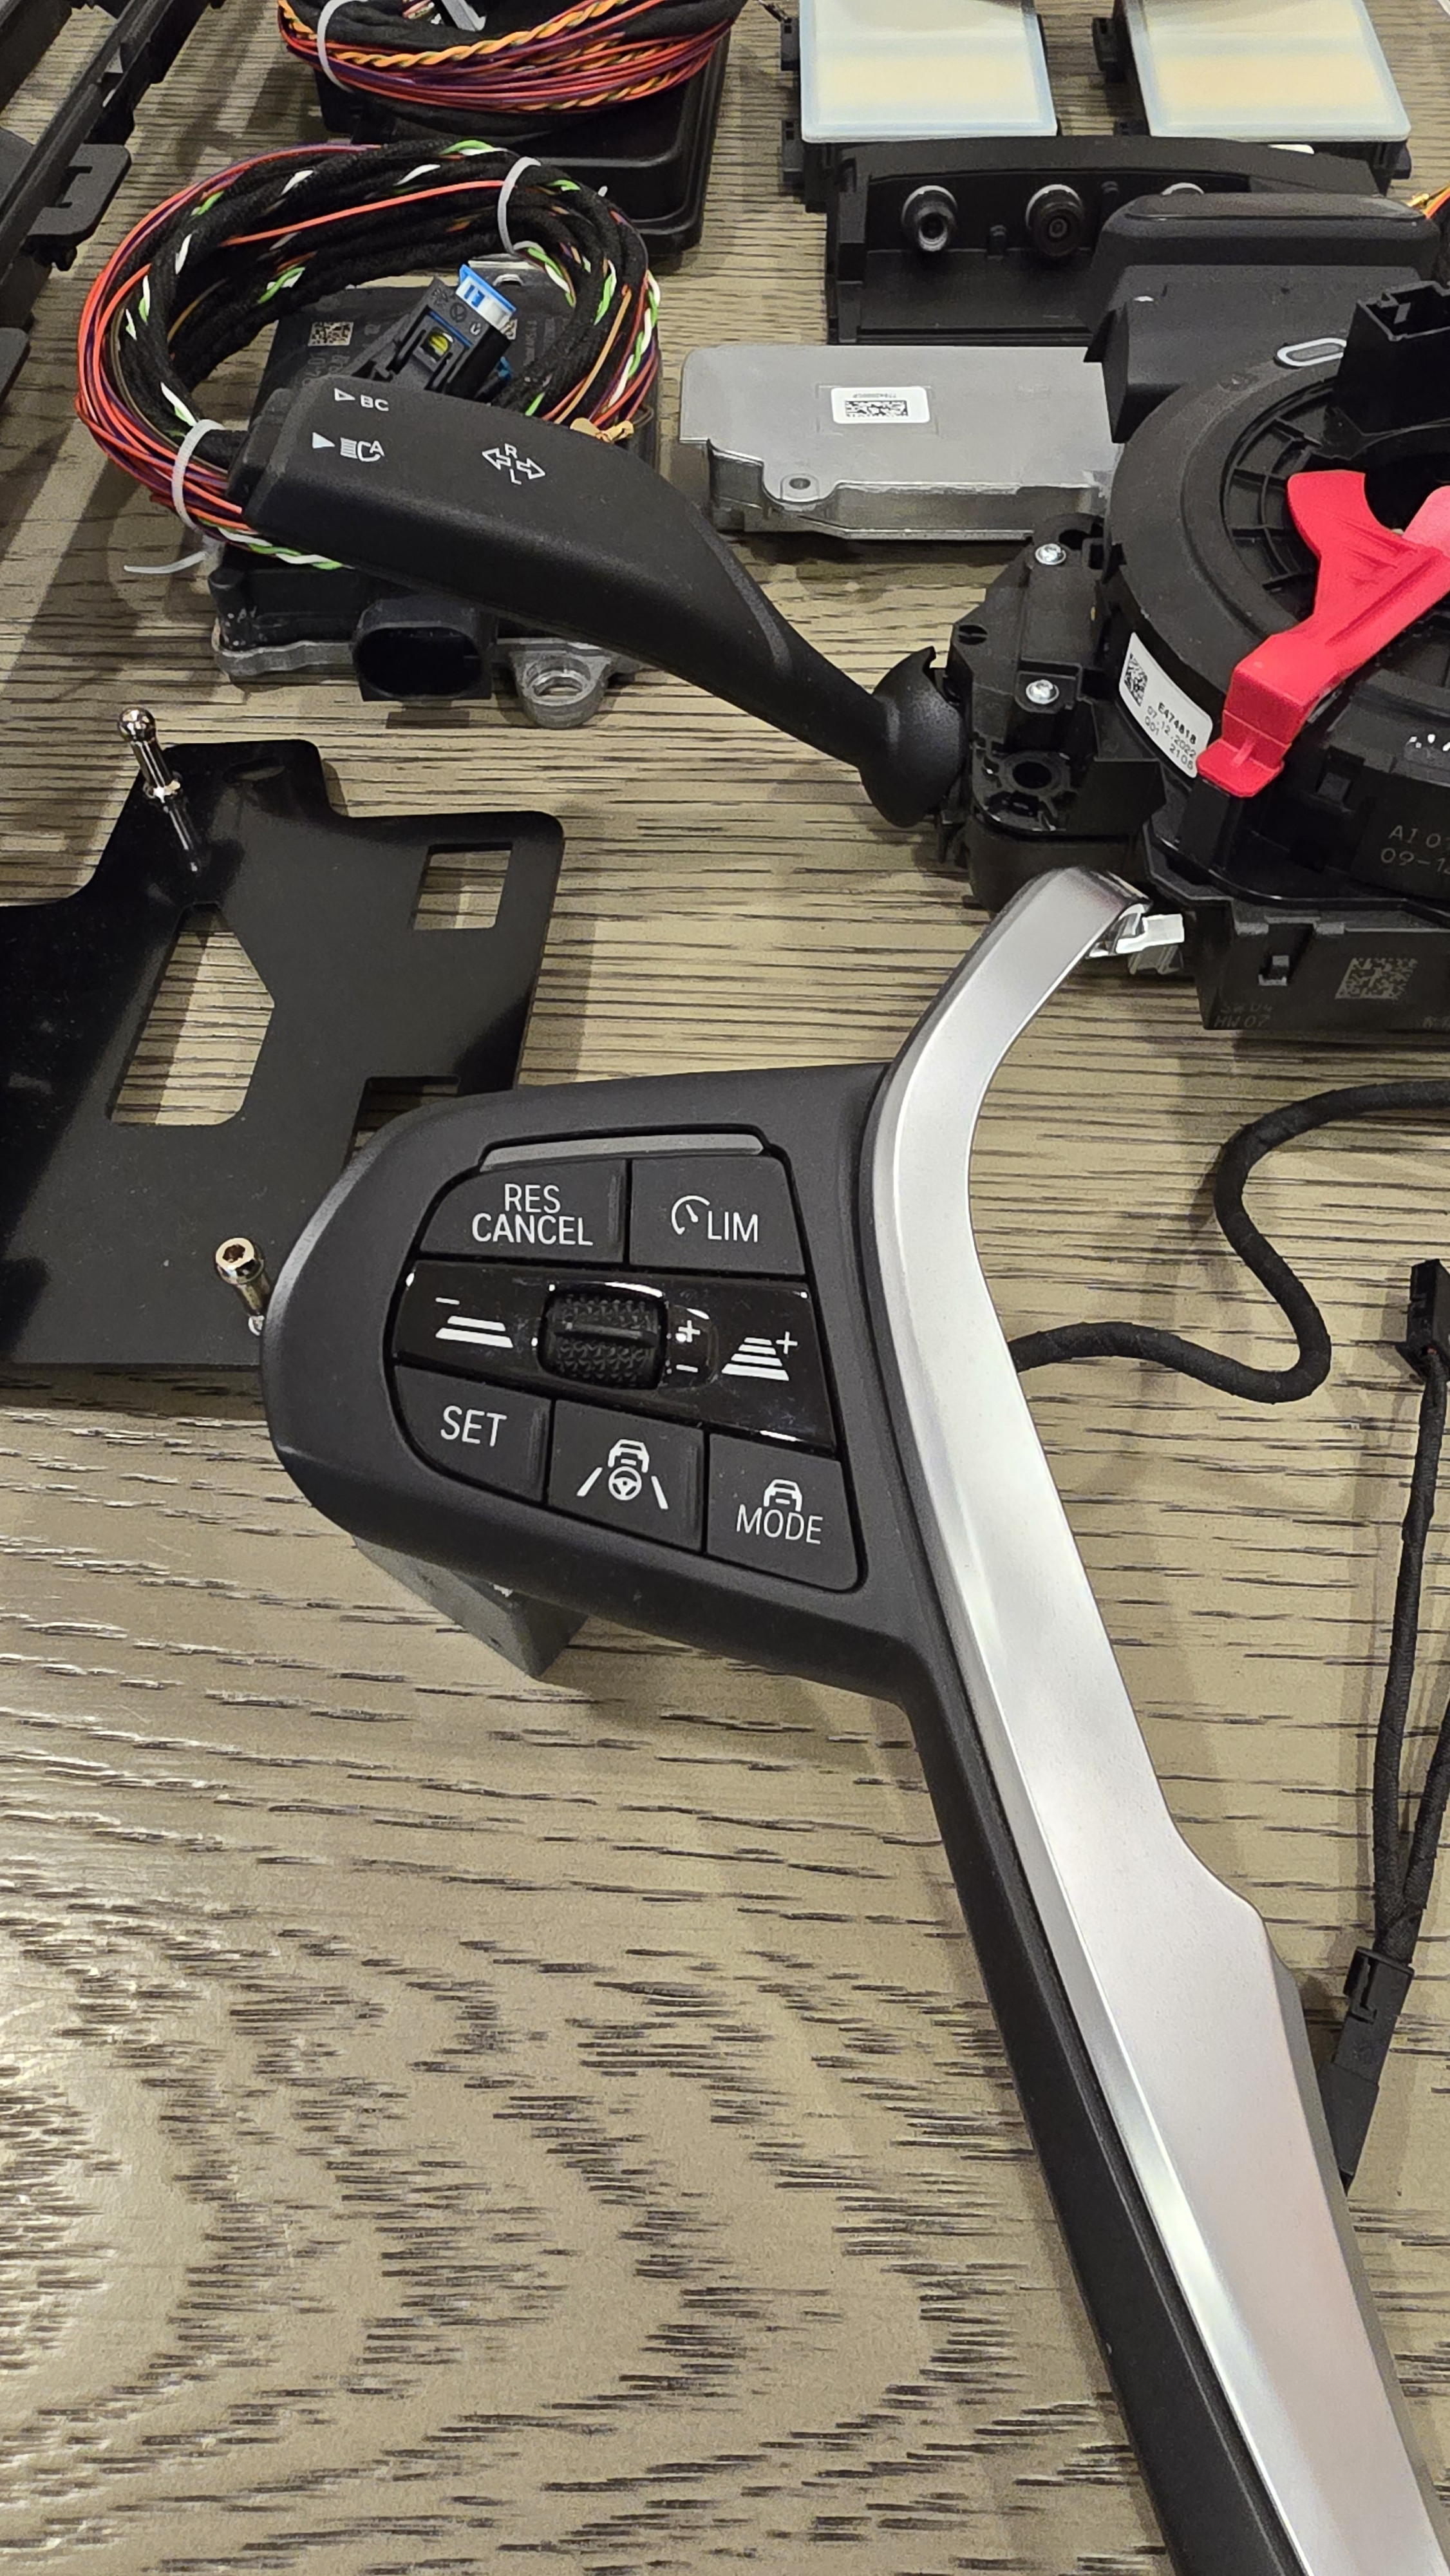 BMW G Series Kafas4 High Camera Unit
High-Level System Diagram of DAP
Understanding the system architecture is crucial for a successful retrofit. The Driving Assistant Professional system integrates various sensors and modules to provide its advanced functionalities.
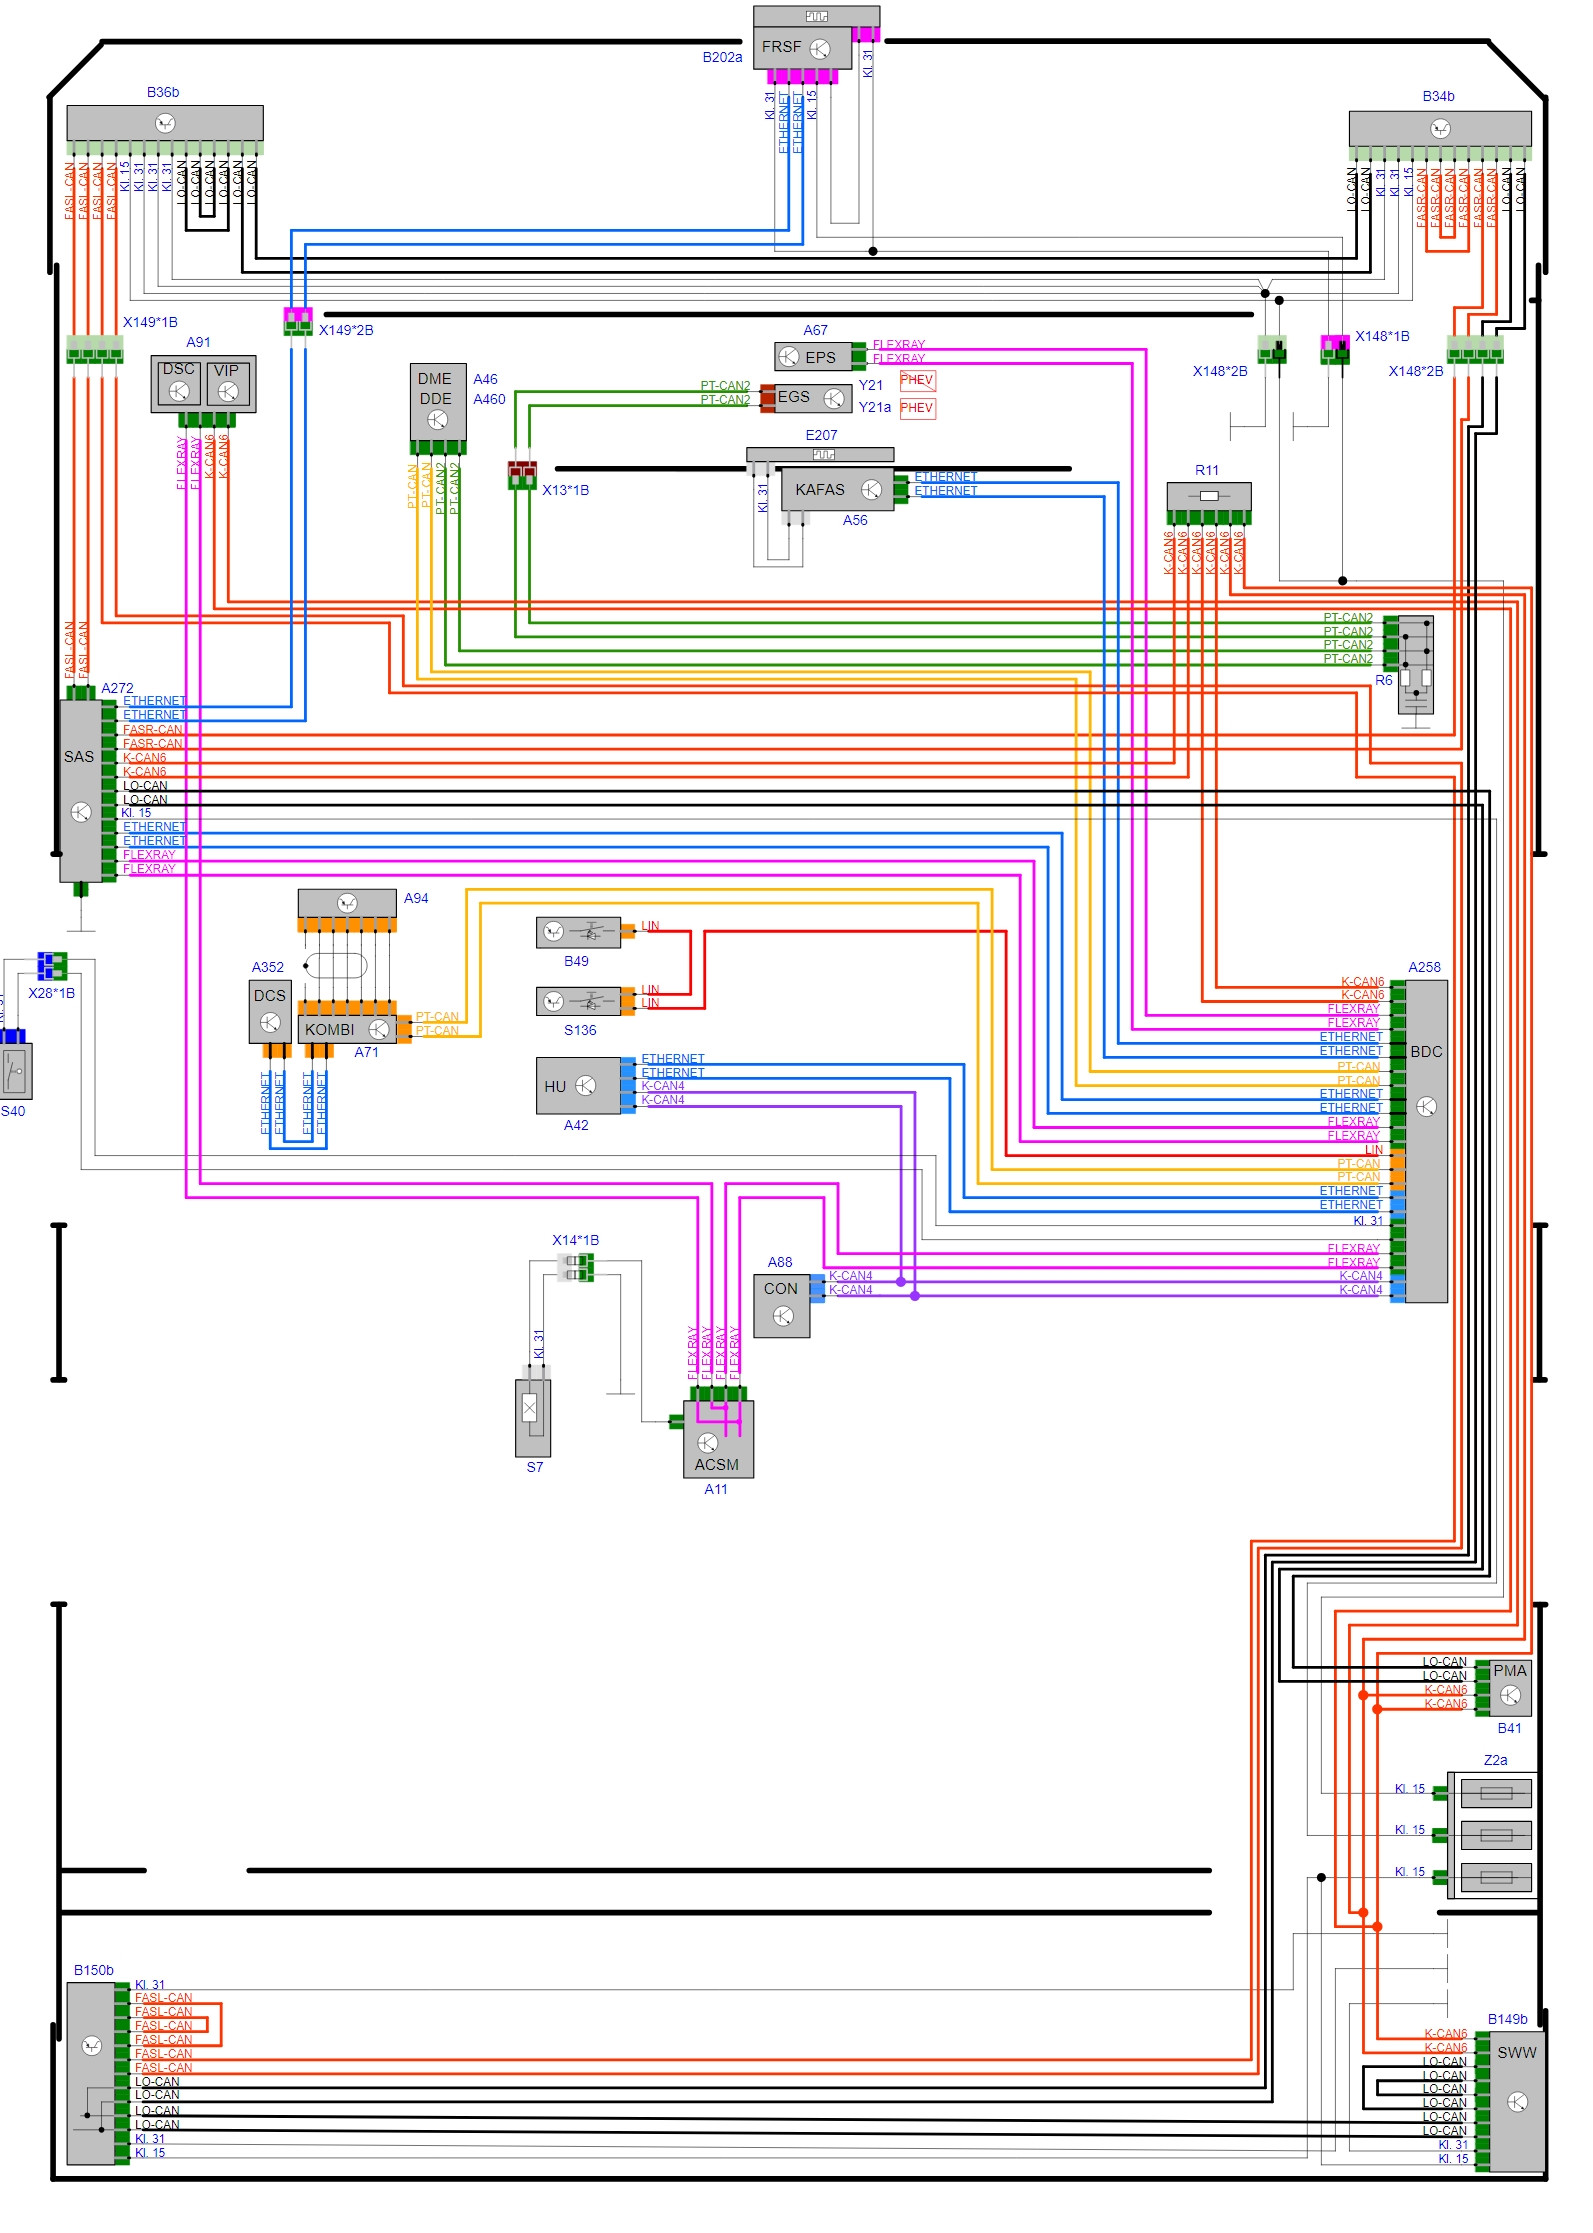 BMW Driving Assistant Professional System High-Level Diagram
Step-by-Step Installation Guide
This retrofit involves several stages, including hardware installation and software coding. The following sections detail the installation process for each major component.
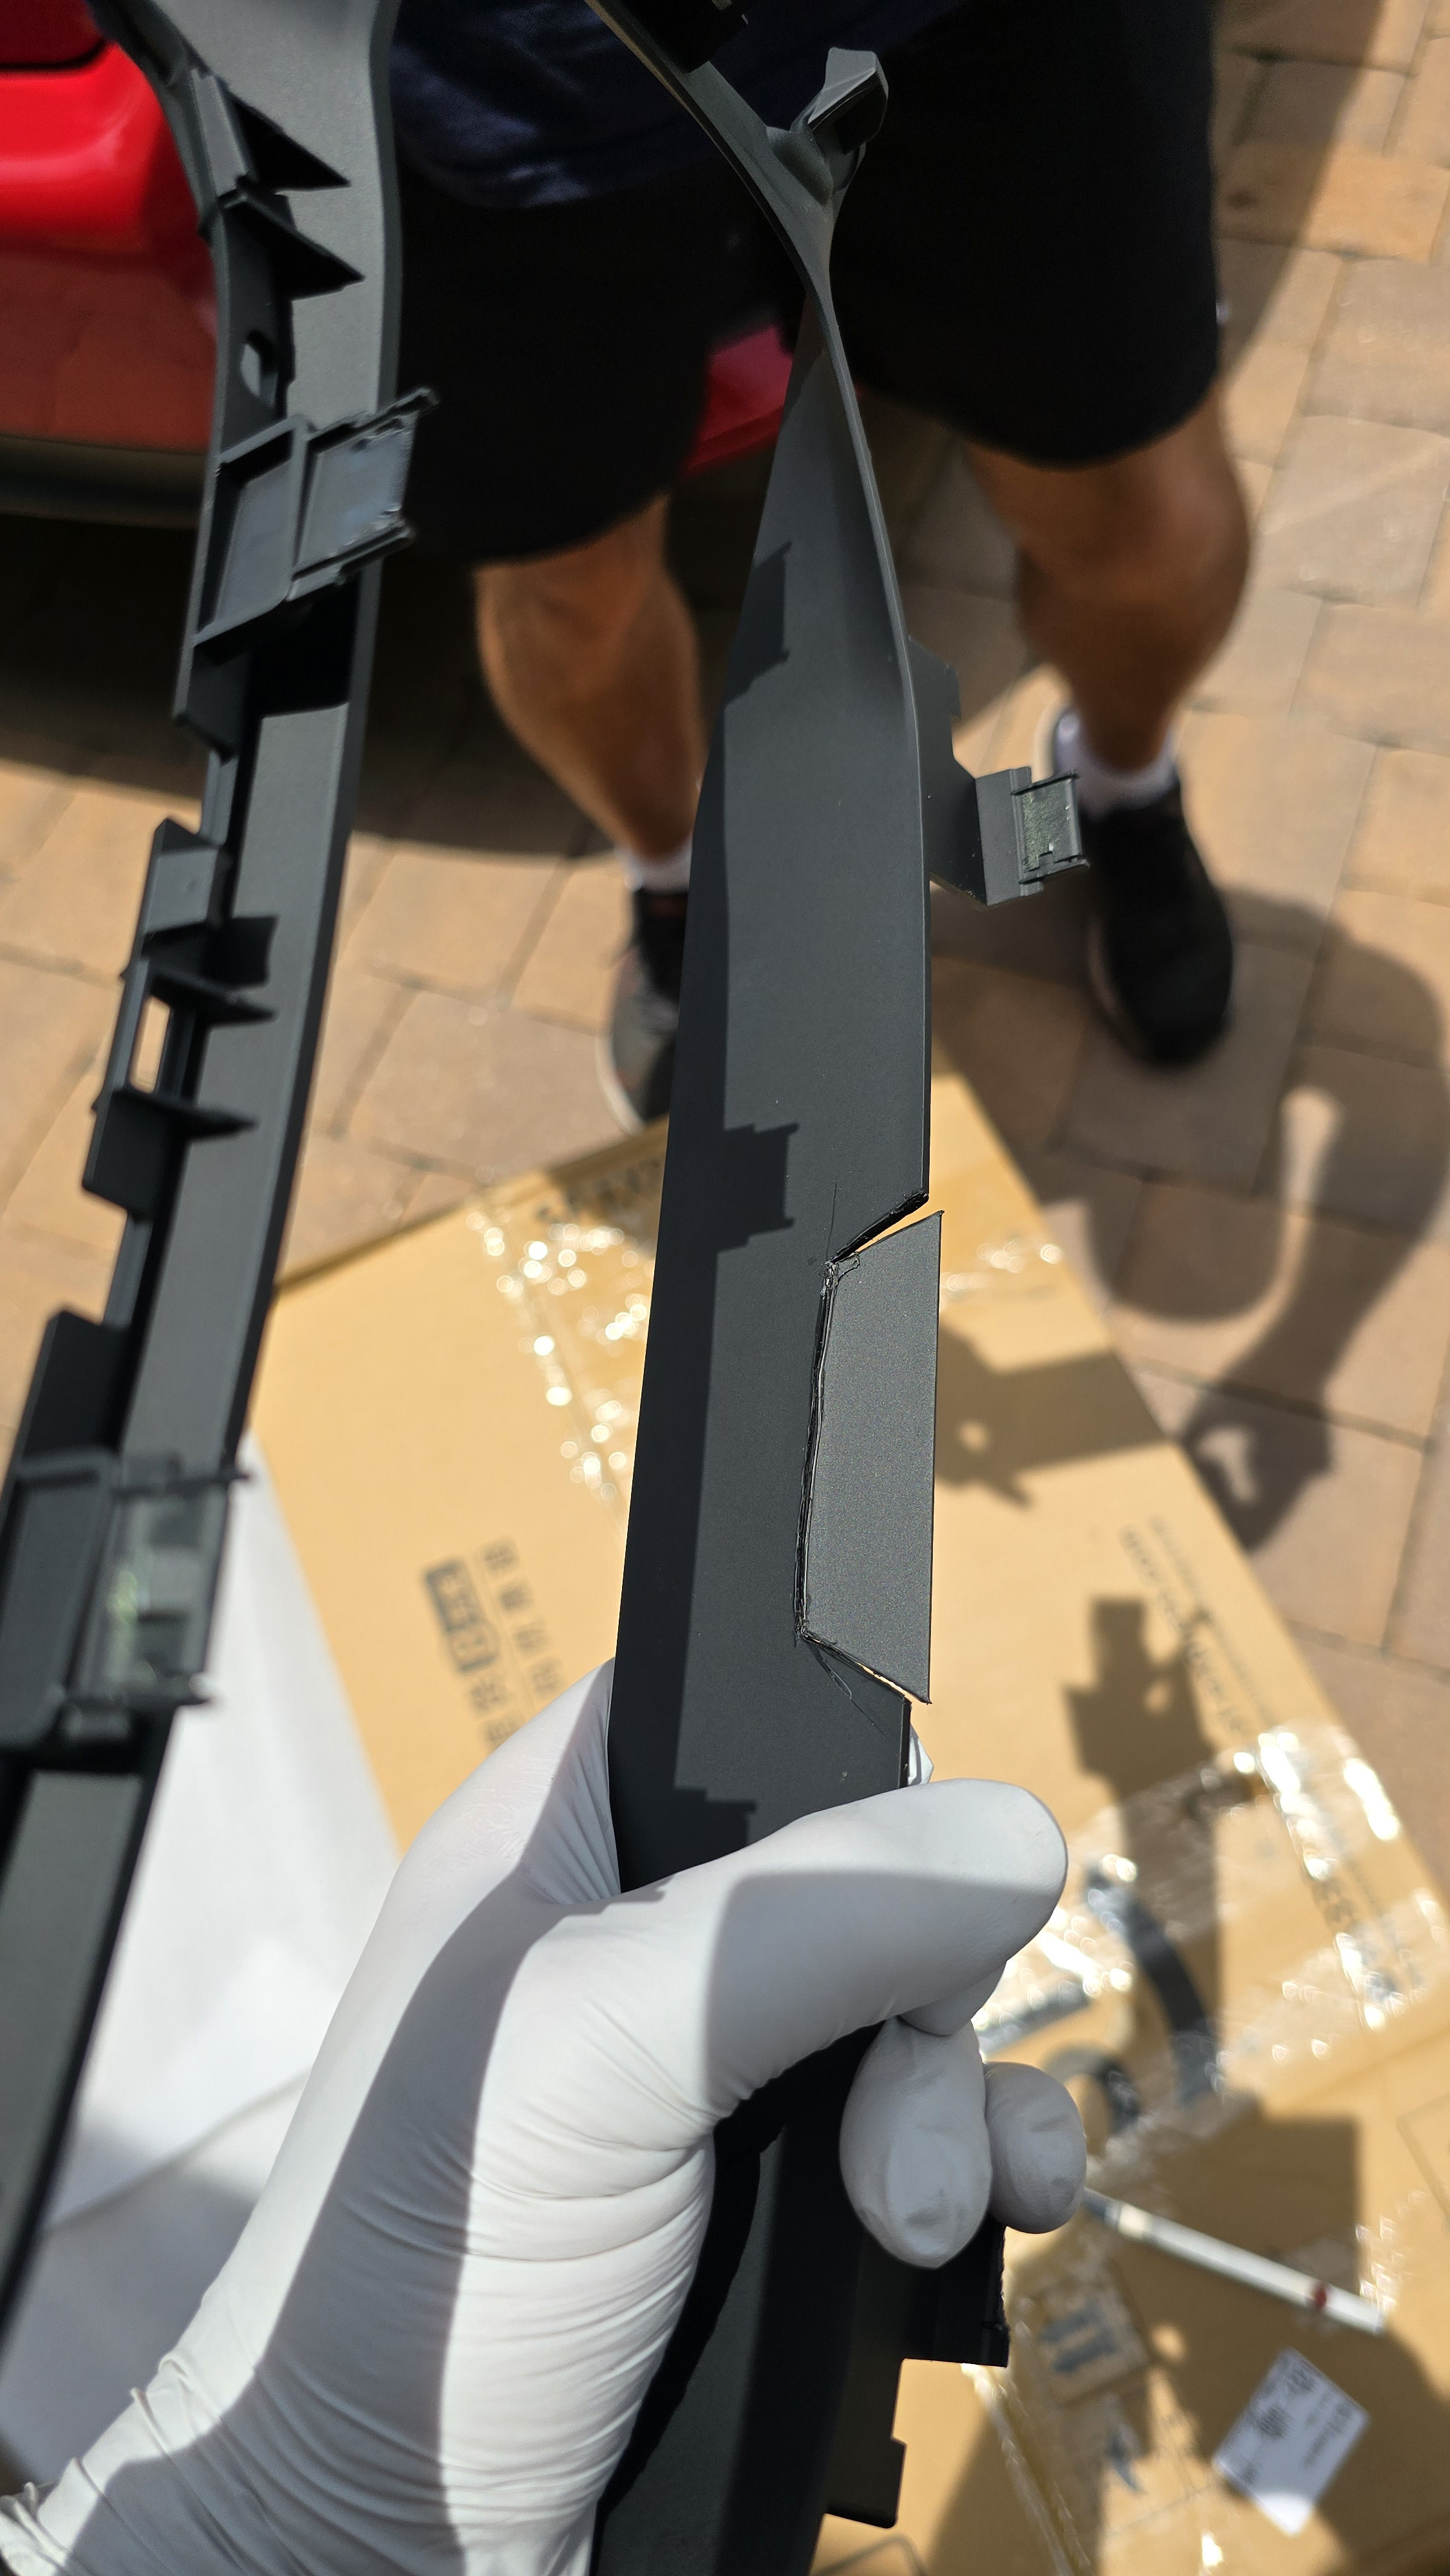
1. Front Bumper Removal and Radar Installation
The first step involves accessing the front bumper area to install the ACC Long Range Radar and Front Short Range Radars.
Procedure:
- Remove all 10mm bolts around the wheel arches and underneath the front bumper.
- Partially remove the wheel trims to access two hidden 10mm bolts on each side, located under the wheel arch.
- Carefully detach the wiring harness on the driver’s side of the bumper before fully removing it.
- Once the bumper is removed, locate the short-range radar housings on both sides.
- Route the OEM wiring harness, ensuring correct left/right side connections using the markings on the plugs. Route the harness along the driver’s side vent towards the firewall.
- Remove the middle mesh grill section of the bumper by unclipping its tabs and install the ACC trim.
- Before mounting the ACC bracket, install the FRR-02 radar sensor with its heating element cover. Ensure it clicks securely into place.
- Connect the FRR radar and heating element plugs.
- Mount the ACC bracket using two 10mm bolts, but do not fully tighten them yet.
- Reinstall the front bumper.
- Ensure the radar is properly aligned within the bumper opening, then fully tighten the bracket bolts.
 BMW G Series Front Bumper Removal – Wheel Arch Bolts
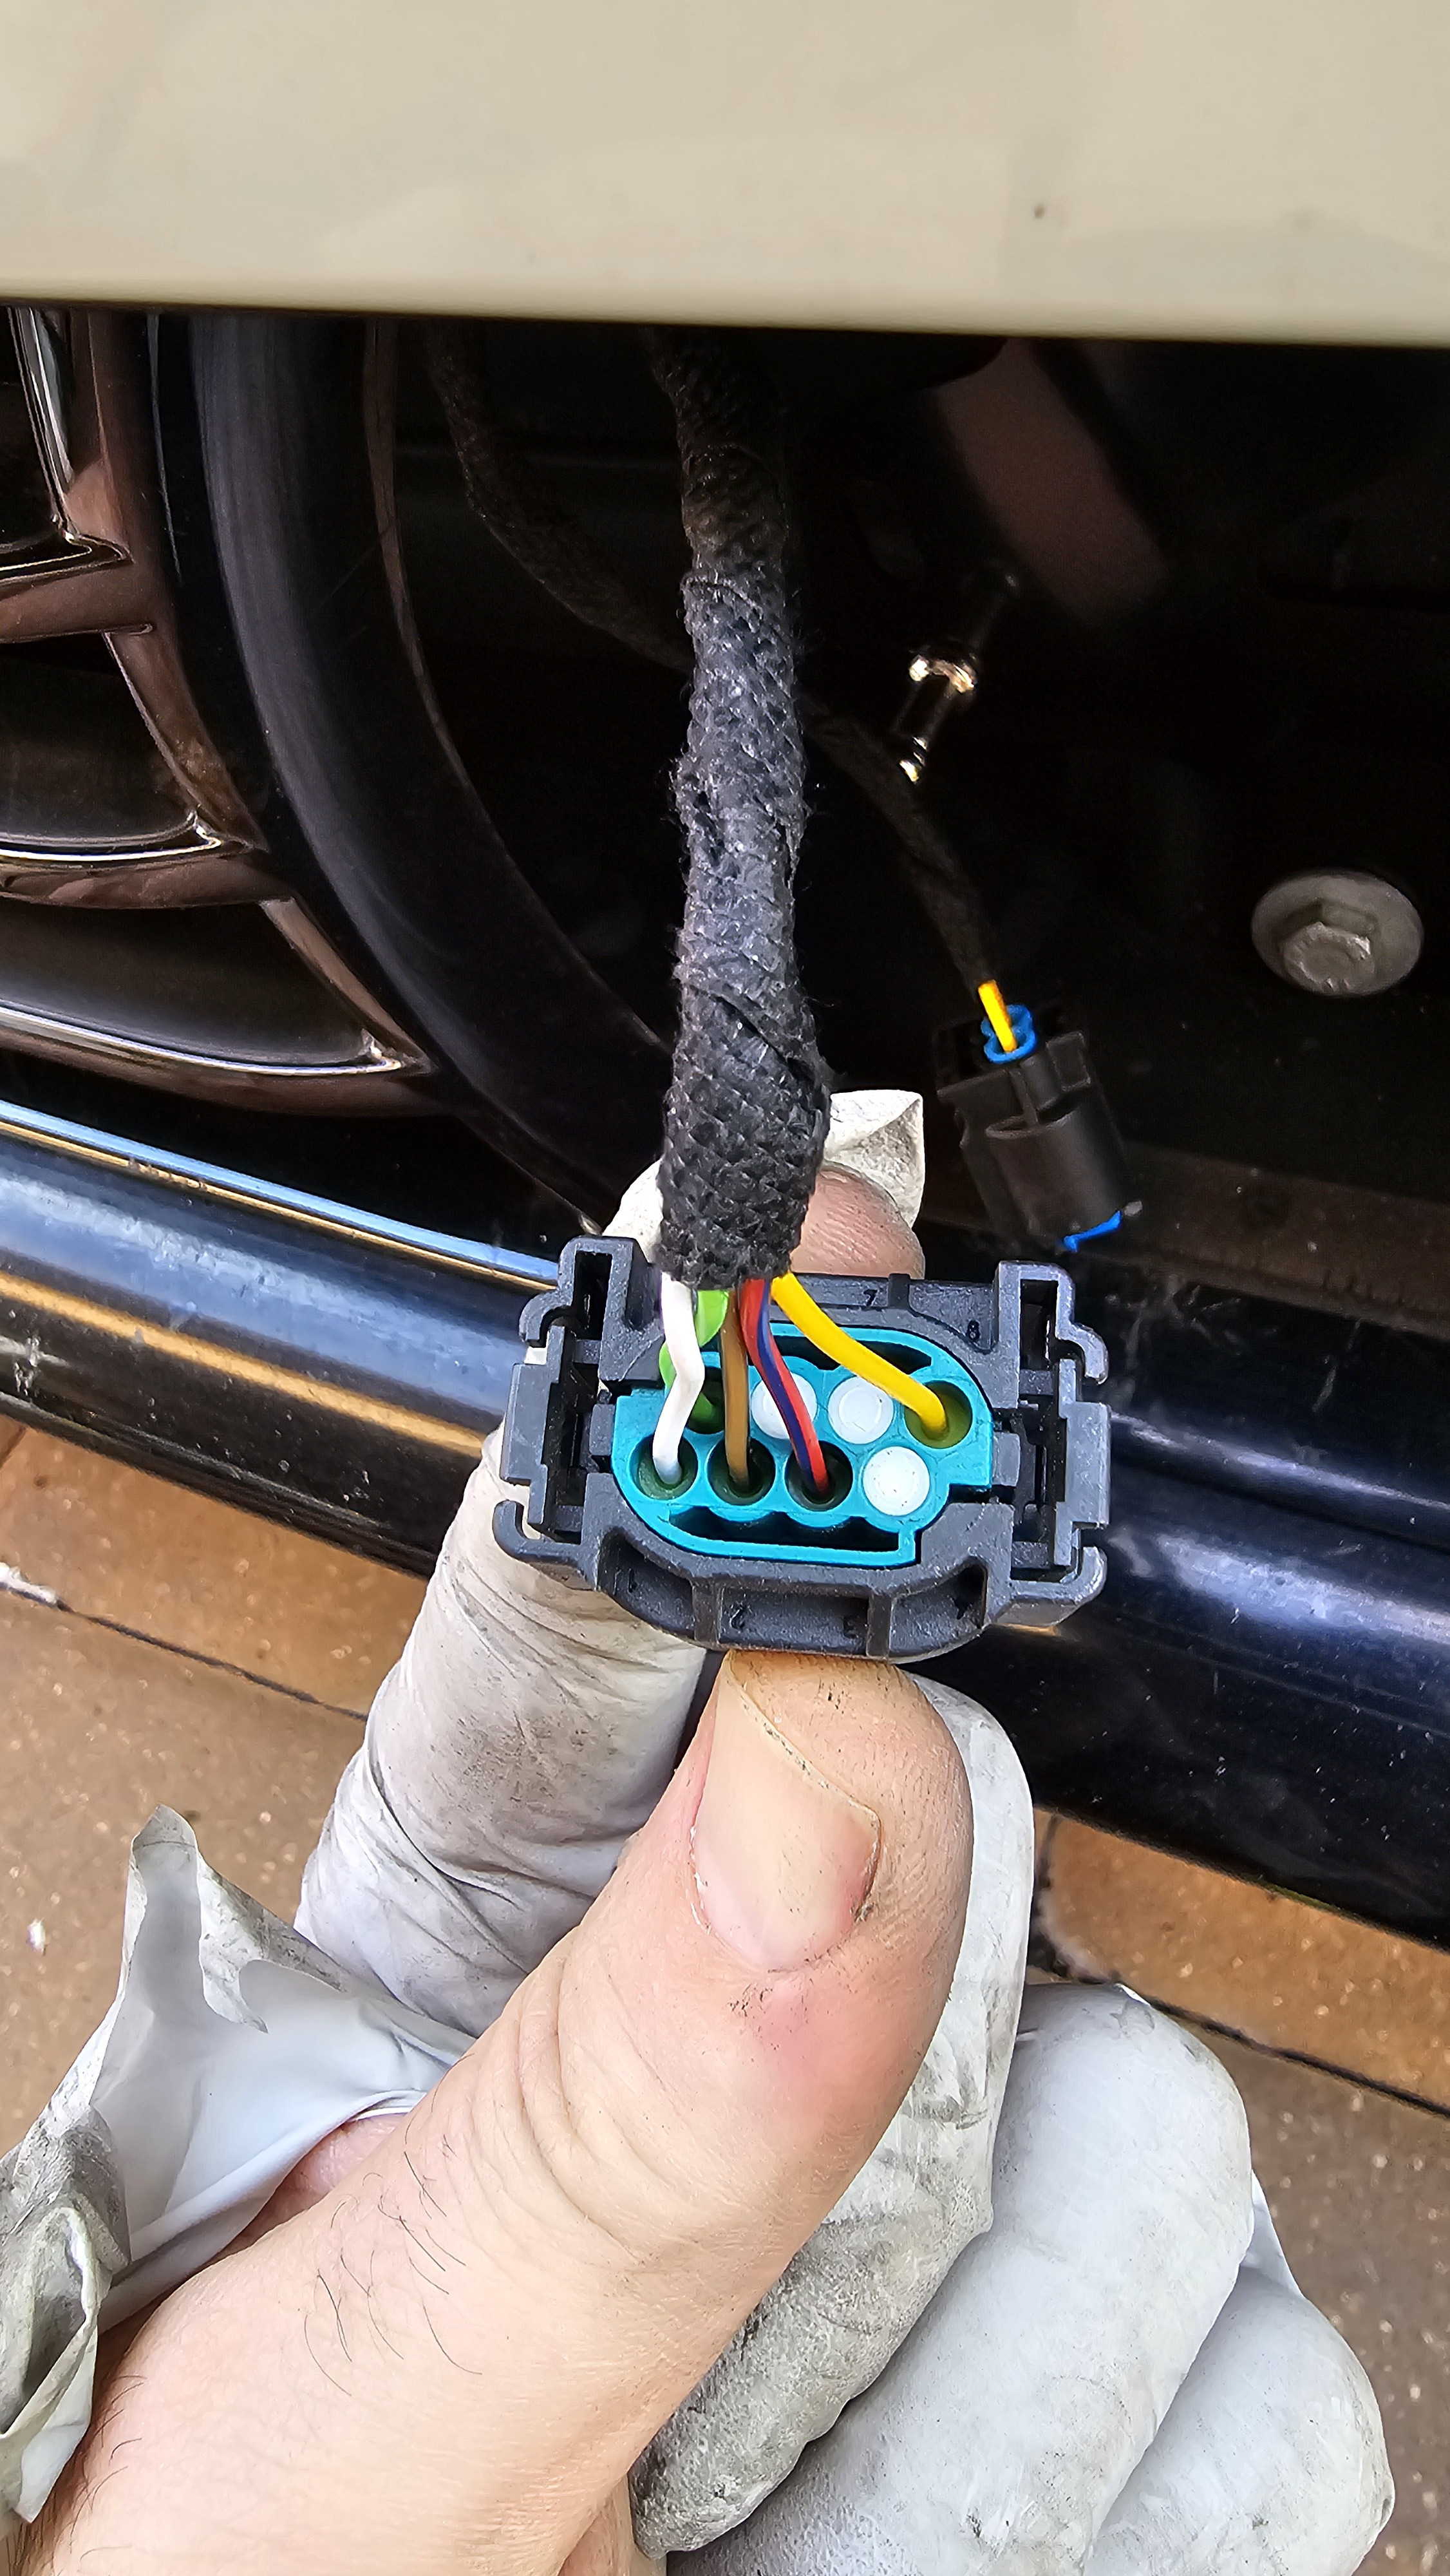 BMW G Series Front Bumper Removal – Hidden Bolts
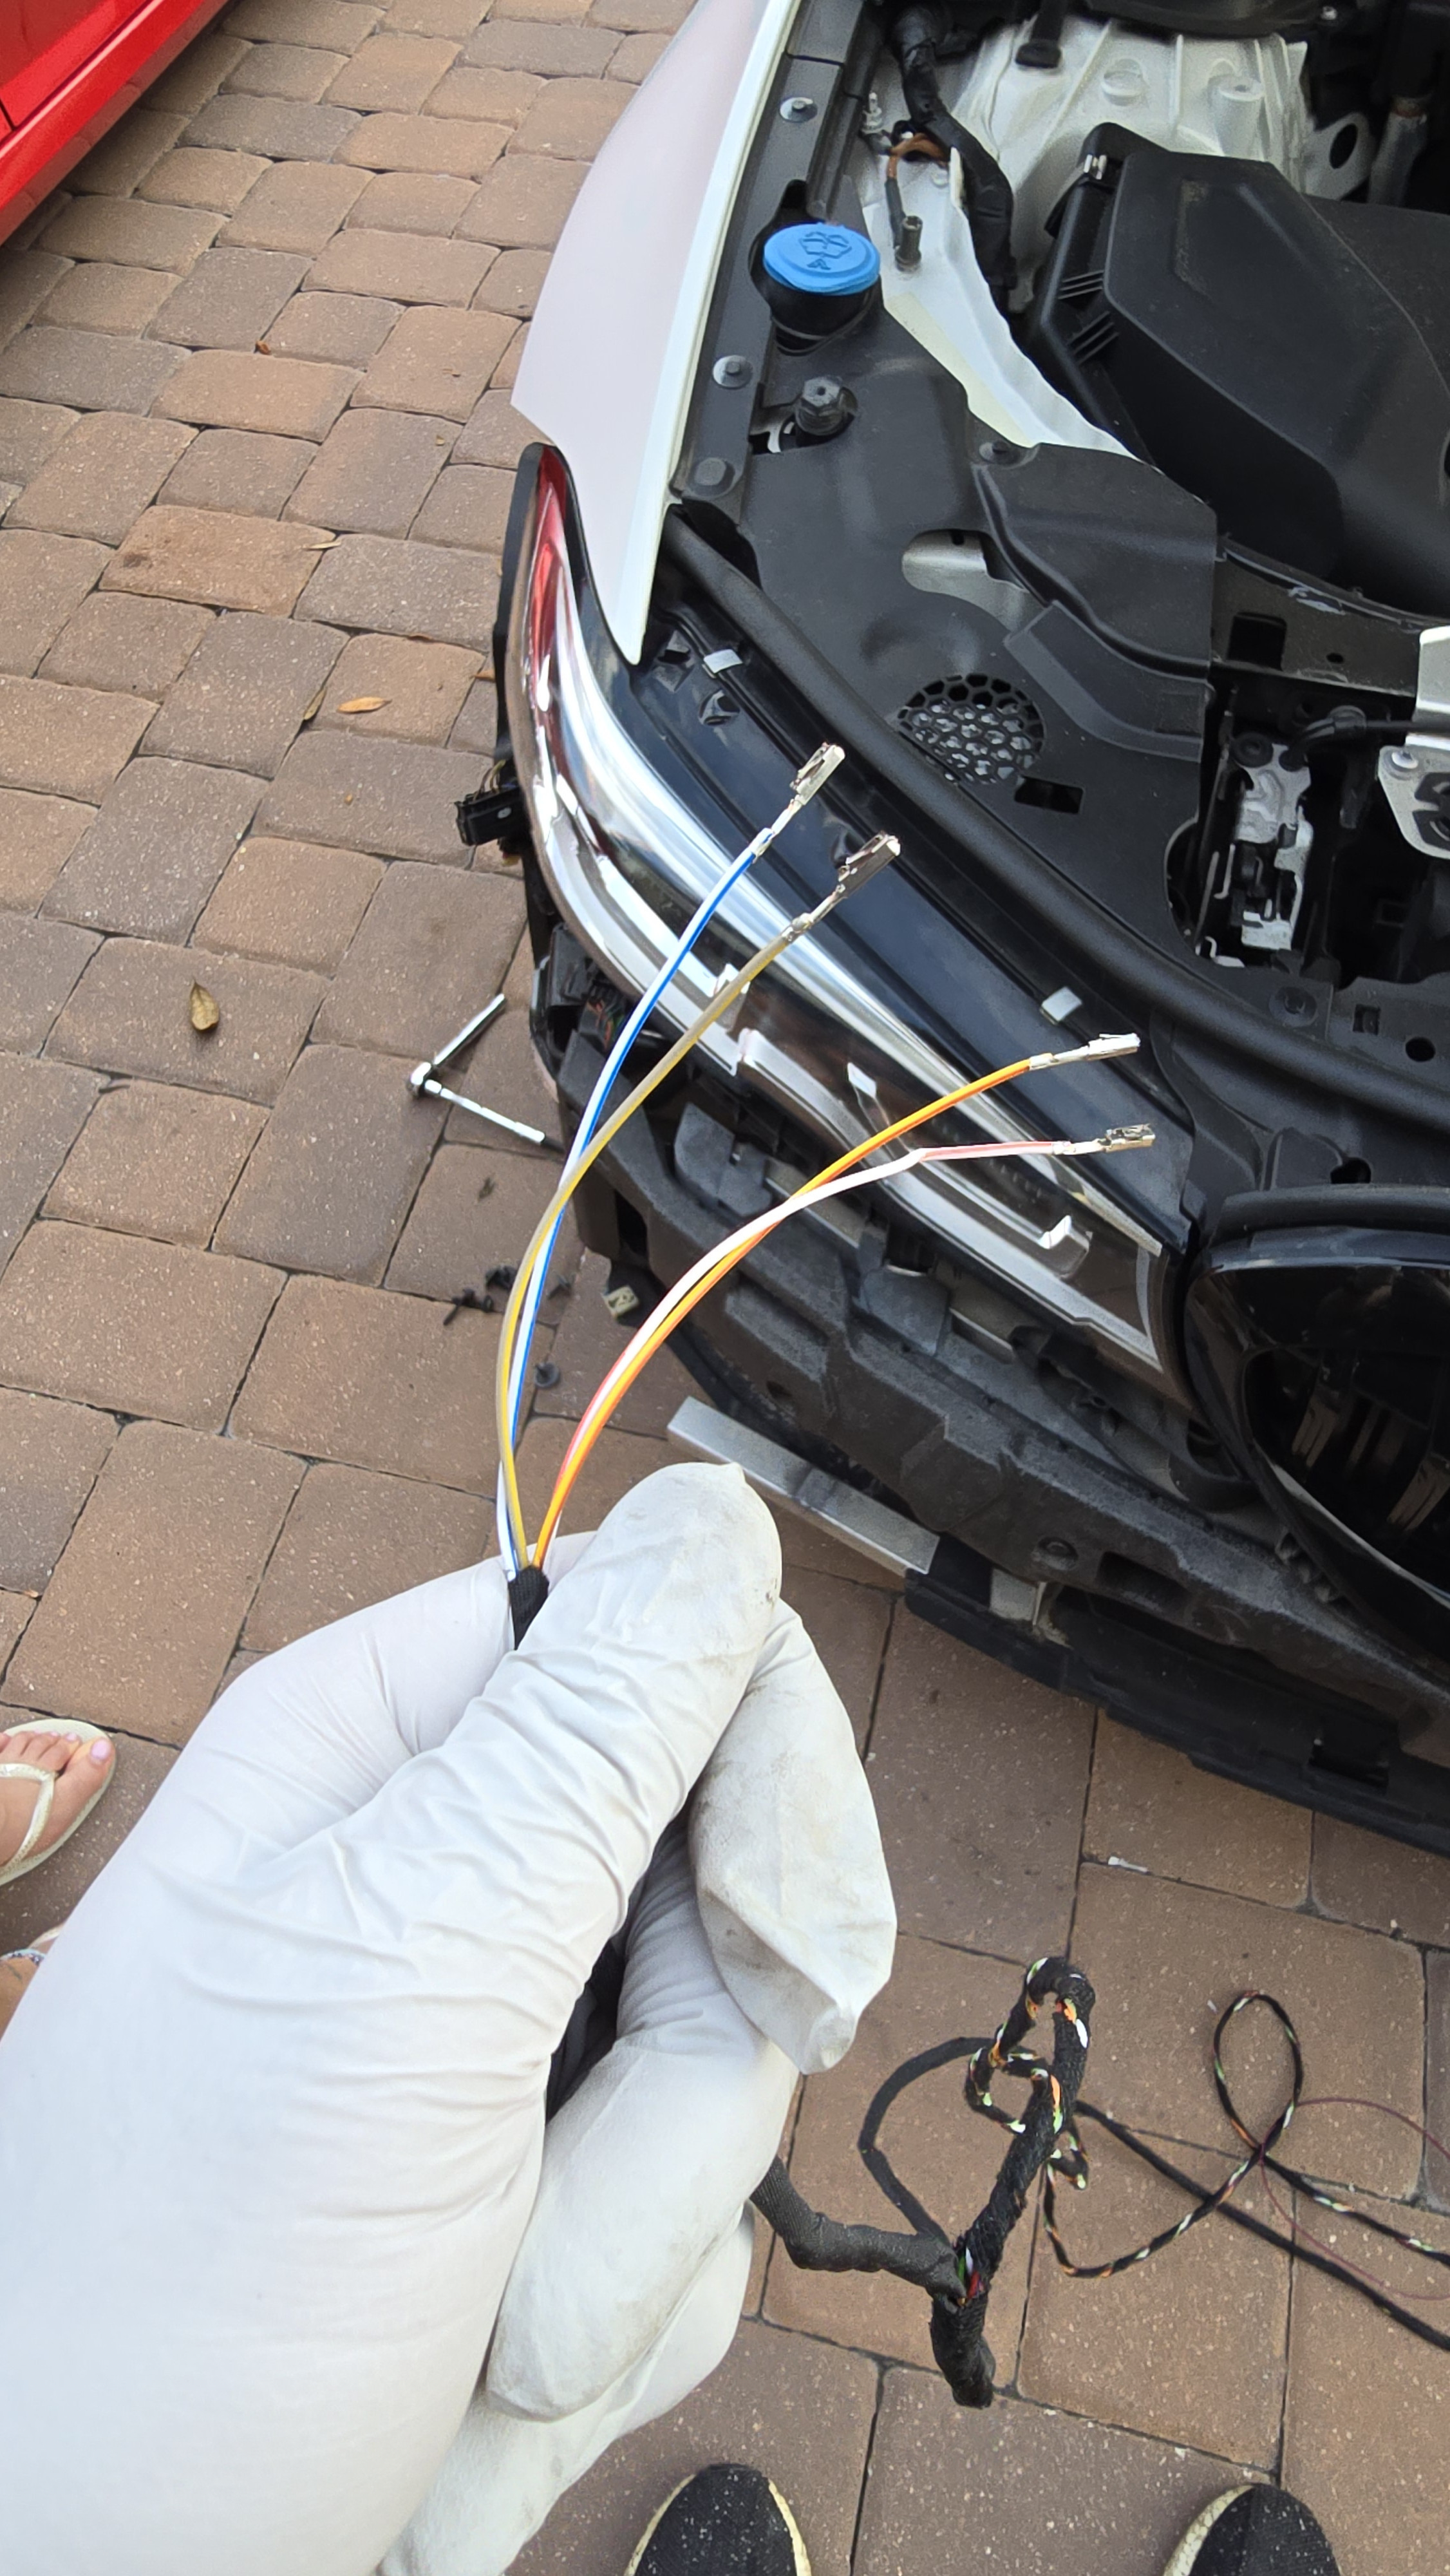 BMW G Series Front Bumper Removed – Radar Housing Location
 BMW G Series Front Radar Sensor Installation
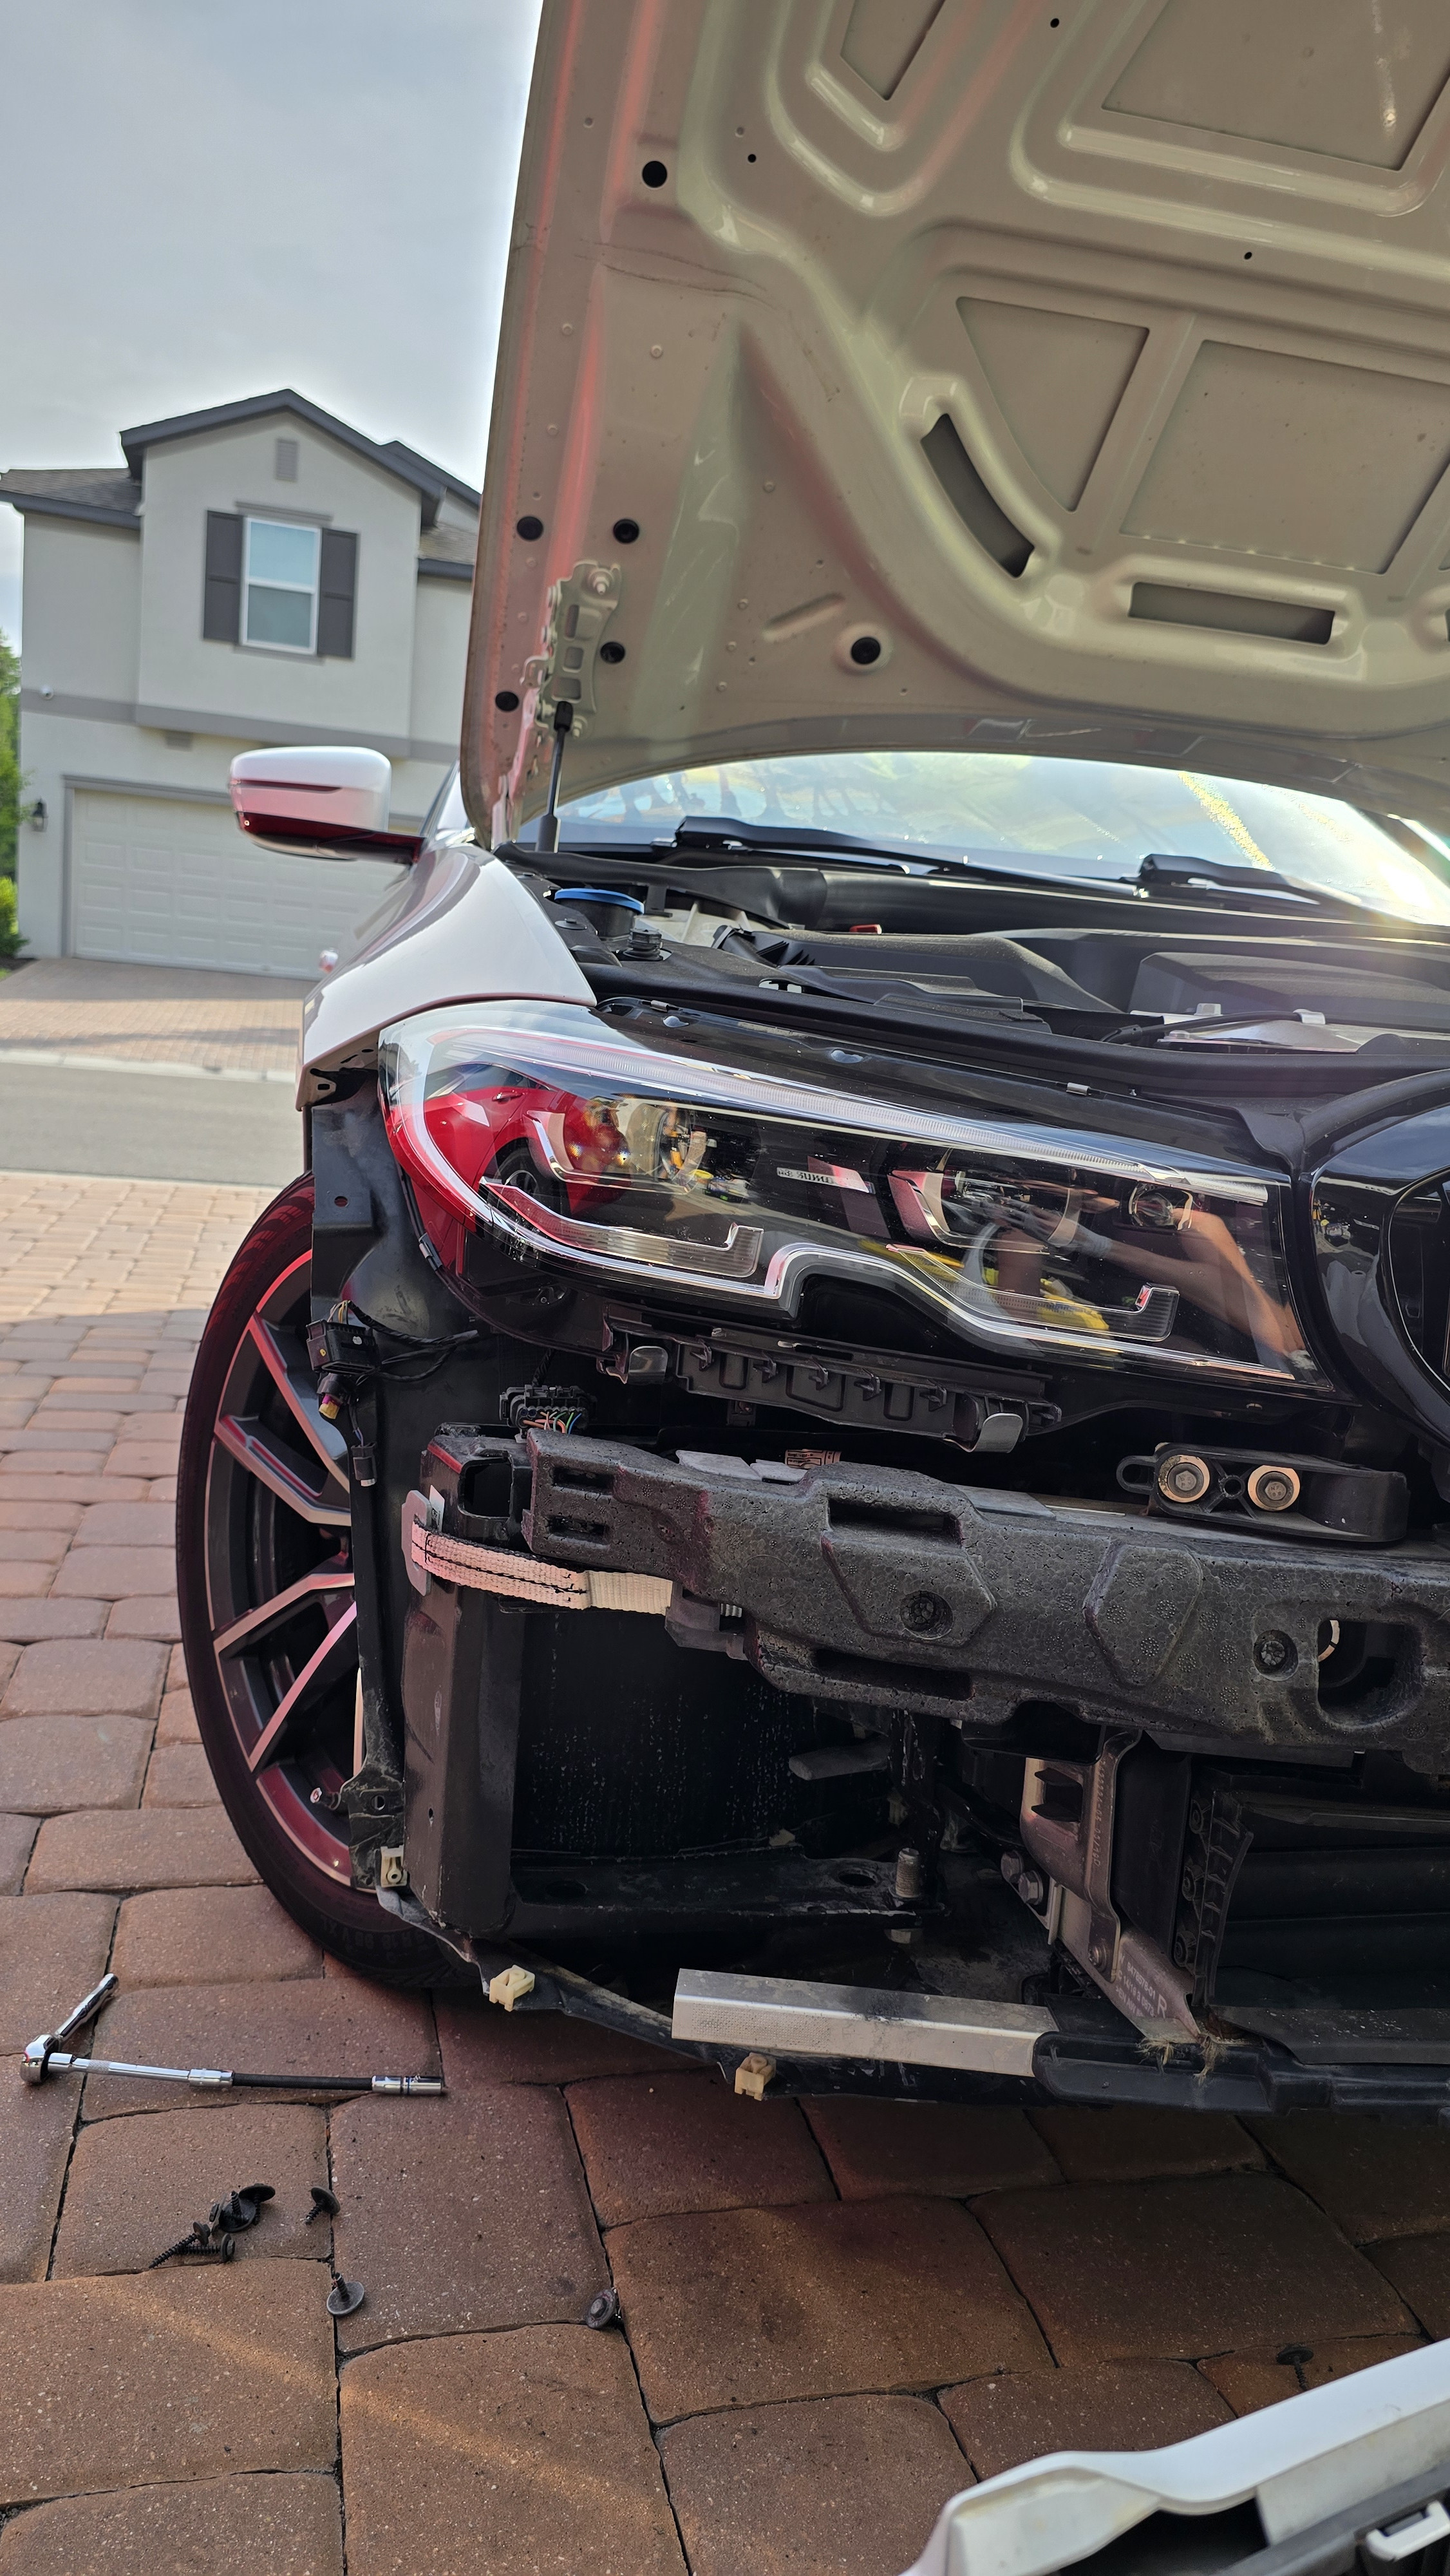 BMW G Series ACC Radar Sensor Mounted
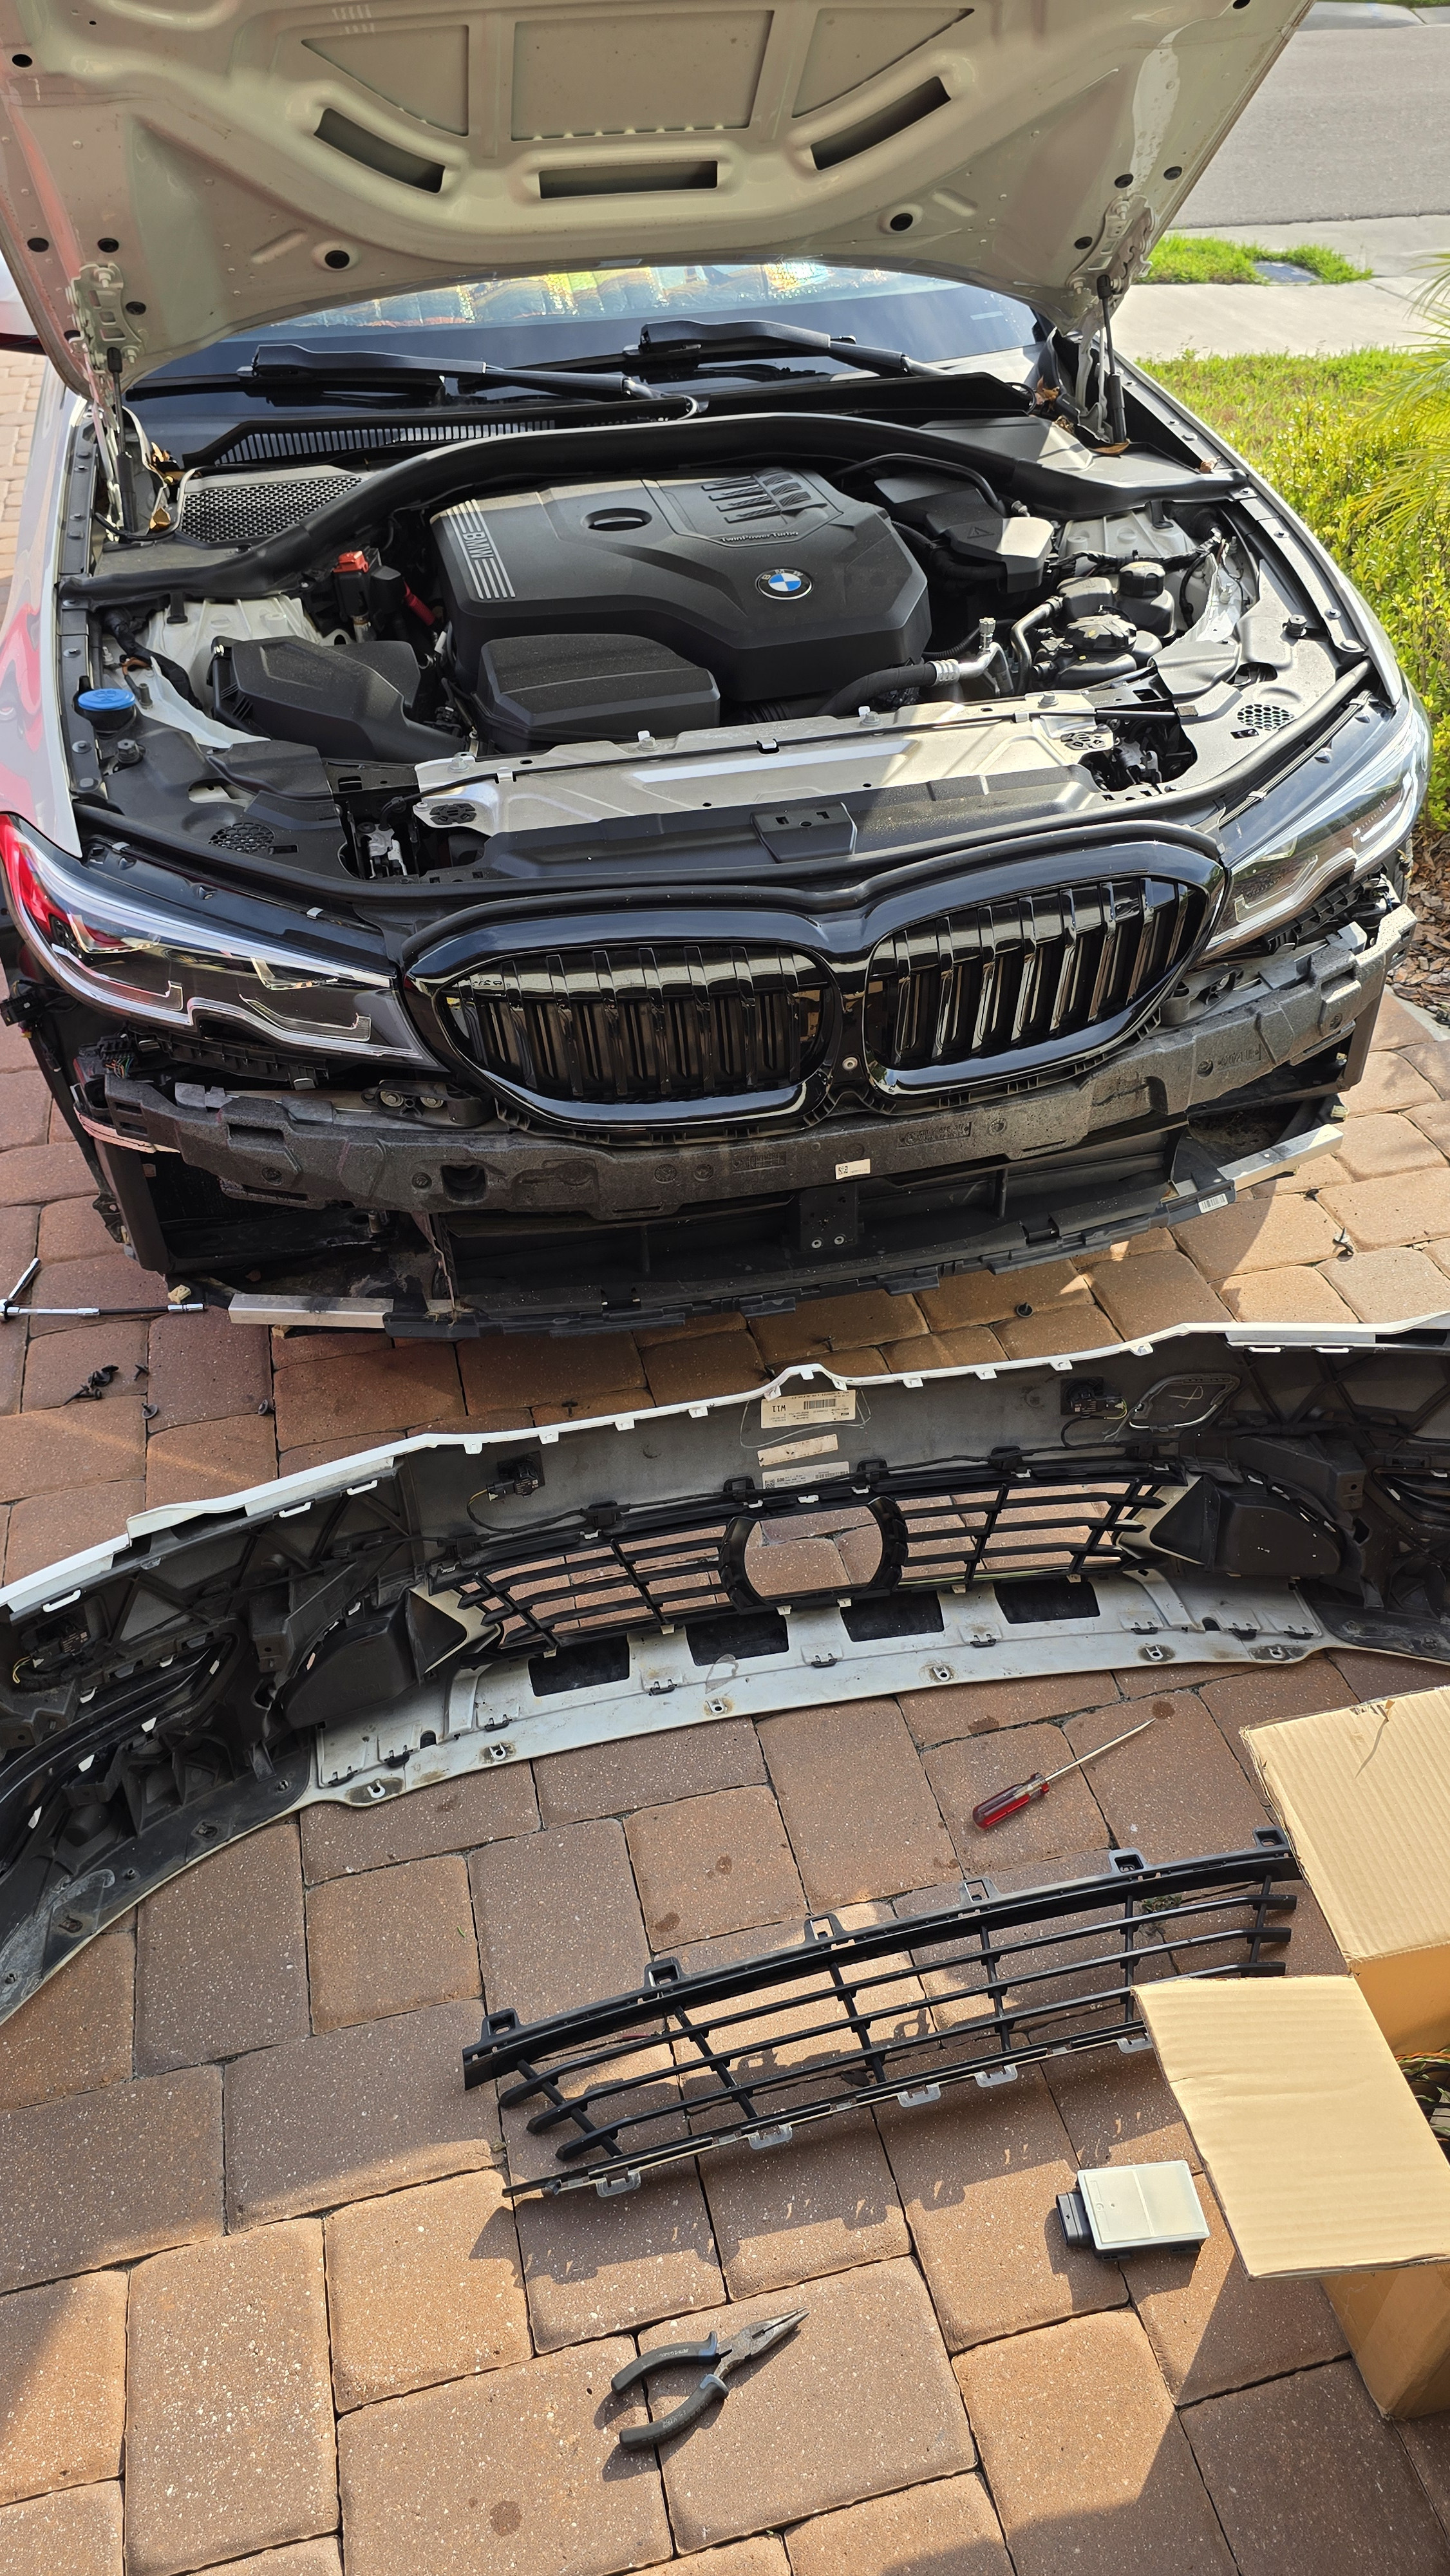 BMW G Series Front Bumper Reinstallation
2. Trunk and Rear Bumper Removal for Rear Radar Installation
Accessing the rear of the vehicle is necessary for installing the rear radar sensors and potentially modifying wiring.
Trunk Disassembly:
- Remove the bottom trunk cover.
- Remove plastic clips holding the plastic cover around the trunk latch and lift the cover.
- Remove side carpets by detaching plastic clips.
- Locate and remove the T40 screws on each side, closer to the seats.
- Unhook the carpet from the trunk engagement side (held by a plastic cover) and pull it out.
- If present, disconnect the cigarette lighter plug on the passenger side.
- Remove the side leather covers at the rear seats where seat belts pass through.
Rear Bumper Removal:
- Remove the plastic cover concealing the outer taillight bolts (2x10mm).
- Inside the trunk, remove the single 8mm bolt holding each outer taillight.
- Remove the taillight. This step is crucial to safely access clips between the bumper and body.
- Locate and remove the 10mm bolt holding the bumper, accessible after taillight removal.
- Remove 10mm bolts inside the wheel arches and at the bottom of the bumper.
- Remove the cover positioned between the bumper and muffler. Unclip the painted bumper part from the black holder where the Side Marker Operation (SMO) is installed.
- Carefully unclip the bumper, starting from the edges near the wheels.
- Disconnect the PDC (Park Distance Control) plug, usually located on the driver’s side.
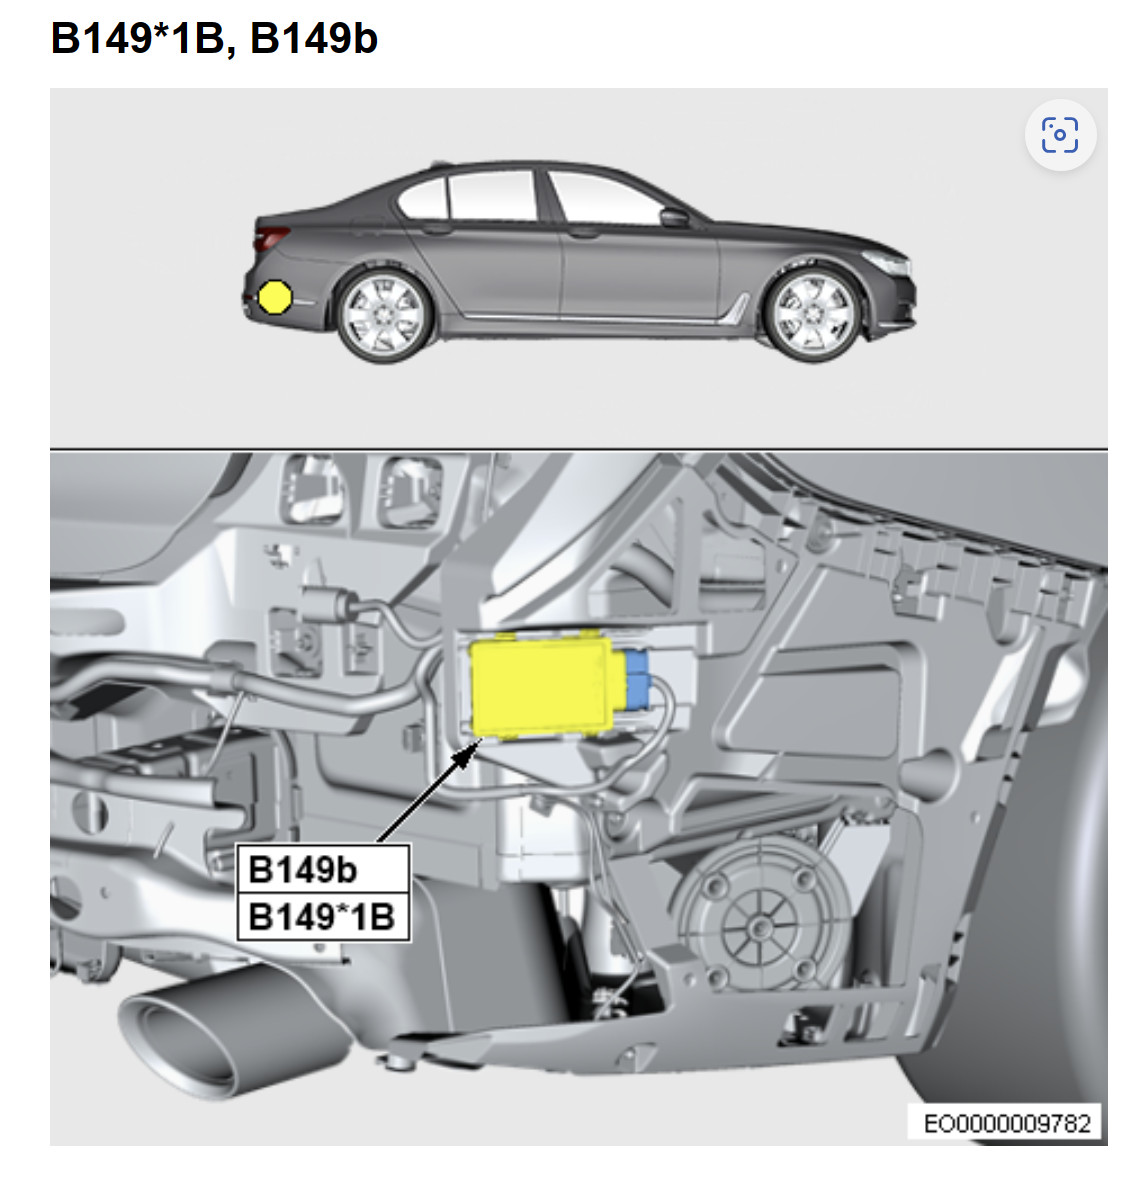 BMW G Series Rear Radar Location
 BMW G Series Rear Left Radar Sensor
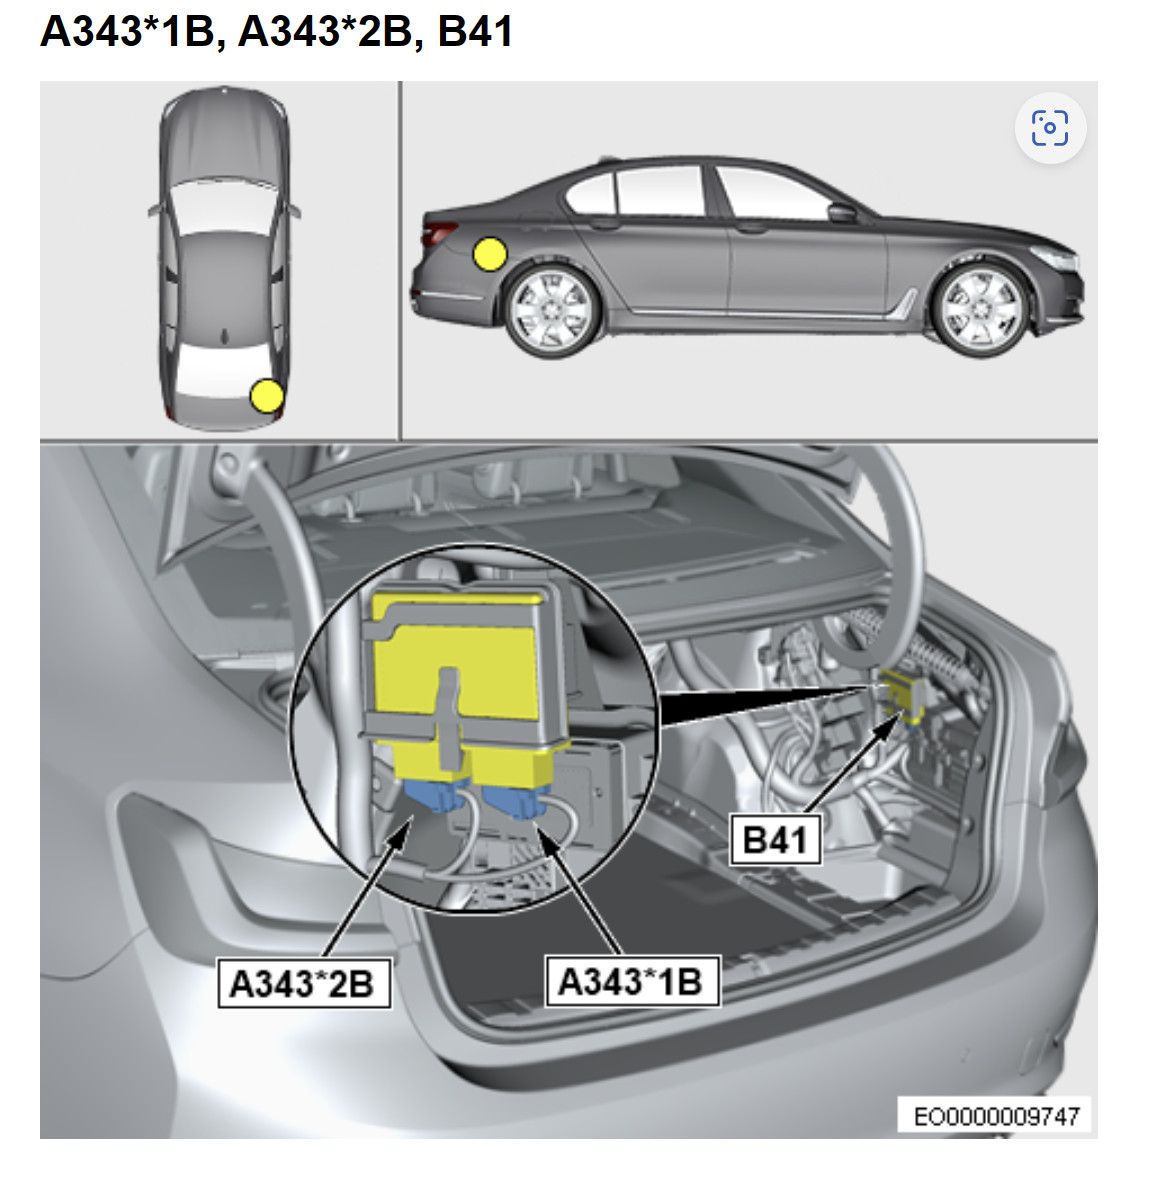 BMW G Series PMA Module Location
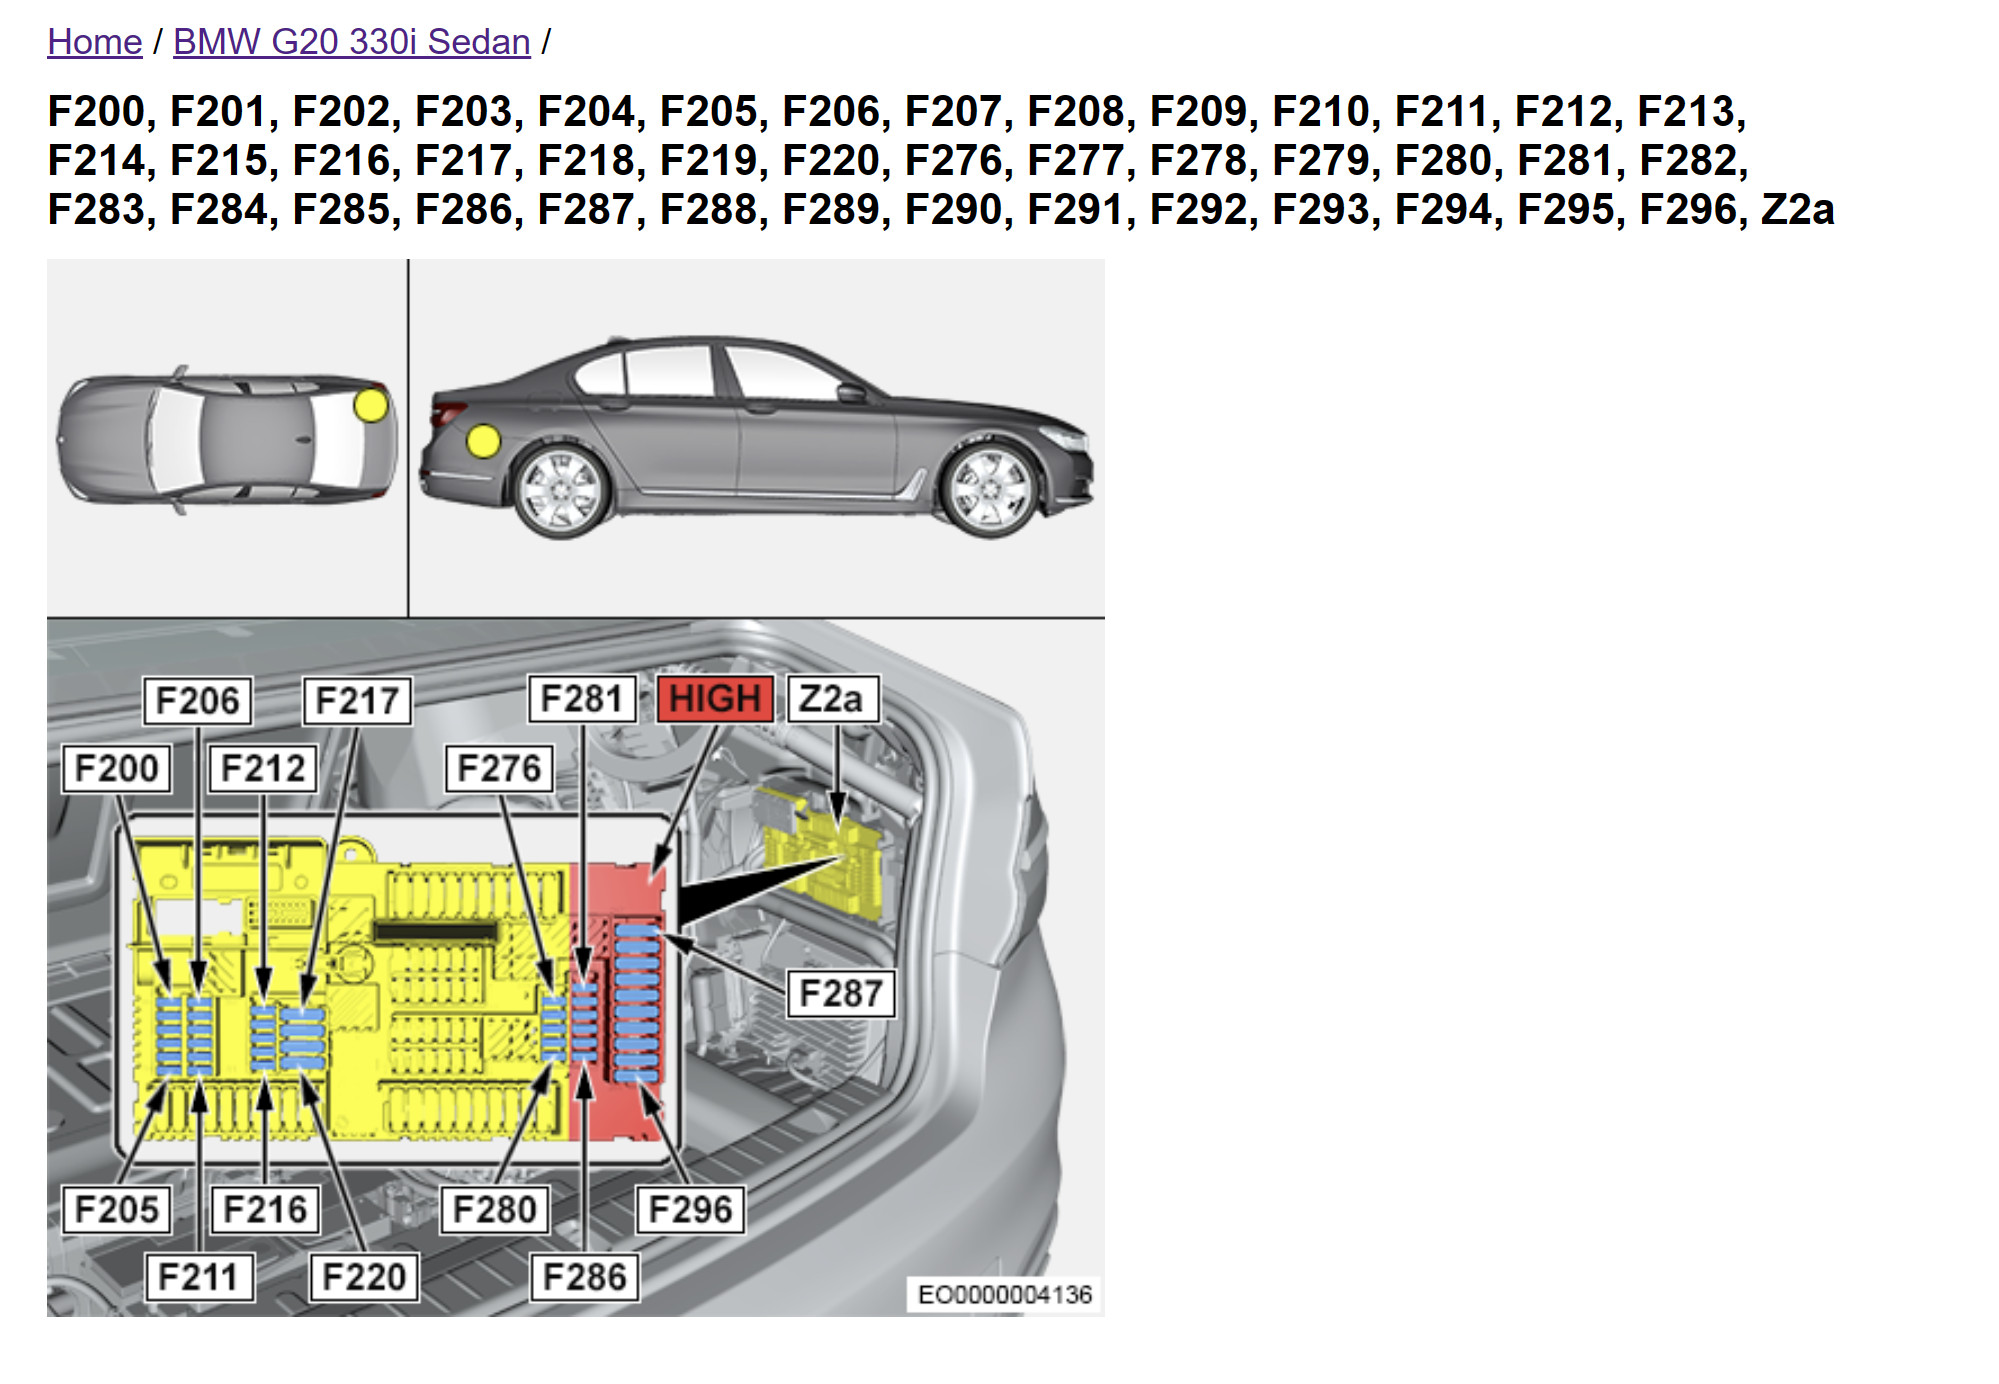 BMW G Series Rear Fuse Box Location
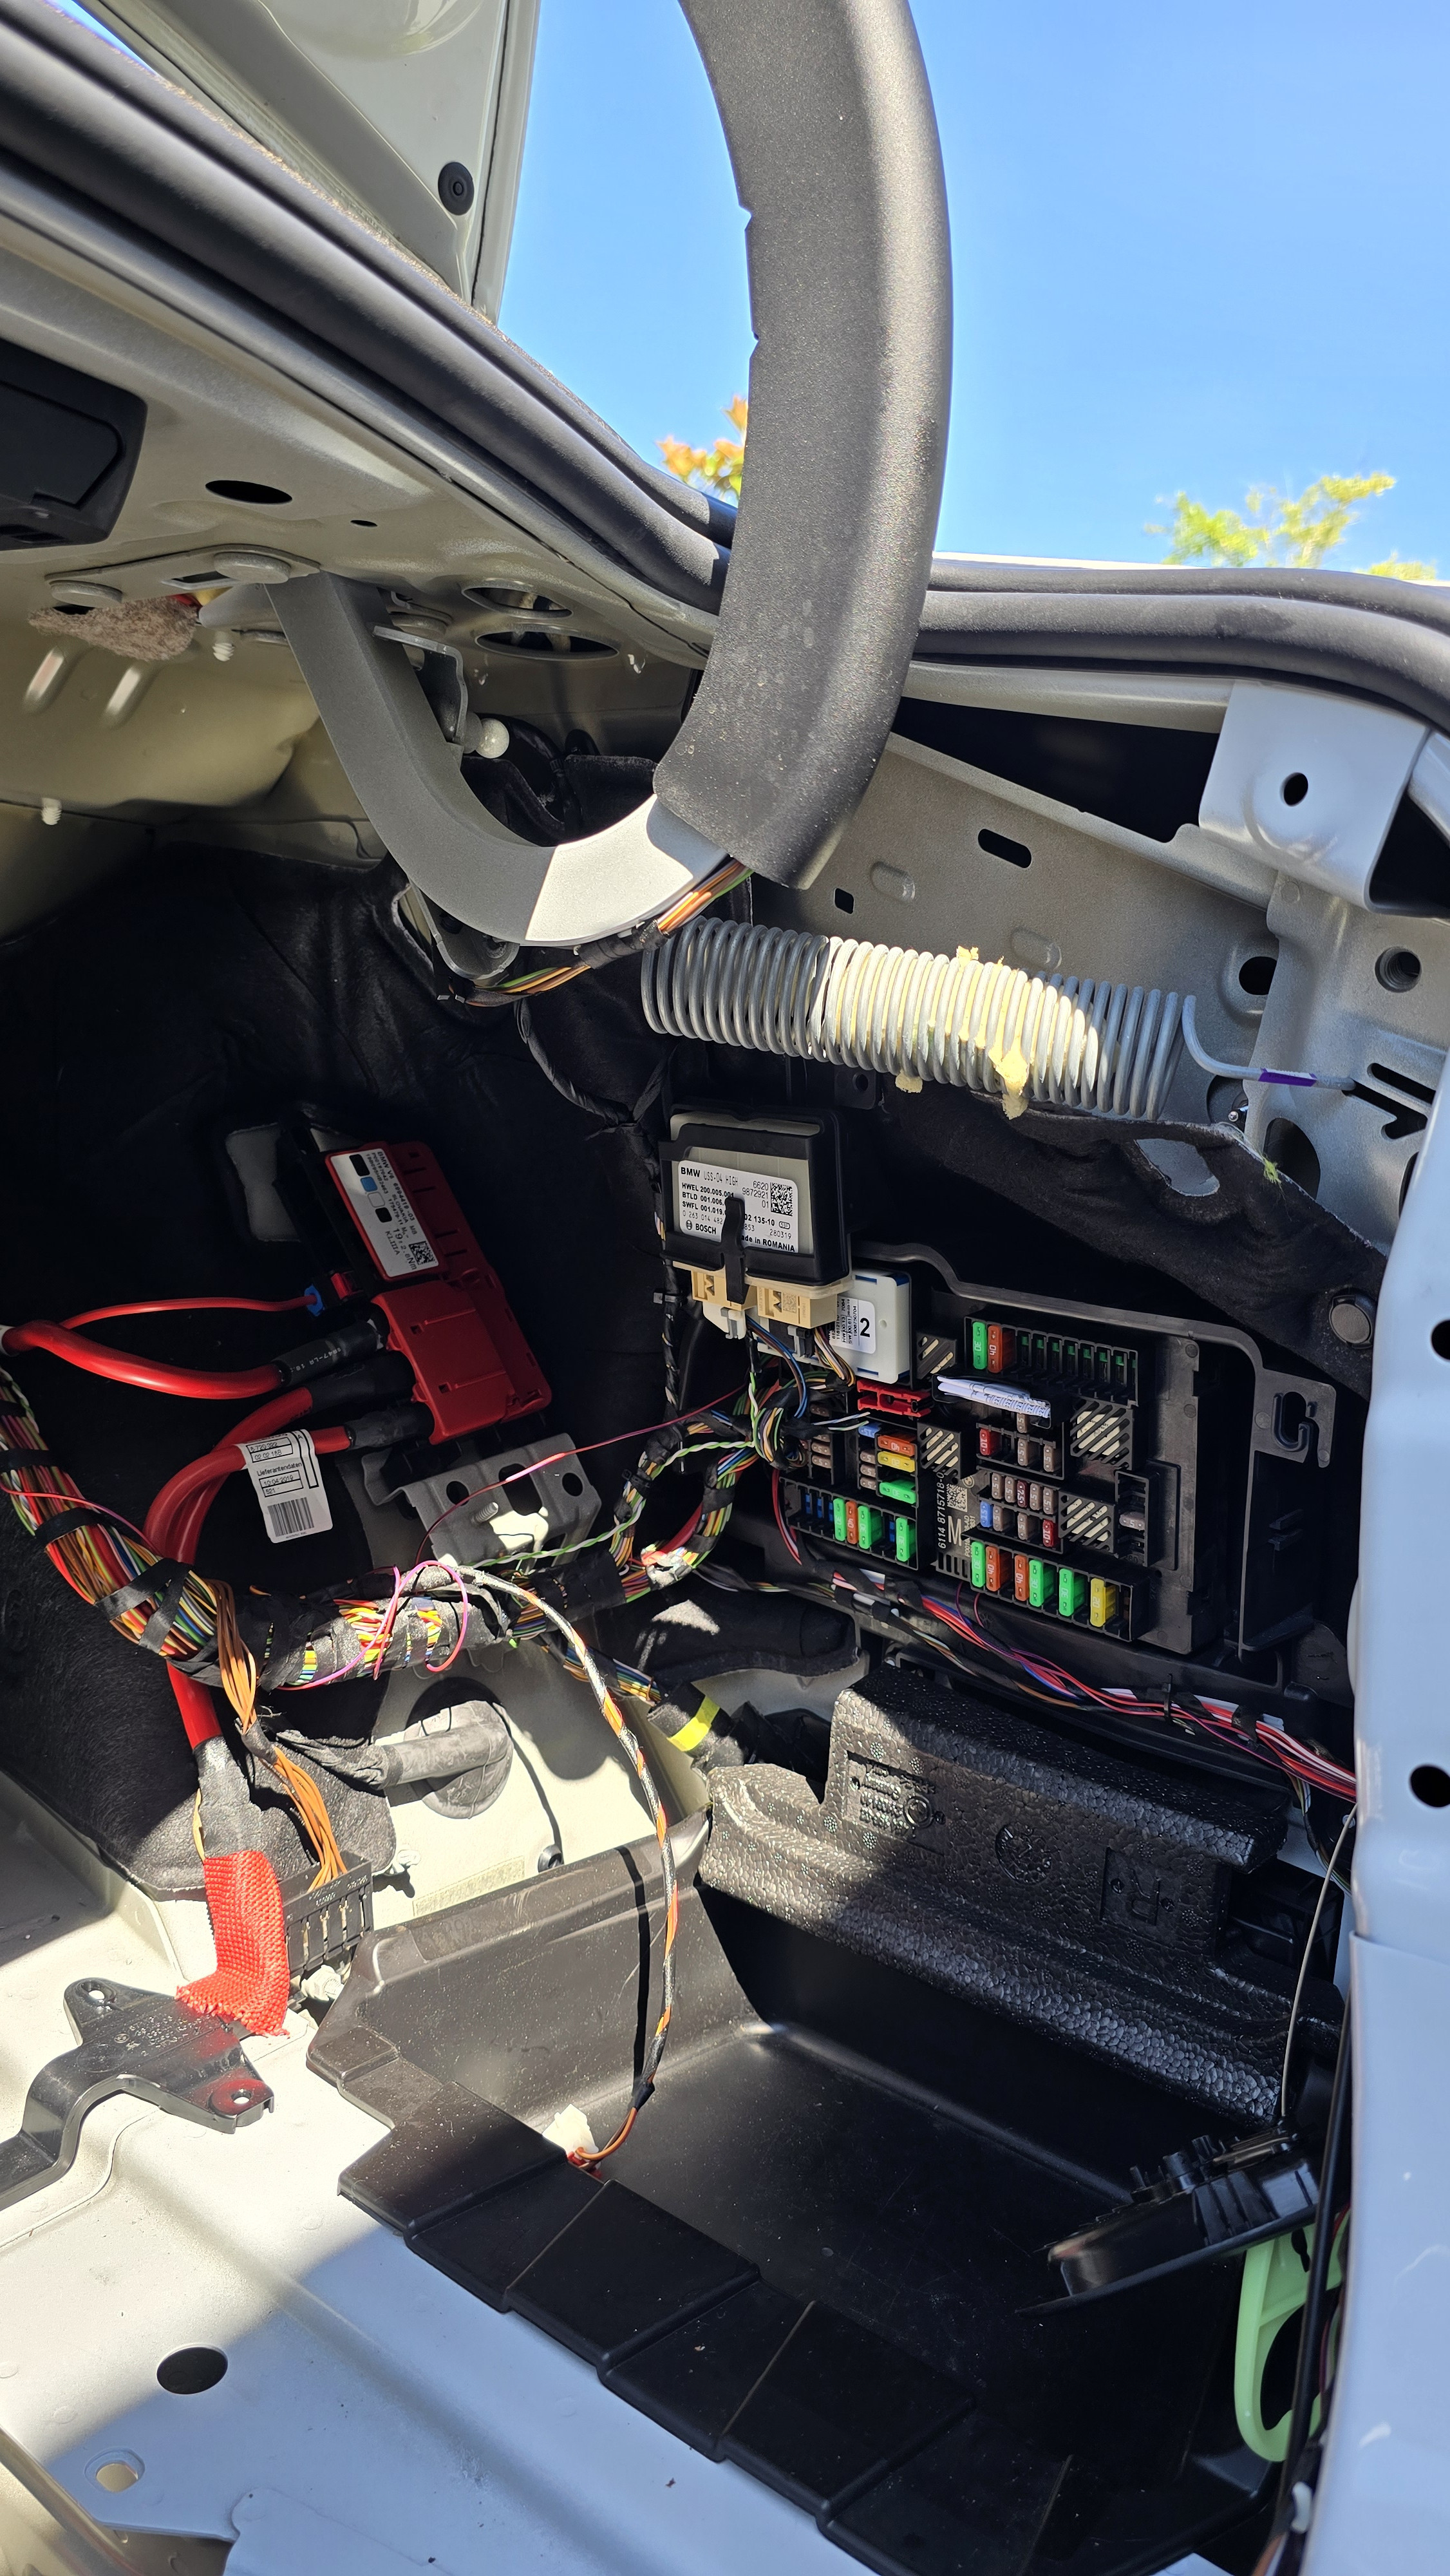 BMW G Series Trunk Carpet Removal
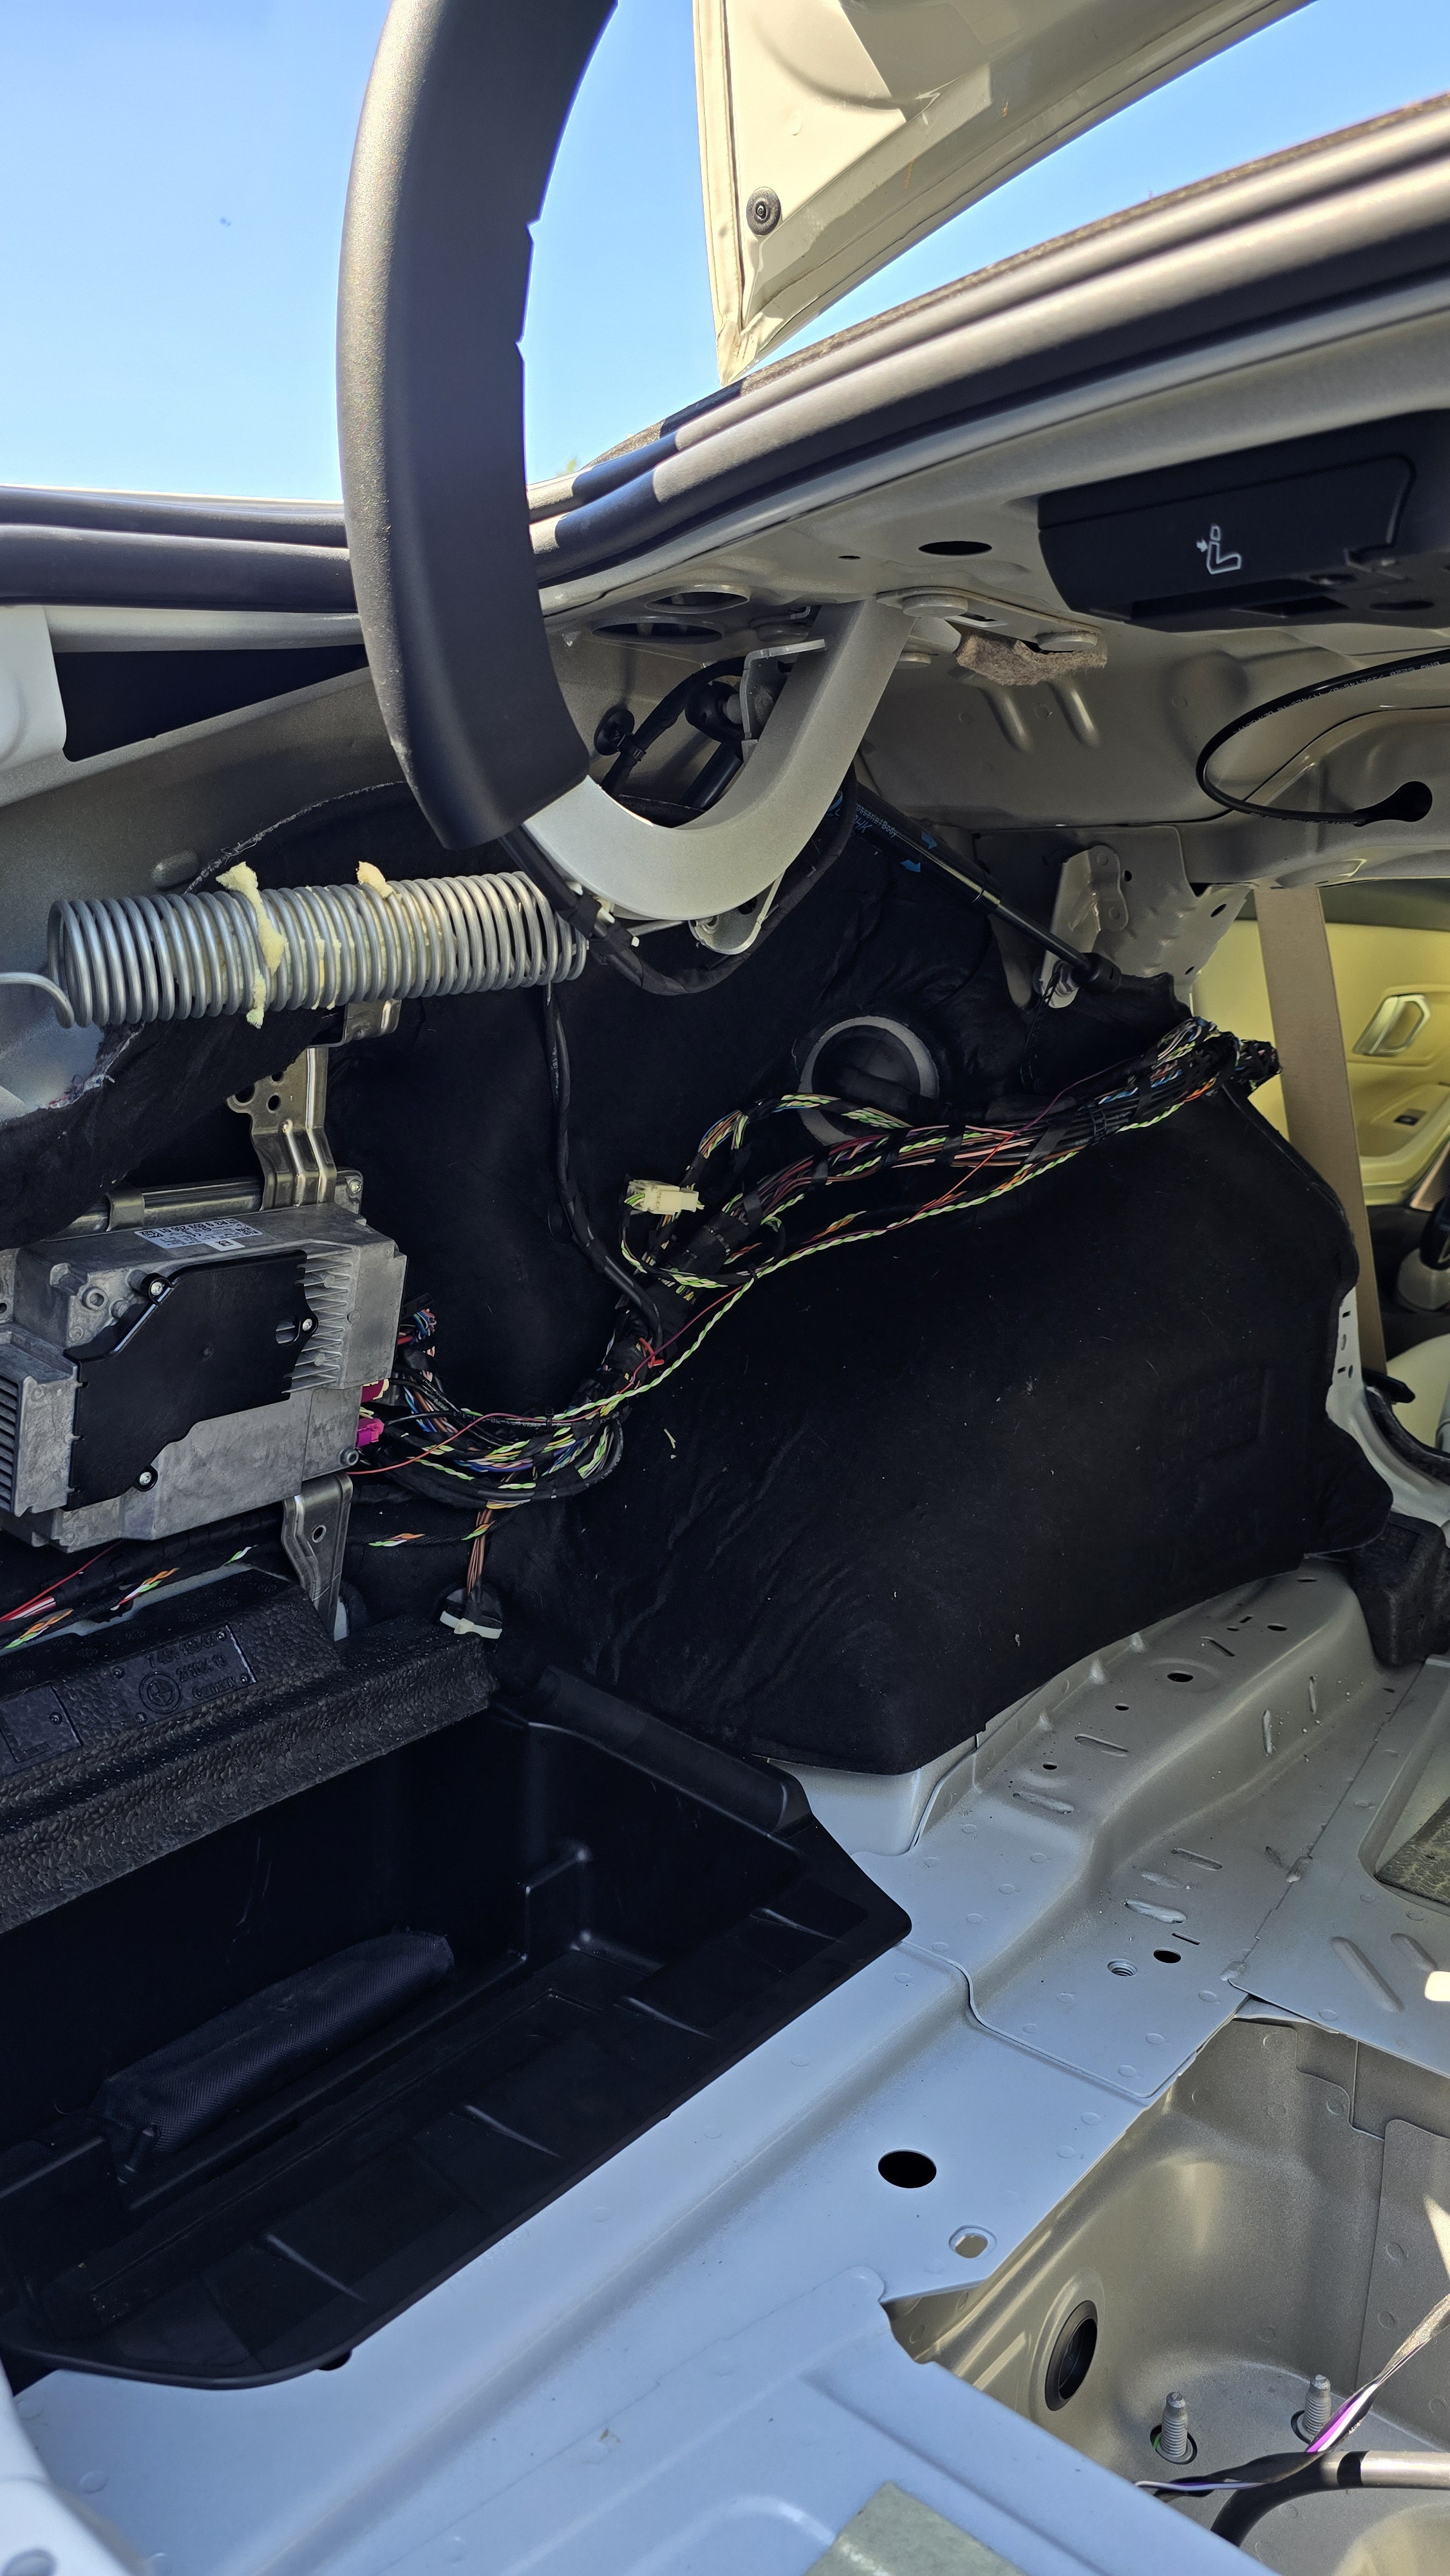 BMW G Series Trunk Side Cover Removal
 BMW G Series Rear Bumper Bolts Location
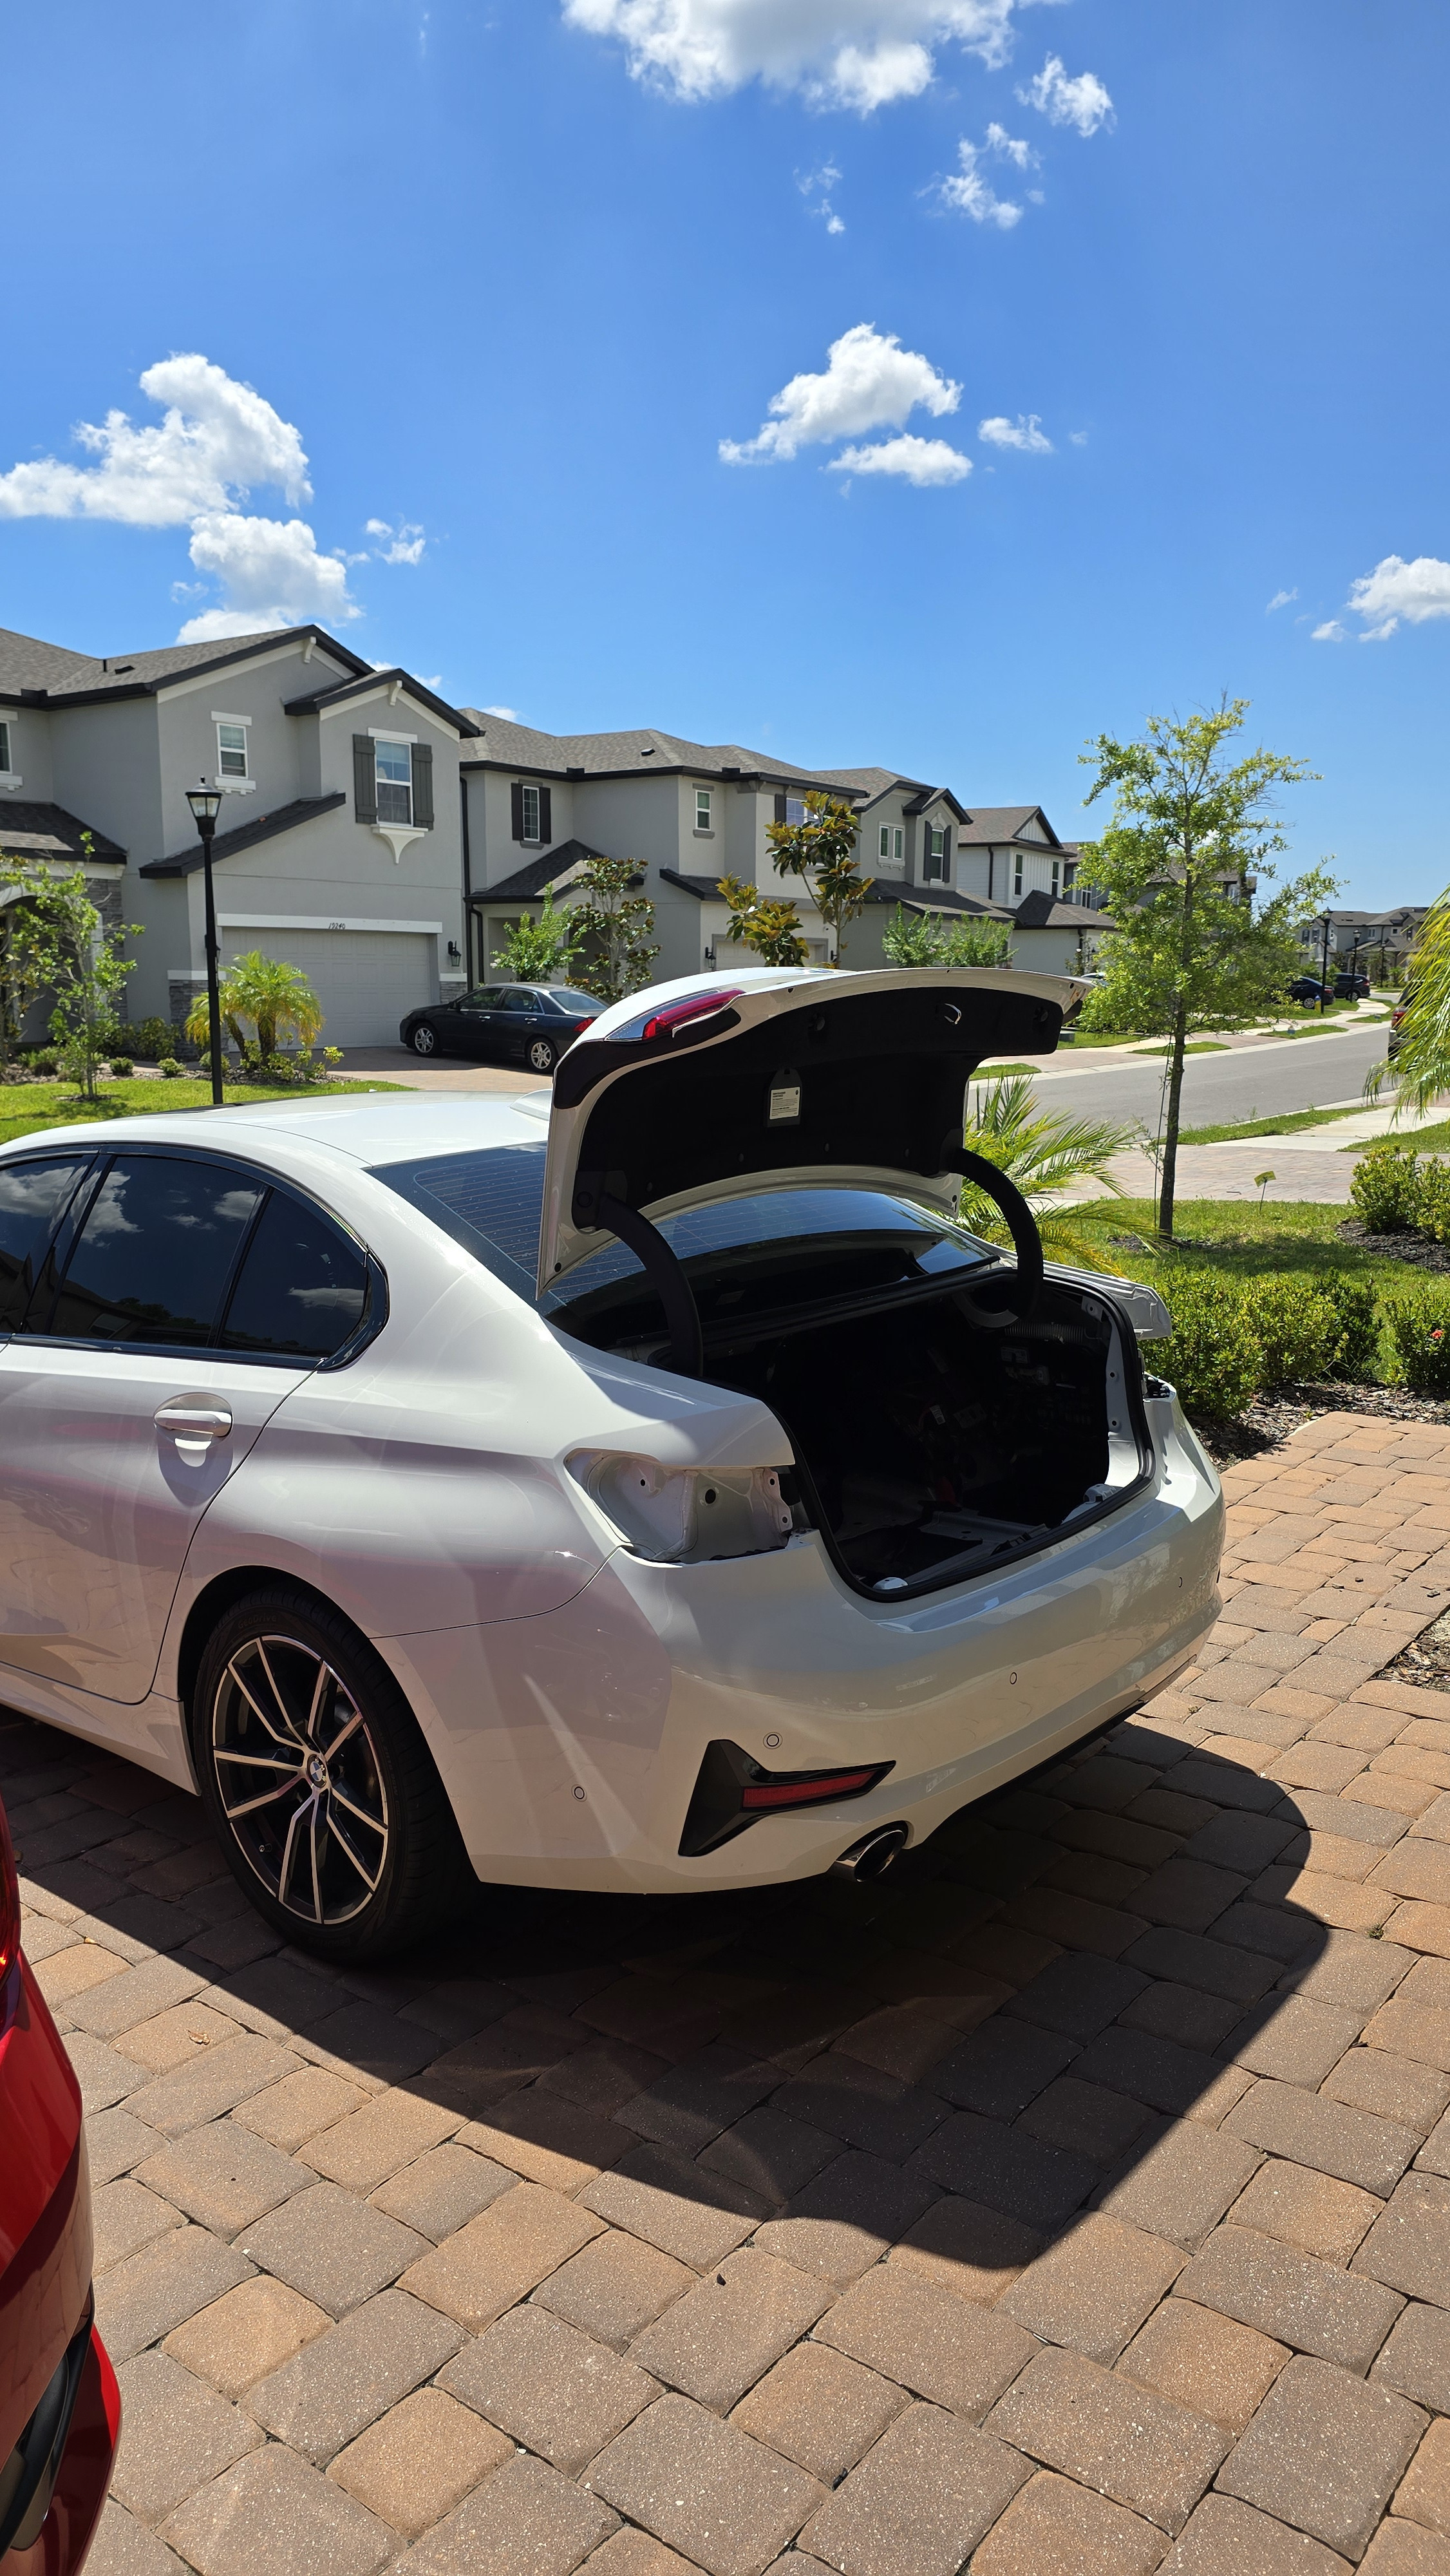 BMW G Series Rear Bumper PDC Plug Disconnection
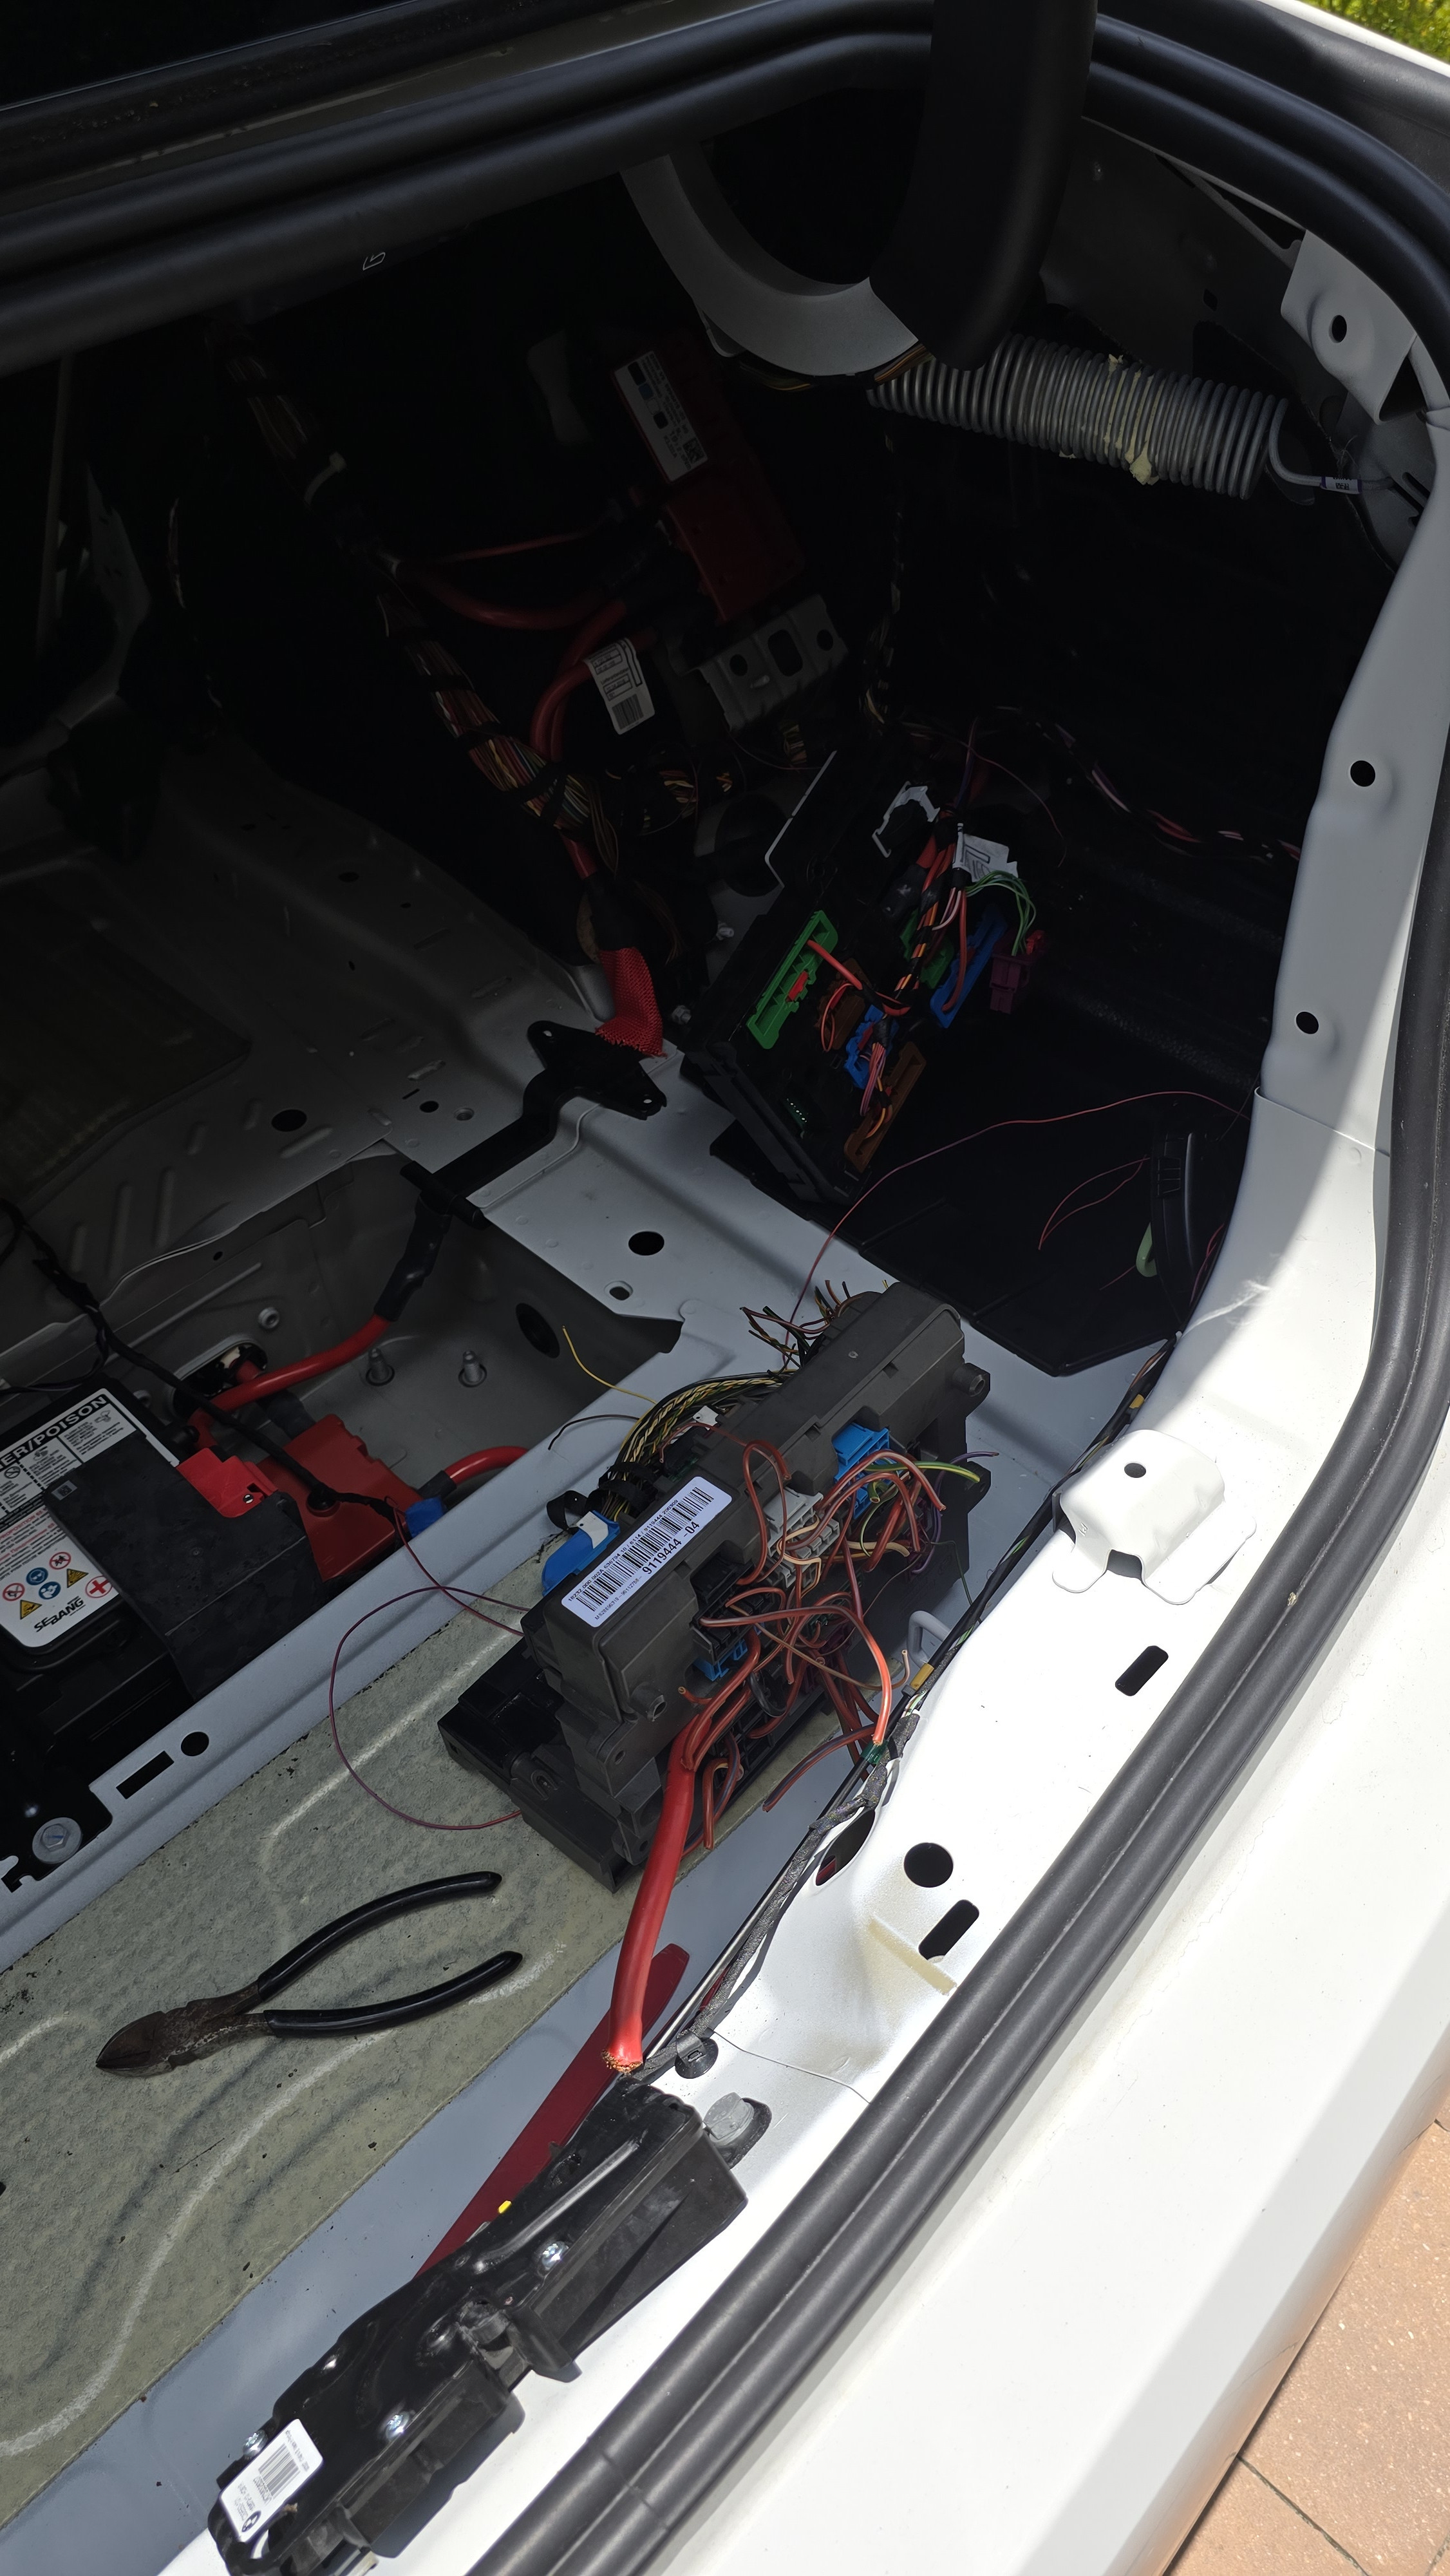 BMW G Series Rear Bumper Unclipping Process
 BMW G Series Rear Bumper Partially Removed
 BMW G Series Rear Bumper Fully Removed
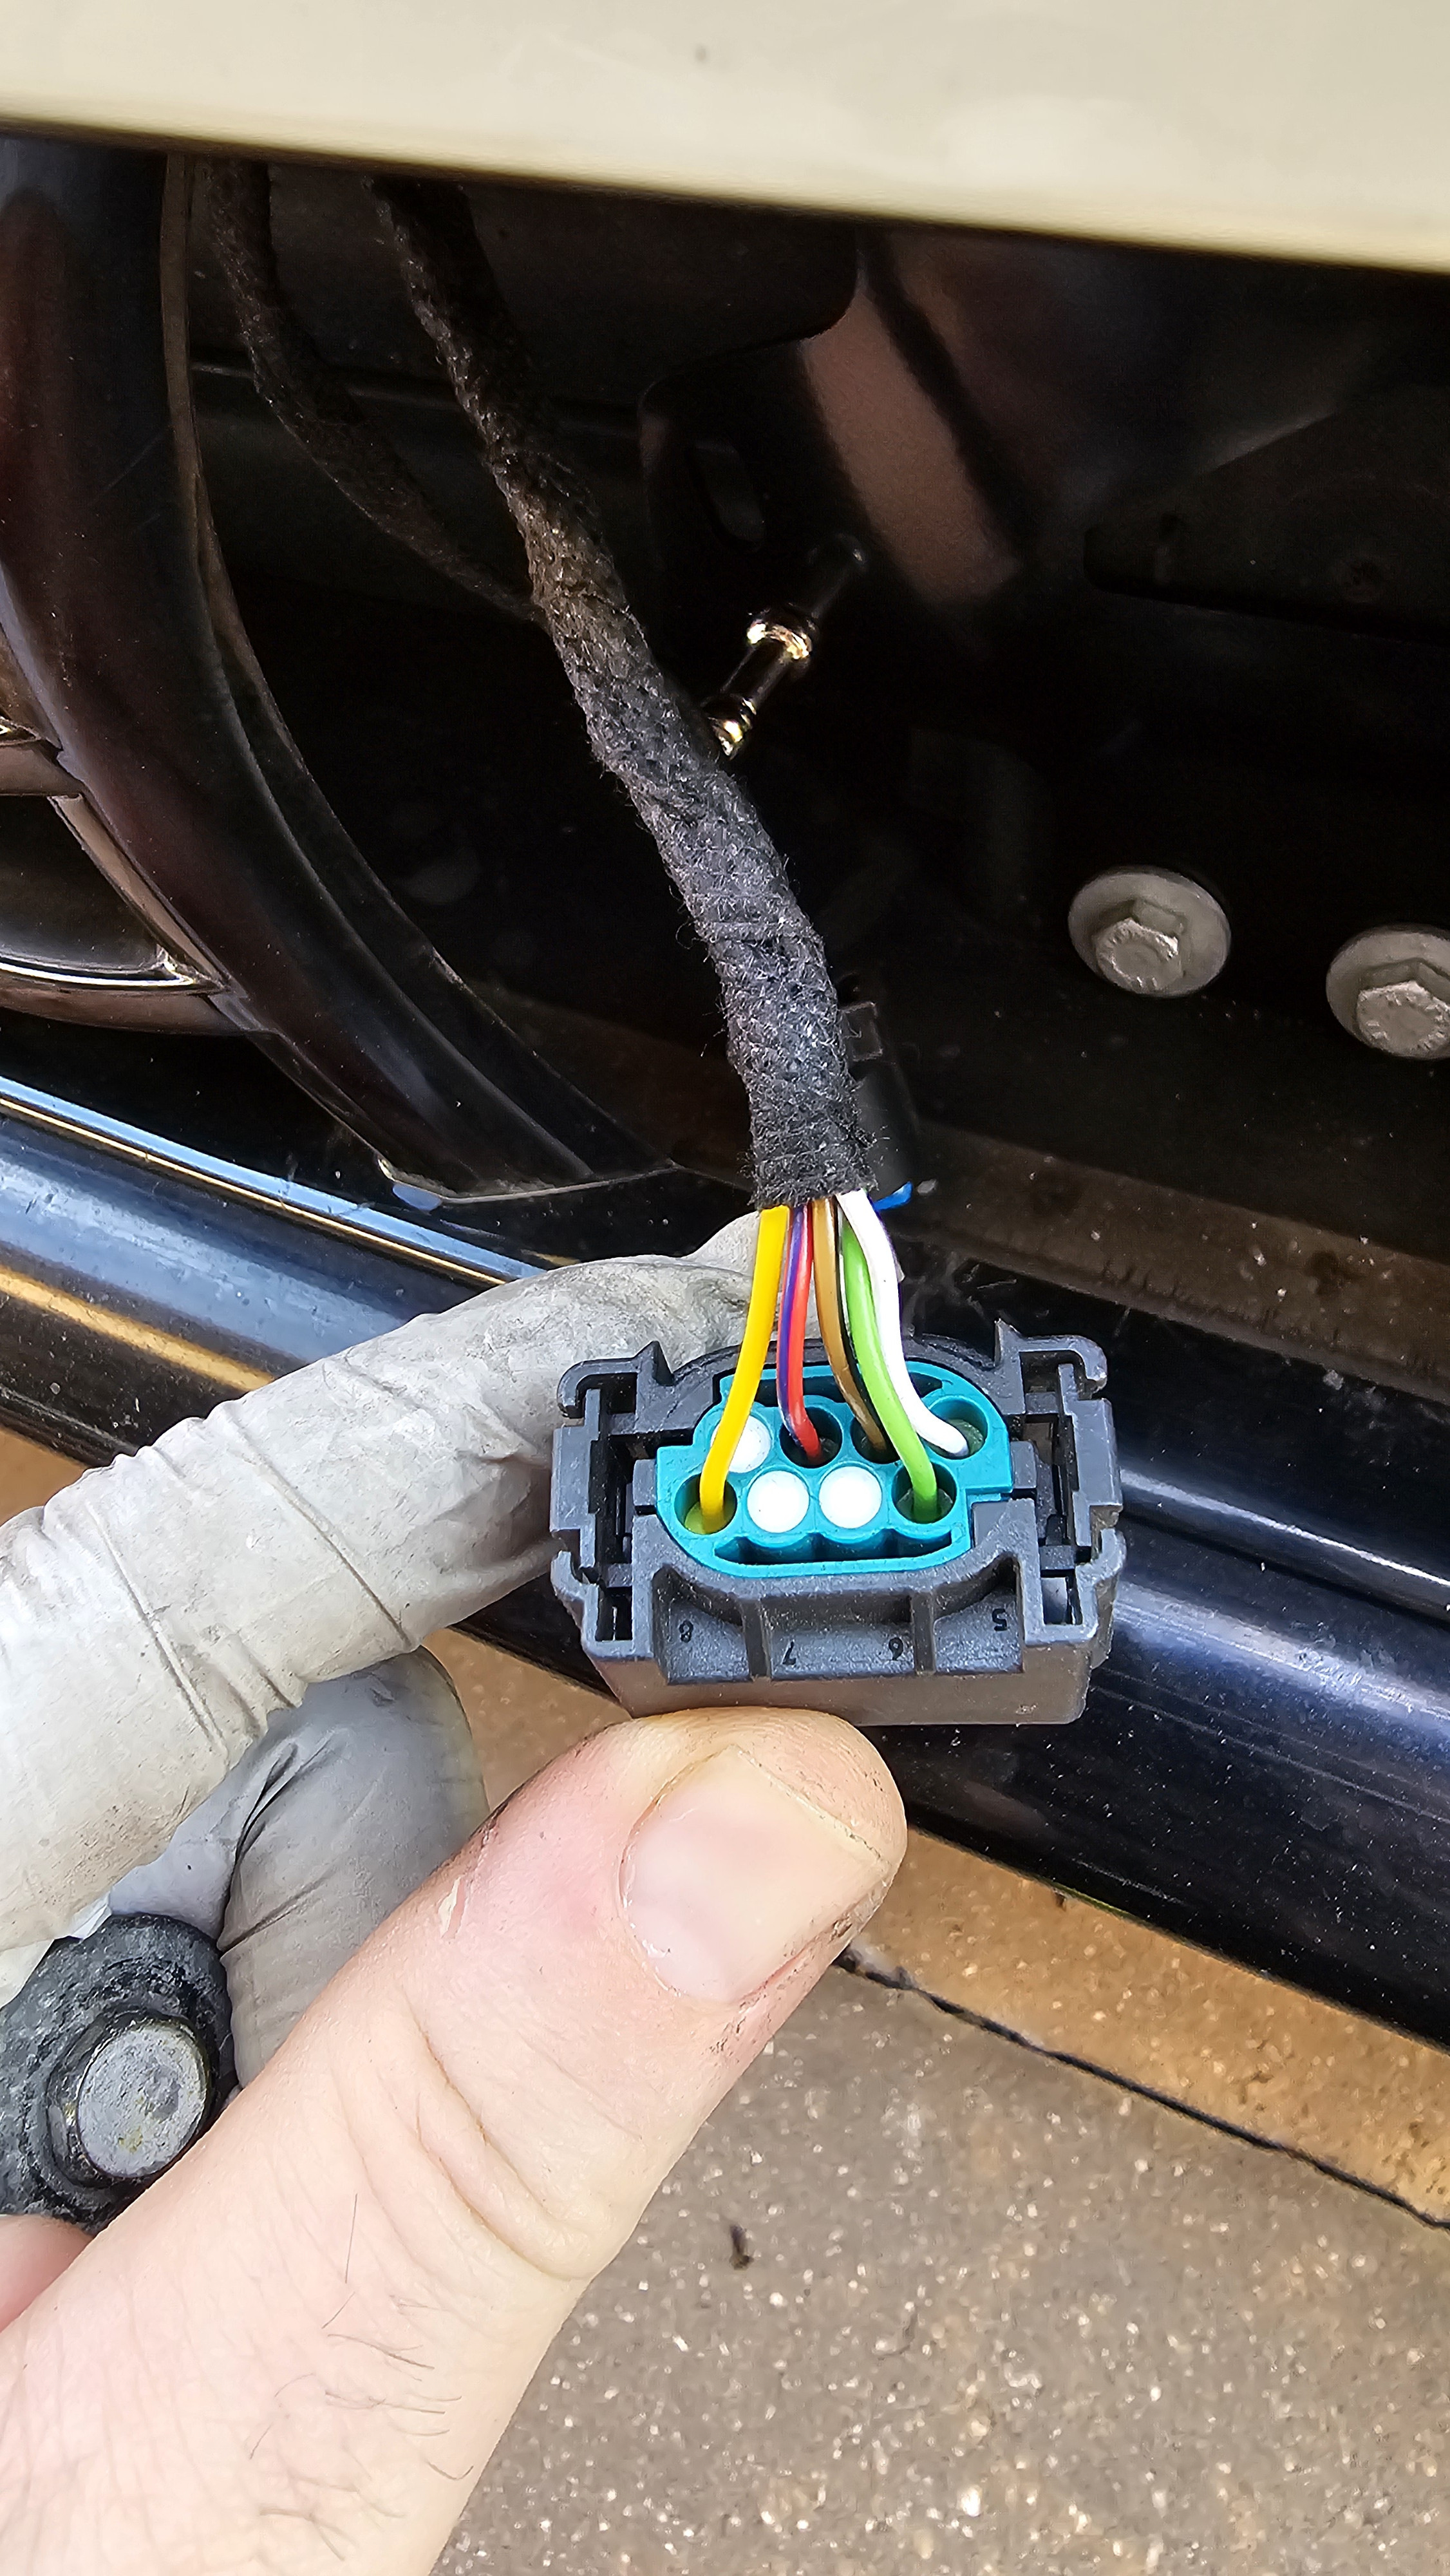
3. SAS3, FRR-02, and Rear Radar Wiring
This step involves integrating the new SAS3 module and wiring the radar sensors.
Wiring Procedure:
- Remove the driver’s door sill and the plastic trim behind the hood handle to easily lift the carpet.
- Position the SAS3 module. In this installation, it was placed on an existing bolt and secured by the carpet.
- Route the factory harness of the SAS3 module to the trunk area.
- Connect 6 pins to the SAS3 plug, which come from the front radars (2 wires per radar).
- Keep the SAS3 plug cover open for further connections from the rear end. If retrofitting PMA and 360 camera, you’ll need 4 additional pins; otherwise, only the rear short radar sensors need connection to SAS3.
- The FRR-02 radar has 4 wires: 2 for power (positive and ground) and 2 Ethernet cables connecting to SAS3.
- Following wiring diagrams, connect all modules to the SAS3, preparing the vehicle for the programming phase.
 BMW G Series SAS3 Module and Wiring
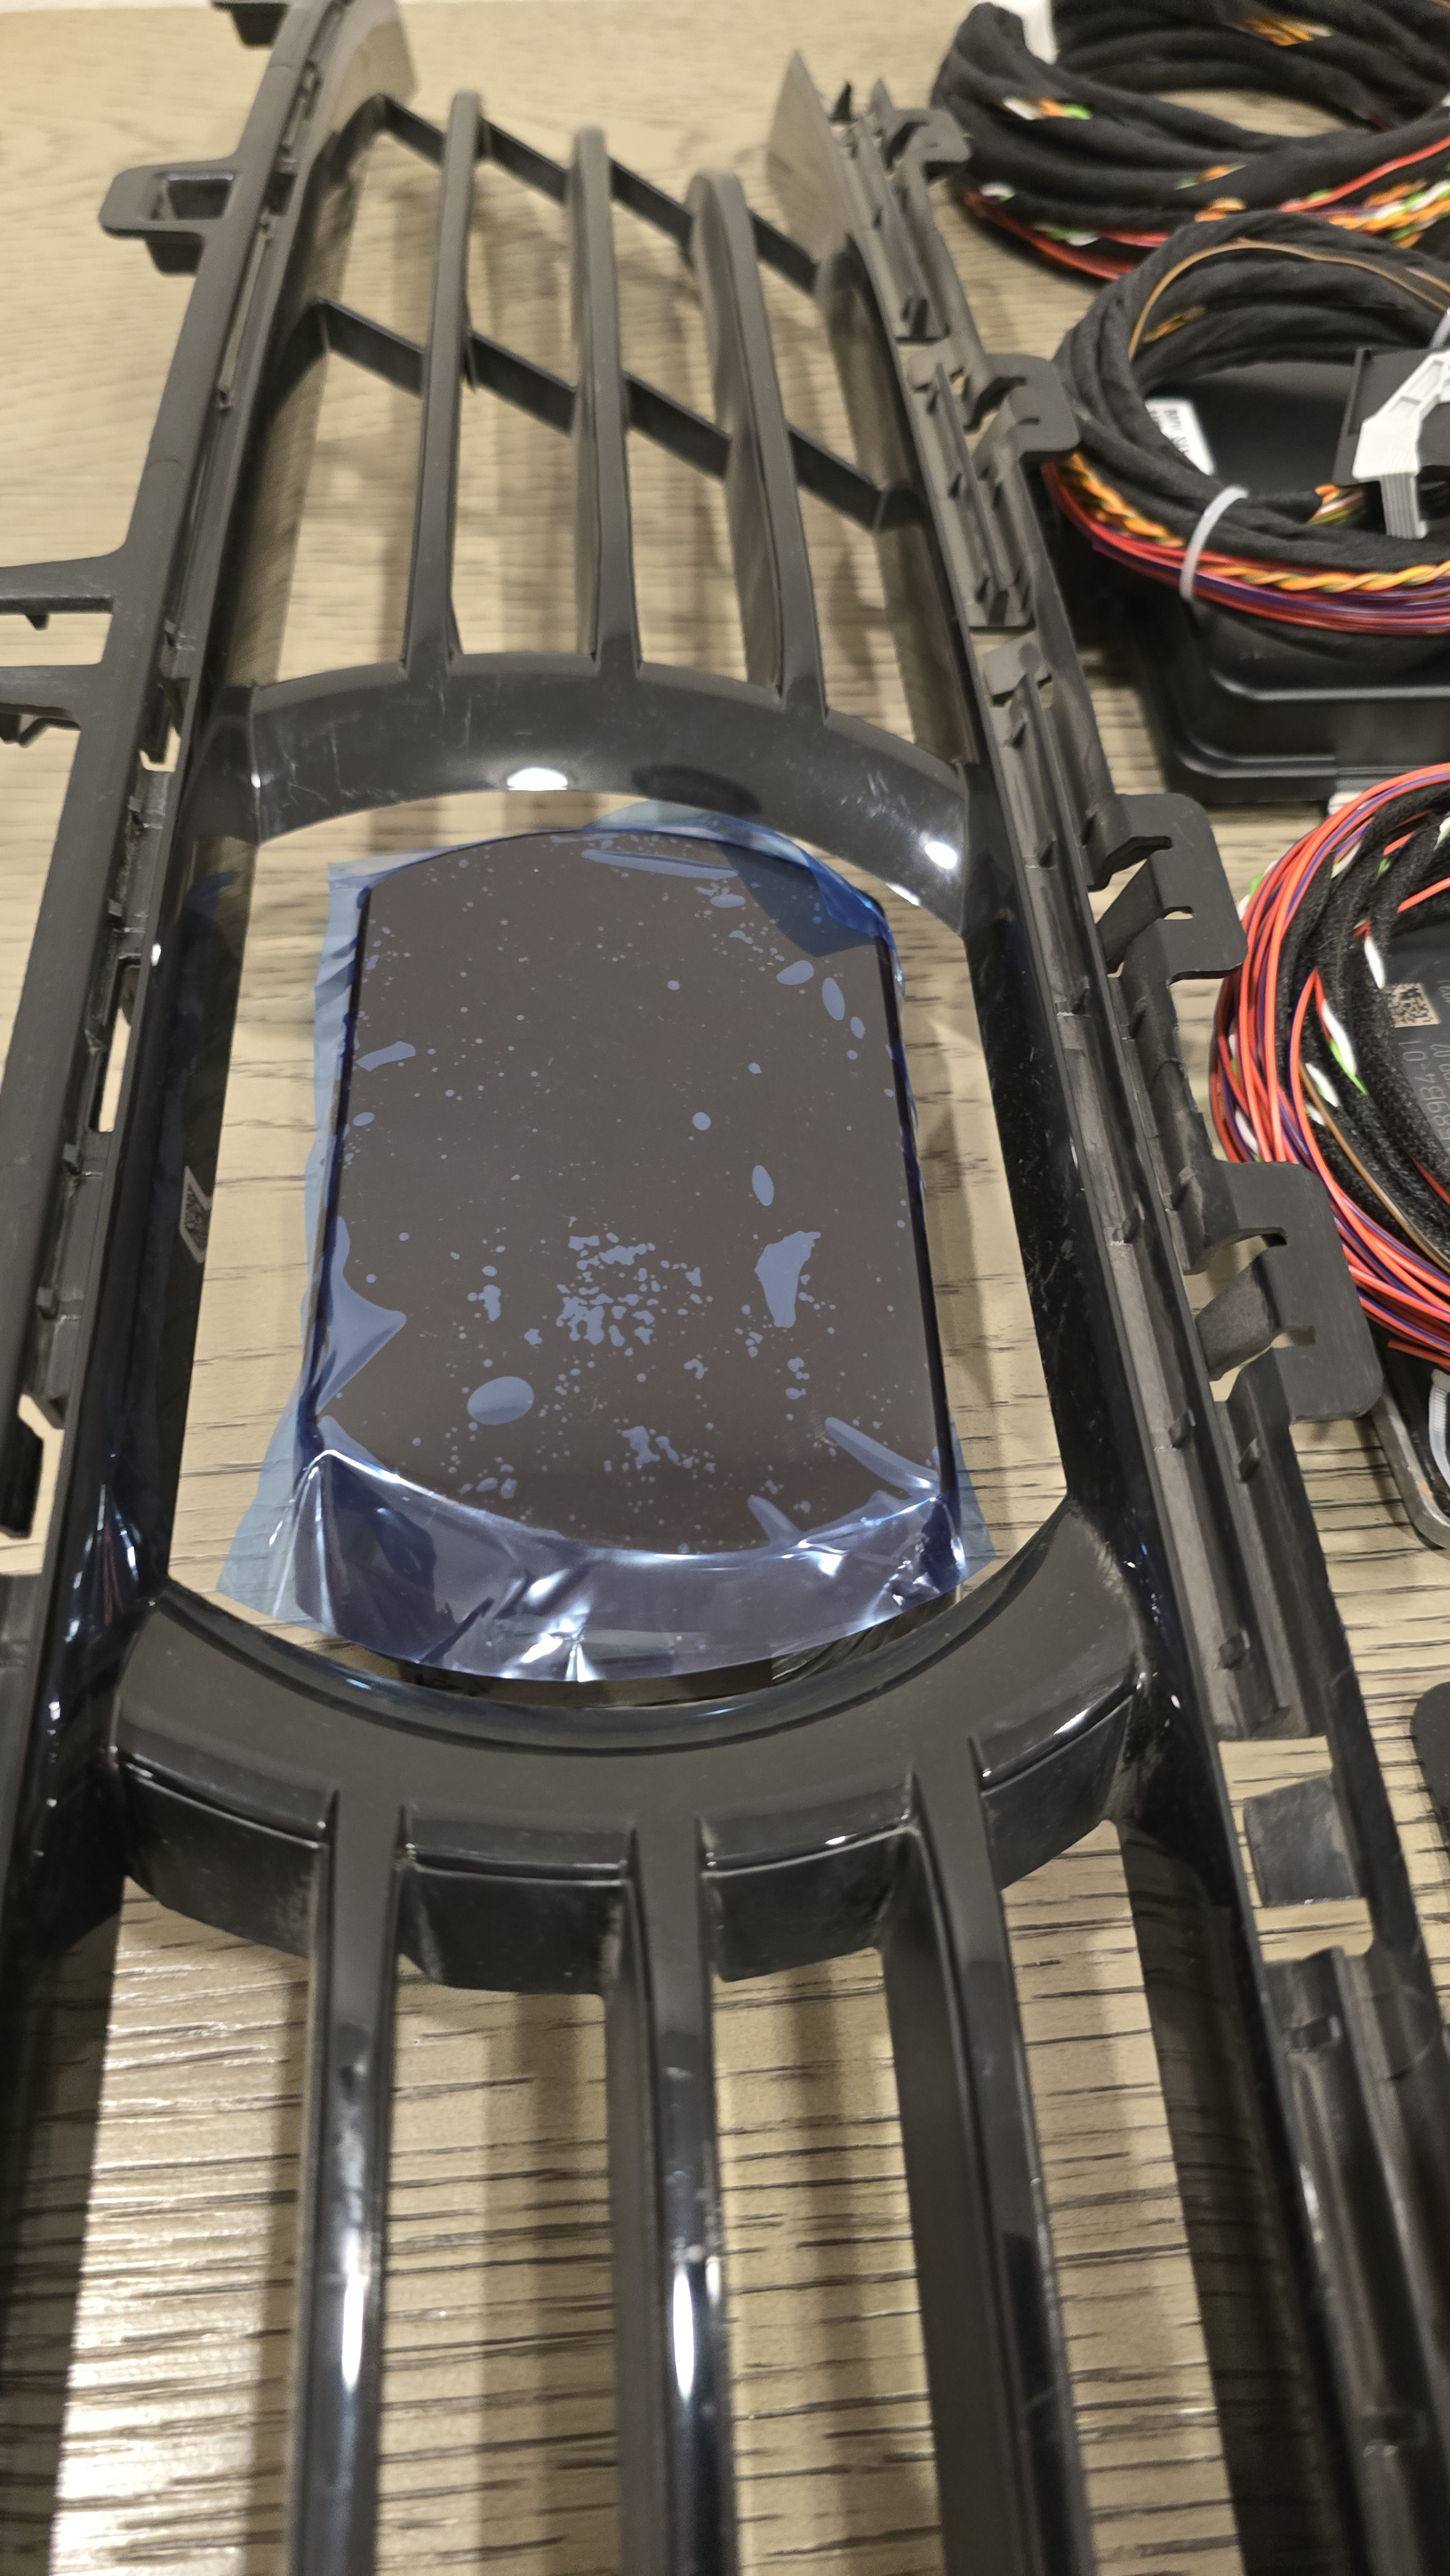 BMW G Series Radar Sensor Wiring Connections
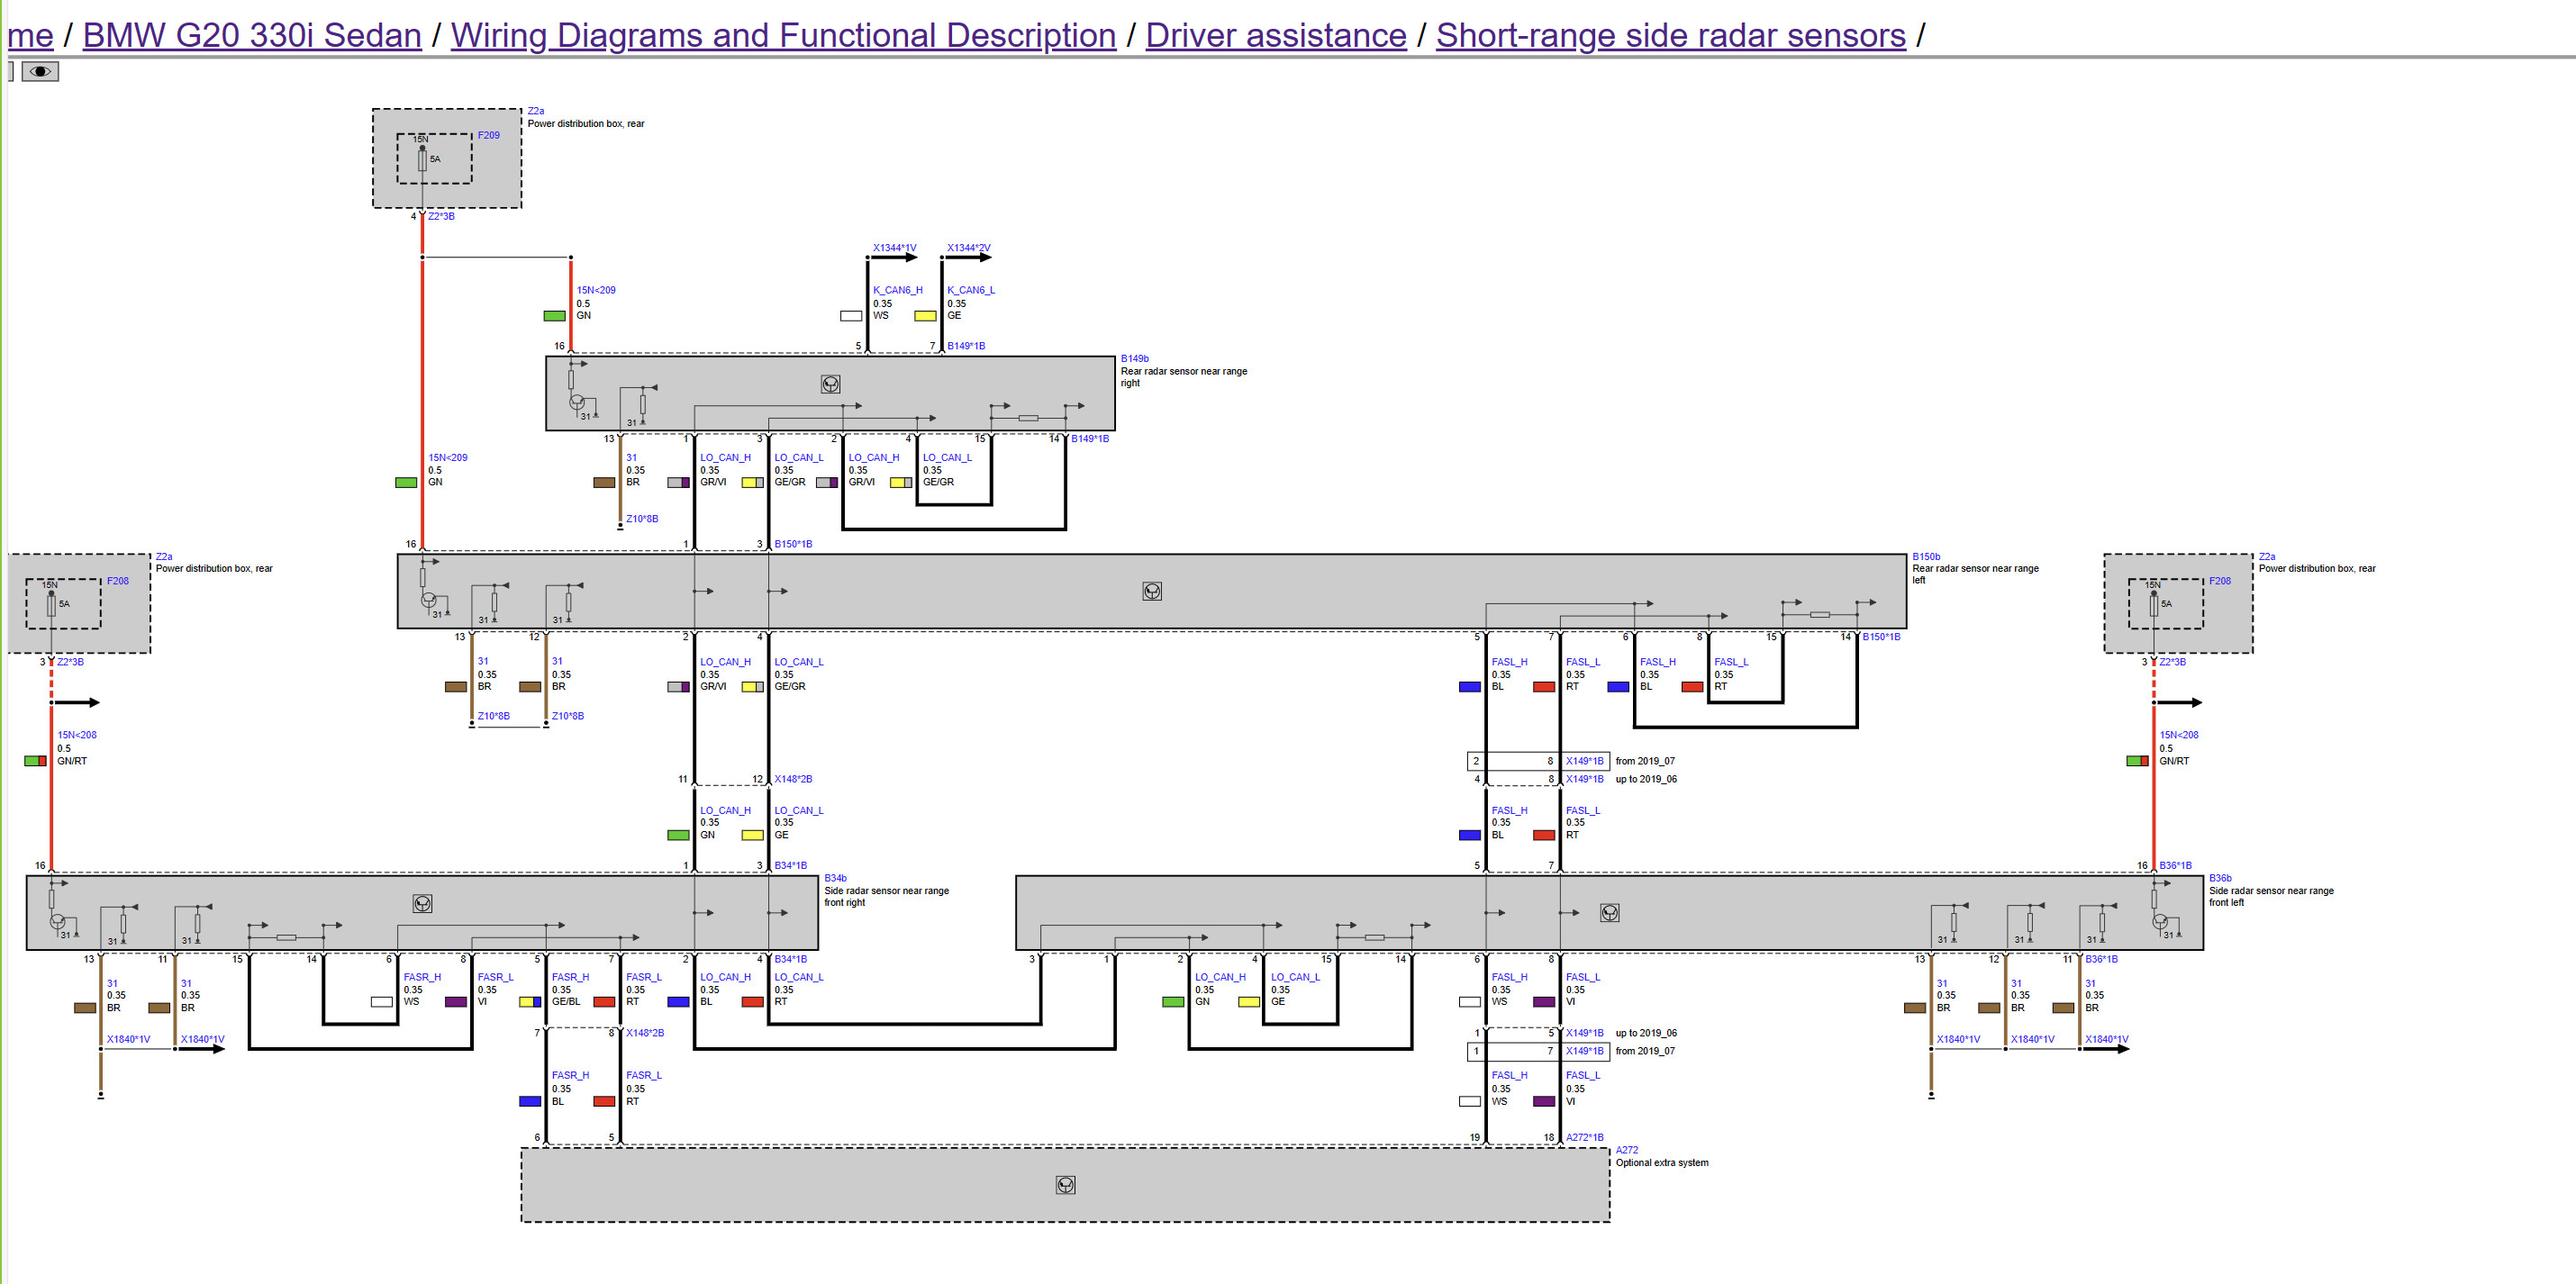 BMW G Series Side Radar Wiring Diagram
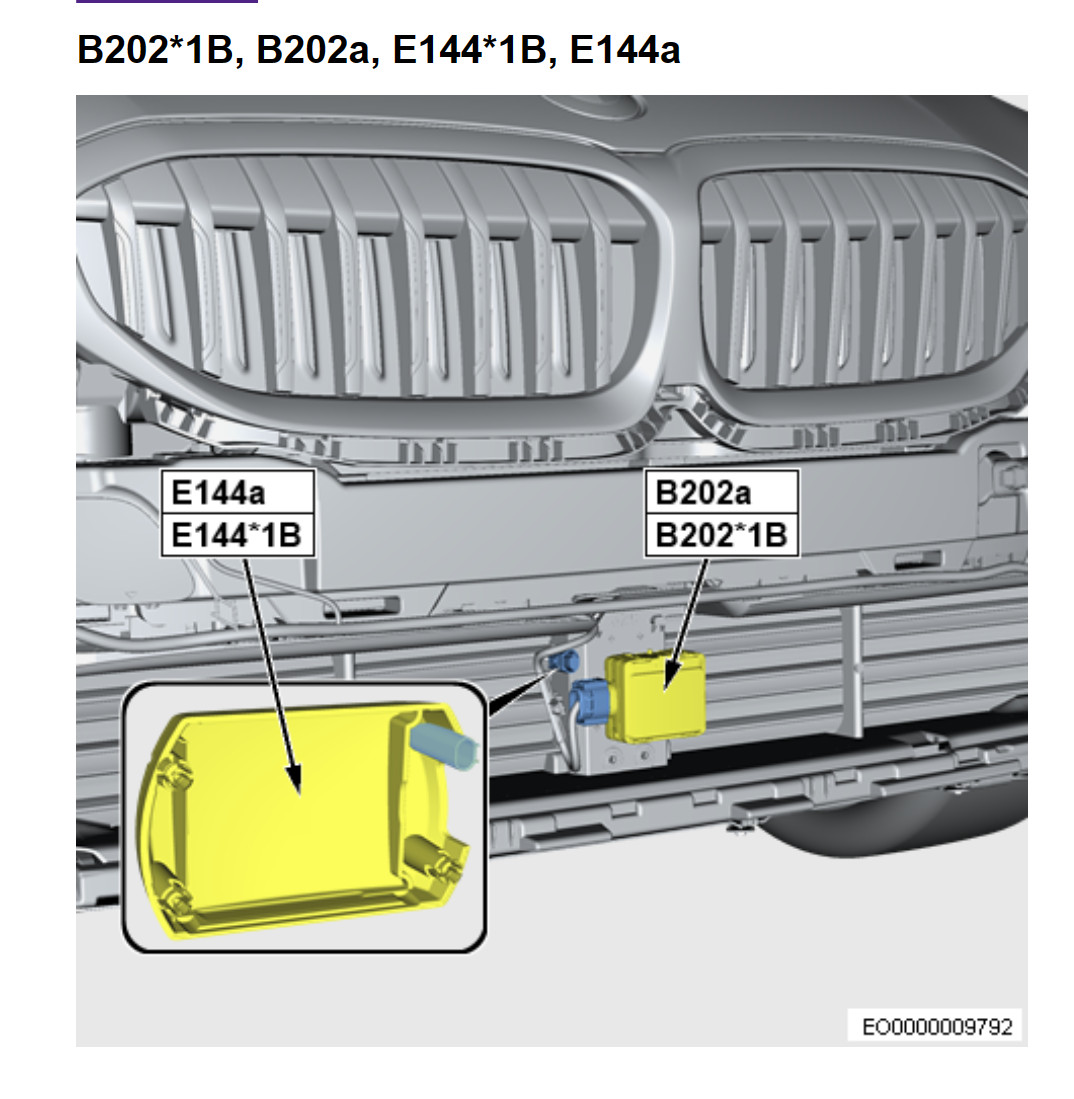 BMW G Series ACC Radar Pinout Diagram
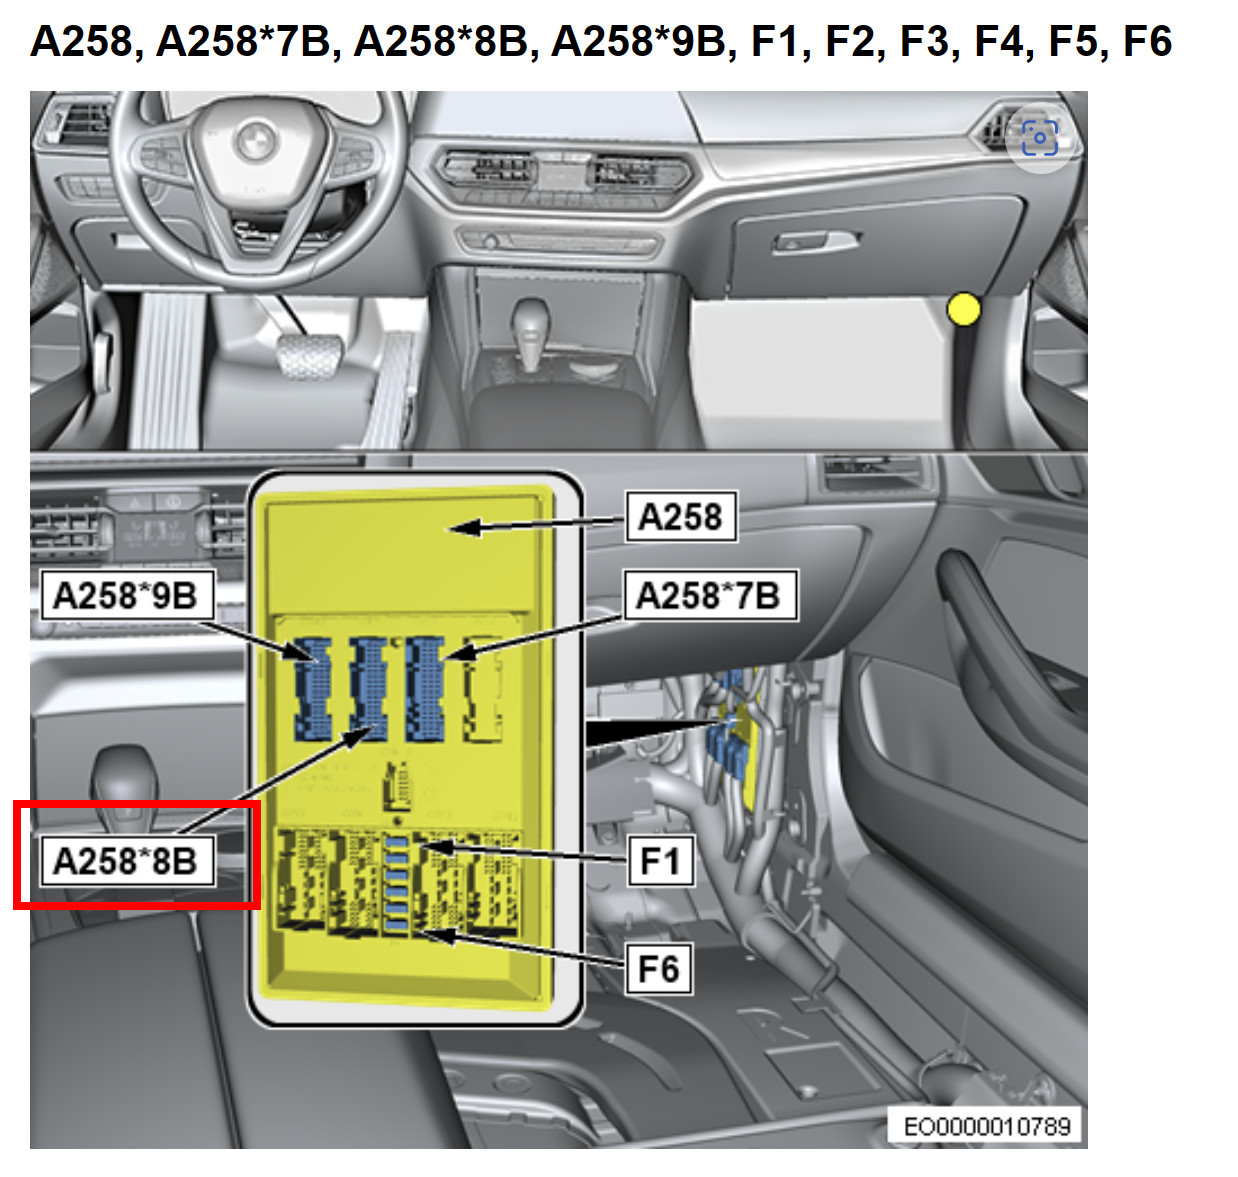 BMW G Series SAS3 to BDC Wiring Diagram
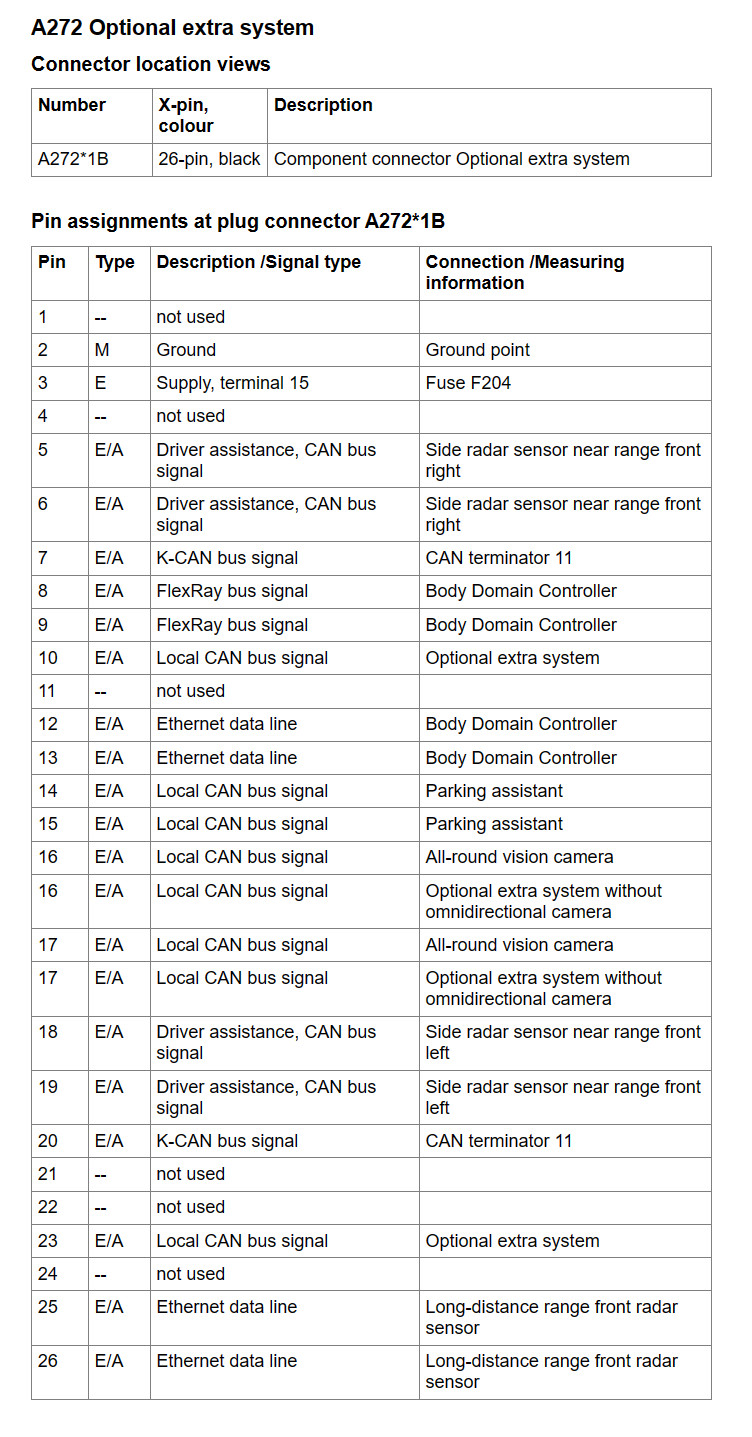 BMW G Series SAS3 Module Pinout
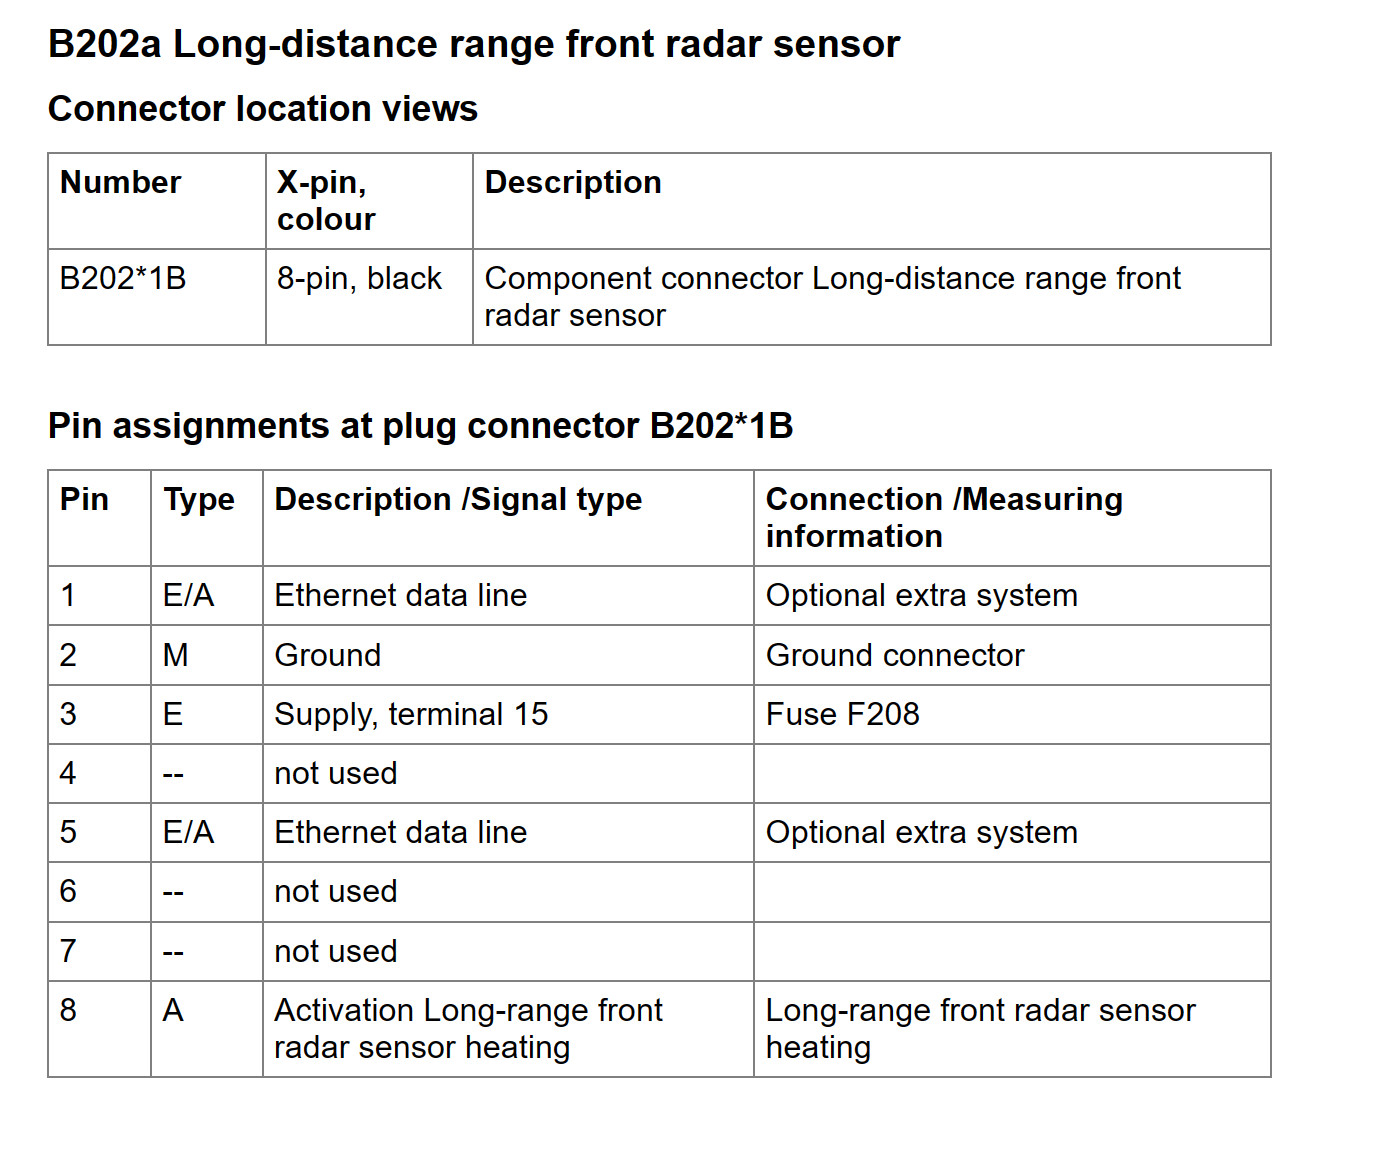 BMW G Series Front Radar Long Range Pinout
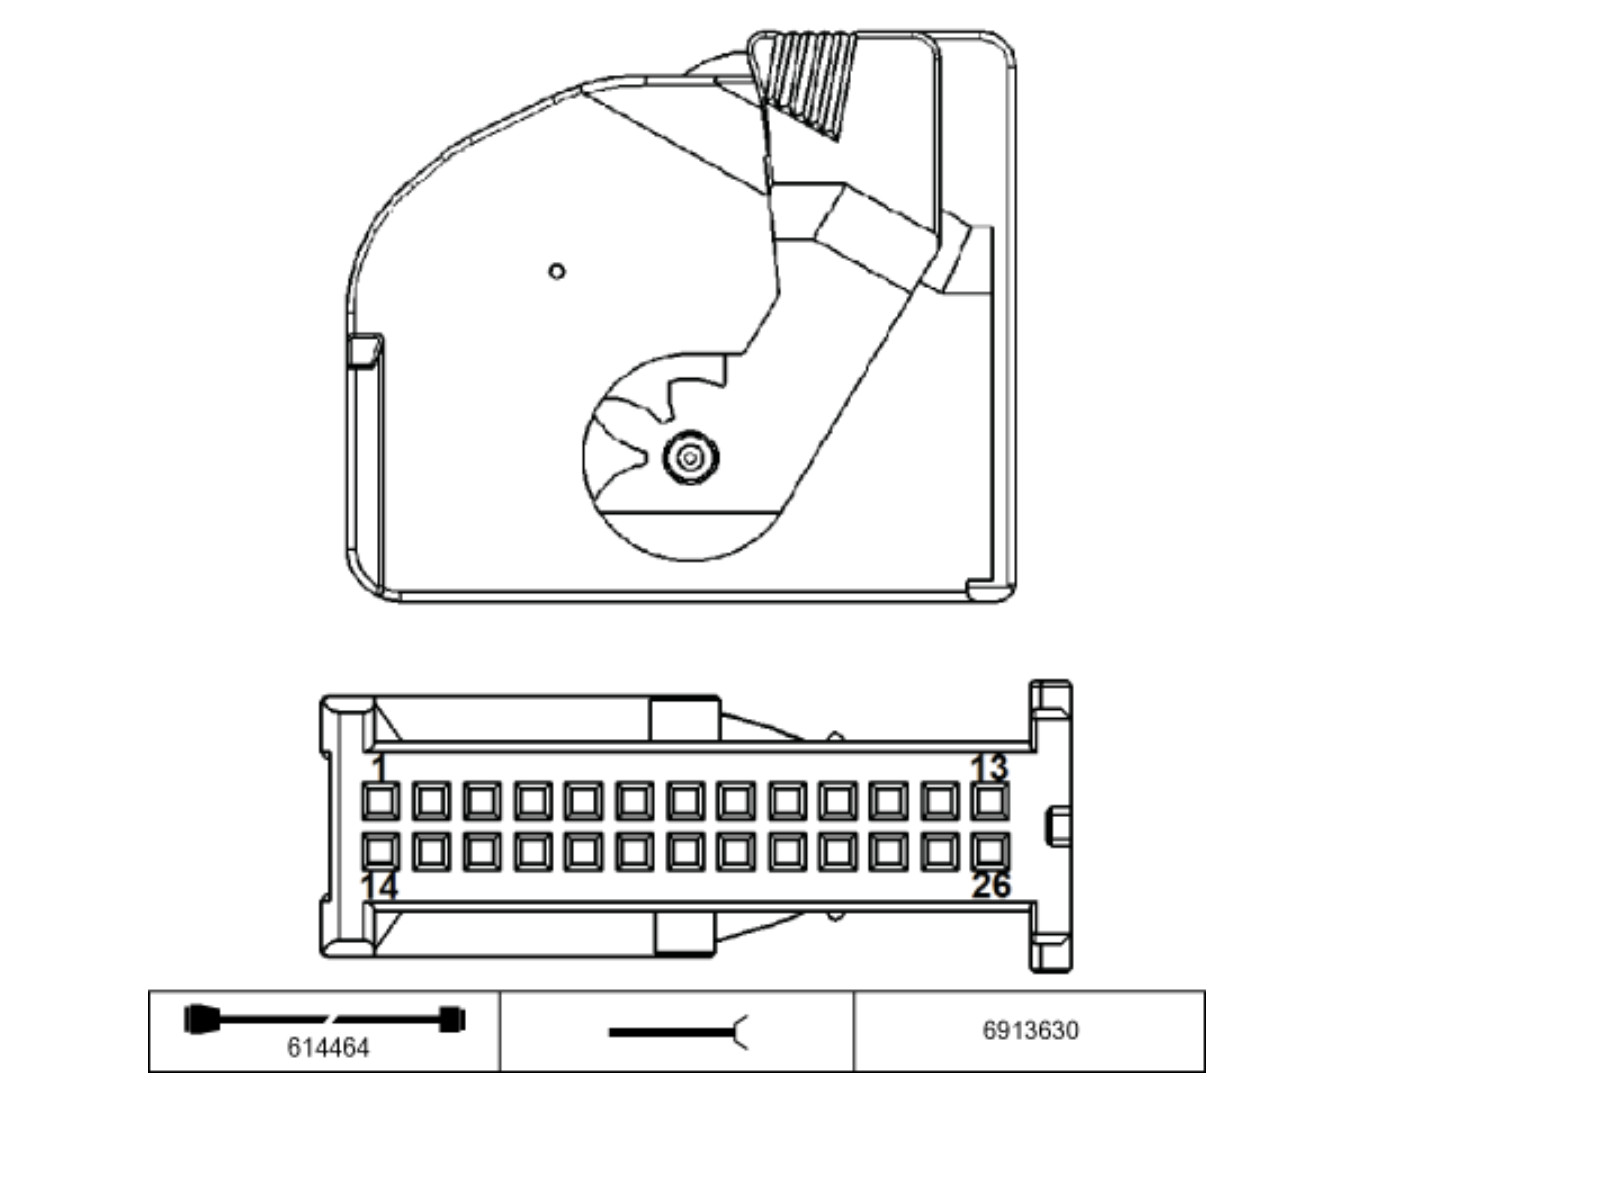 BMW G Series CAN Terminator Location
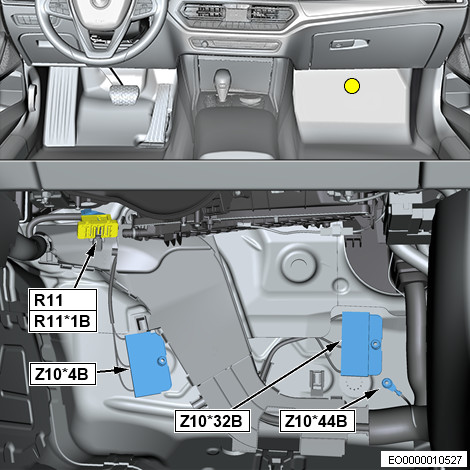 BMW G Series Rear Radar Wiring Diagram 1
 BMW G Series Rear Radar Wiring Diagram 2
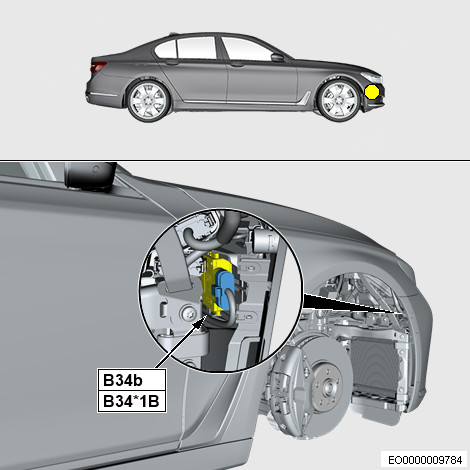 BMW G Series Rear Radar Wiring Diagram 3
4. Steering Wheel and SZL Module Replacement
Upgrading the steering wheel buttons and potentially the SZL (Steering Column Switch) module is essential for ACC control and High Beam Assist.
Steering Wheel Removal and SZL Considerations:
-
Disconnect the Battery: Ensure the vehicle battery is disconnected before starting work on the steering wheel and airbag system. Note that G20 models may have an auxiliary battery in the front passenger side, which may keep the car powered for a short period after disconnecting the main battery.
-
Airbag Removal: Carefully remove the steering wheel airbag. The removal process can be intricate, with hidden access holes.
-
Steering Wheel Bolt Removal: Remove the center 16mm bolt securing the steering wheel.
a. SZL Replacement (if retrofitting 5AC High Beam Assist):
i. Disconnect all plugs connected to the SZL.
ii. Remove the steering wheel.
iii. Remove the plastic cover around the SZL.
iv. Mark the Clock Spring’s orientation before removing the SZL to maintain alignment.
v. Remove the four 10mm bolts securing the SZL.
vi. Carefully remove the SZL and disconnect its plugs.
vii. Separate the Clock Spring from the stalk unit by unclipping plastic clips.
viii. Determine SZL Compatibility: Vehicles with Cruise Control with Braking + Parking Assist Plus (5DN) may already have a compatible SZL for 5AU. If not, replace it with the correct SZL.
ix. SZL Part Number for Driving Assistant Professional + High Beam Assist + Heater: 61319436668.
x. Reinstall the new SZL.b. Skipping SZL Replacement (if not retrofitting 5AC): If High Beam Assist is not being retrofitted, skip step ‘a’ and proceed with steering wheel disassembly.
c. Steering Wheel Trim and Button Replacement:
i. Remove shifters by unscrewing T20 screws.
ii. Remove bolts holding the silver trim and buttons.
iii. Remove the silver trim (clipped in place) and replace it with the new trim compatible with LED lighting.
iv. Replace the buttons with ACC-compatible buttons and install the new silver trim.
v. Install the HOD emulator by connecting it to the button plug and then plugging the buttons into the emulator’s additional plug. This is necessary for steering wheels without factory Hands-On Detection.d. HOD Emulator Note: The HOD emulator bypasses the need for a HOD-equipped steering wheel. Factory HOD systems require driver input on the wheel every 30 seconds, which some find intrusive. Emulators eliminate this requirement, offering a potentially less intrusive experience. However, for a factory-standard installation, consider using a steering wheel with HOD.
e. Steering Wheel Reinstallation: Before reinstalling the steering wheel, proceed with DCS (Driver Camera System) installation.
 BMW G Series Steering Wheel Removal – Airbag Release Holes
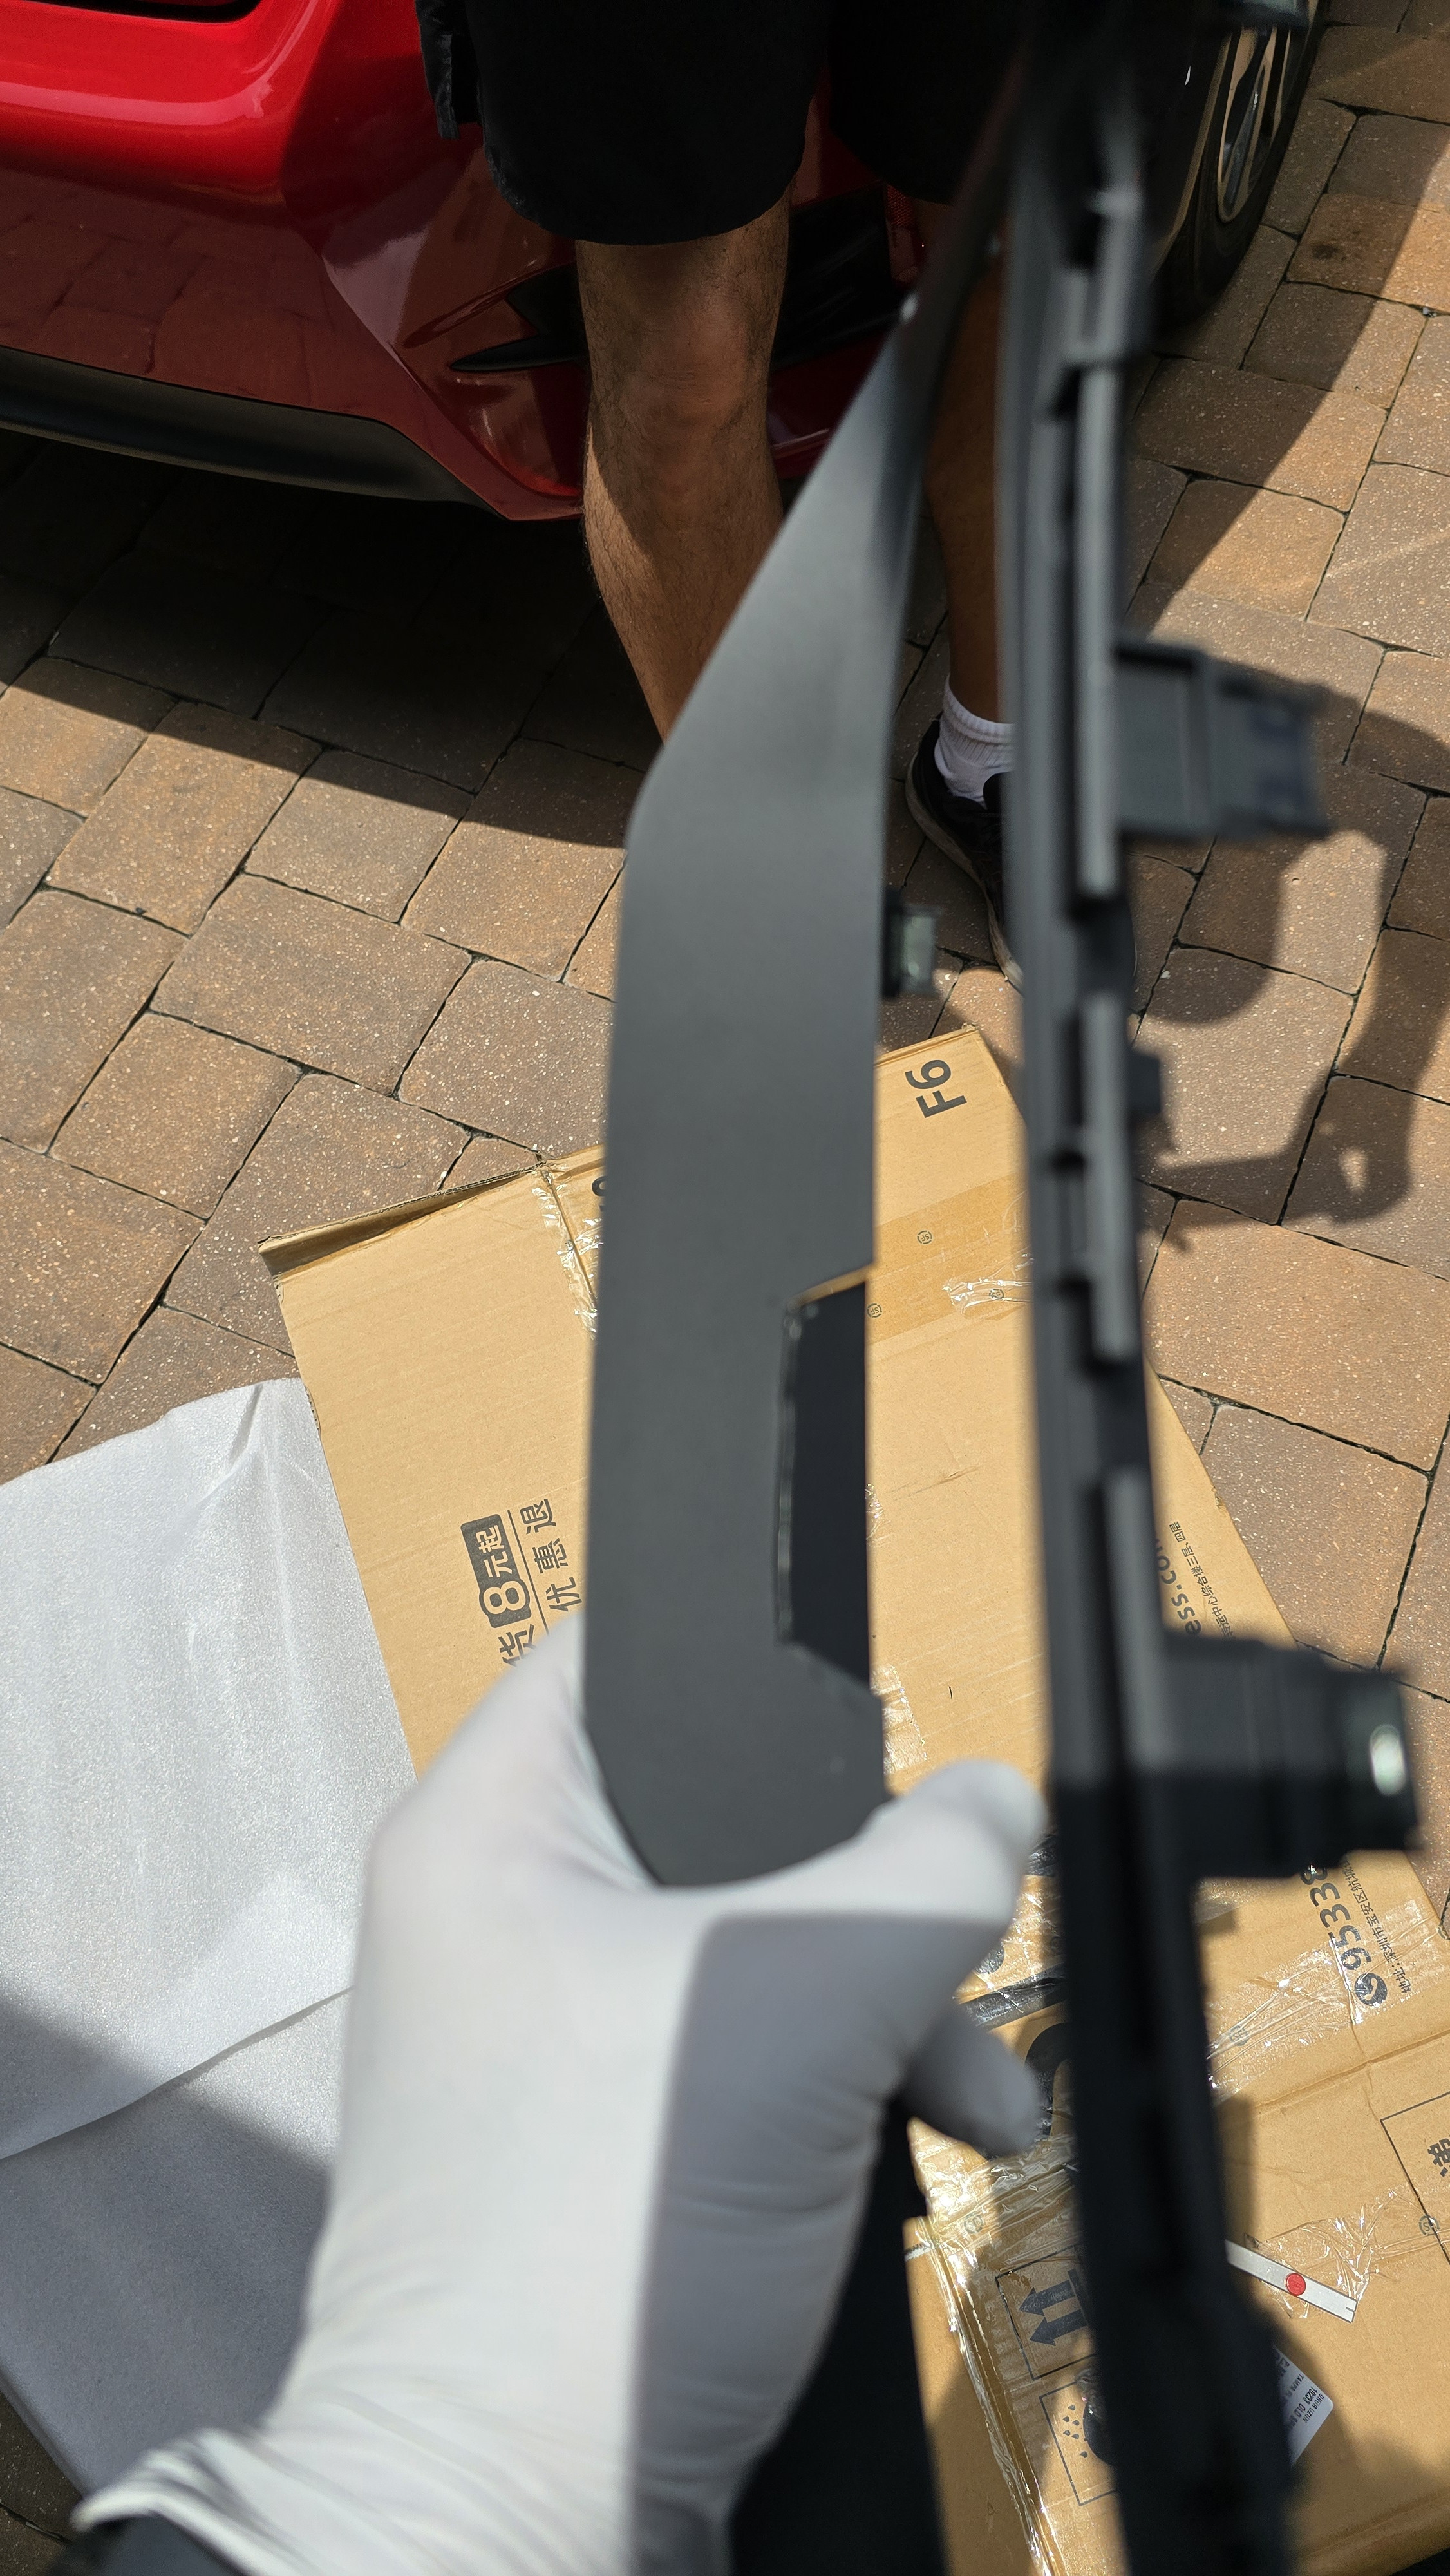 BMW G Series Steering Wheel Airbag Removed
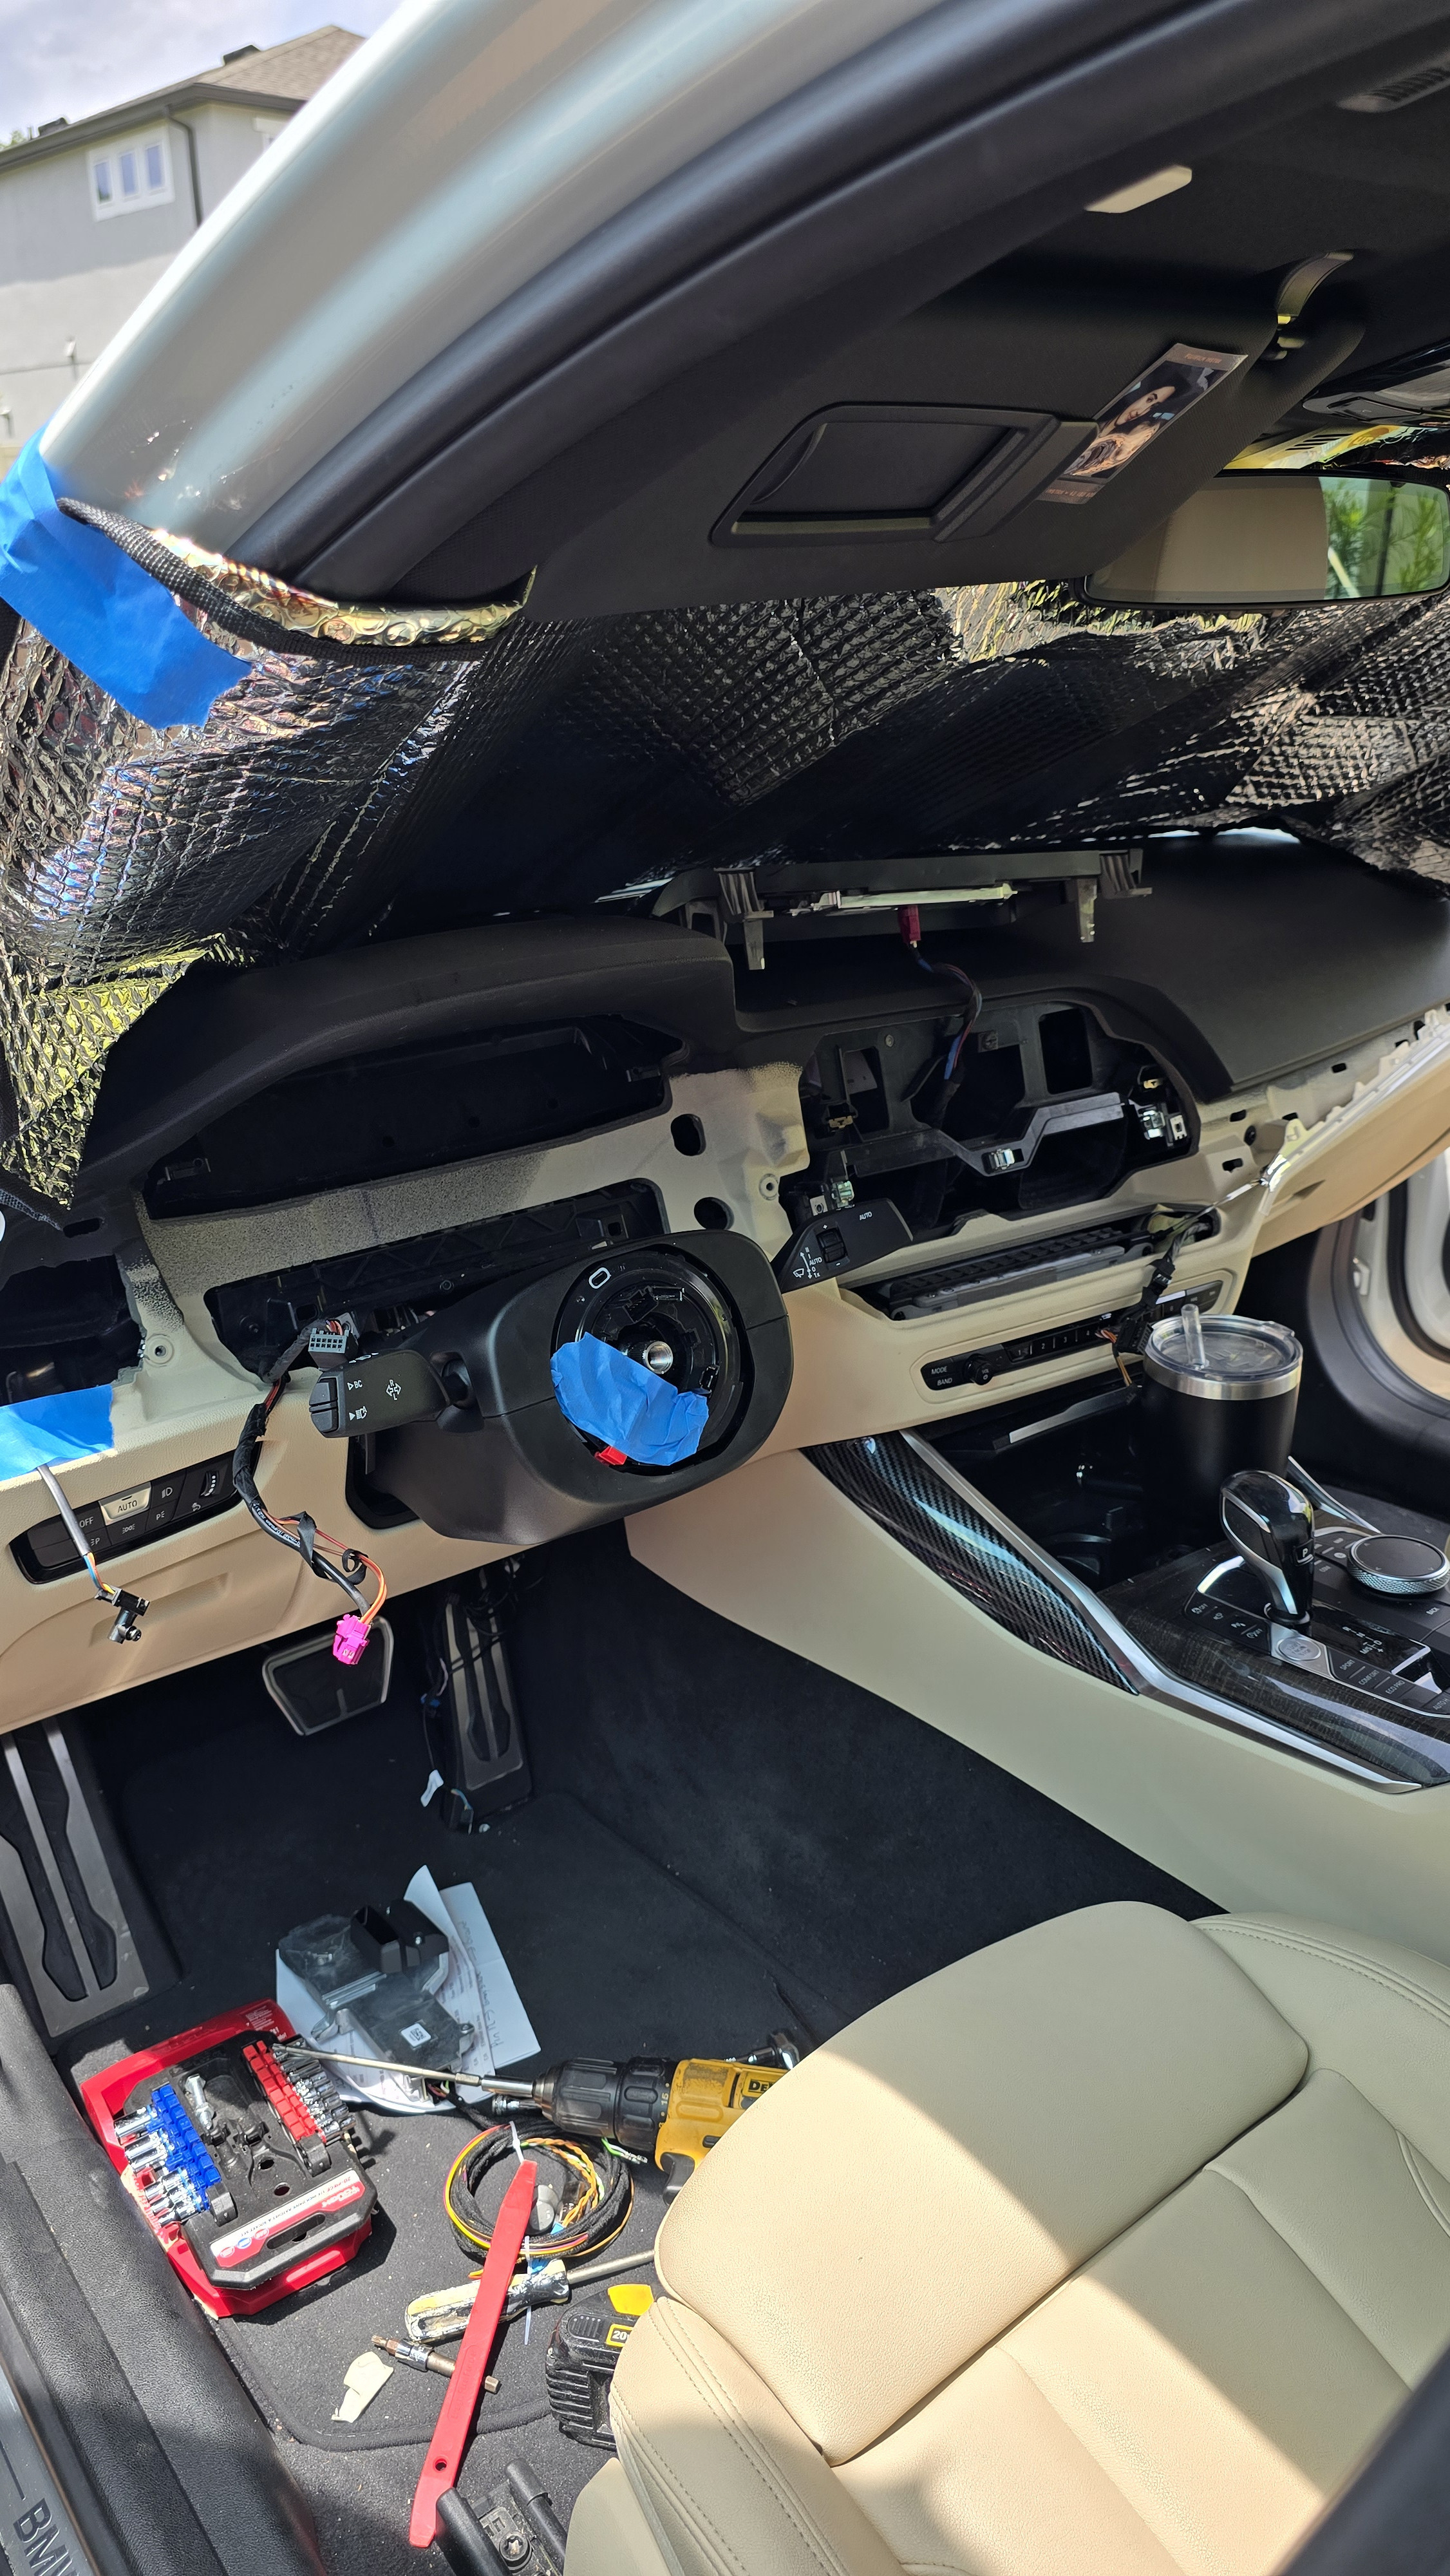 BMW G Series Steering Wheel 16mm Bolt
 BMW G Series SZL Module Location
 BMW G Series Steering Wheel Shifter Removal
 BMW G Series Steering Wheel Button and Trim Removal
 BMW G Series Steering Wheel Trim Clips
 BMW G Series Steering Wheel Button Plug and Emulator Installation
 BMW G Series Steering Wheel with New Buttons and Trim Installed
 BMW G Series Steering Wheel Button Detail
 BMW G Series Steering Wheel Rear View
 BMW G Series Steering Wheel Button Connectors
 BMW G Series Steering Wheel Button Components
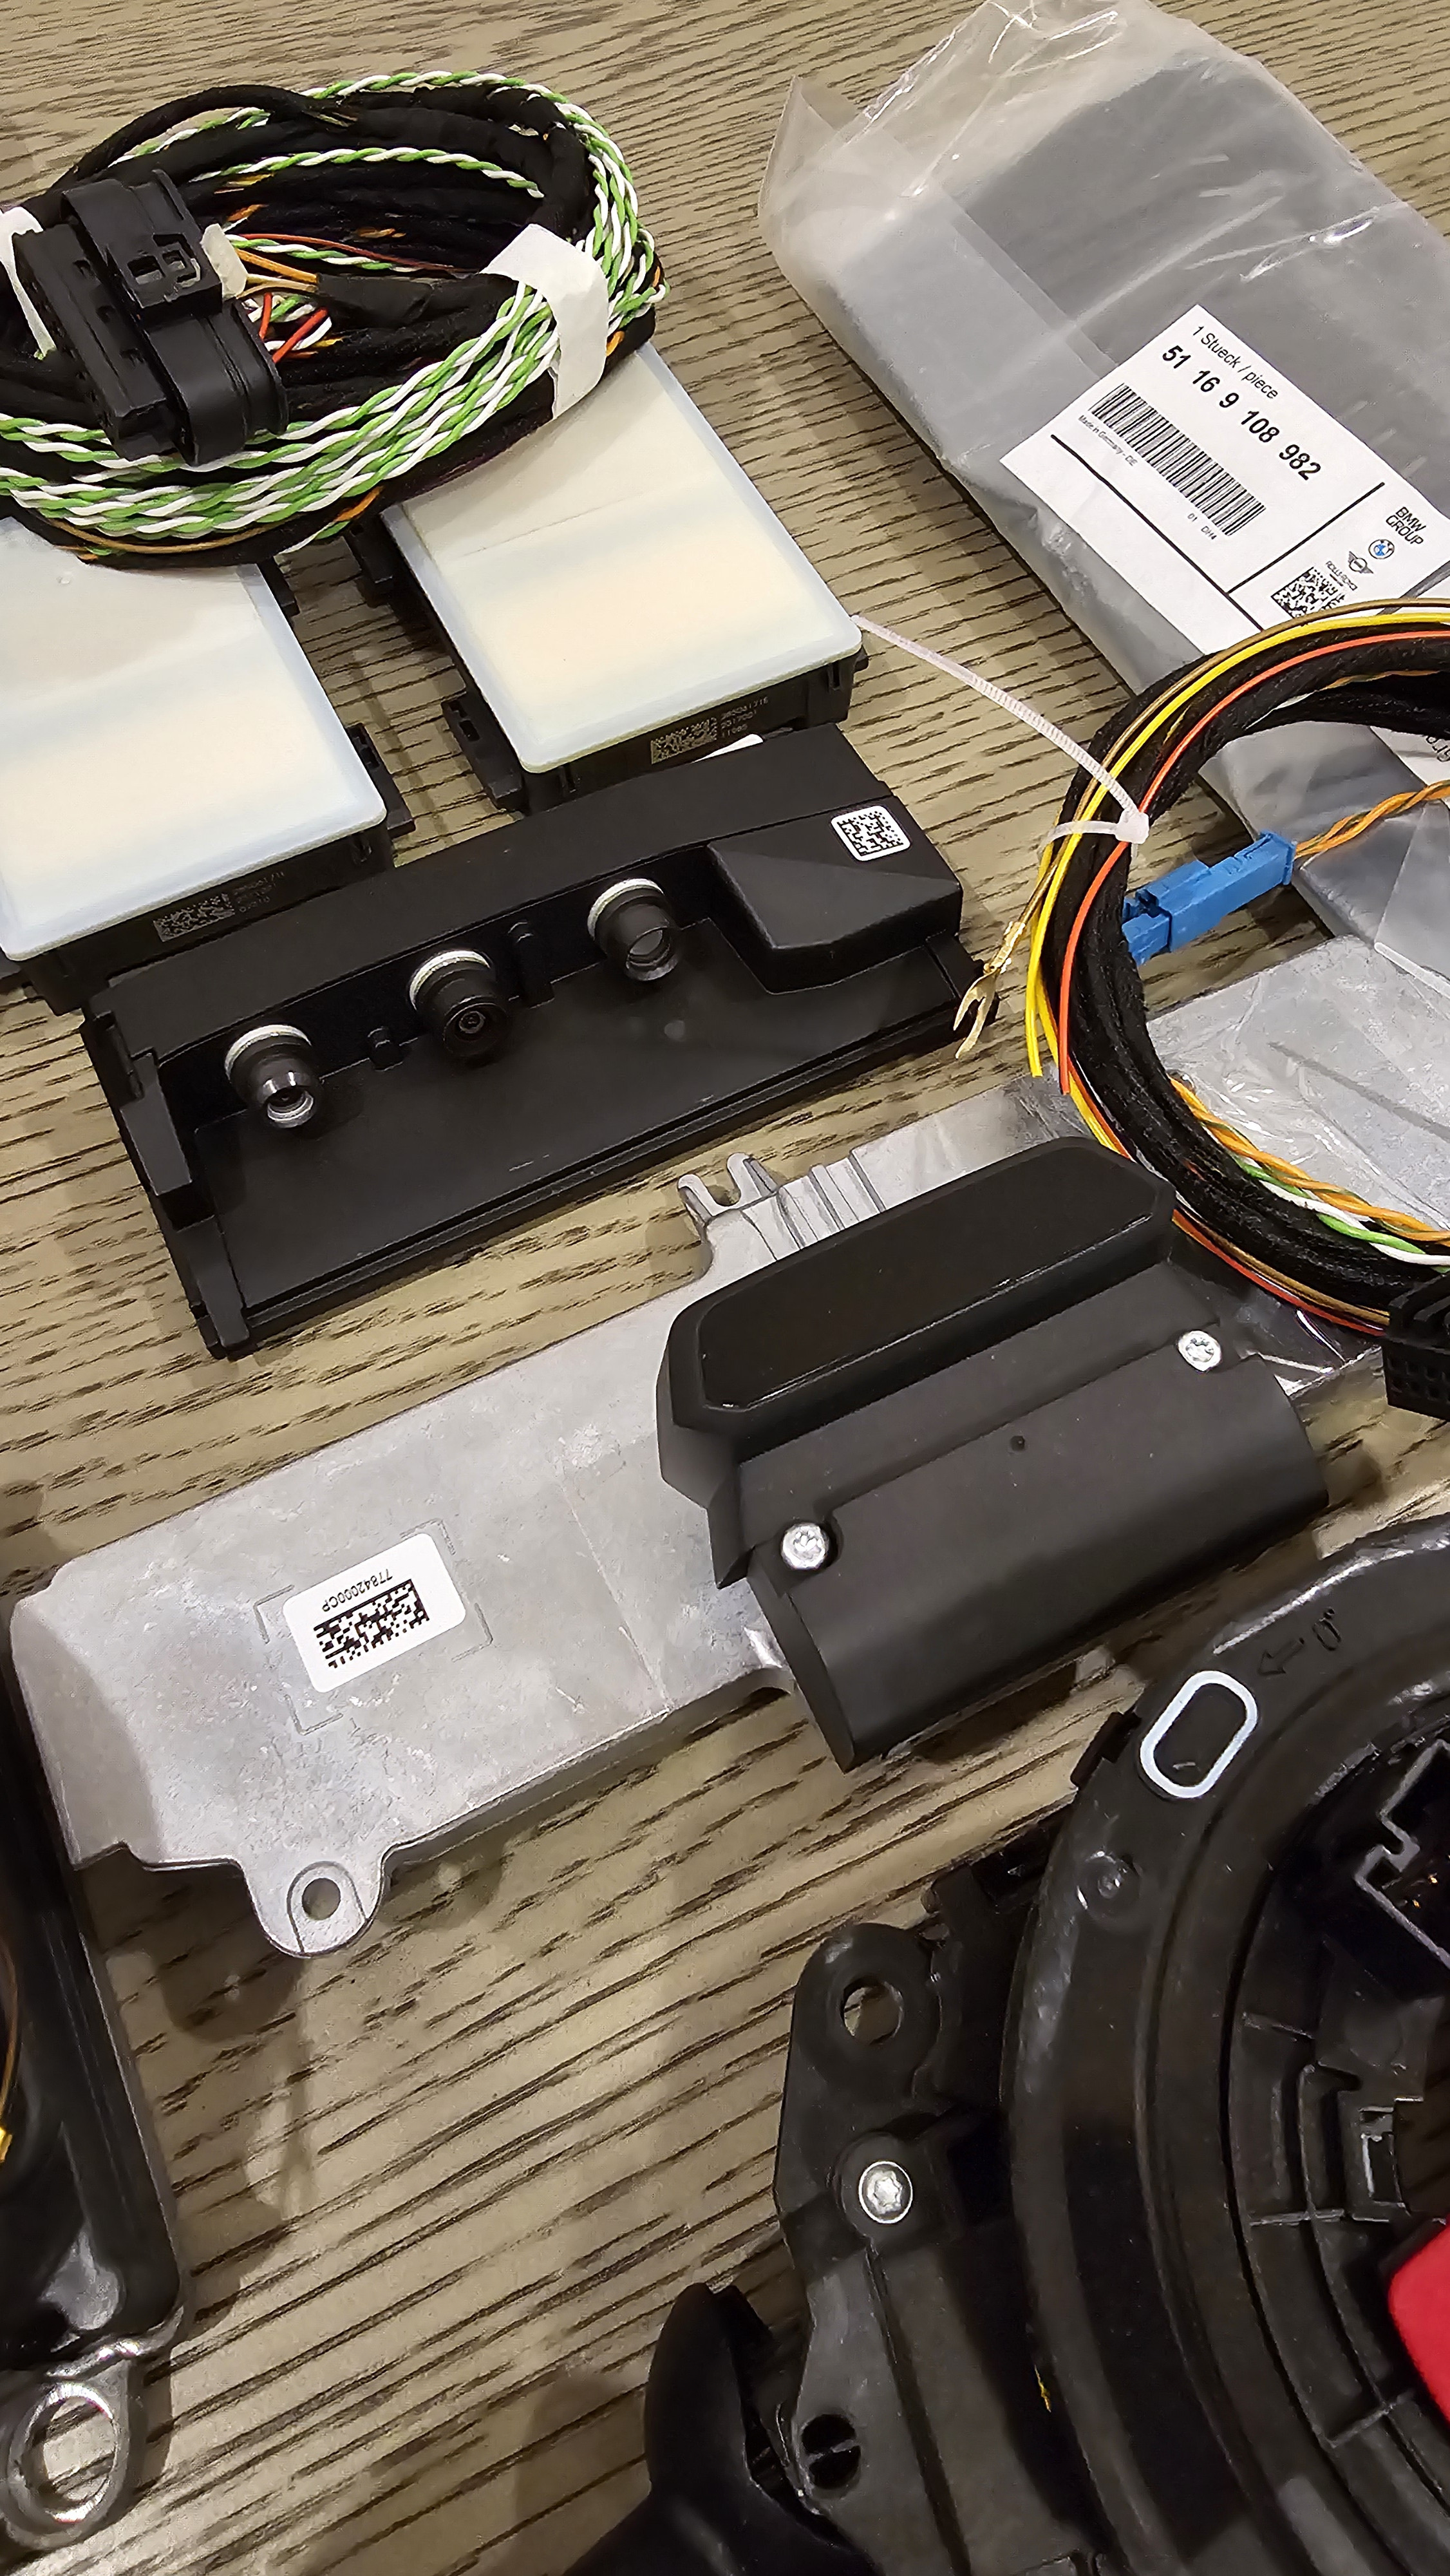 BMW G Series Steering Wheel Button and Trim Parts
5. DCS (Driver Camera System) Installation
Installing the Driver Camera System (DCS) involves accessing the instrument cluster area and integrating the new camera module.
DCS Installation Procedure:
- Remove air vent trims on both the driver and passenger sides to access two T20 screws for the cluster bezel.
- After removing the screws, do not fully detach the bezel from the cluster to avoid breaking clips.
- Instead, gently pry the cluster loose, starting from the bottom, and pull it towards you. Unhook the top part and carefully remove the cluster.
- Once the cluster is removed, detach the bezel.
- Disconnect the FAKRA connector and plug from the cluster.
- Place the cluster on a soft surface and install the DCS camera module on top. The cluster housing has pre-drilled holes for DCS installation. Secure the DCS module using provided screws.
- Bezel Modification or Replacement: The DCS camera protrudes and may not fit with the original bezel. Either cut an opening in the original bezel to accommodate the camera or order a replacement bezel designed for DCS.
- Connect the DCS plug to the module. Ensure compatibility; some plugs may require slight modification (shaving plastic) for proper fit.
- Wiring to Head Unit: Pins 1 and 2 of the DCS need to be connected to the head unit. Locate these pins on the cluster connector and transfer them to the DCS plug. This avoids the need to remove the head unit, which is a complex process in G series models.
- Route DCS wires towards the passenger side through the vent openings, ensuring no vents are blocked.
- Powering DCS: DCS is powered from the front fuse box, unlike other modules powered from the rear fuse box. G series fuse boxes are easily accessible without tools. Simply snap open the fuse box after removing the passenger side footwell cover.
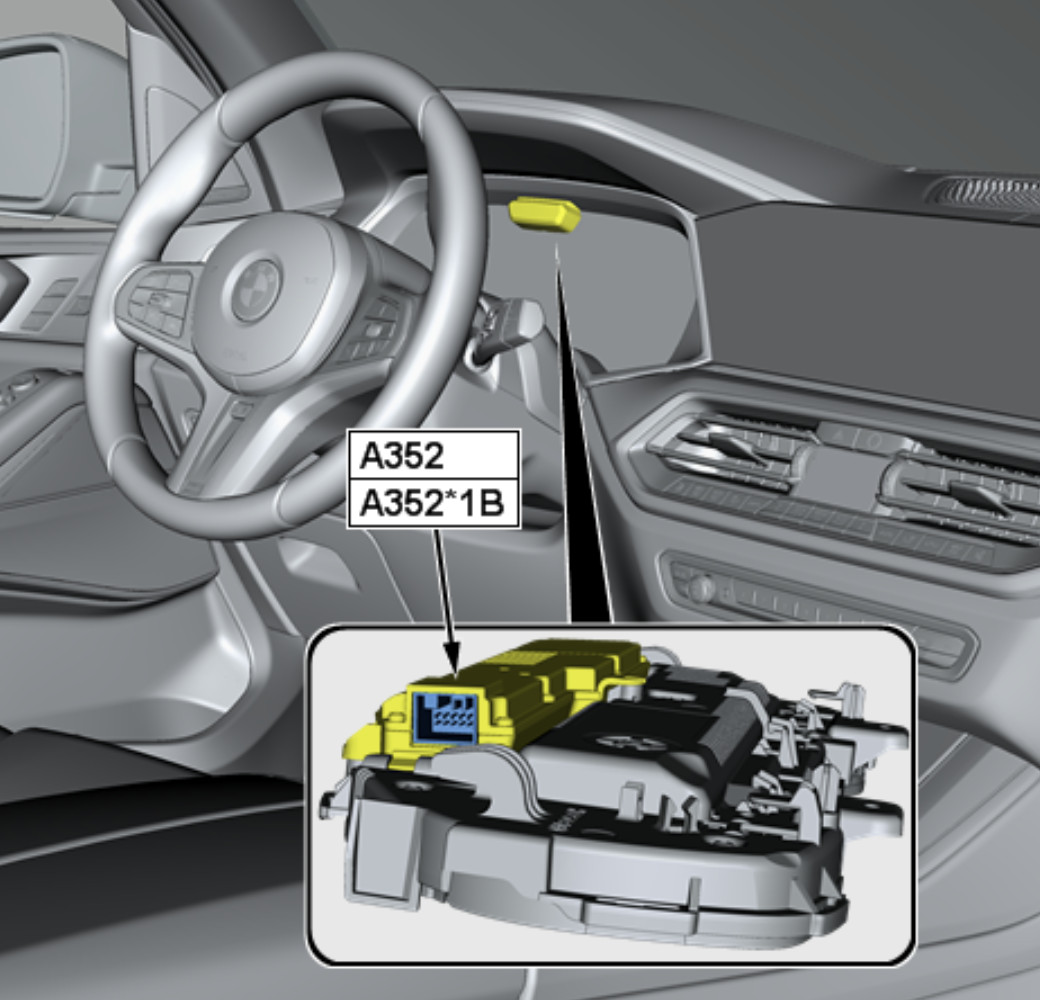 BMW G Series DCS Module Location DiagramBMW G Series Steering Wheel Removal – Airbag Release HolesBMW G Series Steering Wheel Button and Trim Parts
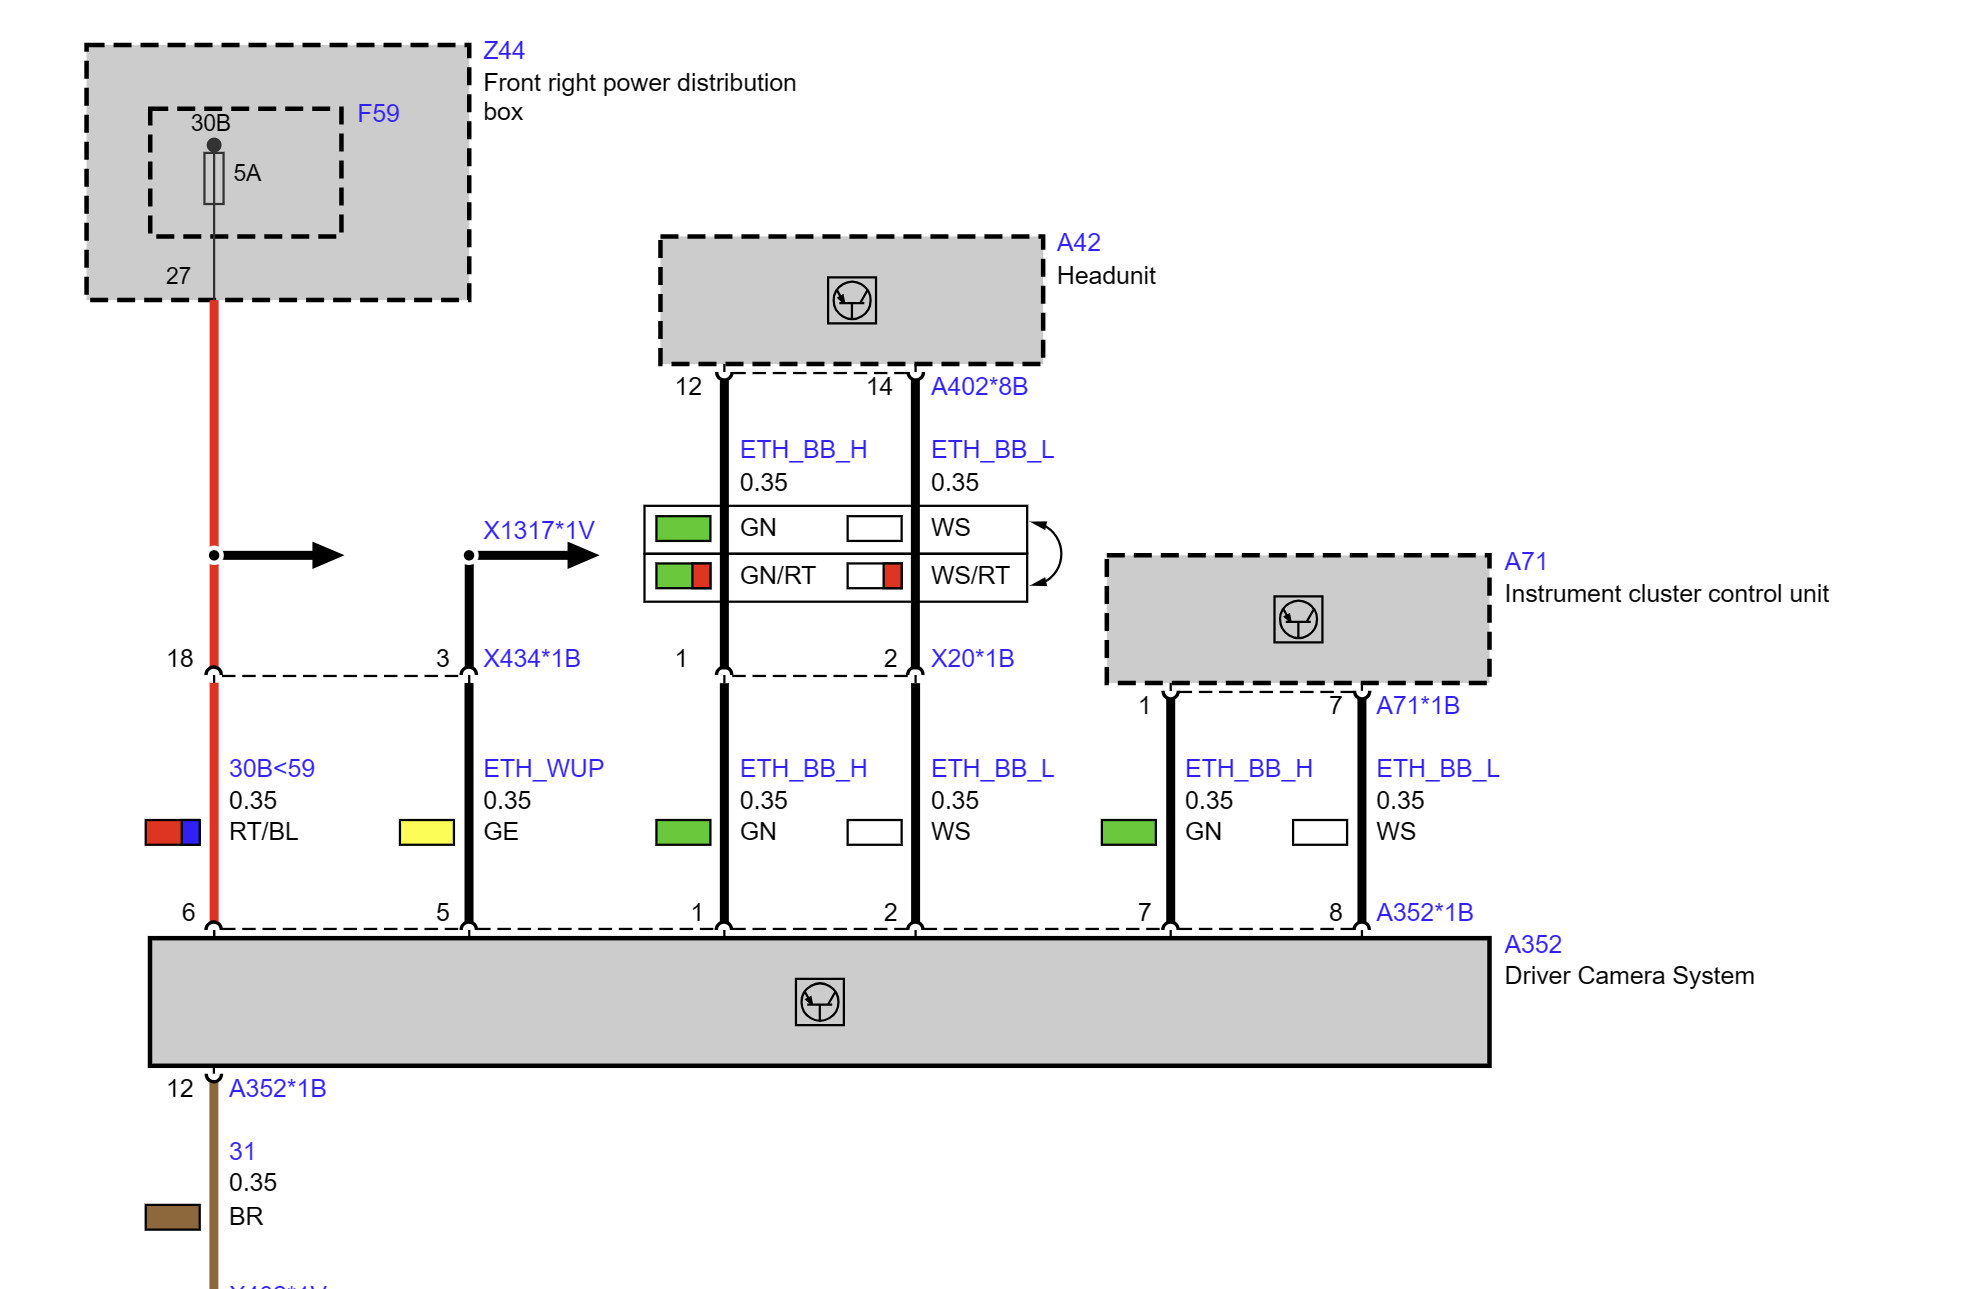 BMW G Series DCS Module Diagram
6. R11 CAN Terminator Location
Locating the R11 CAN terminator is essential for proper network configuration. It is typically found in the front passenger footwell area.
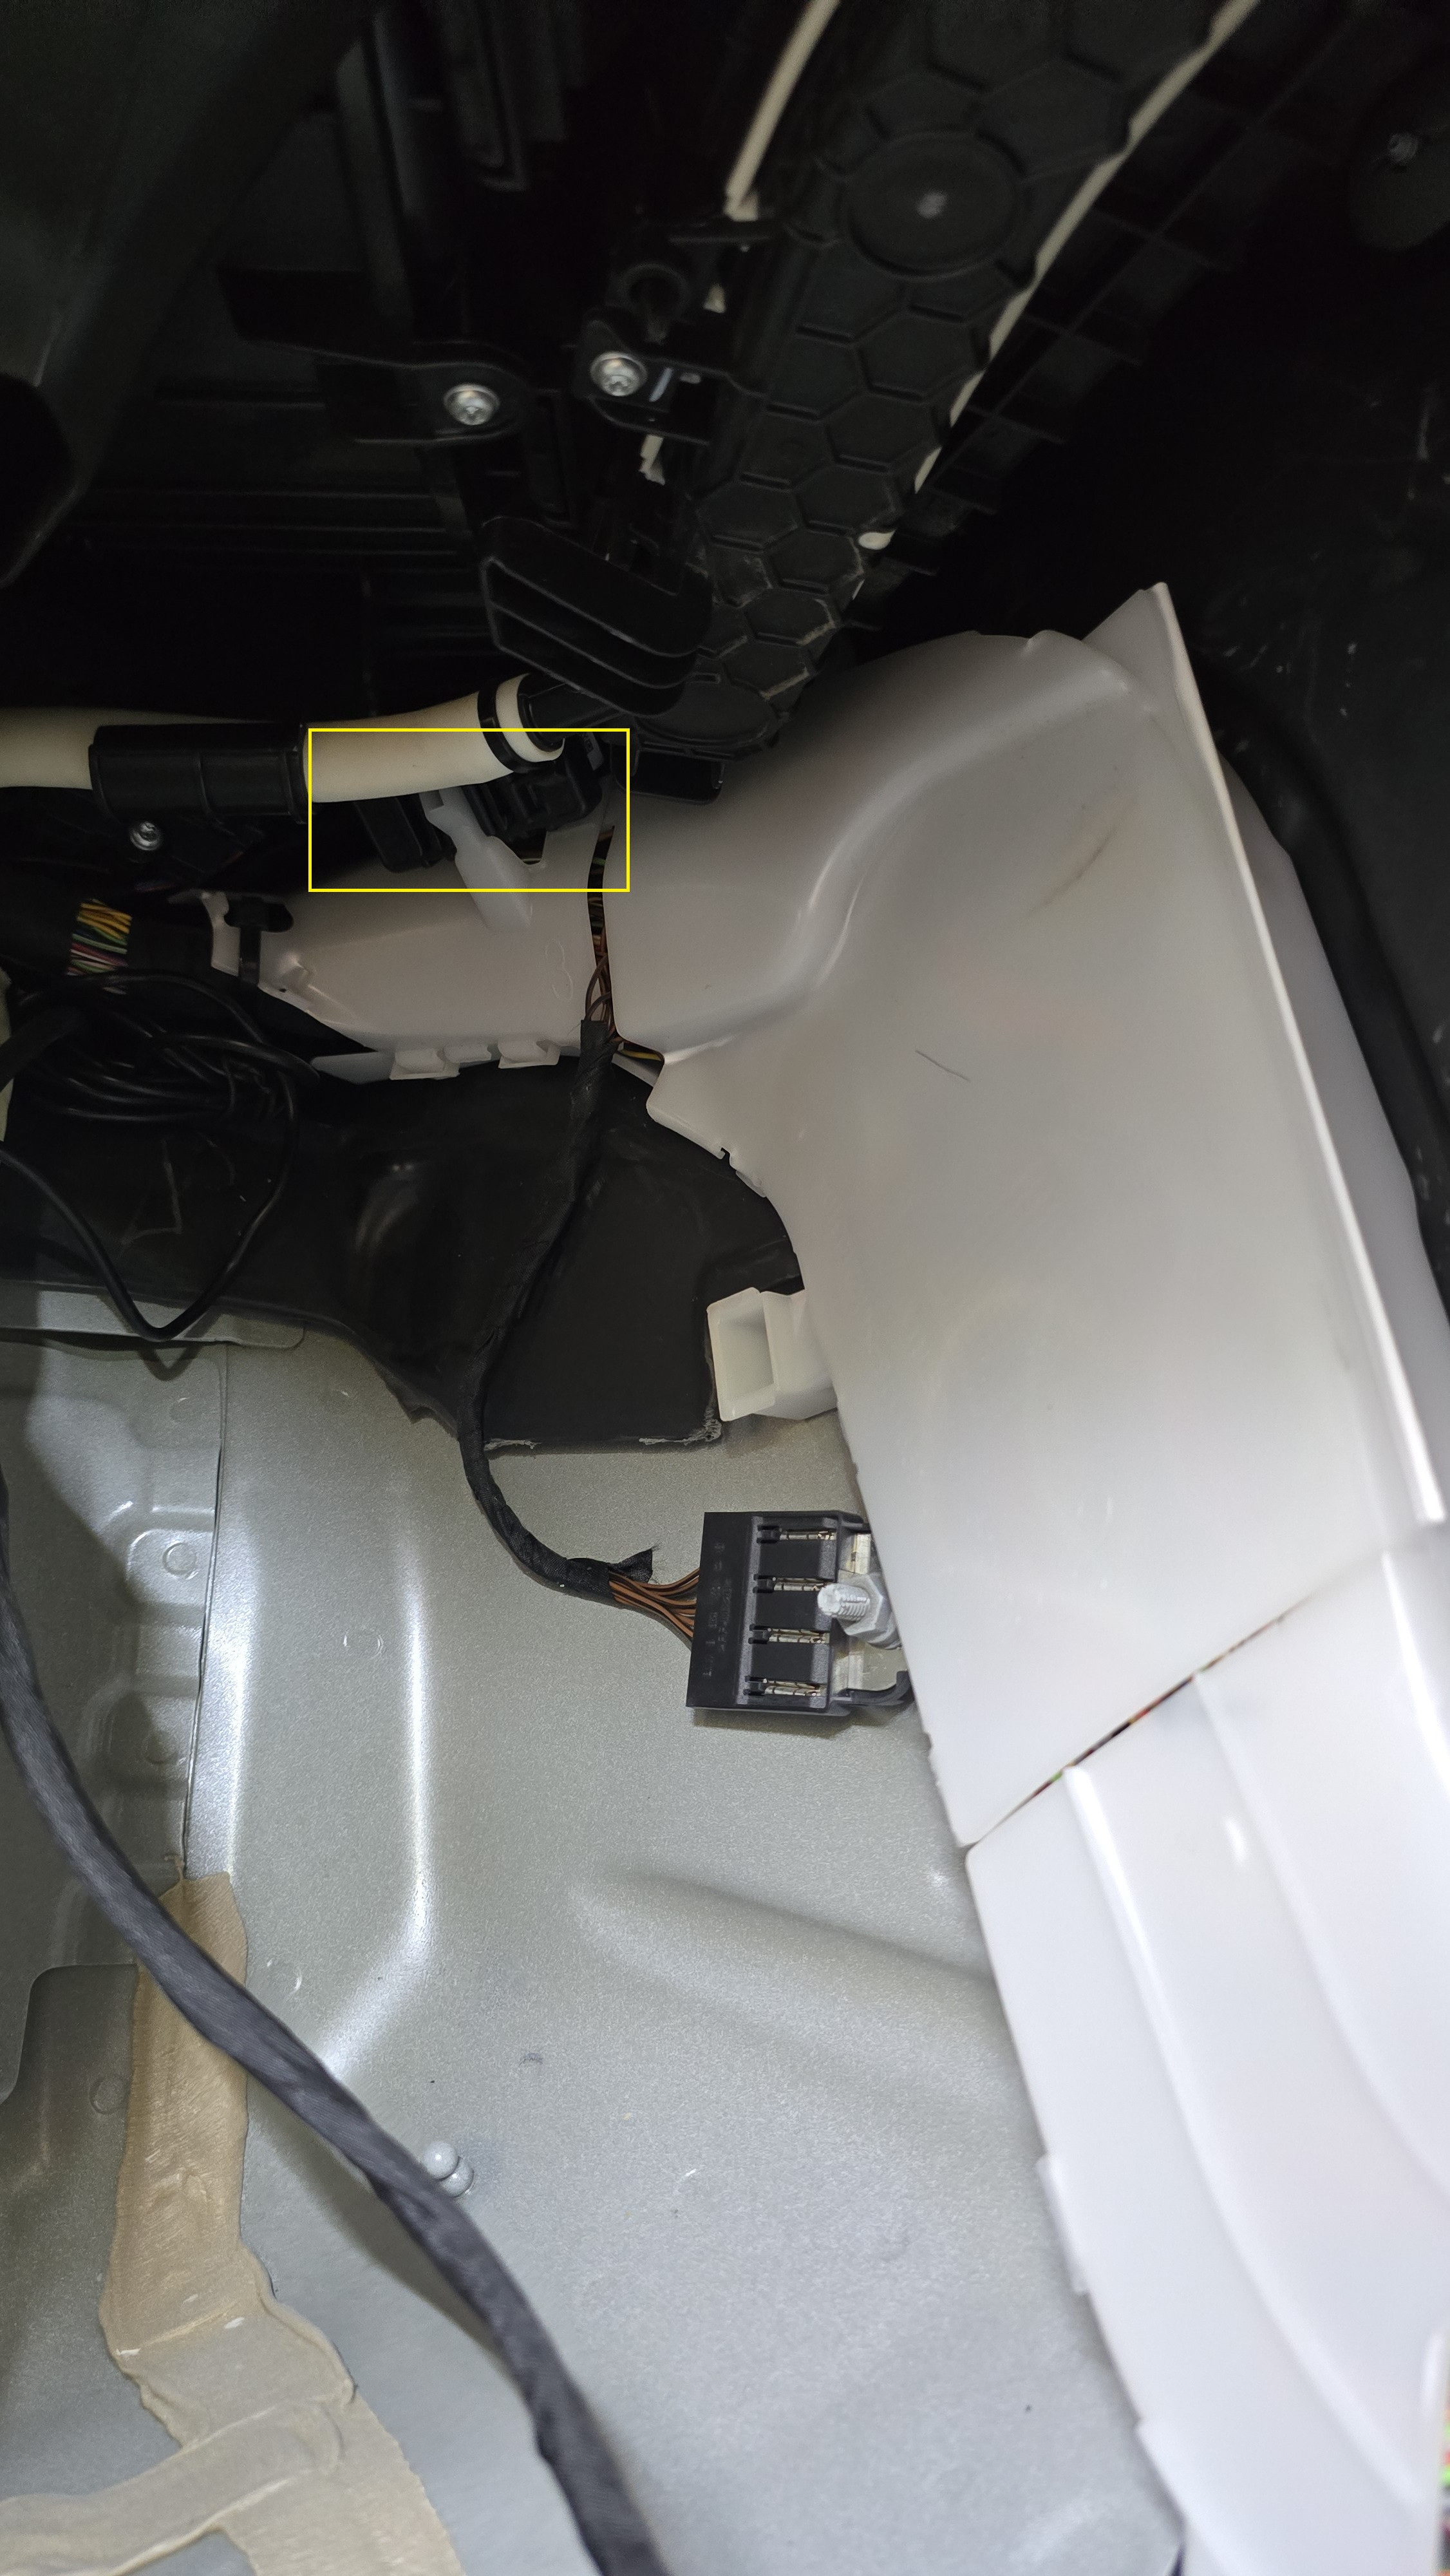 BMW G Series R11 CAN Terminator LocationBMW G Series Rear Radar Wiring Diagram 1
Software Programming and Remote Coding
After hardware installation, software programming is required to activate the Driving Assistant Professional features. This involves using E-SYS software and remote coding services.
Programming Steps:
- Connect with E-SYS: Connect your computer with E-SYS software to the BMW.
- Remove 5AS: Delete option code 5AS (Driving Assistant) from the vehicle order (FA).
- Add 5AU and 5AR: Add option codes 5AU (Driving Assistant Professional) and 5AR (Traffic Jam Assistant) to the FA. If also retrofitting High Beam Assist, add 5AC as well.
- Save FA: Save the modified FA to the vehicle.
- Calculate TAL: Calculate the Target Analyzer List (TAL) in Comfort Mode within E-SYS.
- Backup SVT: Before flashing, go to Expert Mode/VCM and save the SVT Soll to SVT_Target file as a backup.
- Flash Modules: In Expert Mode/TAL Processing, select DCS, SRR (Short Range Radar), and SAS modules and flash them using the calculated TAL.
- VO Code: After flashing, perform Vehicle Order (VO) coding on the entire car to apply the new configuration.
- Clear Errors: Delete all error codes using diagnostic tools like ISTA.
Congratulations! Your BMW G series is now equipped with fully functional Driving Assistant Professional features.
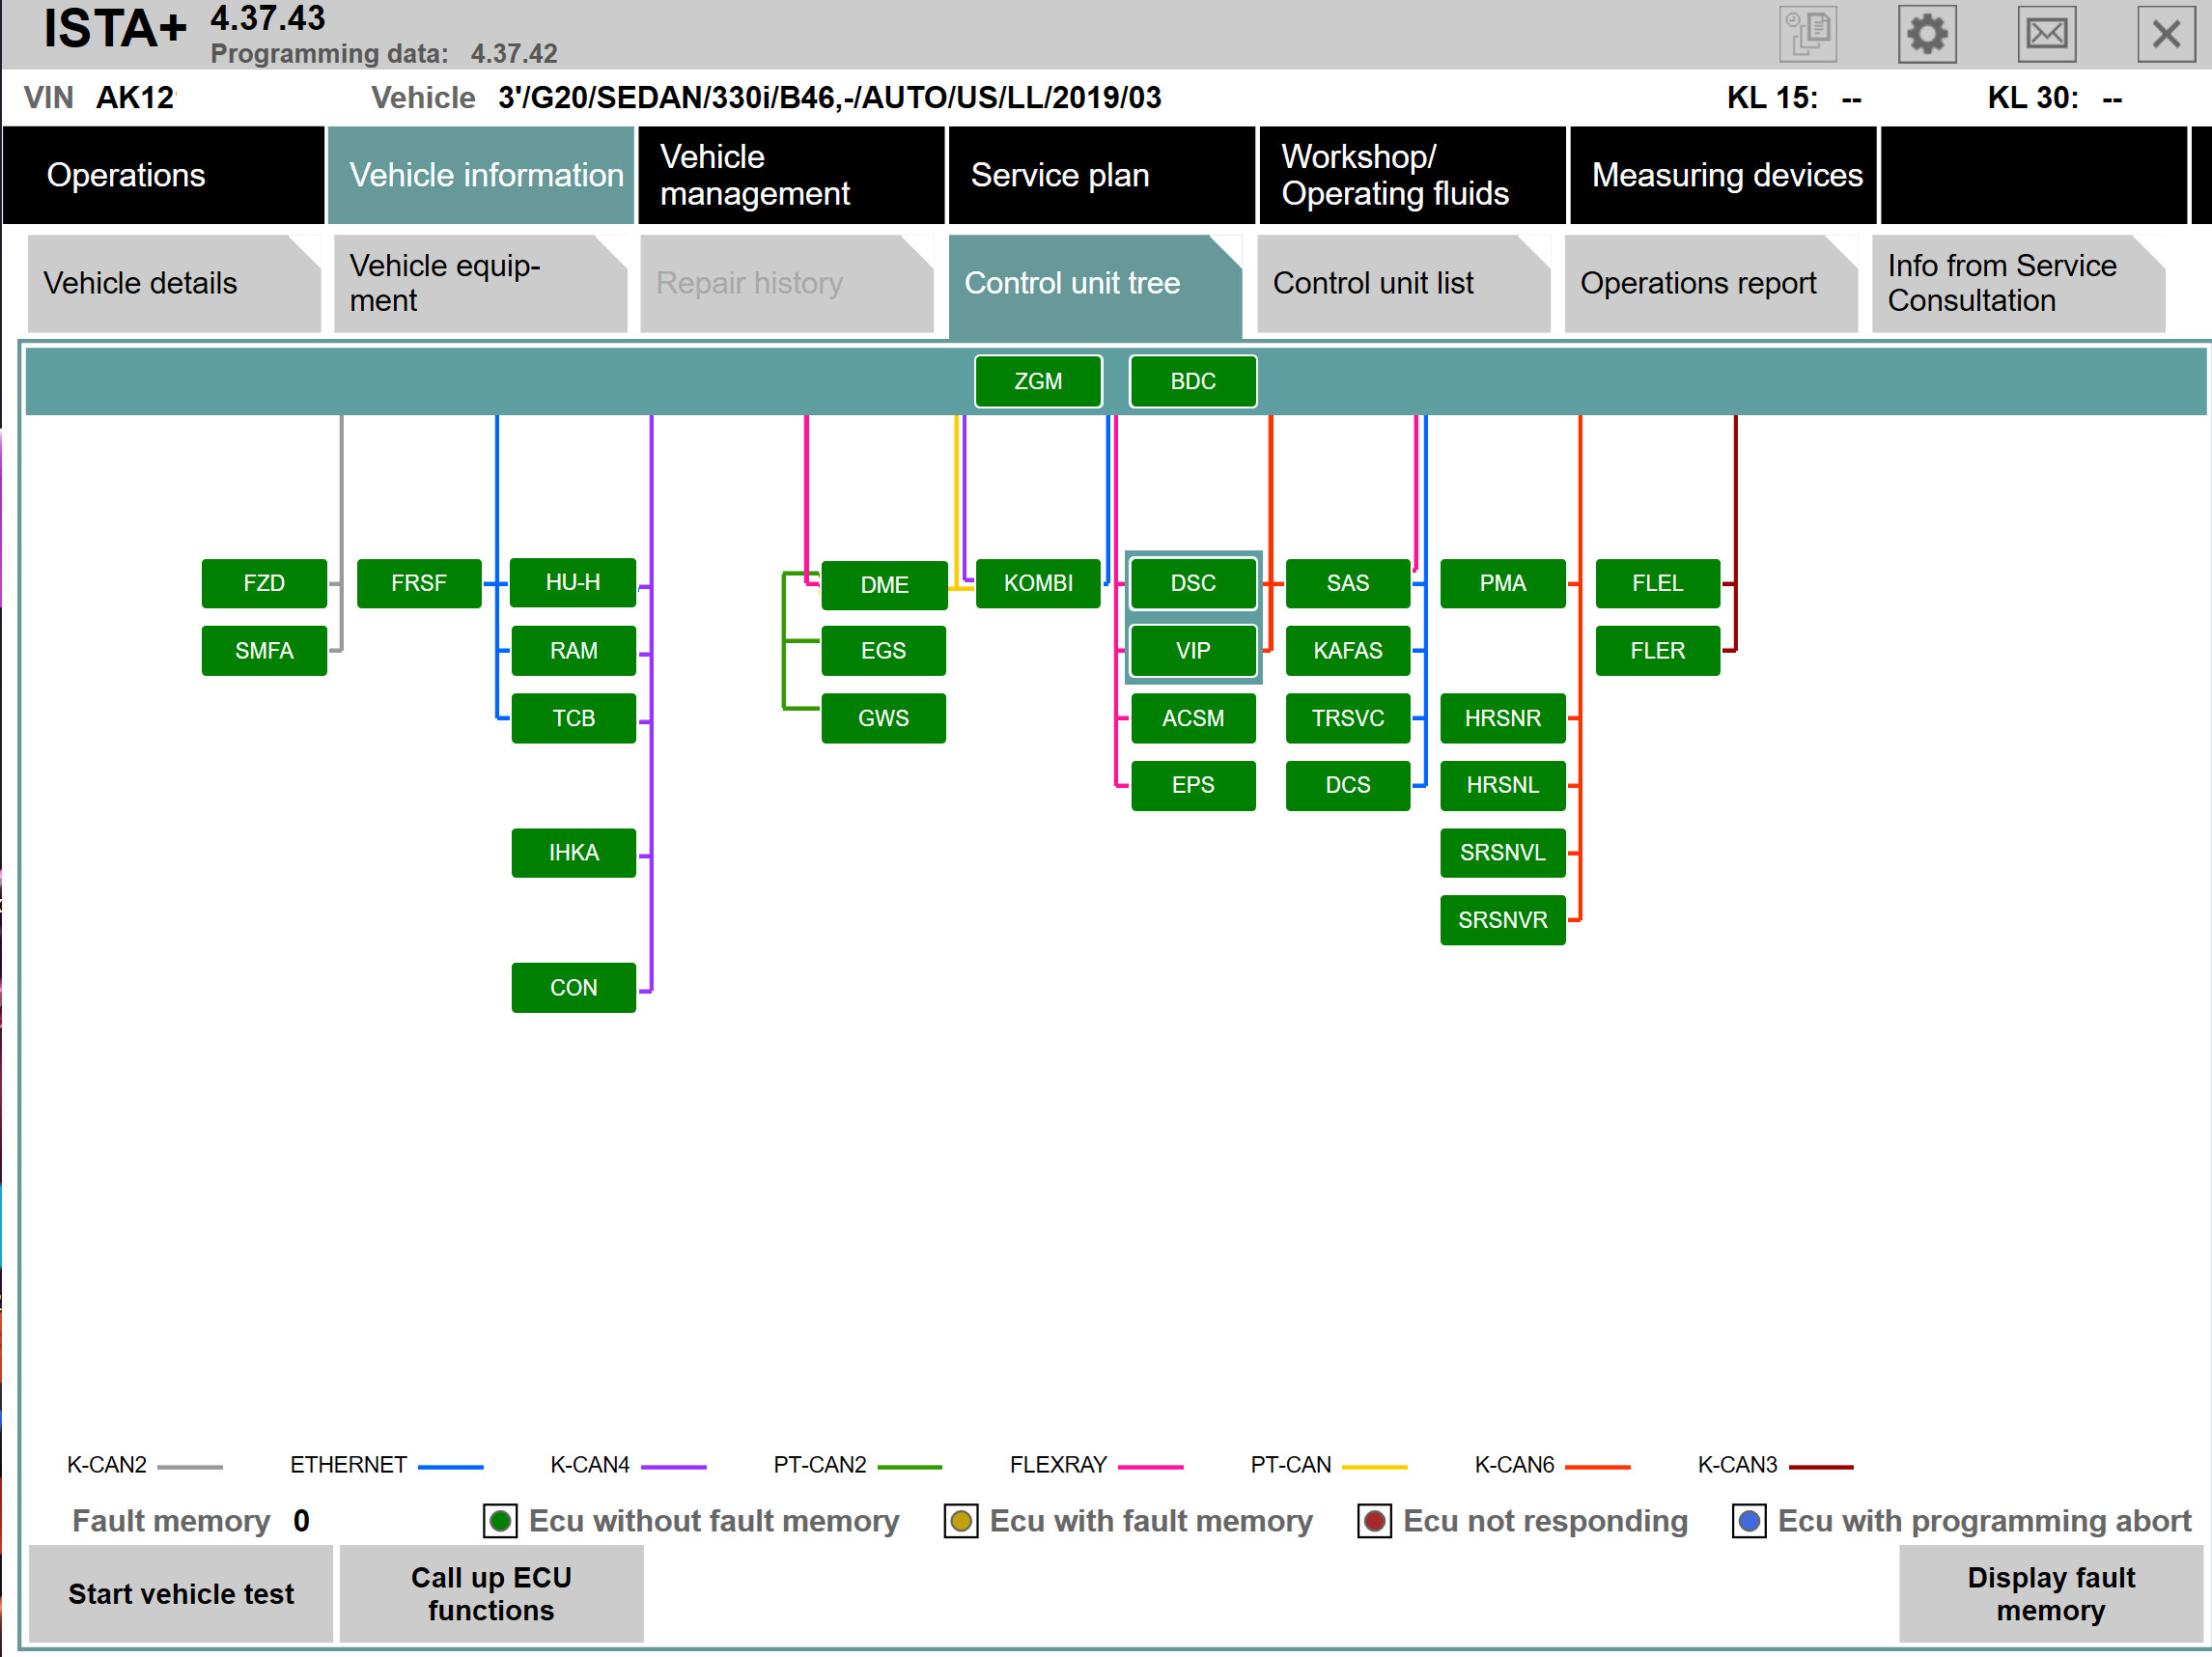 BMW ISTA Diagnostic Tool Interface
Post-Coding Feature Activation
After successful VO coding, additional steps can unlock and customize specific features of the Driving Assistant Professional system through parameter adjustments.
Feature Activation Codes:
-
Enable Driving Assist View: Enhance the instrument cluster display to show Driving Assist views.
- DKOMBI4 Module Coding:
- SICHT_ABSICHT_ENABLE to “Active”
- CB_FZG_UMGEBUNG_FAS to “Active”
- CB_PRESELECT_NAVI_ANSICHT_FZG_UMGEBUNG to “Active”
- PIA_FZG_UMGEBUNG_FAS to “Active”
- DKOMBI4 Module Coding:
-
Enable Automatic Lane Change Assist: Activate the automatic lane change functionality.
- BDC_BODY3 Module Coding:
- PURWECHSEL_ASSISTENT to “active”
- HU_MGU Module Coding:
- SPURWECHSELASSISTENT to “Gen_1”
- SAS3 Module Coding:
- C_SWA_VORHANDEN to “NR001_VORHANDEN”
- BDC_BODY3 Module Coding:
-
Automatic Speed Limit Assist (aSLA): Enable automatic speed limit adaptation. (Extensive coding parameters provided in the original article for BDC, HU_MGU, SAS3, and DSC_VIP modules).
-
Automatic Traffic Light Assist (aTLA): Activate traffic light detection and response. Requires aSLA coding and enabling ‘Automatically adjust speed’ in iDrive settings. (Detailed coding parameters for BDC, HU_MGU, SAS3, and DSC_VIP modules are available in the original article).
These coding adjustments fine-tune the system and enable advanced functionalities of the BMW ACC Features Remote Coding Package for G Series.
Conclusion
Retrofitting the BMW Driving Assistant Professional to a G series BMW is a complex but highly rewarding project. By following this comprehensive guide, you can upgrade your vehicle with state-of-the-art driver assistance features, significantly enhancing safety and driving comfort. This detailed walkthrough, from hardware installation to software coding and feature activation, provides all the necessary information to undertake this advanced retrofit successfully. For those seeking a complete solution, pre-packaged kits including all necessary parts, FSC packs, and remote programming support are available, simplifying the process and ensuring a seamless upgrade experience.
For inquiries about complete retrofit kits, FSC packs, and remote programming assistance, please contact specialized vendors.
Further Resources:
- YouTube Video Demonstration: https://youtube.com/shorts/lFvgZXzykqQ?feature=share
This guide is based on the pioneering work of achieving the first fully detailed 5AU retrofit in the world, offering valuable insights and practical steps for enthusiasts and BMW owners looking to enhance their vehicle’s technology.
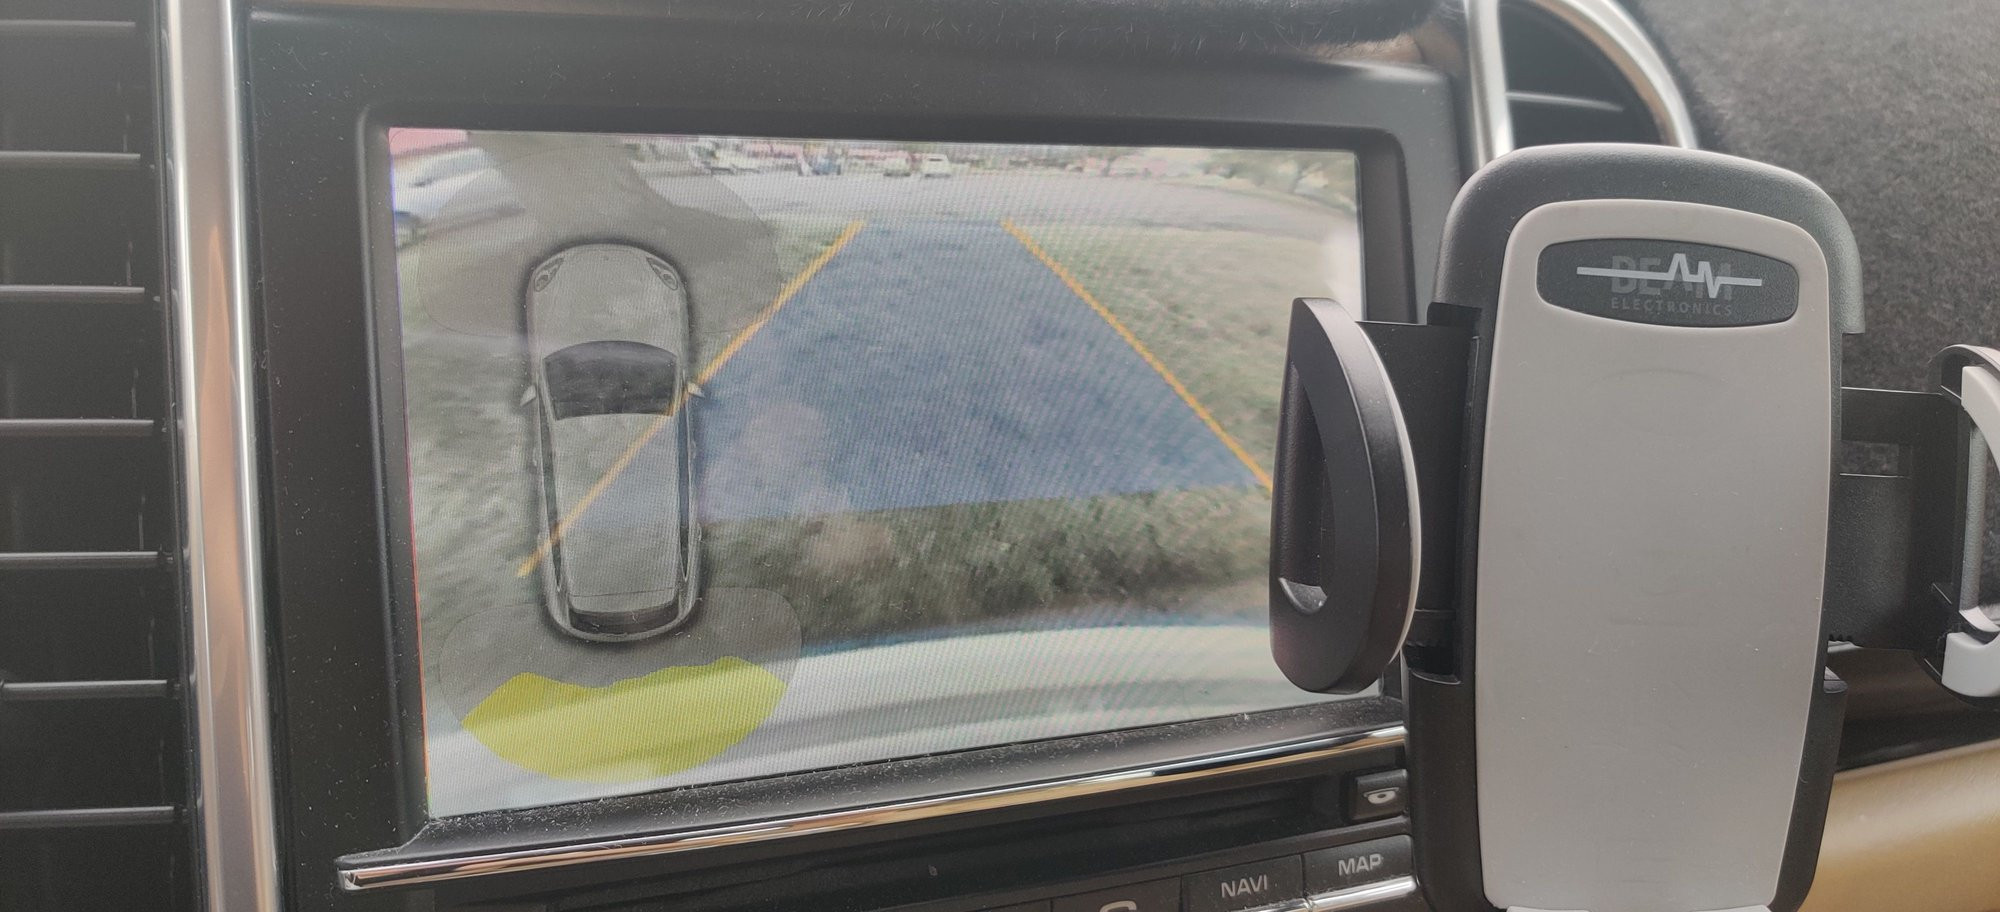
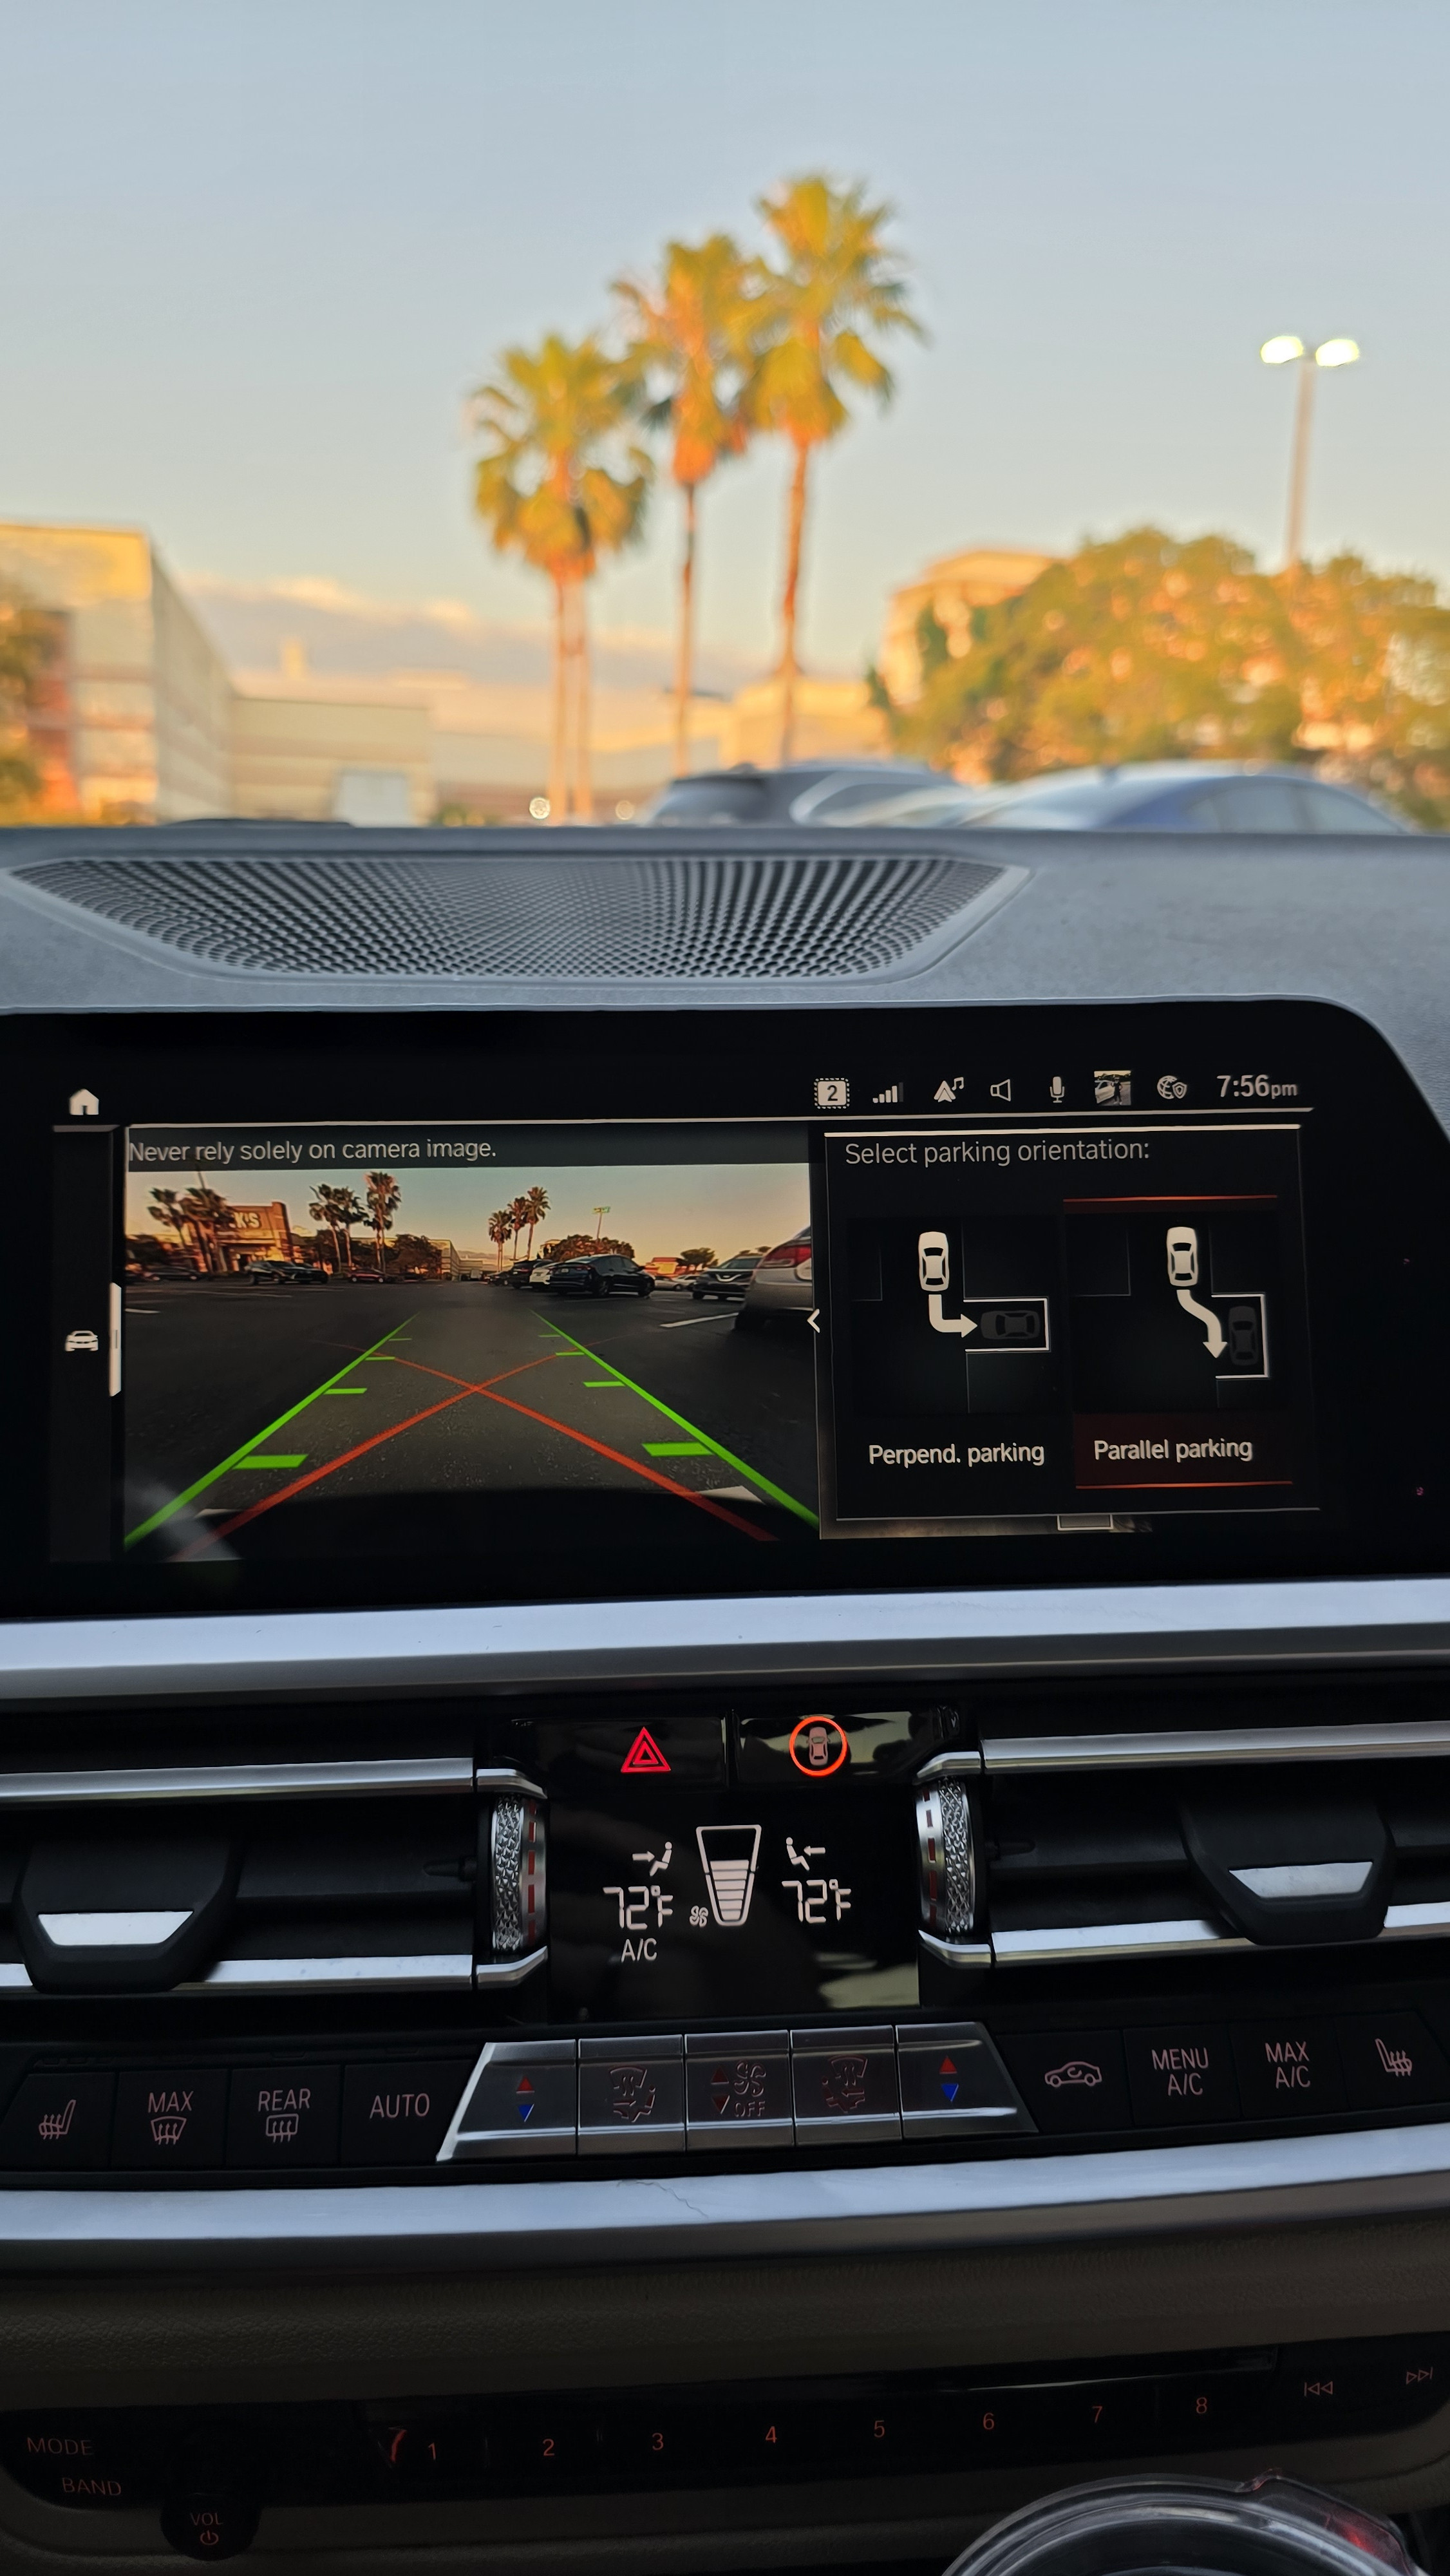 BMW G Series Driving Assistant Professional in Action
 BMW G Series Driving Assistant Professional Features Display
 BMW G Series Driving Assistant Professional Lane Keeping Assist
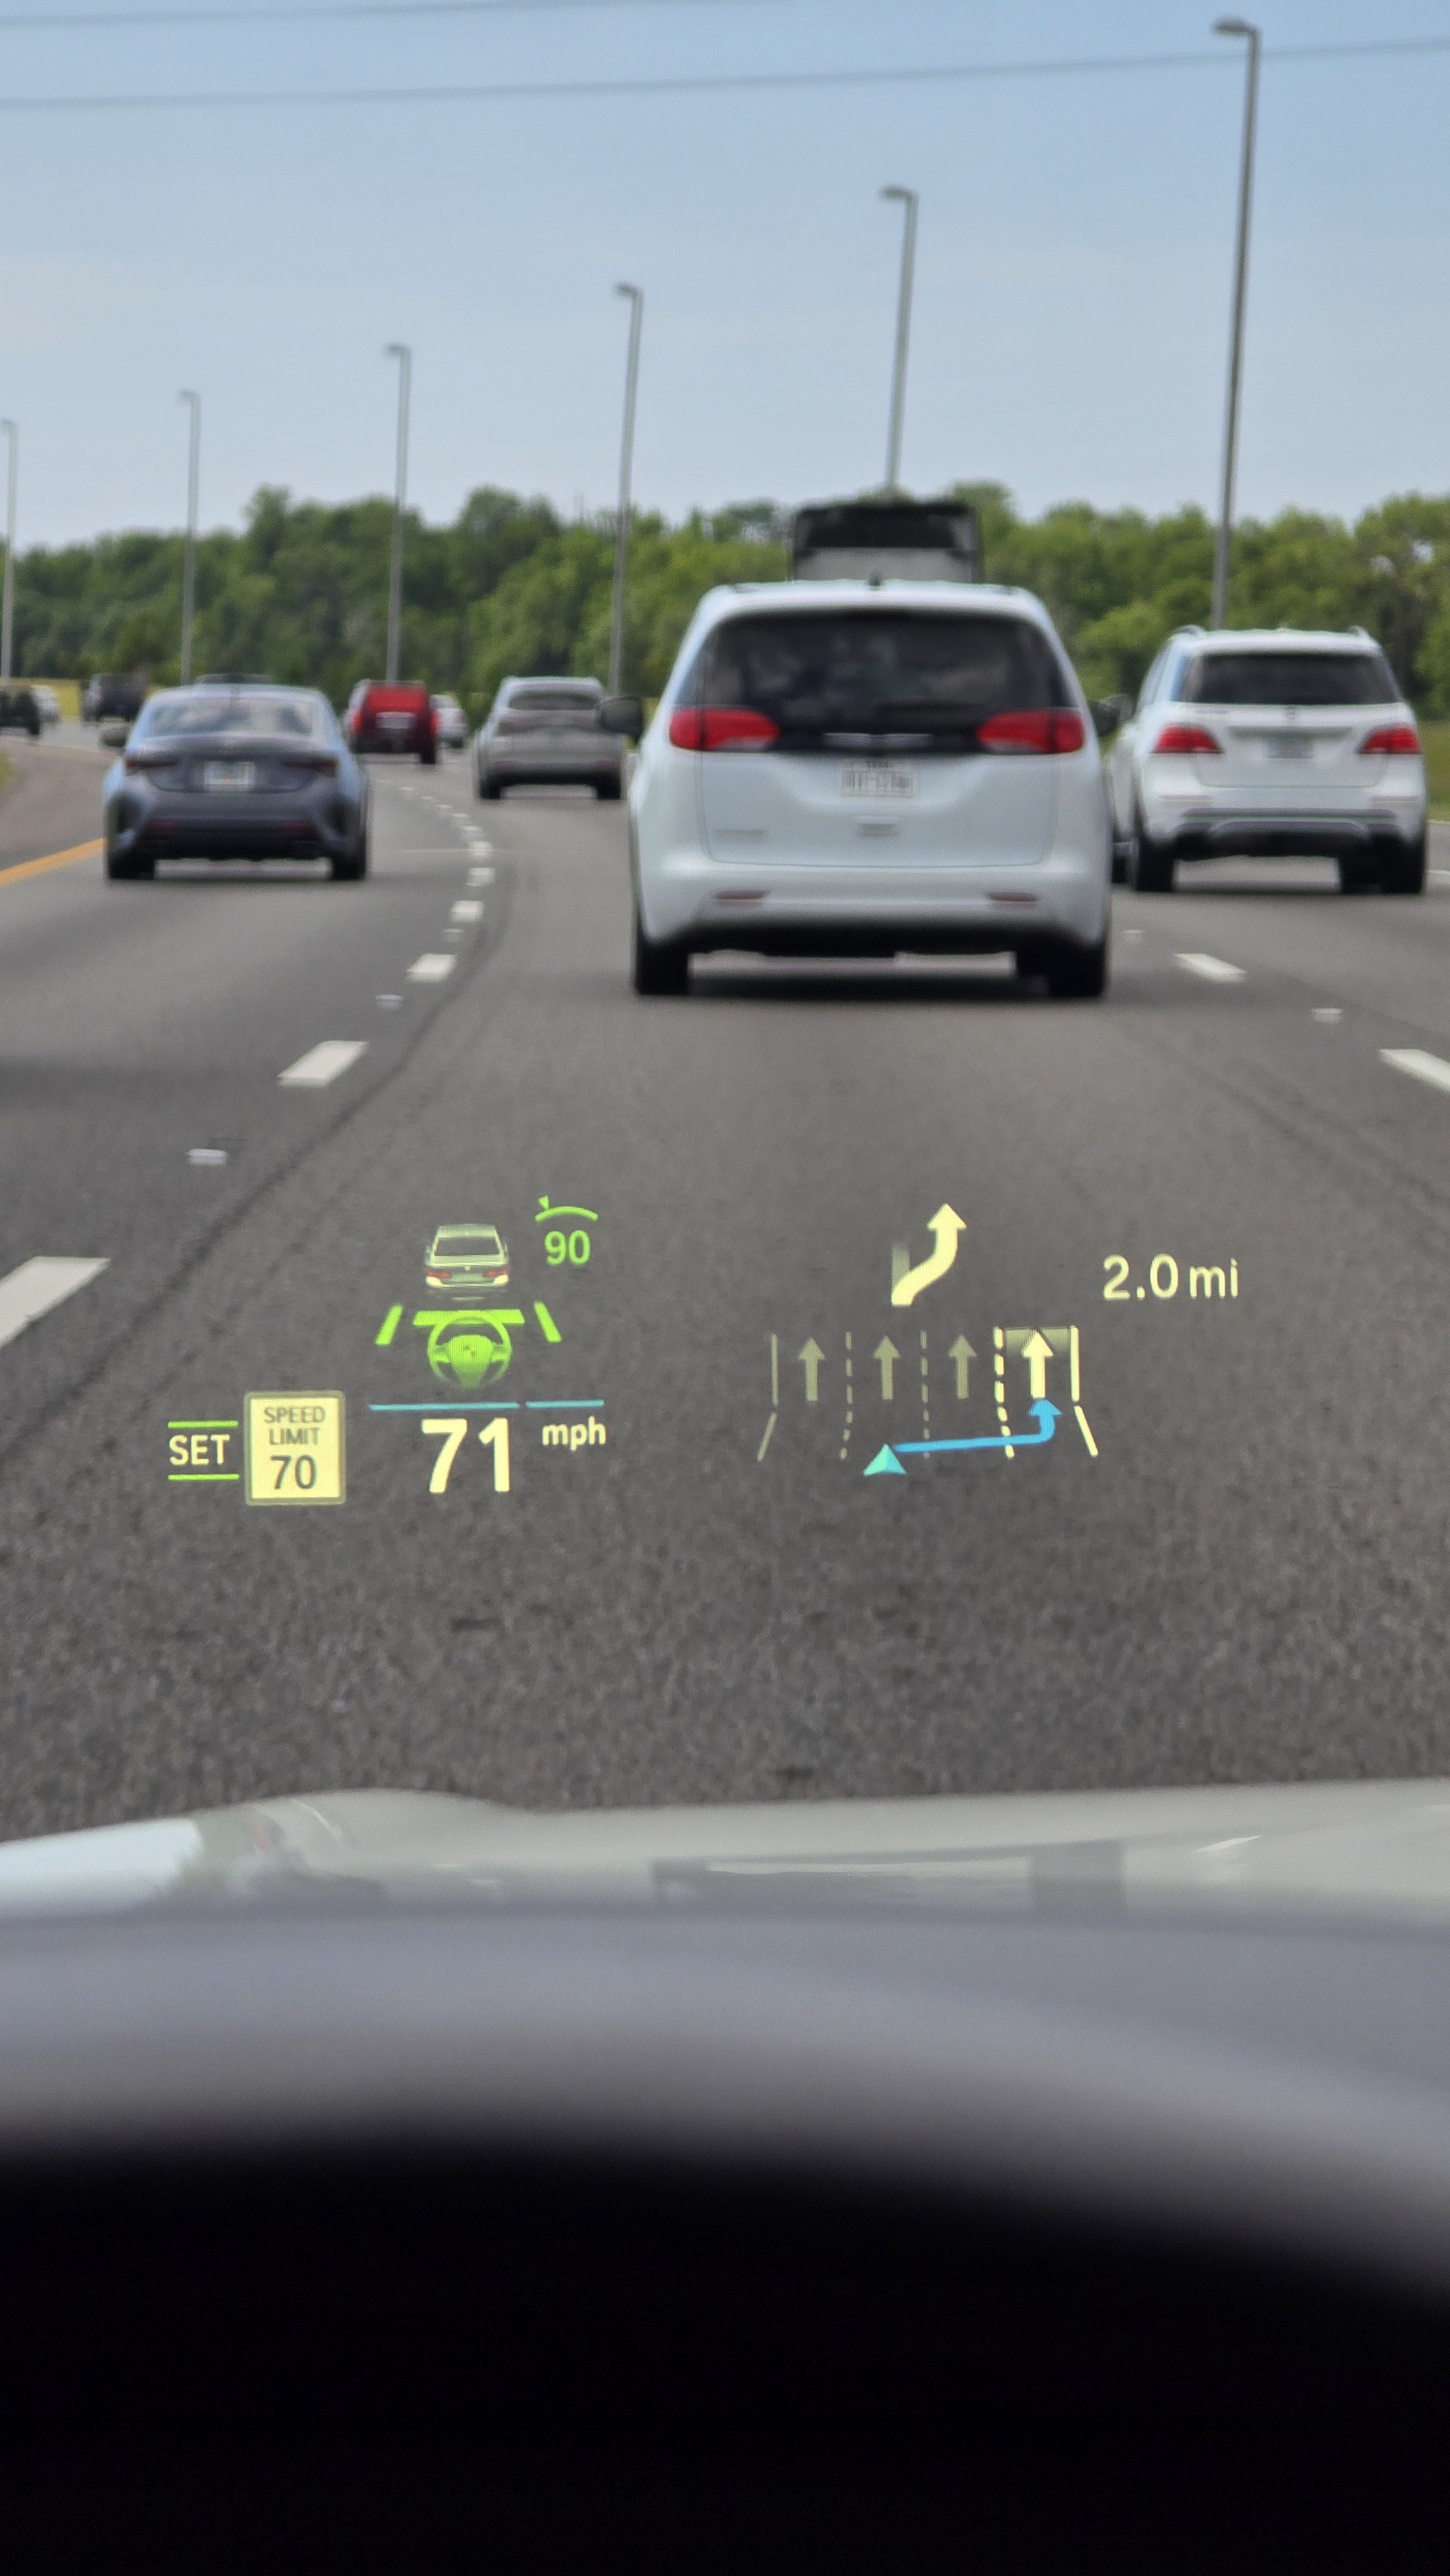 BMW G Series Driving Assistant Professional Adaptive Cruise Control
 BMW G Series Retrofit Project Showcase
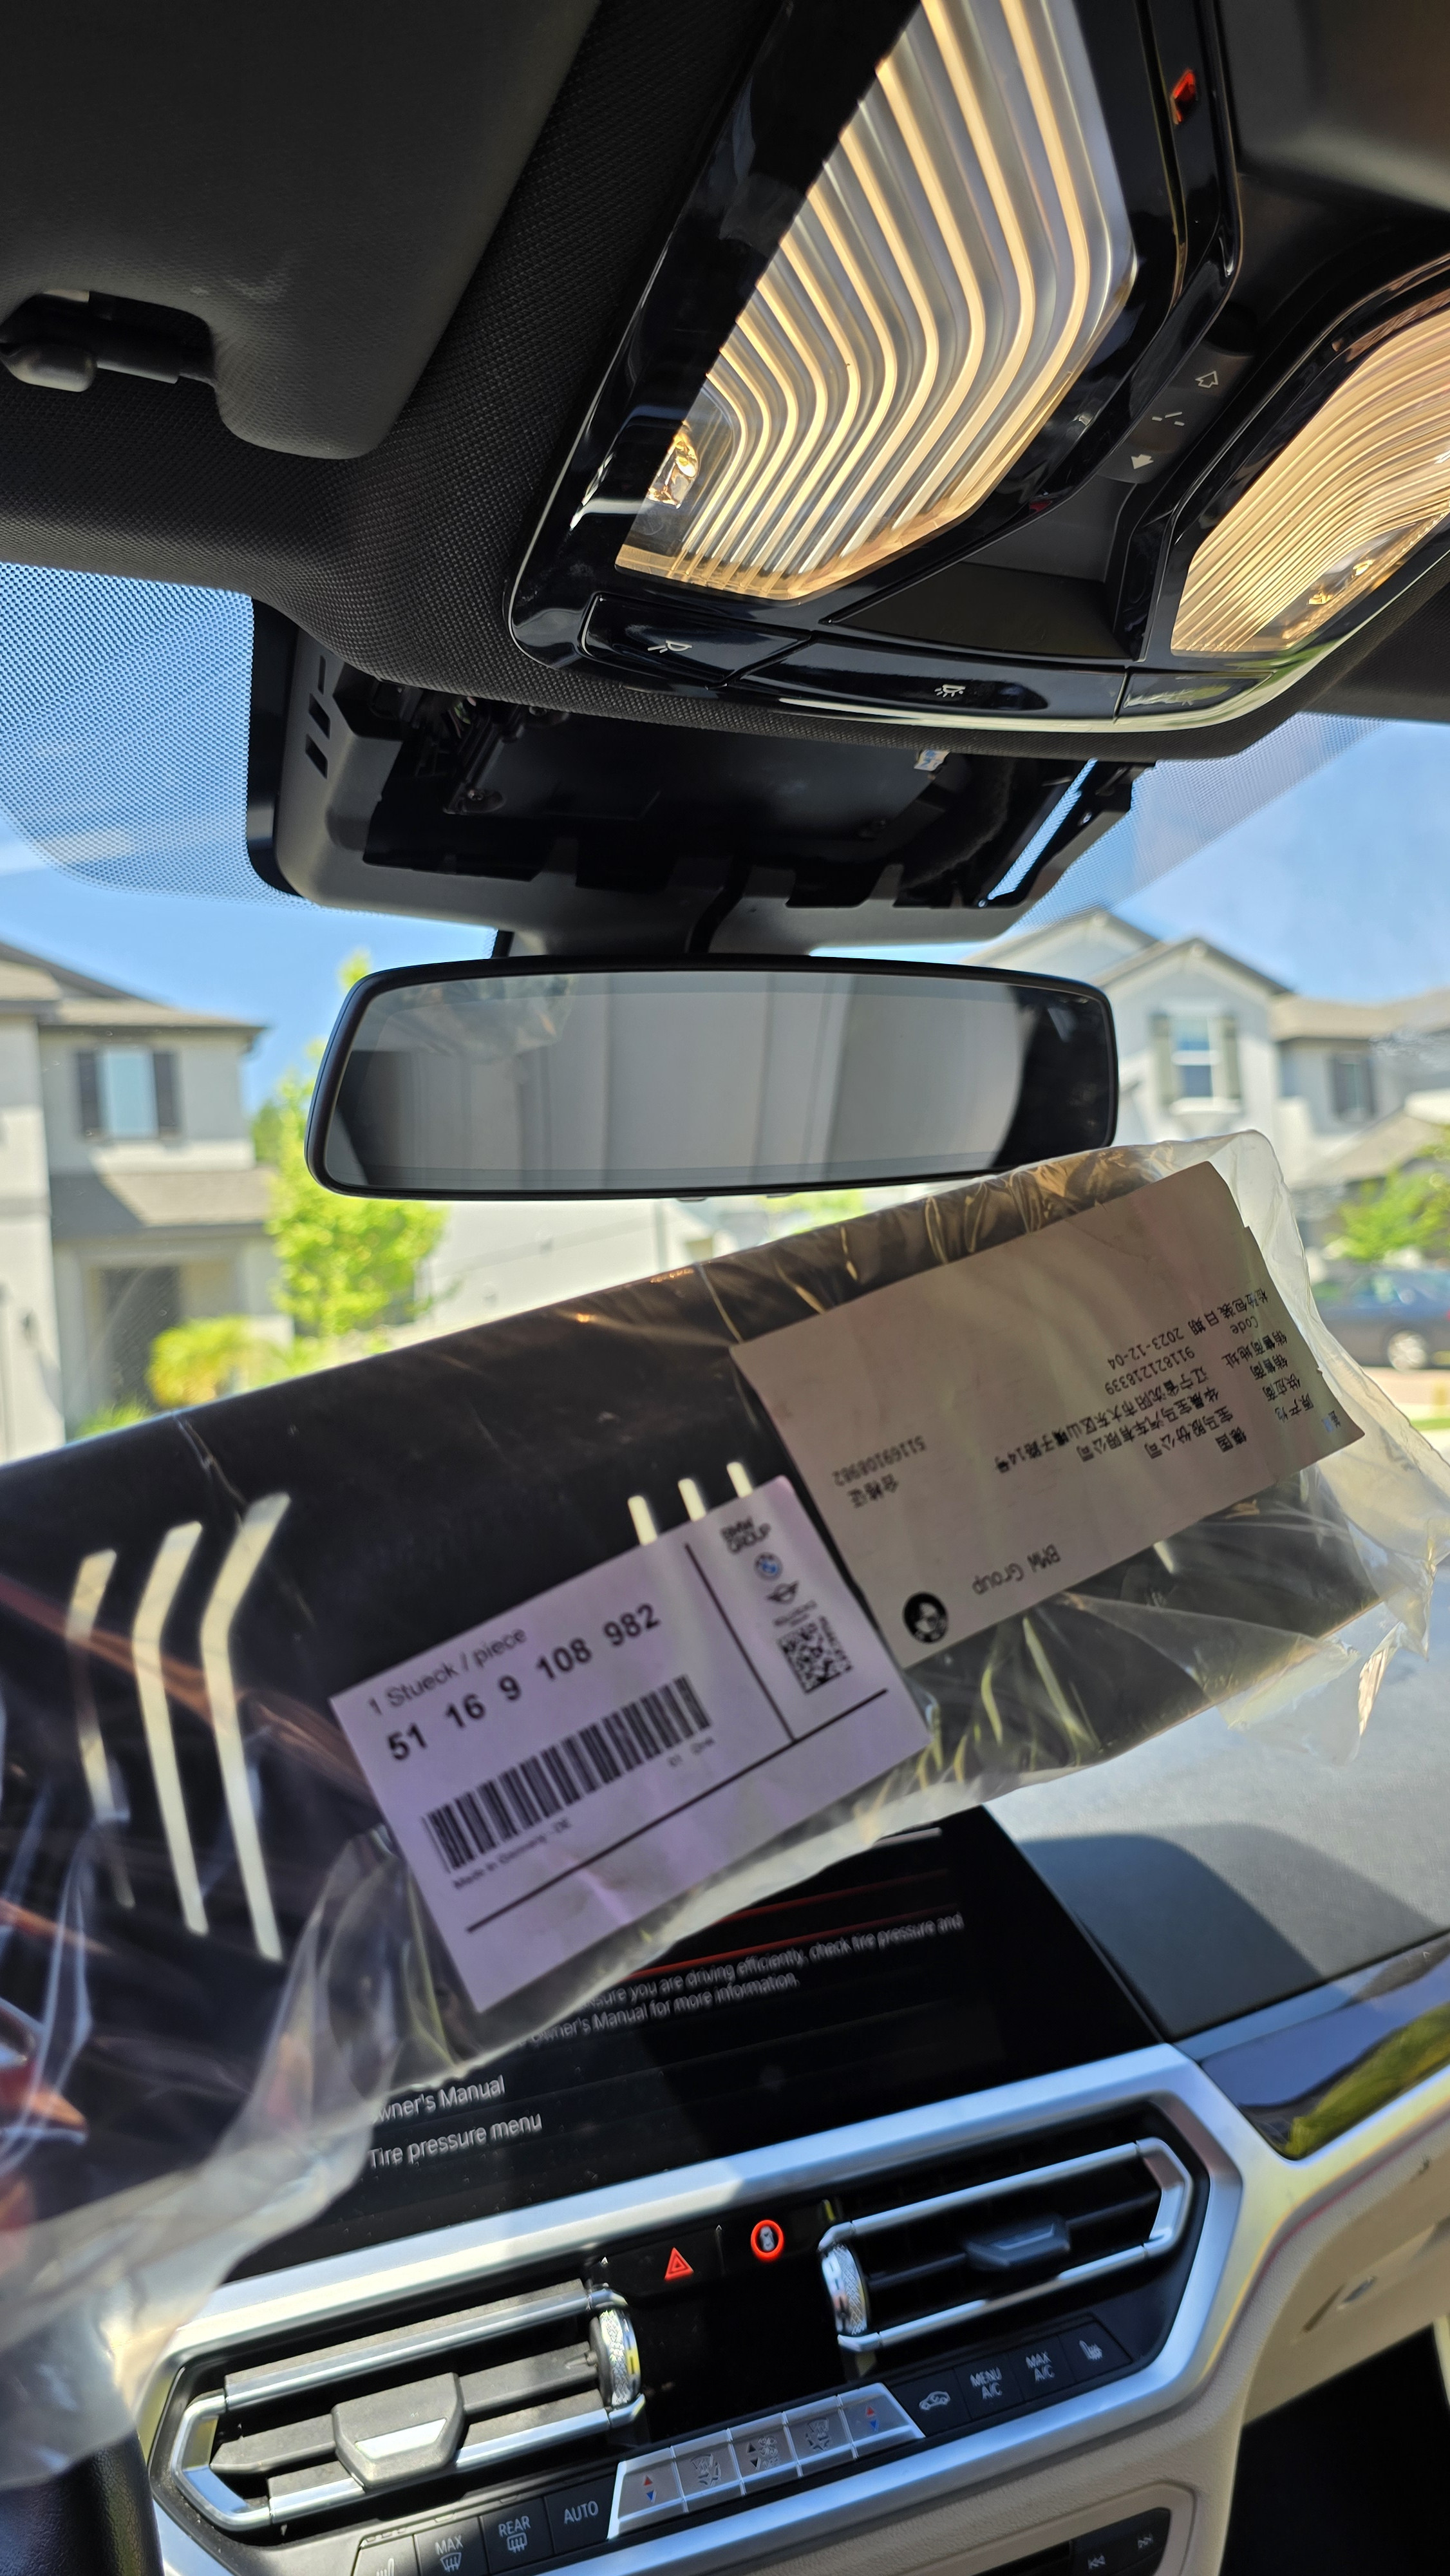 BMW G Series Wiring Harness Detail 1
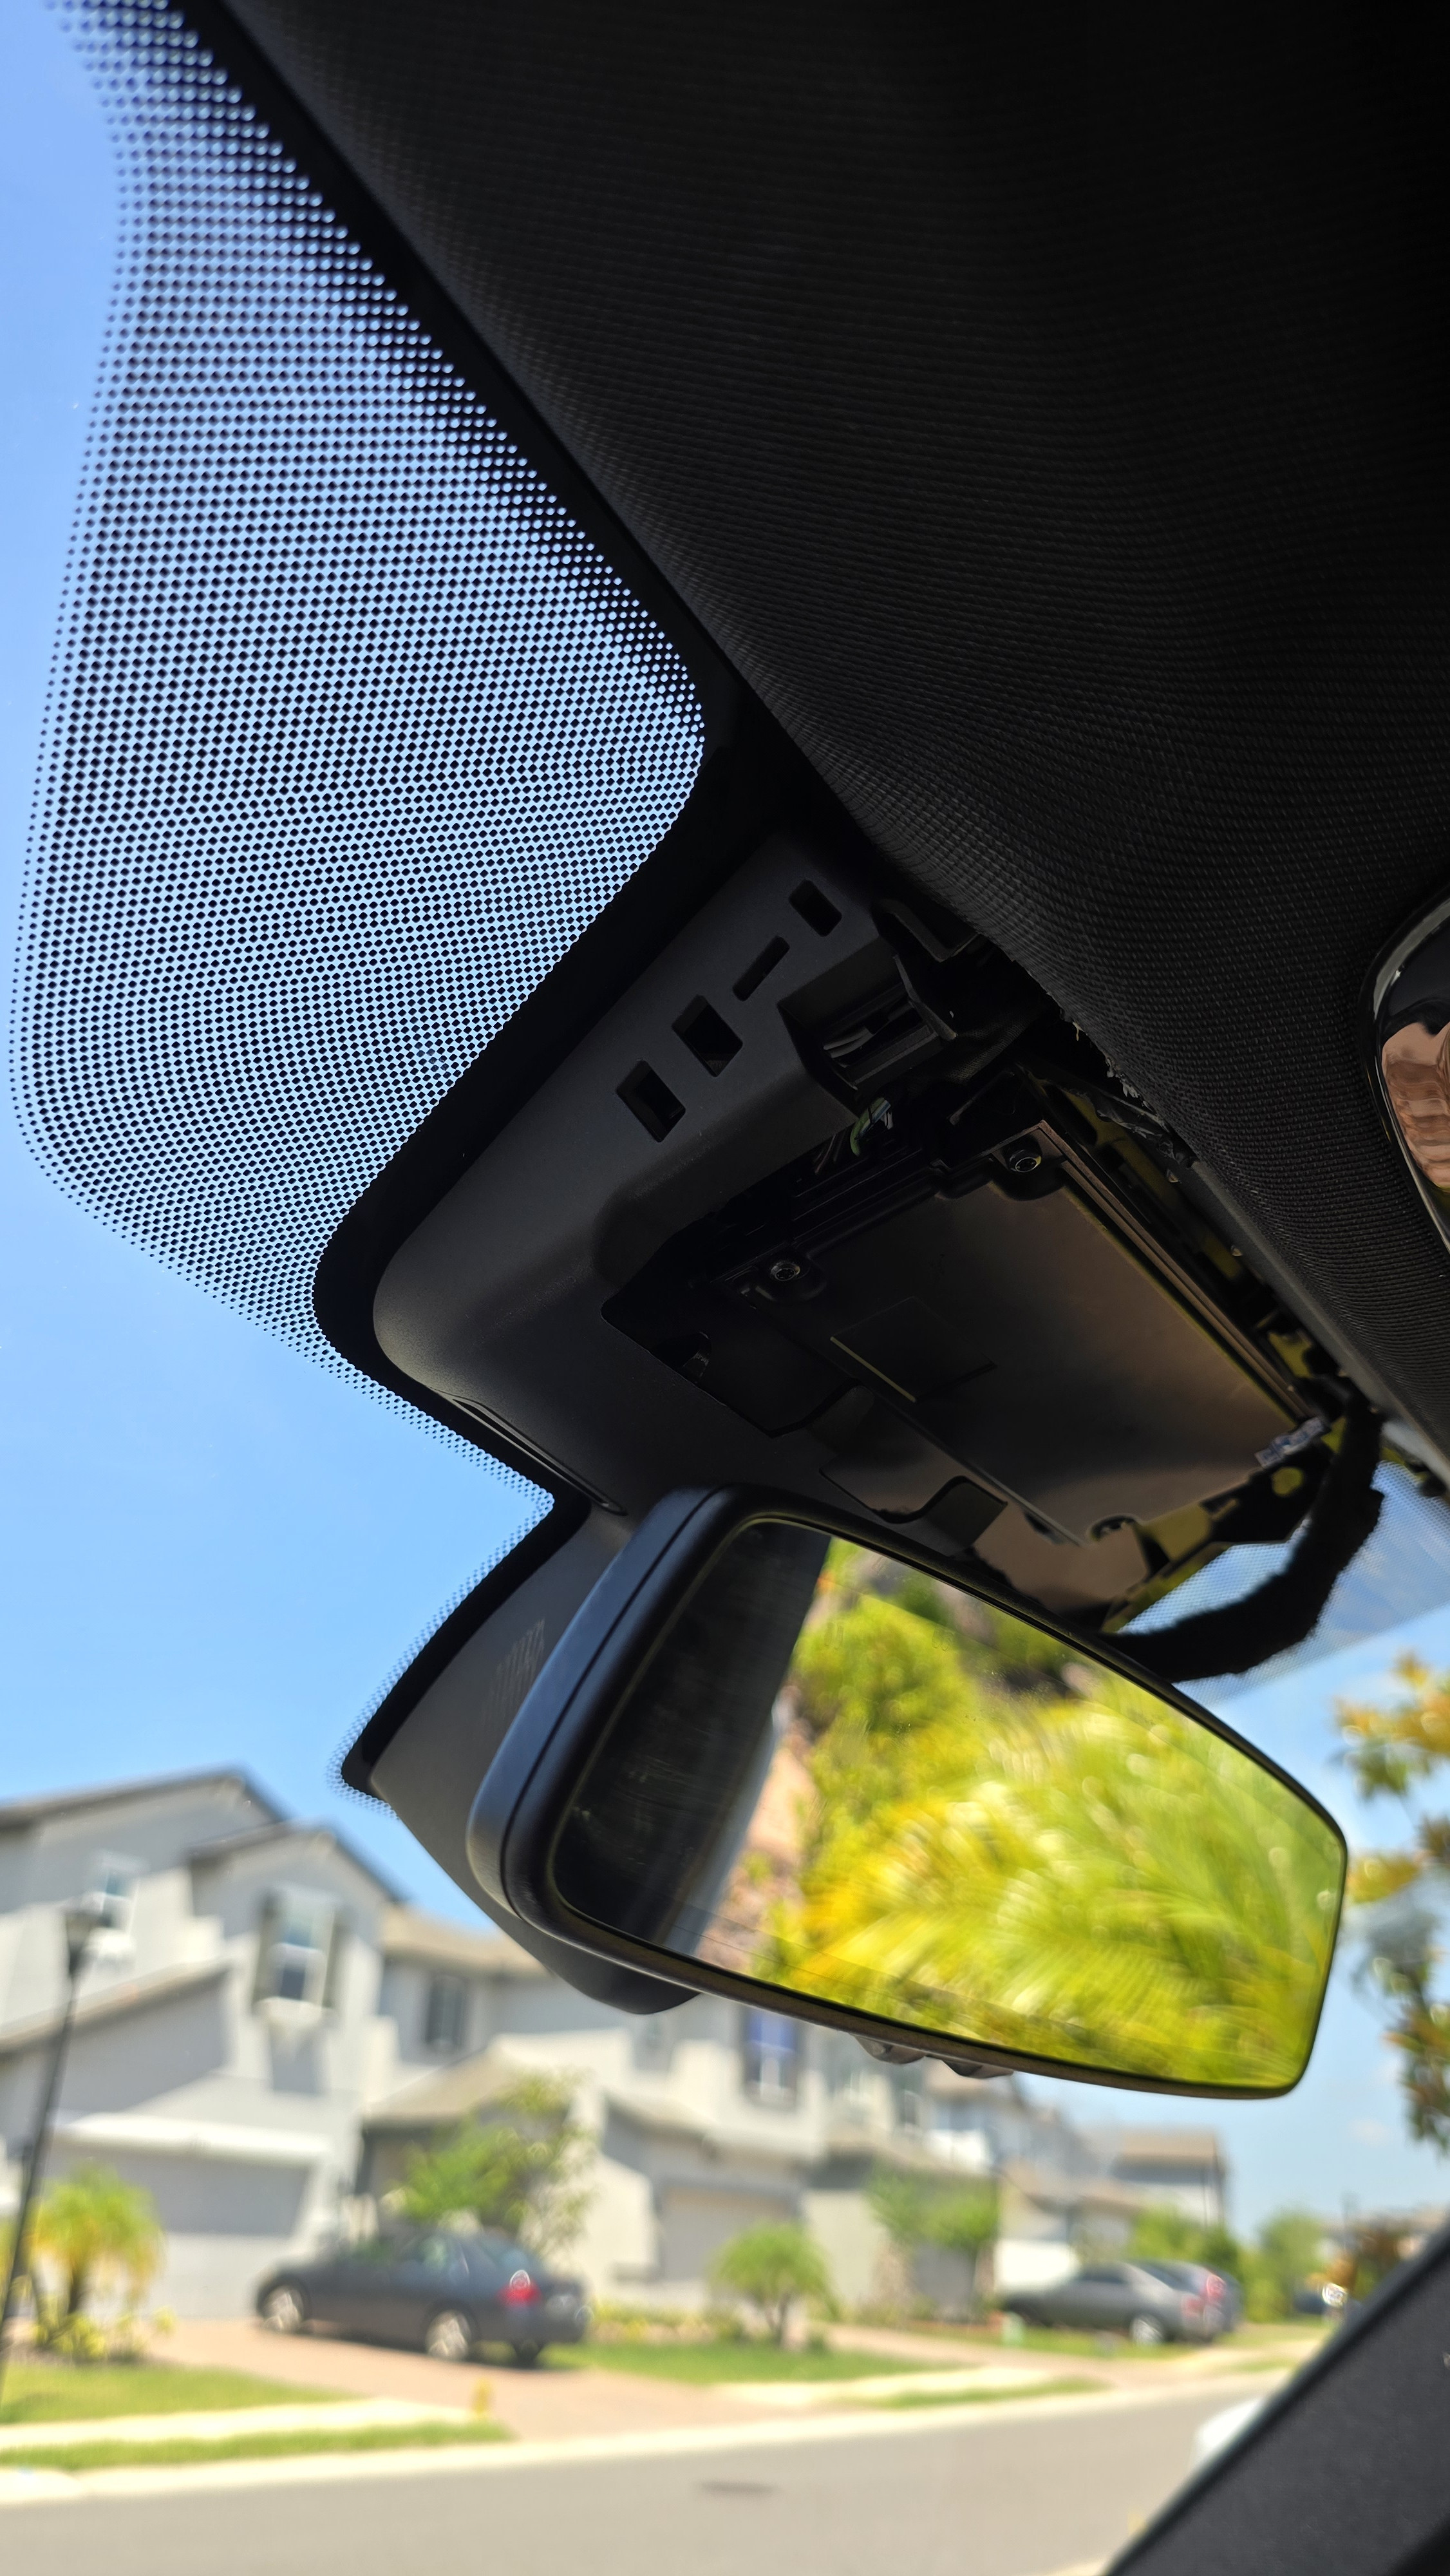 BMW G Series Wiring Harness Detail 2
 BMW G Series Wiring Harness Installation
 BMW G Series Trunk Disassembly Detail
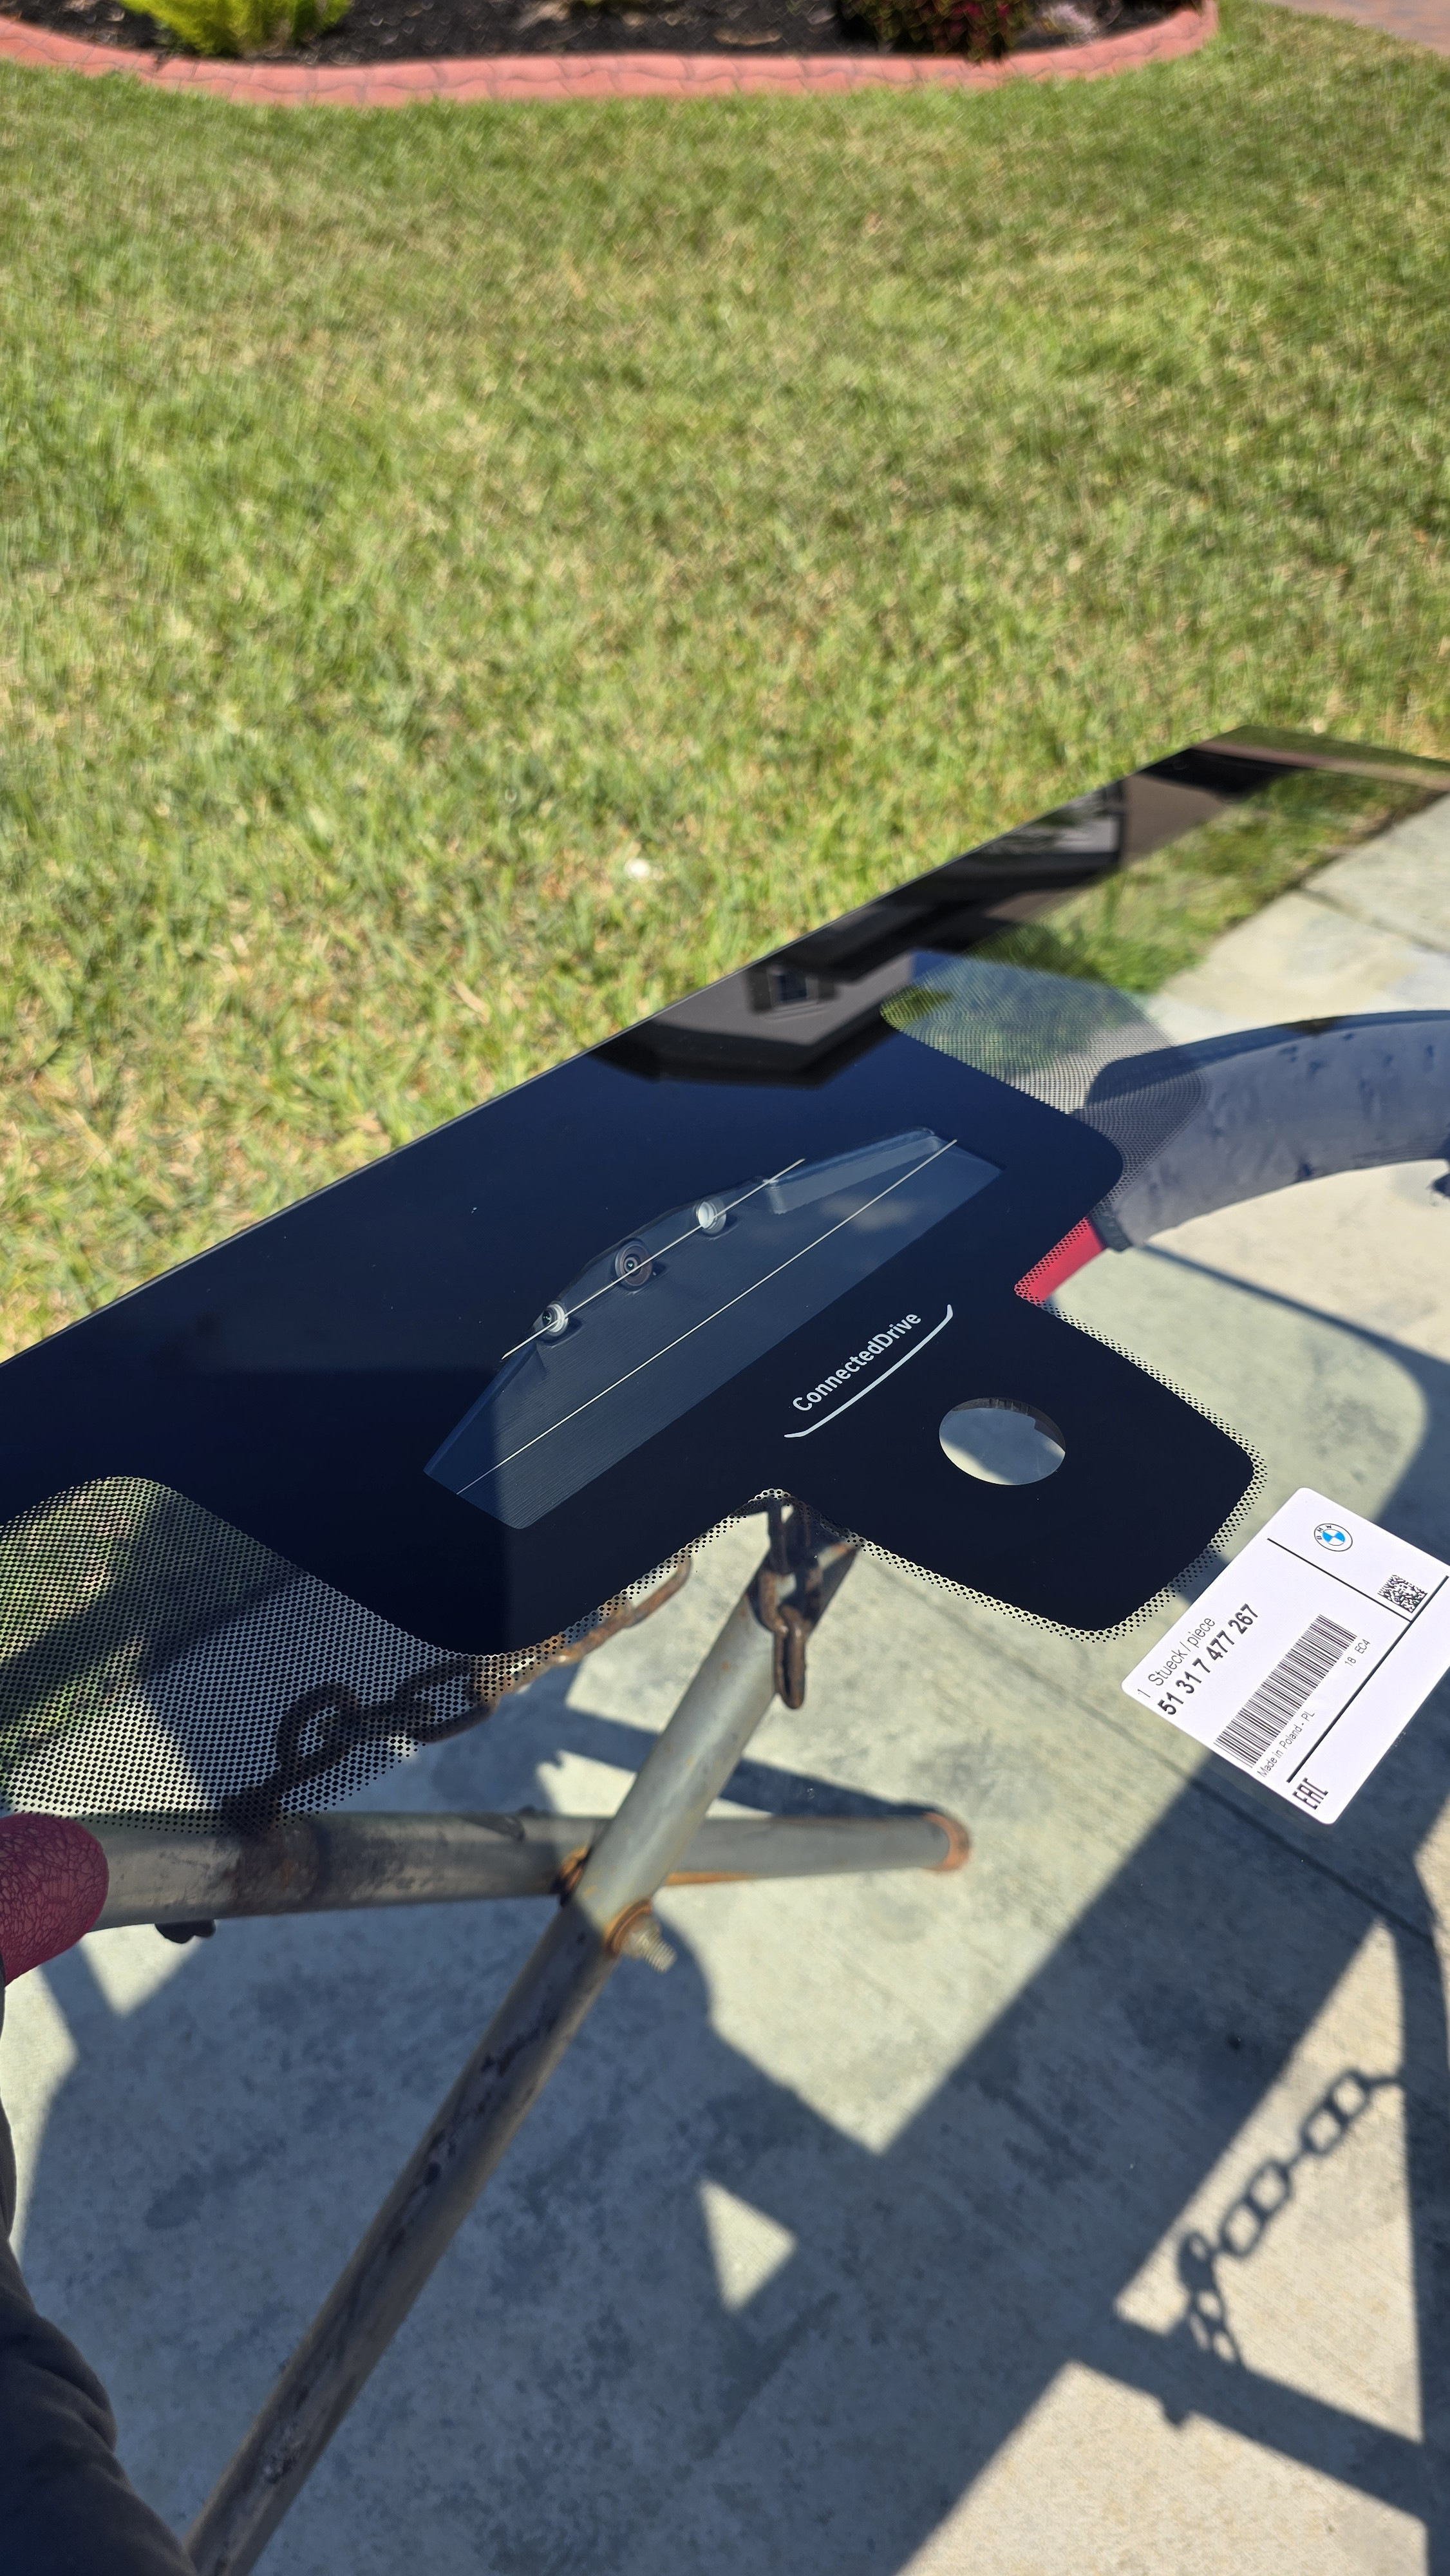 BMW G Series Rear Bumper Detail 1
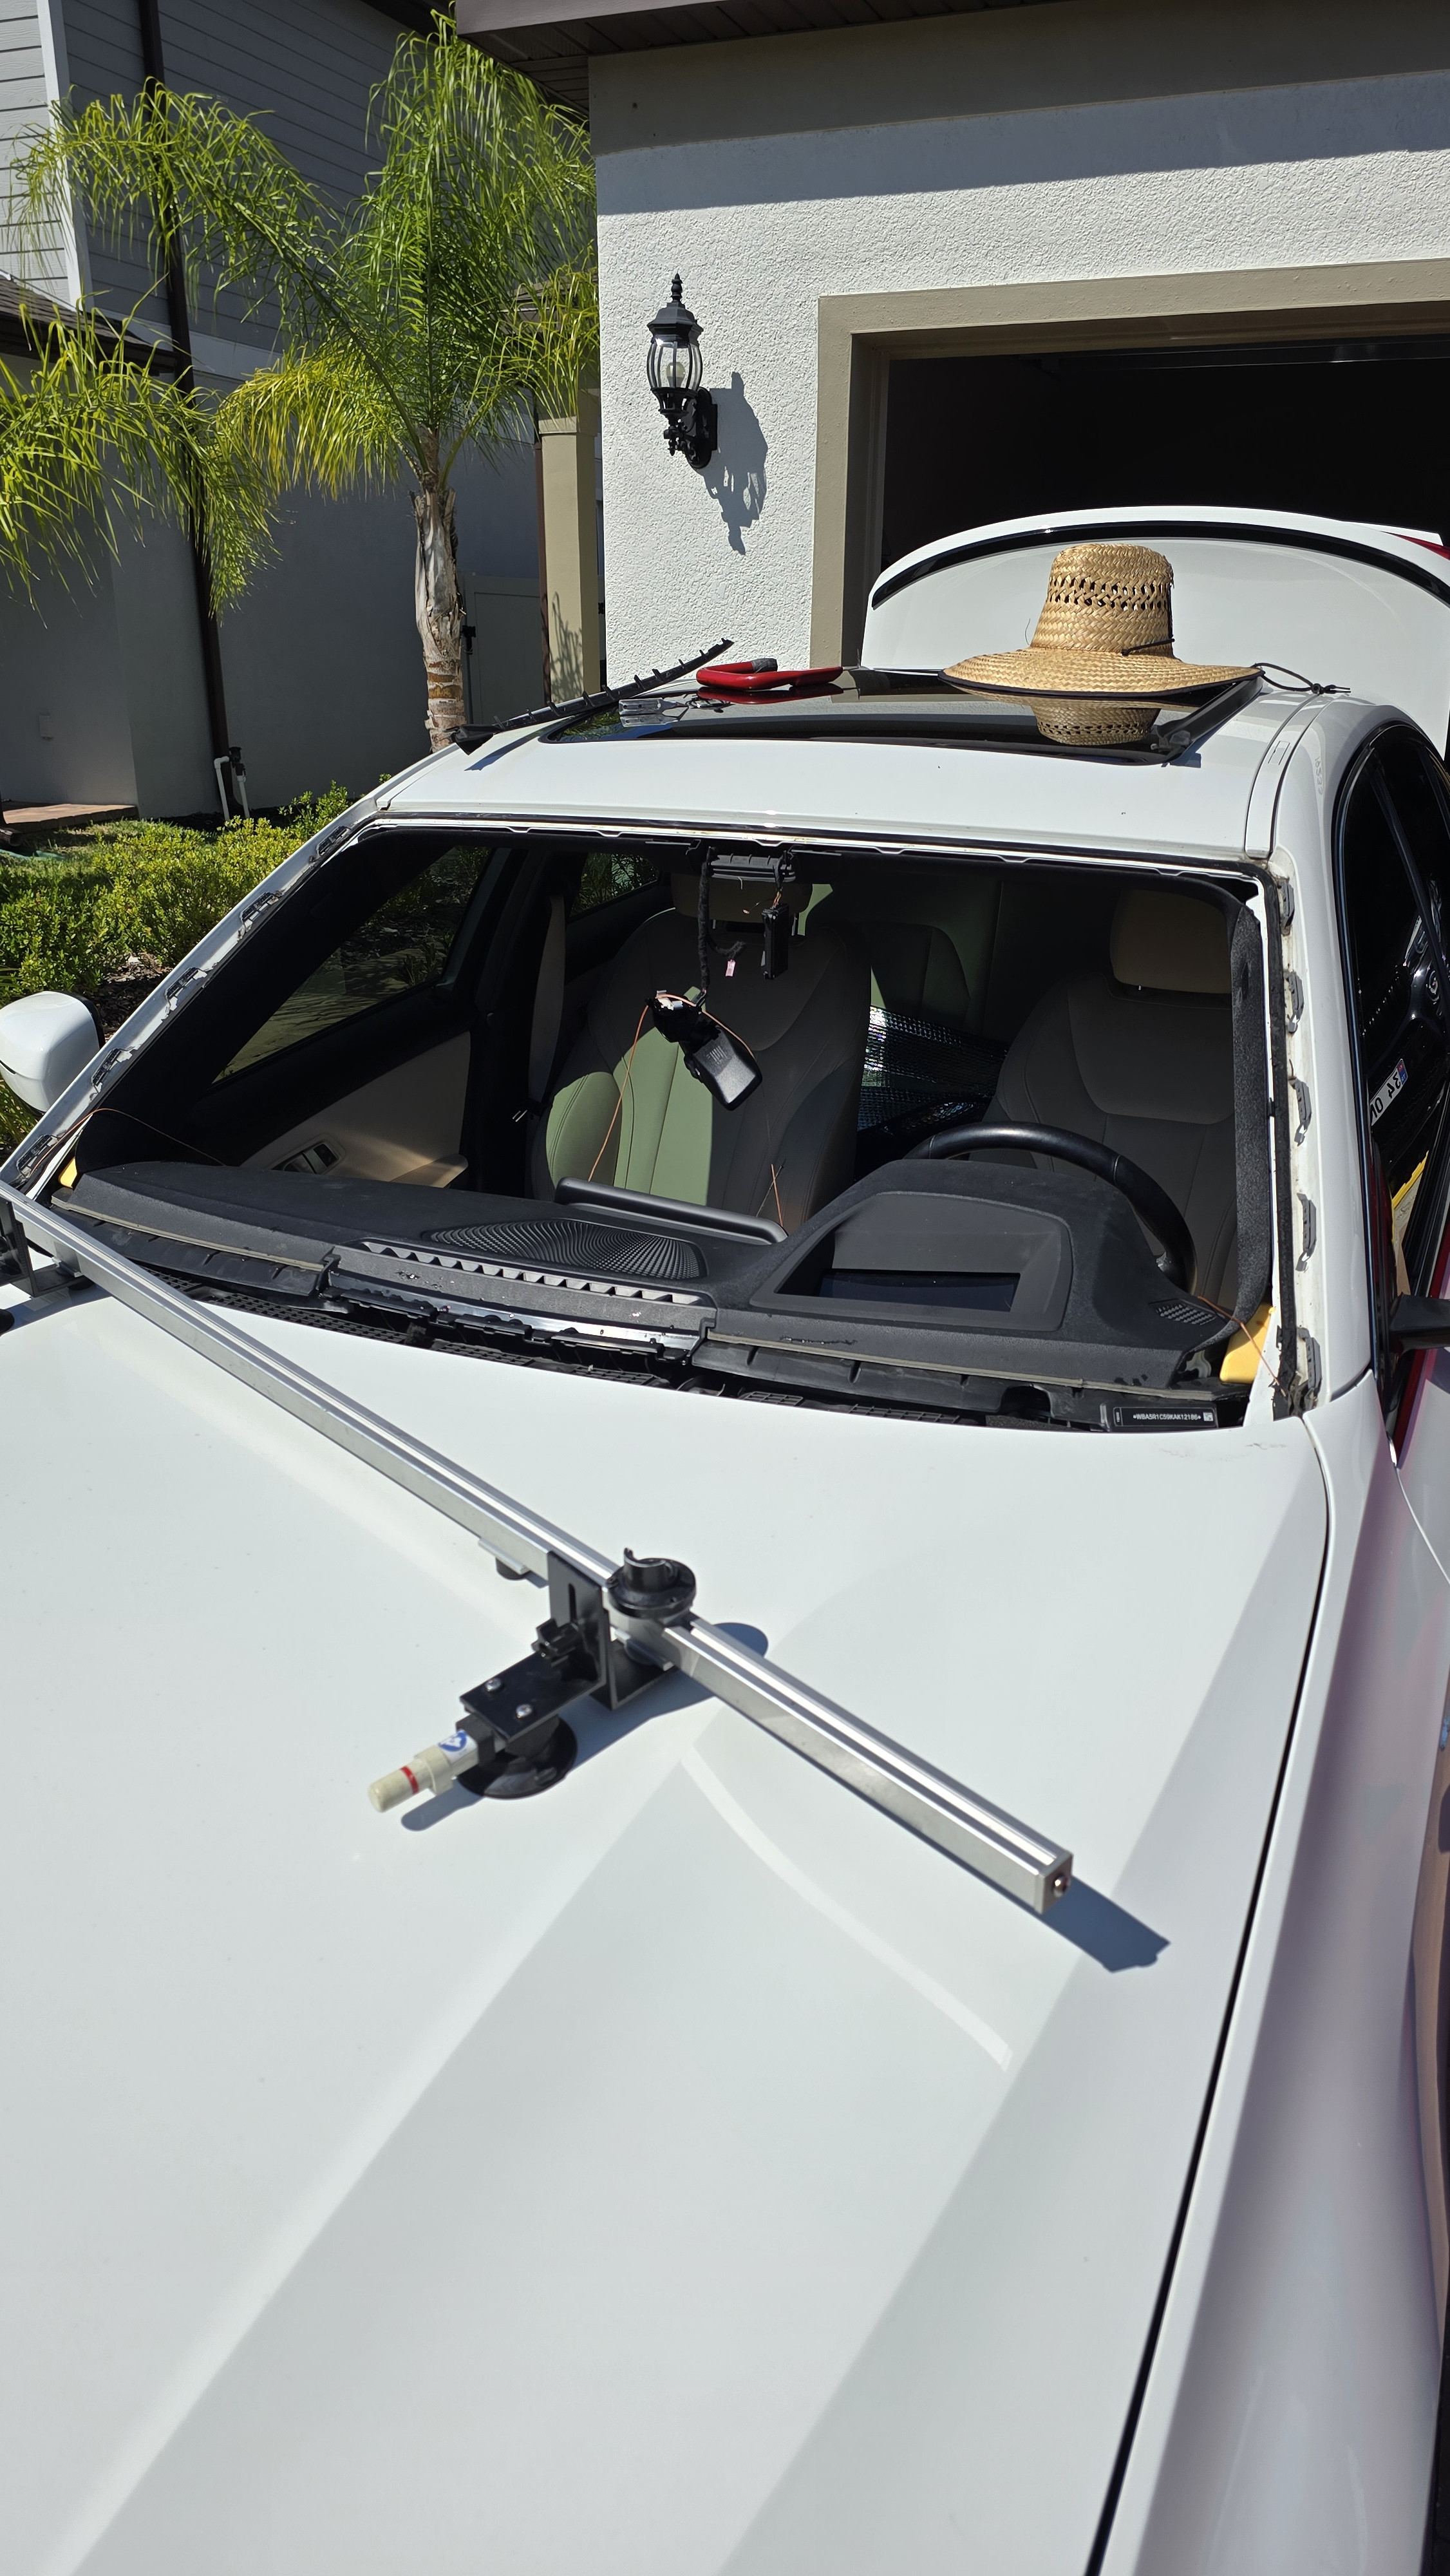 BMW G Series Rear Bumper Detail 2
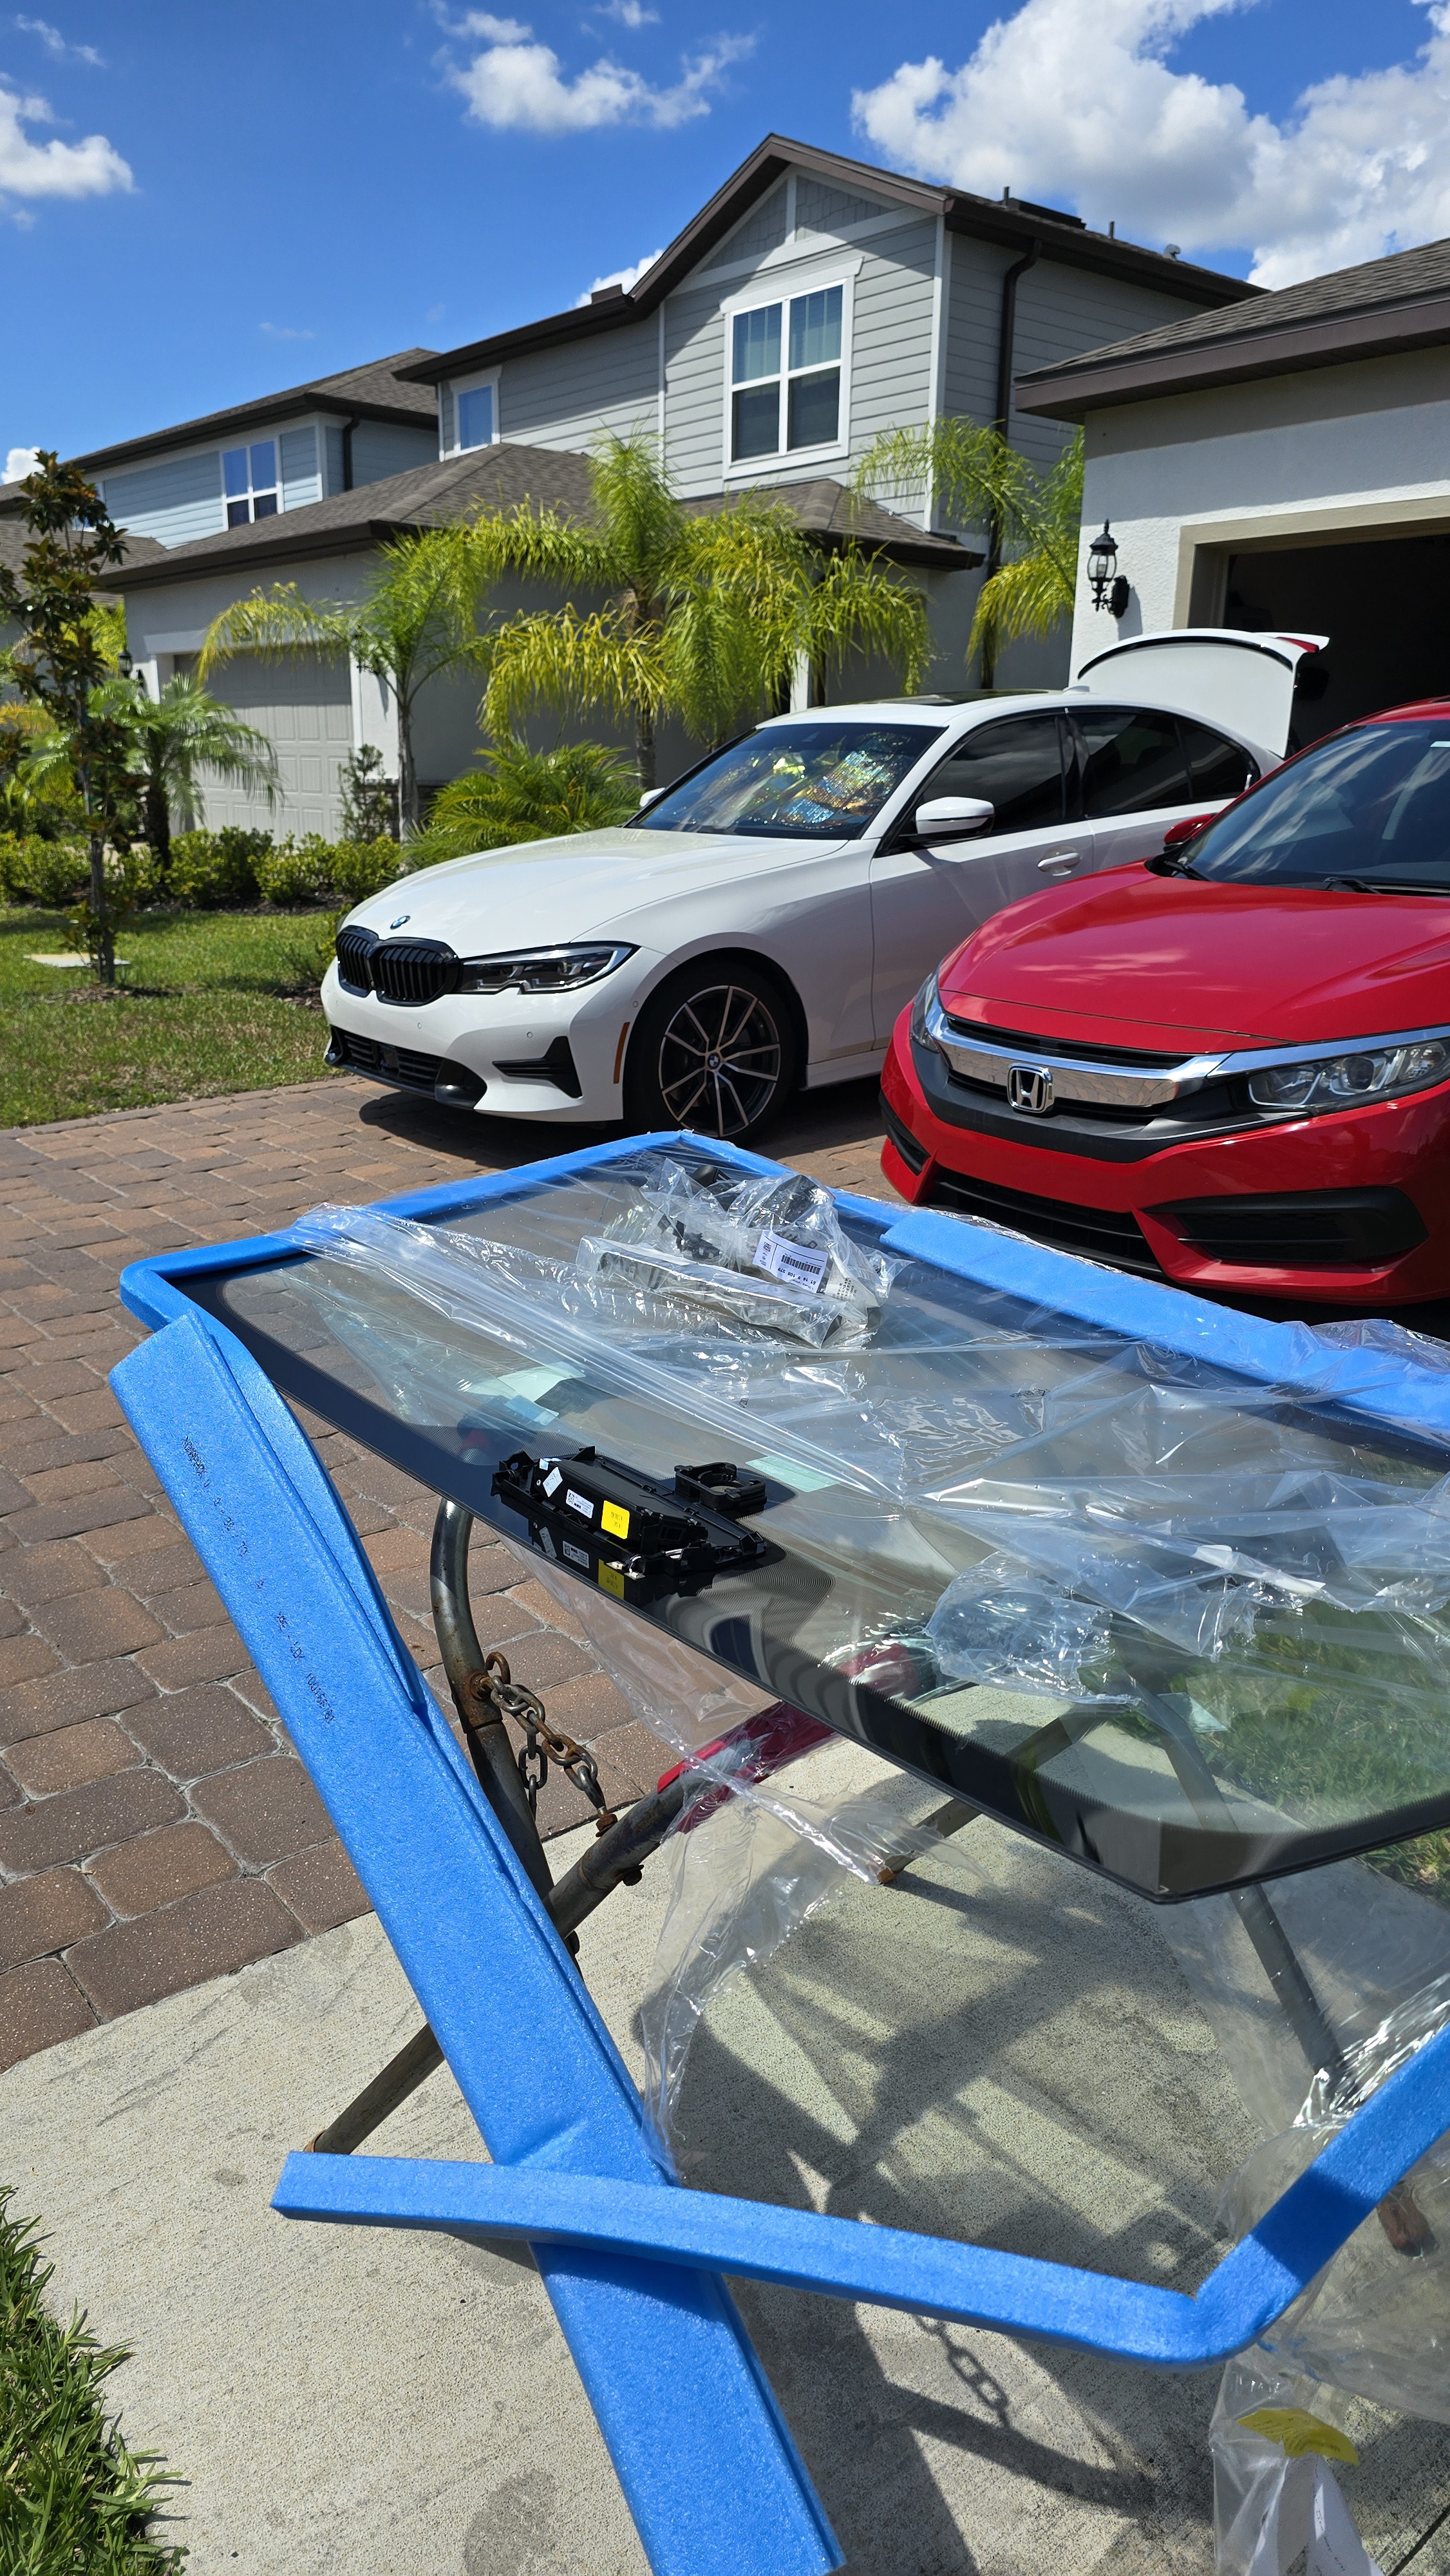 BMW G Series Rear Radar Sensor Detail 1
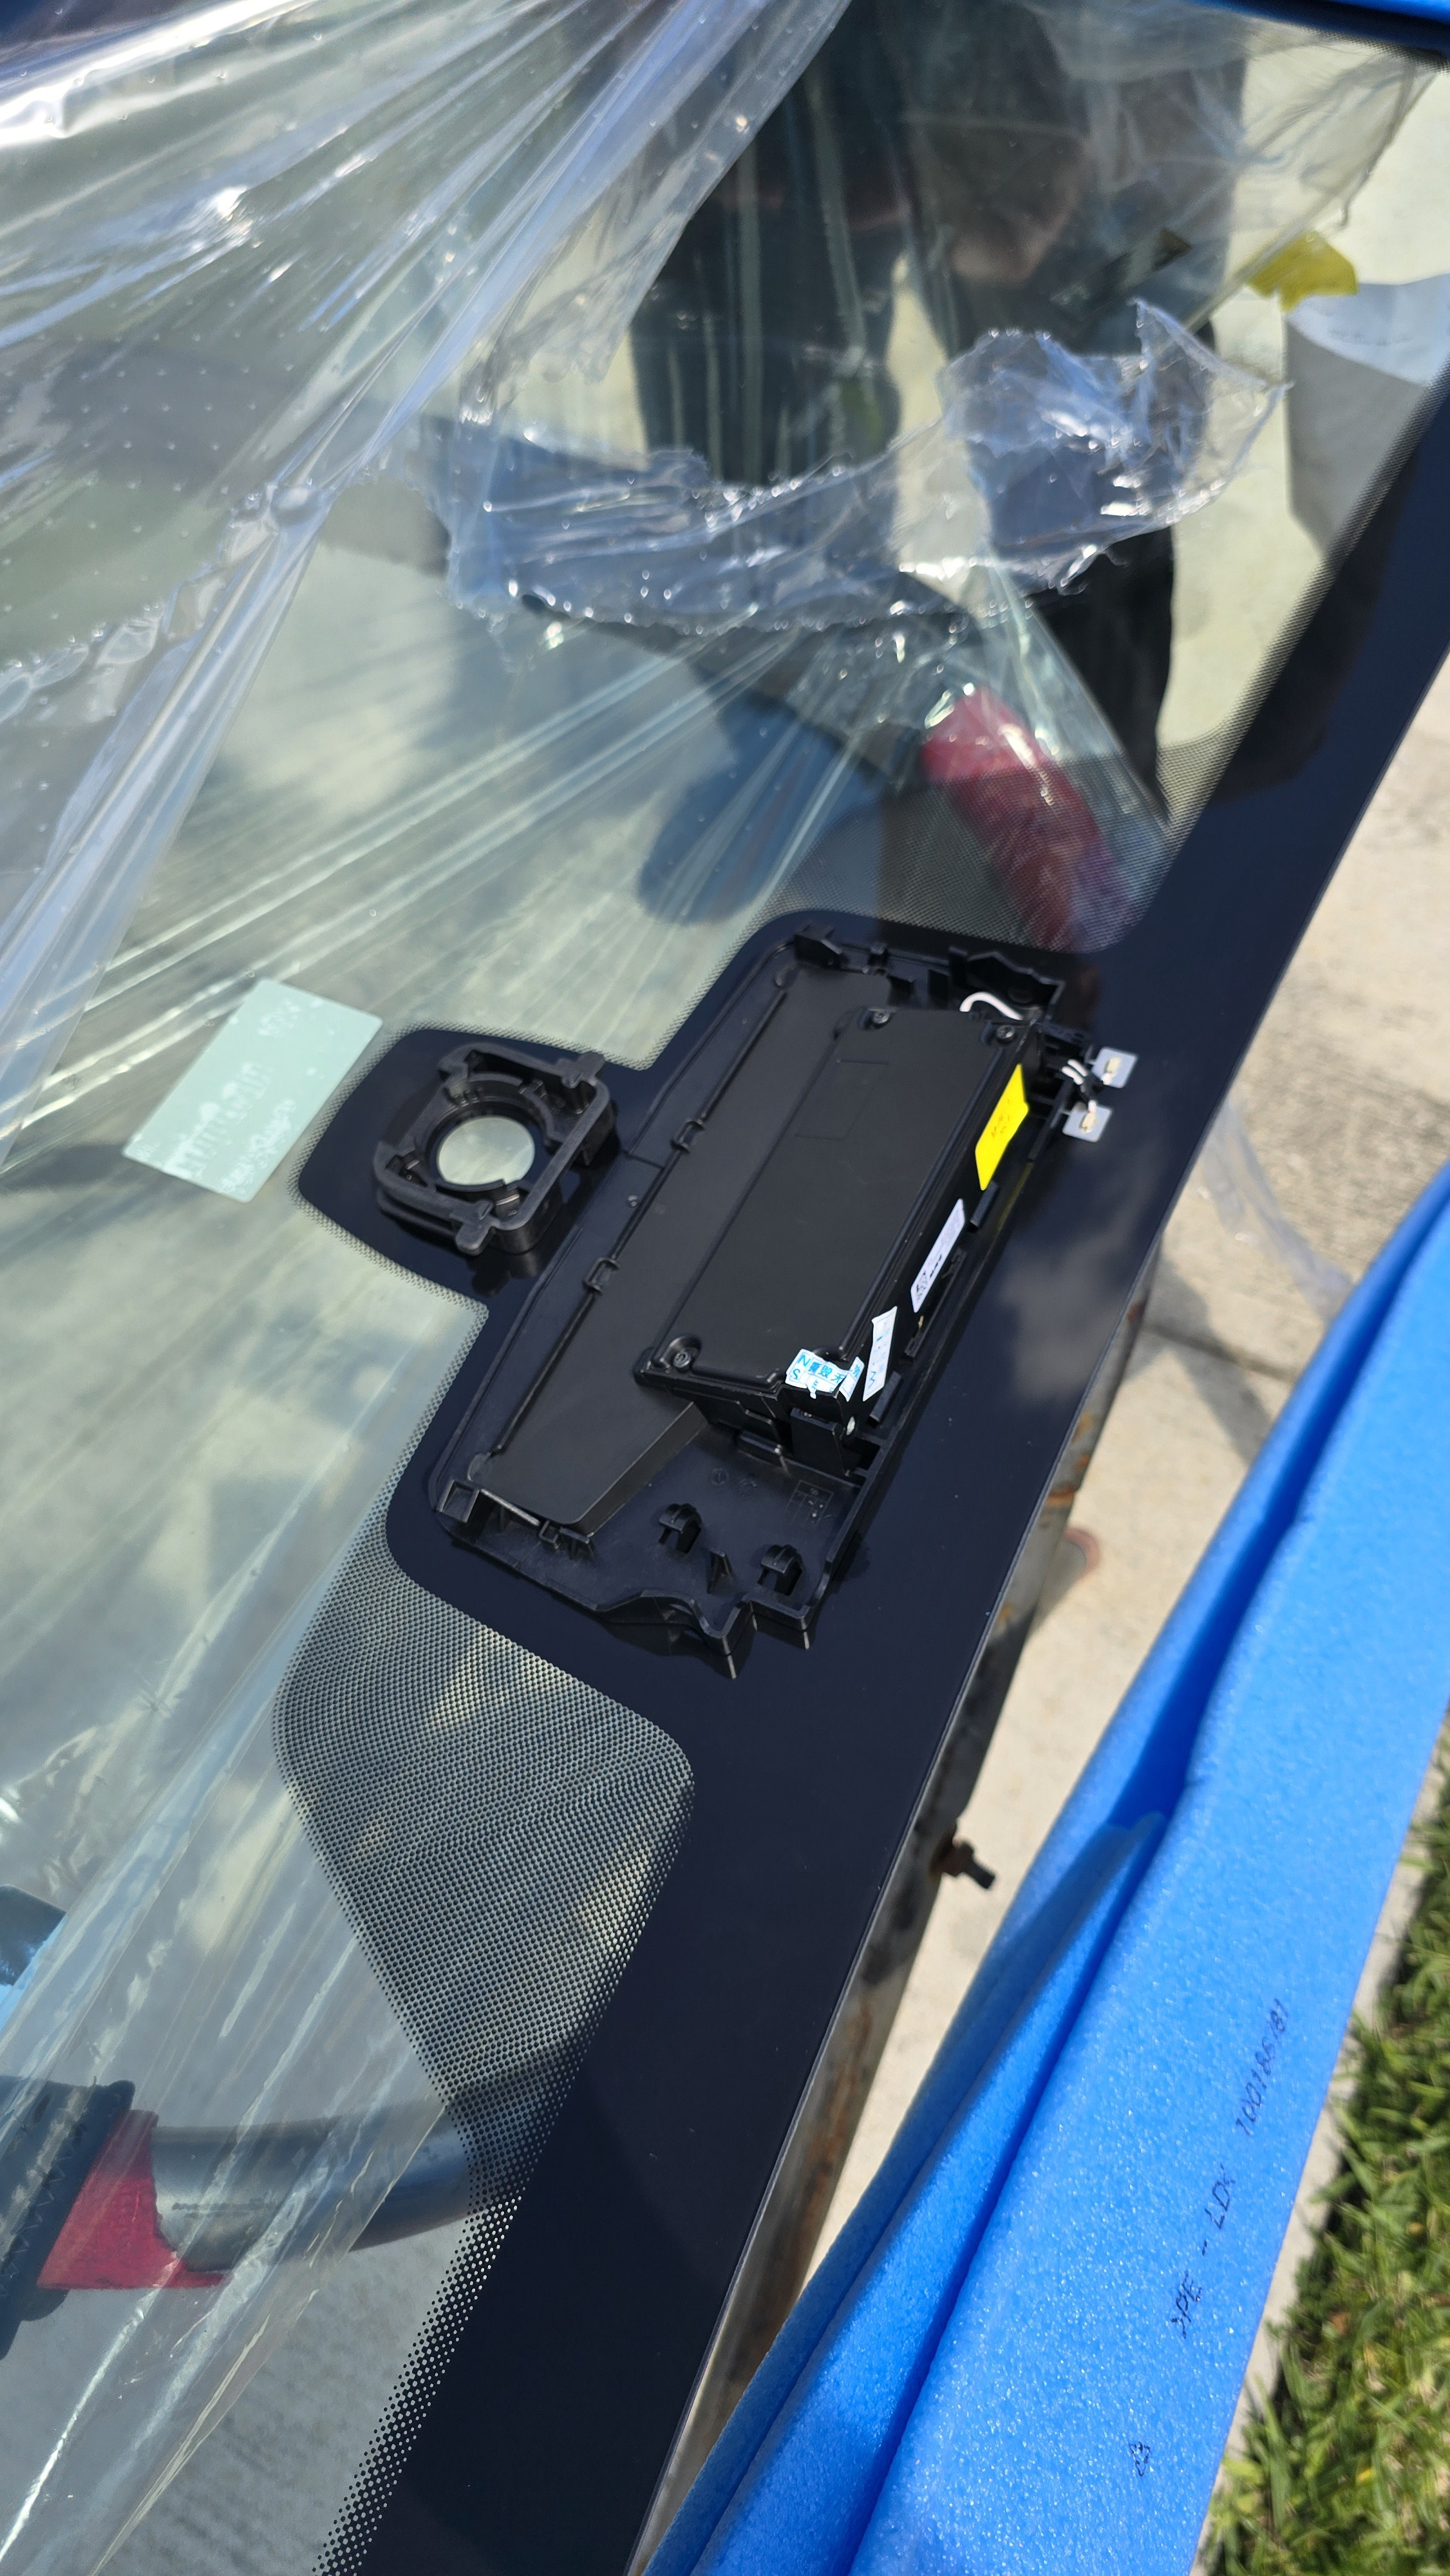 BMW G Series Rear Radar Sensor Detail 2
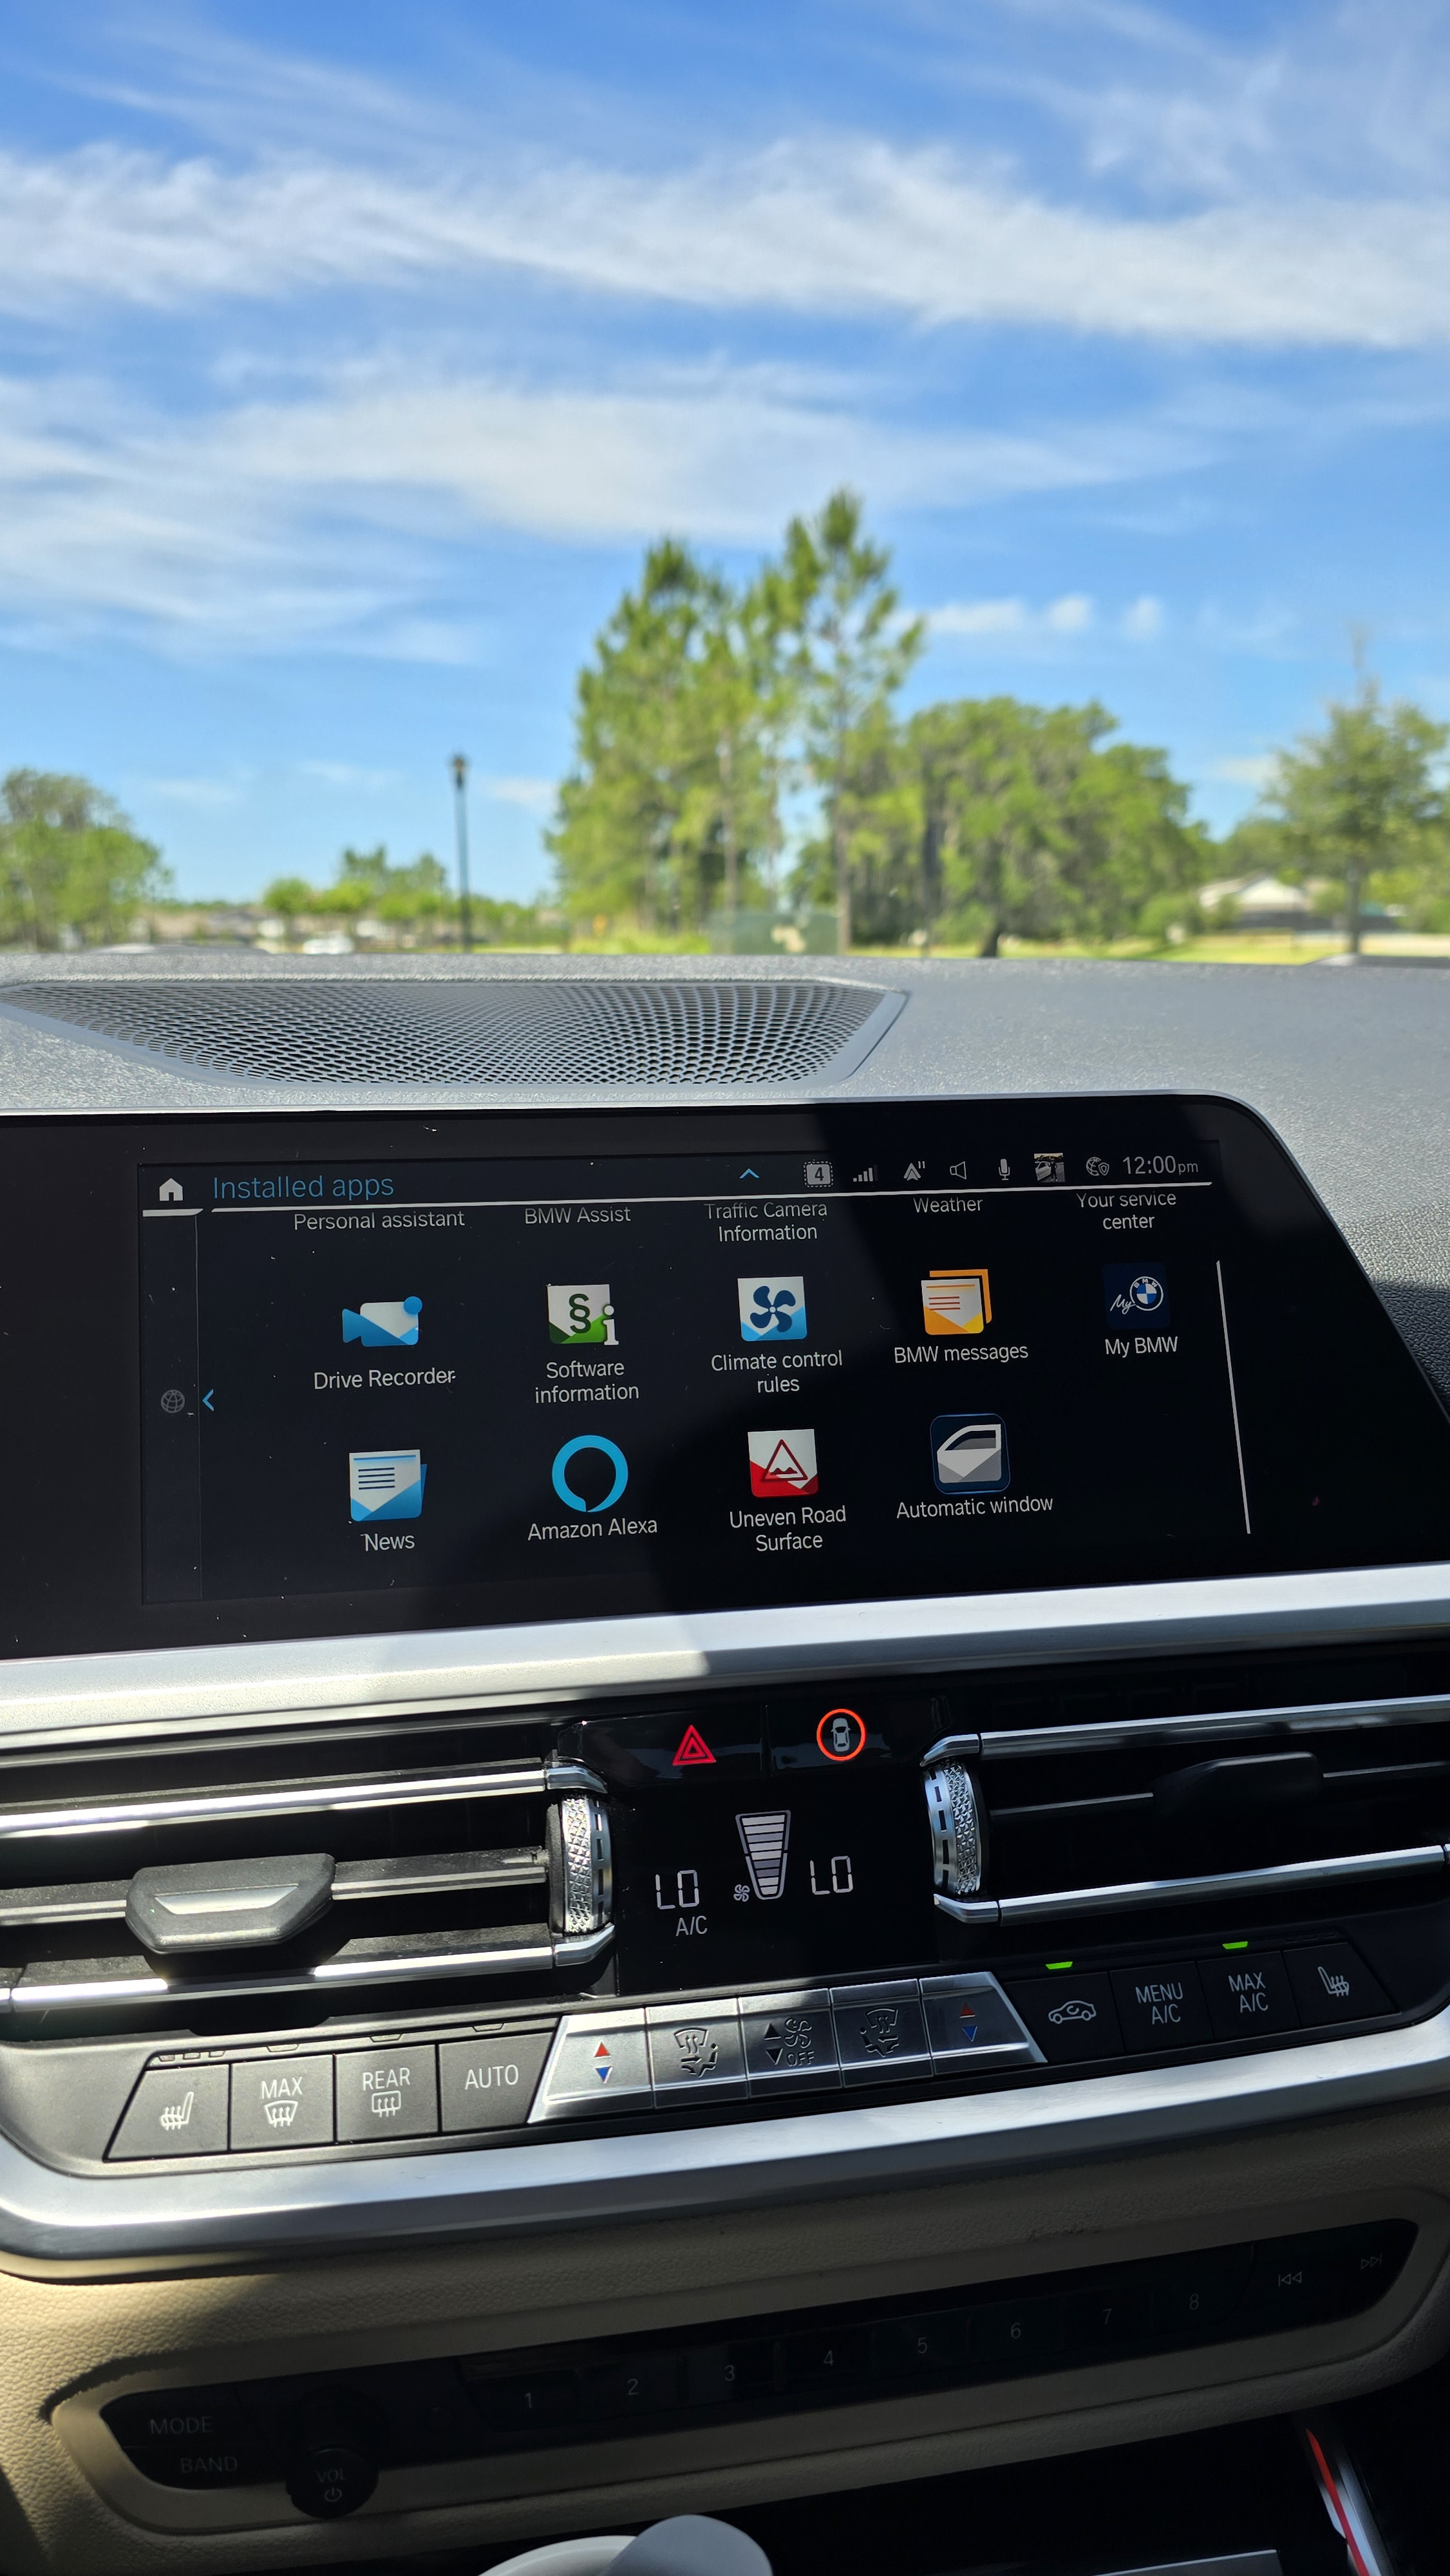 BMW G Series Software Coding in Progress
 BMW G Series Driving Assistant Professional Video Capture 1
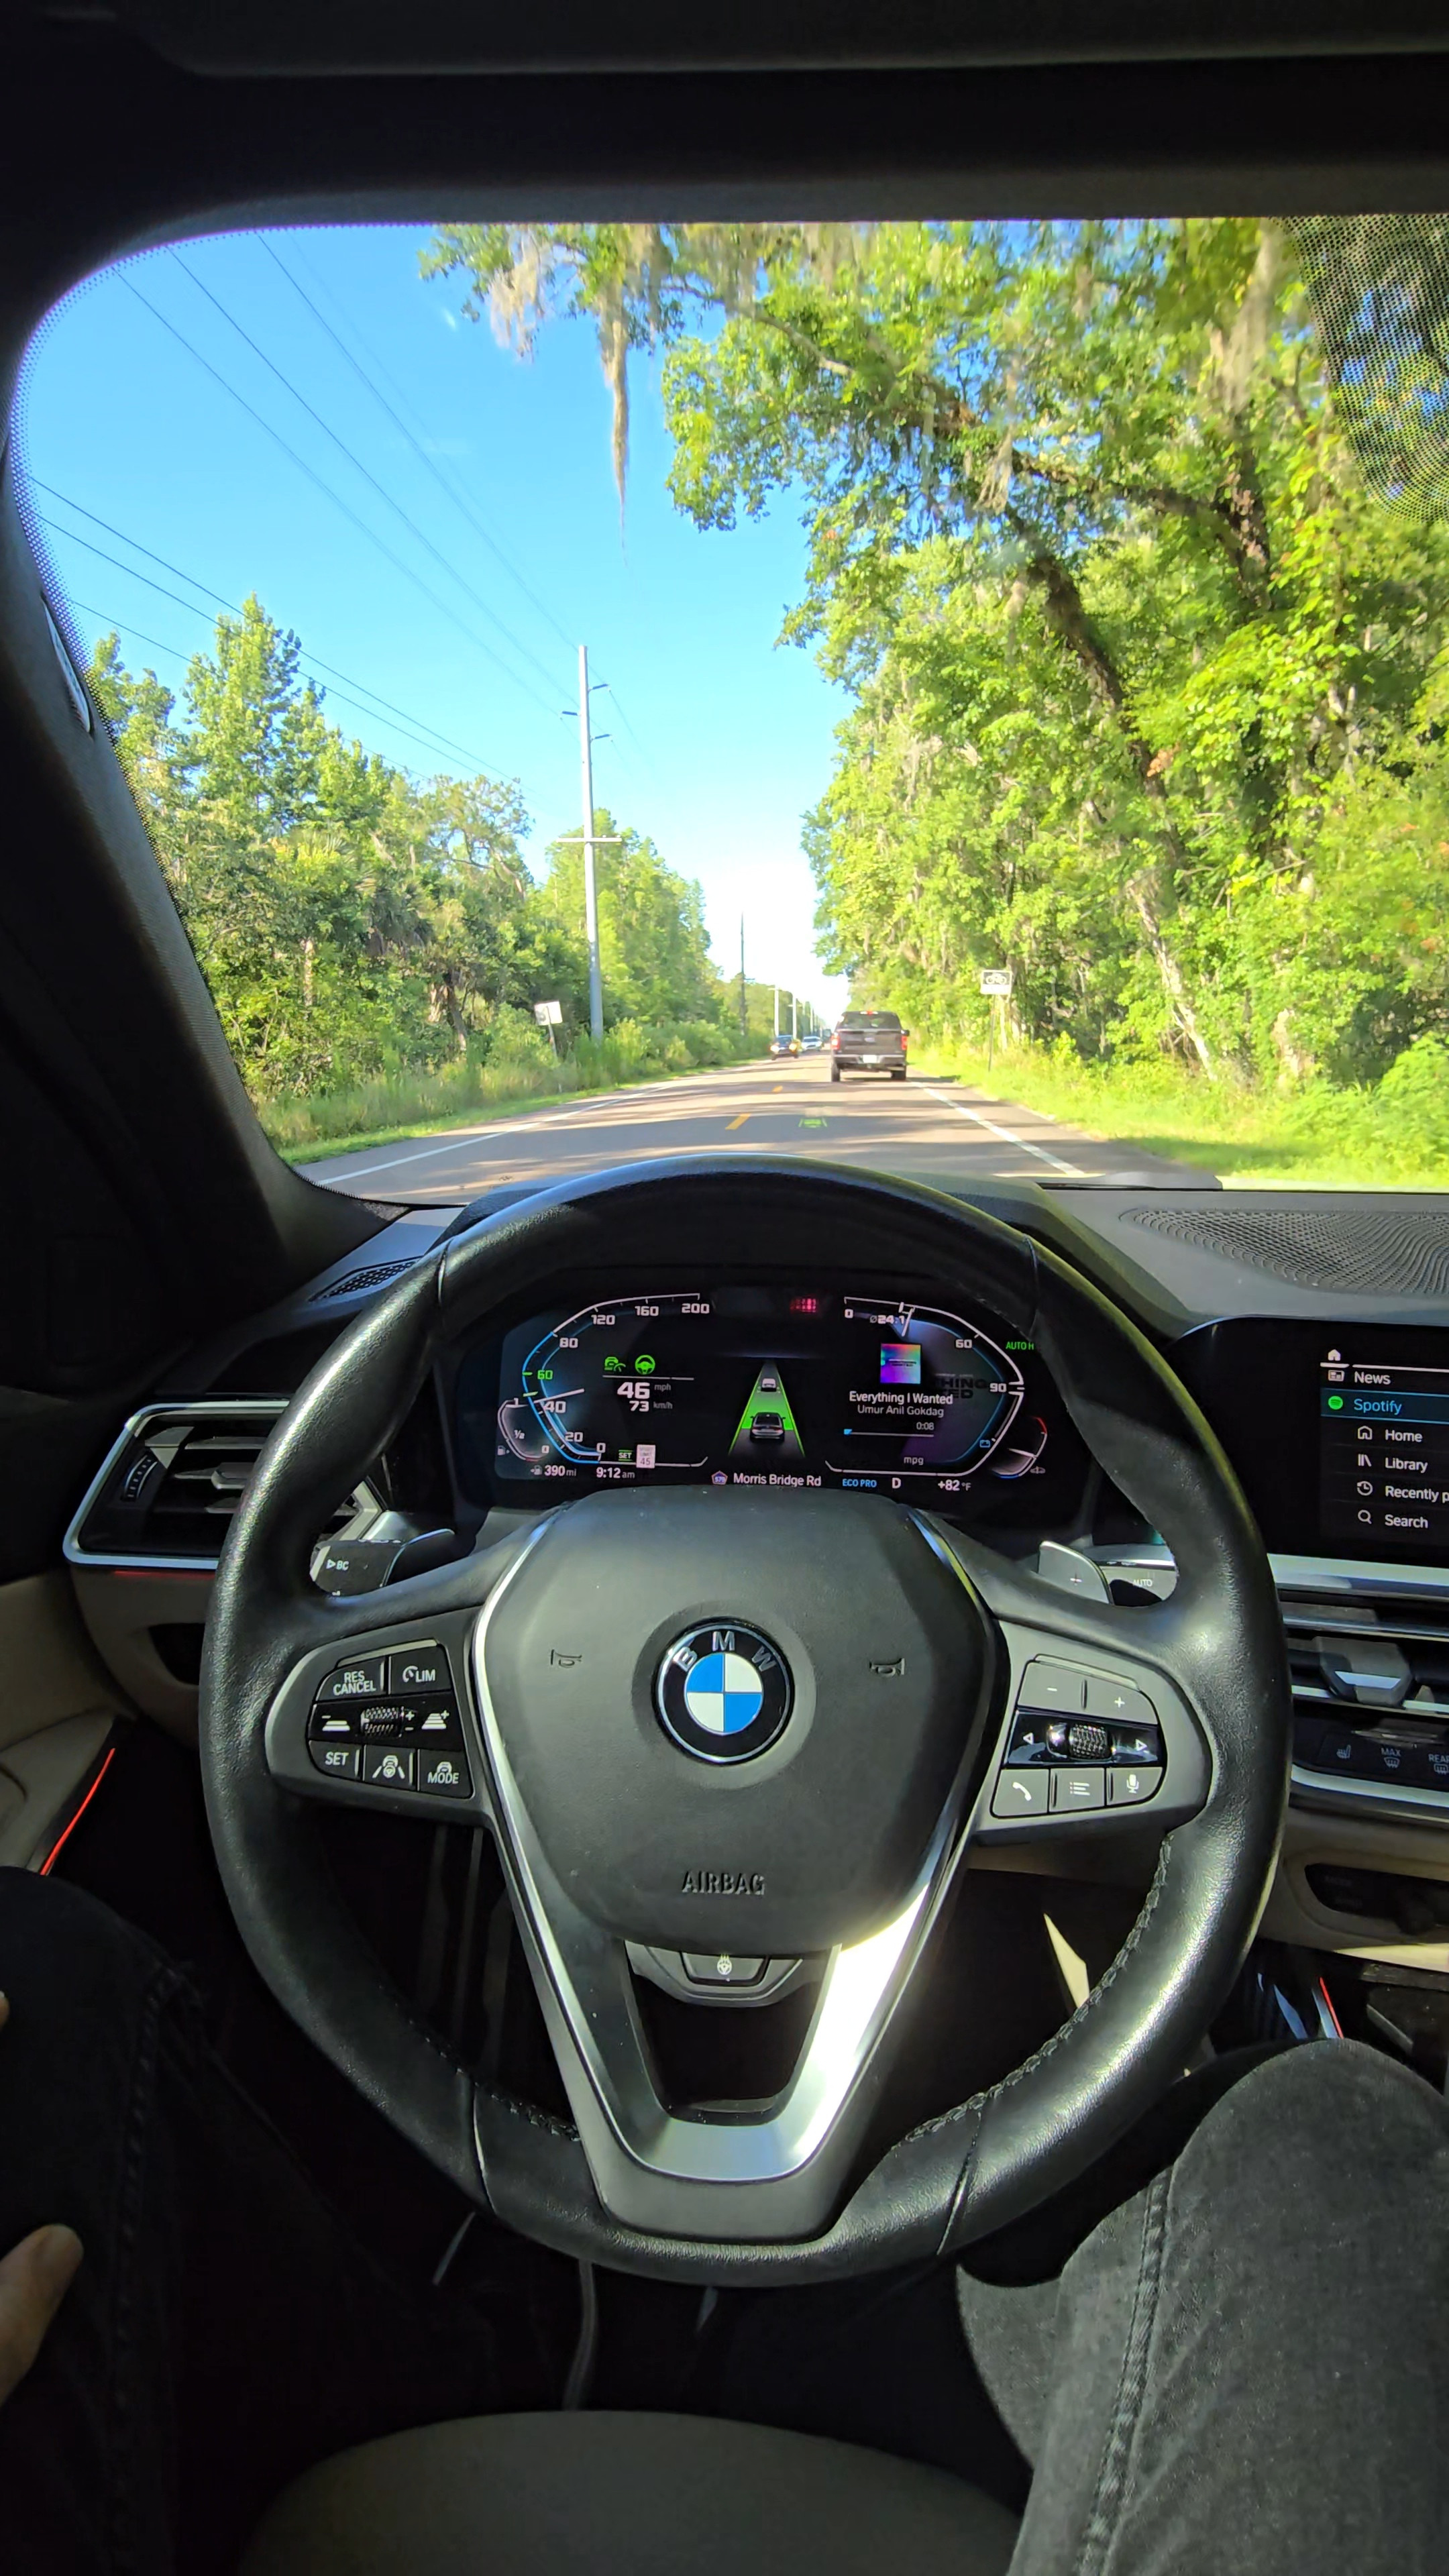 BMW G Series Driving Assistant Professional Video Capture 2