Mercedes Sprinter Window Fuse Location: Your Ultimate Guide
The Mercedes Sprinter Window Fuse Location is a crucial piece of information for any Sprinter owner or mechanic. Understanding the fuse layout ensures quick troubleshooting and repairs, keeping you on the road. This comprehensive guide, brought to you by CARDIAGTECH.NET, will pinpoint the exact locations of these fuses, helping you resolve window issues efficiently. We’ll also explore related fuse details for your Sprinter.
Contents
- 1. Understanding the Importance of Knowing the Mercedes Sprinter Window Fuse Location
- 1.1. Why Windows Stop Working: Common Culprits
- 1.2. The Role of Fuses in Your Mercedes Sprinter
- 2. Locating the Mercedes Sprinter Window Fuse
- 2.1. Instrument Panel Fuse Box
- 2.2. Fuse Box Under the Driver’s Seat
- 2.3. Identifying the Correct Fuse
- 3. Step-by-Step Guide to Checking and Replacing a Fuse
- 3.1. Gathering Your Tools
- 3.2. Step-by-Step Instructions
- 3.3. Important Safety Precautions
- 4. Mercedes Sprinter Fuse Layout: A Detailed Overview
- 4.1. Instrument Panel Fuse Box Diagram
- 4.2. Fuse Box Under Driver’s Seat Diagram
- 5. Troubleshooting Common Window Problems
- 5.1. Windows Not Working at All
- 5.2. Window Works Intermittently
- 5.3. Window Moves Slowly
- 6. Advanced Diagnostics for Window Issues
- 6.1. Using a Multimeter
- 6.2. Using an OBD-II Scanner
- 6.3. When to Seek Professional Help
- 7. Maintaining Your Mercedes Sprinter’s Electrical System
- 7.1. Regular Inspections
- 7.2. Preventative Maintenance
- 7.3. Upgrading Your Tools with CARDIAGTECH.NET
- Addressing Customer Challenges
- Services We Offer
- 8. Benefits of Using High-Quality Tools from CARDIAGTECH.NET
- 8.1. Precision and Accuracy
- 8.2. Durability and Reliability
- 8.3. Ease of Use
- 8.4. Comprehensive Support
- 9. Why Choose CARDIAGTECH.NET?
- 9.1. Expertise and Experience
- 9.2. Wide Range of Products
- 9.3. Competitive Pricing
- 9.4. Customer Satisfaction
- 10. Frequently Asked Questions (FAQ)
- 10.1. Where is the main fuse box located in a Mercedes Sprinter?
- 10.2. How do I know if a fuse is blown?
- 10.3. What size fuse do I need for my power windows?
- 10.4. Can I use a higher amperage fuse if I don’t have the correct size?
- 10.5. What do I do if my power windows still don’t work after replacing the fuse?
- 10.6. How often should I check my fuses?
- 10.7. What is a fuse puller and why should I use one?
- 10.8. Where can I buy replacement fuses for my Mercedes Sprinter?
- 10.9. Is it safe to work on my car’s electrical system myself?
- 10.10. What other electrical components are important to maintain in my Mercedes Sprinter?
- Conclusion: Empowering You with Knowledge and Tools
1. Understanding the Importance of Knowing the Mercedes Sprinter Window Fuse Location
Knowing where to find the window fuse in your Mercedes Sprinter can save you time and money. Instead of immediately taking your vehicle to a mechanic, you can quickly check and replace a blown fuse yourself. This simple task can resolve issues like windows not operating, saving you on diagnostic fees.
1.1. Why Windows Stop Working: Common Culprits
Several factors can cause your Sprinter’s windows to malfunction. The most common include:
- Blown Fuse: This is often the first thing to check. Overloads or electrical surges can cause the window fuse to blow, cutting power to the window motor.
- Faulty Window Motor: The motor that powers the window can wear out over time or become damaged, preventing the window from moving.
- Wiring Issues: Damaged or frayed wires can interrupt the electrical signal to the window motor.
- Window Regulator Problems: The window regulator is the mechanism that guides the window up and down. If it fails, the window may become stuck.
- Switch Malfunction: The switch that controls the window may fail due to wear and tear or electrical issues.
1.2. The Role of Fuses in Your Mercedes Sprinter
Fuses are safety devices designed to protect your vehicle’s electrical system. They contain a thin wire that melts and breaks the circuit if there is an overload of electricity. This prevents damage to more expensive components, such as the window motor or wiring harness. Knowing the Mercedes Sprinter window fuse location and how to check it is an essential skill for any vehicle owner.
2. Locating the Mercedes Sprinter Window Fuse
The Mercedes Sprinter has multiple fuse boxes located in different areas of the vehicle. The specific fuse for the windows can vary depending on the model year and configuration. However, generally, you’ll want to check two main locations.
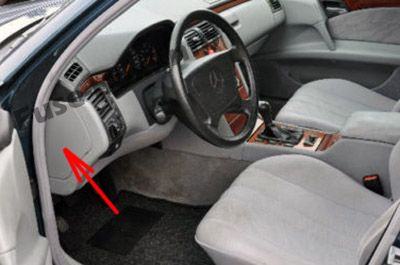
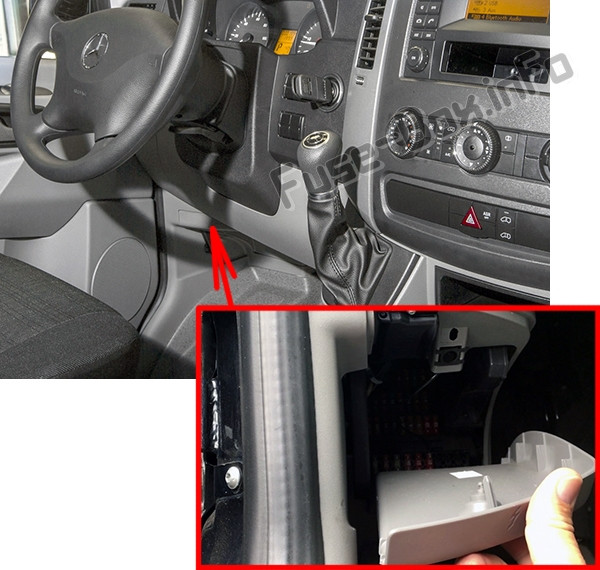
2.1. Instrument Panel Fuse Box
- Location: Under the instrument panel on the driver’s side, behind a protective cover.
- How to Access: You may need a screwdriver or a plastic trim removal tool to gently pry open the cover.
- Relevant Fuses: Typically, fuses related to windows are in this box. Refer to the fuse diagram (usually located on the inside of the cover) to identify the correct fuse.
2.2. Fuse Box Under the Driver’s Seat
- Location: Beneath the driver’s seat.
- How to Access: You might need to slide the seat forward or remove a small panel to access this fuse box.
- Relevant Fuses: This box often contains fuses for various accessories and power functions, including windows.
2.3. Identifying the Correct Fuse
Once you’ve located the fuse boxes, you’ll need to identify the correct fuse for the windows. Here’s how:
- Fuse Diagram: Every fuse box should have a diagram, usually on the inside of the cover. This diagram labels each fuse and its corresponding function.
- Window Symbol: Look for a symbol that represents a window, such as an icon of a window or the words “power windows.”
- Fuse Number: The diagram will also list the fuse number. Make a note of this number to help you locate the fuse within the box.
3. Step-by-Step Guide to Checking and Replacing a Fuse
Once you’ve found the Mercedes Sprinter window fuse location, follow these steps to check and replace the fuse:
3.1. Gathering Your Tools
Before you start, make sure you have the following tools:
- Fuse Puller: This small plastic tool makes it easy to remove fuses without damaging them.
- Spare Fuses: Keep a set of spare fuses of the correct amperage rating for your Sprinter.
- Flashlight: A flashlight can help you see clearly inside the fuse box.
- Multimeter (Optional): A multimeter can be used to test the fuse for continuity.
3.2. Step-by-Step Instructions
-
Turn Off the Ignition: Always turn off the ignition before working on the electrical system.
-
Locate the Fuse Box: Find the appropriate fuse box (instrument panel or under the driver’s seat) based on the diagrams mentioned earlier.
-
Remove the Cover: Use a screwdriver or trim removal tool to carefully remove the fuse box cover.
-
Identify the Fuse: Use the fuse diagram to locate the fuse for the power windows.
-
Check the Fuse:
- Visual Inspection: Look at the fuse. If the wire inside is broken or the fuse looks burnt, it needs to be replaced.
- Multimeter Test: If you have a multimeter, set it to the continuity setting. Touch the probes to each end of the fuse. If the multimeter beeps or shows continuity, the fuse is good. If not, it’s blown.
-
Remove the Fuse: Use the fuse puller to gently remove the blown fuse.
-
Replace the Fuse: Insert a new fuse of the exact same amperage rating into the empty slot.
-
Test the Windows: Turn the ignition on and test the power windows to see if they are working.
-
Replace the Cover: Put the fuse box cover back in place.
3.3. Important Safety Precautions
- Always use the correct amperage fuse: Using a fuse with a higher amperage rating can cause serious damage to the electrical system.
- Never use metal objects to remove fuses: This can cause a short circuit.
- If the fuse blows again immediately: There may be a more significant electrical problem that needs professional attention.
4. Mercedes Sprinter Fuse Layout: A Detailed Overview
To help you better understand the Mercedes Sprinter fuse layout, here’s a detailed overview of the fuse locations and their functions.
4.1. Instrument Panel Fuse Box Diagram
This table provides a general overview of the fuse functions in the instrument panel fuse box. Note that the exact fuse assignments may vary depending on the model year and specific options installed in your Sprinter.
| Fuse Number | Function | Amperage |
|---|---|---|
| 1 | Horn | 15A |
| 2 | ESTL (Electric Steering Lock) Ignition Lock | 25A |
| 3 | Terminal 30 Z, vehicles with a gasoline engine/ ignition lock/instrument cluster | 10A |
| 4 | Light Switch/Switch unit on center console | 5A |
| 5 | Windshield Wipers | 30A |
| 6 | Fuel Pump Terminal 87 (5) (Vehicles with code MI6/MH3/XM0) | 15A/10A |
| 7 | MRM (Jacket Tube Module) | 5A |
| 8 | Terminal 87 (2) | 20A |
| 9 | Terminal 87 (1) Terminal 87 (3), vehicles with a gasoline engine Terminal 87 (3), vehicles with a diesel engine | 25A/20A/25A |
| 10 | Terminal 87 (4) | 10A |
| 11 | Terminal 15 R vehicle | 15A |
| 12 | Air Bag Control Unit | 10A |
| 13 | Cigarette Lighter/Glove Box Lamp/Radio/Body Manufacturer Loading Tailgate/PND (Personal Navigation Device) Power Socket | 15A |
| 14 | Diagnostics Connection/Light Switch/Instrument Cluster/Deactivating Reverse Warning Device/Anti-Theft Protection with Vehicle Tracking | 5A |
| 15 | Headlamp Range Control/Front-Compartment Heating | 5A |
| 16 | Terminal 87 (1) Terminal 87 (3) (Vehicles with code MI6/MH3/XM0) | 10A |
| 17 | Air Bag Control Unit | 10A |
| 18 | Terminal 15 vehicle/ Brake Light Switch | 7.5A |
| 19 | Interior Lighting | 7.5A |
| 20 | Front-Passenger Door Power Window Switch/ terminal 30/2 SAM (Signal Acquisition and Actuation Module) | 25A |
| 21 | Engine Control Unit | 5A |
| 22 | Brake System (ABS) | 5A |
| 23 | Starter Motor Terminal 87 (6) (Vehicles with code MI6/MH3/XM0) | 20A/10A |
| 24 | Diesel Engine, Engine Components/Control Unit, vehicles with a natural gas engine NGT (Natural Gas Technology) | 10A |
| 25 | 12 V Socket (center console) for tire sealant | 25A |
4.2. Fuse Box Under Driver’s Seat Diagram
This table provides an overview of the fuse functions typically found in the fuse box under the driver’s seat. As with the instrument panel fuse box, the exact assignments can vary.
| Fuse Number | Function | Amperage |
|---|---|---|
| 1 | Mirror Setting/Rear Window Defroster | 5A |
| 2 | Rear Window Wiper | 30A |
| 3 | Auxiliary Heating, Digital Timer/Rear View Camera/Neutral Gate Switch, Starting-Off Aid and All-Wheel Drive/Engine Runon/DIN Slot Basic Wiring (Roof)/FleetBoard/Anti-Theft Protection with Vehicle Tracking/Emergency Hammer Lighting in the Rear Compartment | 5A |
| 4 | Tachograph/ADR Working Speed Governor/ Power Take-Off/AAG (Trailer Control Unit) | 7.5A |
| 5 | ECO Start/Control Unit EGS (Electronic Gearbox Control) | 5A/10A |
| 6 | All-Wheel Drive Control Unit Auxiliary Oil Pump | 5A/10A |
| 7 | ESM (Electronic Selector Module) | 10A |
| 8 | Loading Tailgate/Tipper Vehicle PARKTRONIC (Vehicles with code XM0) | 10A |
| 9 | Rear Compartment Air Conditioning, Compressor Clutch, Disengageable Reverse Warning Device | 7.5A |
| 10 | Terminal 30, Body/ Equipment Manufacturer | 25A |
| 11 | Terminal 15, Body/ Equipment Manufacturer | 15A |
| 12 | D+, Body/Equipment Manufacturer | 10A |
| 13 | Fuel Pump FSCM (Fuel Sensing Control Module) Fuel Pump Relay (Vehicles with code MI6/MH3/XM0) (NAFTA) | 20A/15A |
| 14 | Trailer Power Socket | 20A |
| 15 | Trailer Recognition Unit | 25A |
| 16 | Tire Pressure Monitor PARKTRONIC (Pre-facelift vehicle) | 7.5A |
| 17 | Programmable Special Module (PSM) | 25A |
| 18 | Programmable Special Module (PSM) | 25A |
| 19 | Overhead Control Panel without ATA (Anti-Theft Alarm system) and without rain sensor Overhead Control Panel with ATA (Anti-Theft Alarm system) Overhead Control Panel with rain sensor | 5A/25A/25A |
| 20 | License Plate Lamp (courier vehicles)/Perimeter Lamp (NAFTA)/Identification Lighting (NAFTA) | 7.5A |
| 21 | Terminal 30, Body Electrics (courier vehicles) Rear Window Defroster without ATA (Anti-Theft Alarm system) Rear Window Defroster with ATA (Anti-Theft Alarm system) | 15A/30A/15A |
| 22 | Rear Window Defroster 2 Vehicle Socket (courier vehicles) | 15A/20A |
| 23 | 12 V Left Rear Socket, Load/Rear Compartment Electric System: Non-MB Body | 15A/10A |
| 24 | 12 V Socket Under the Base of Driver’s Seat | 15A |
| 25 | 12 V Right Rear Socket, Load/Rear Compartment | 15A |
| 26 | Hot-Water Auxiliary Heating | 25A |
| 27 | Electrical Heater Booster (PTC) Auxiliary Warm-Air Heater | 25A/20A |
| 28 | SRB Starter Relay (fuse and relay module) (NAFTA) (Vehicles with code XM0) Starterfor electrical supply support using the additional battery | 25A |
| 29 | Terminal 87 (7), Gas System, vehicles with a natural gas engine (NGT) (Natural Gas Technology) Selective Catalytic Reduction control unit, vehicles with exhaust gas aftertreatment (NAFTA) Terminal 30, All-Wheel Drive, Control Unit | 7.5A/10A/30A |
| 30 | Auxiliary Heat Exchanger Fan Brake Booster (NAFTA) | 15A/30A |
| 31 | Rear Compartment Heating Blower Sliding Door Closing Assistance, Left Electric Sliding Door, Left | 30A/15A/30A |
| 32 | Selective Catalytic Reduction Relay Supply, vehicles with exhaust gas aftertreatment KEYLESS ENTRY | 5A/10A |
| 33 | Electric Sliding Door, Right Sliding Door Closing Assistance, Right ENR (Level Control) Control Unit Compressor Air Suspension | 30A/15A/30A/30A |
| 34 | Selective Catalytic Reduction Heater 3 DEF (Diesel Exhaust Fluid) Supply Reservoir, vehicles with exhaust gas aftertreatment, 6 cyl. Diesel (Vehicles with code MH3) (NAFTA) Selective Catalytic Reduction Heater 1 DEF, vehicles with exhaust gas aftertreatment diesel (Not for vehicles with code MH3) | 15A/20A |
| 35 | Selective Catalytic Reduction Heater 2 Hose, vehicles with exhaust gas aftertreatment, 6 cyl. Diesel (Vehicles with code MH3) (NAFTA) Selective Catalytic Reduction Heater 2 DEF, vehicles with exhaust gas aftertreatment diesel (Not for vehicles with code MH3) | 15A/25A |
| 36 | Selective Catalytic Reduction Heater 1 Delivery Pump, vehicles with exhaust gas aftertreatment, 6 cyl. Diesel (Vehicles with code MH3) (NAFTA) Selective Catalytic Reduction Heater Control 3 DEF, vehicles with exhaust gas aftertreatment diesel (Not for vehicles with code MH3) | 10A/15A |
| 37 | COLLISION PREVENTION ASSIST/FCW (Forward Collision Warning) Blind Spot Assist/BSM (Blind Spot Monitor) | 5A/5A |
| 38 | Multifunction Camera with Highbeam Assist With a warning when leaving a lane | 10A/10A |
| 39 | Body Electrics (courier vehicles) Rear-Compartment Air-Conditioning System Roof Ventilator Siren | 7.5A/7.5A/15A/15A |
| 40 | Auxiliary Battery Charge Current (Vehicles with auxiliary battery) | 15A |
| 41 | SAM (Signal Acquisition and Actuation Module) Auxiliary Battery Reference Voltage (Vehicles with auxiliary battery) | 7.5A |
| 42 | Rear-Compartment Air-Conditioning System | 30A |
| 43 | Electrical Step/Sliding Door, Right | 10A |
| 44 | Electrical Step/Sliding Door, Left | 10A |
| 45 | Electrical Step, Control System and Warning Buzzer | 5A |
5. Troubleshooting Common Window Problems
Knowing the Mercedes Sprinter window fuse location is just the first step. Here’s how to troubleshoot common window problems:
5.1. Windows Not Working at All
- Check the Fuse: As outlined above, start by checking the fuse. Replace it if it’s blown.
- Test the Window Switch: Use a multimeter to test the window switch. Make sure it’s sending power when activated.
- Inspect Wiring: Look for any visible damage to the wiring harness that connects to the window motor.
- Check the Window Motor: If the fuse and switch are good, the window motor may be faulty. Consider testing or replacing the motor.
5.2. Window Works Intermittently
- Wiring Issues: Intermittent problems often result from loose or corroded wiring connections.
- Window Regulator: The window regulator may be binding or sticking. Lubricate the regulator or replace it if necessary.
- Switch Problems: The window switch may have a loose connection or worn contacts.
5.3. Window Moves Slowly
- Window Regulator: A slow-moving window often indicates a problem with the regulator. Clean and lubricate the regulator mechanism.
- Window Motor: The window motor may be weak and struggling to move the window.
- Obstructions: Check for any obstructions in the window channel that may be impeding movement.
6. Advanced Diagnostics for Window Issues
If you’ve checked the fuse and tried basic troubleshooting steps, but the window still isn’t working, you may need to perform more advanced diagnostics.
6.1. Using a Multimeter
A multimeter is an essential tool for diagnosing electrical problems. Here’s how to use it:
- Check for Power: Verify that the window motor is receiving power when the switch is activated.
- Test the Switch: Make sure the switch is sending the correct signals.
- Inspect the Wiring: Look for voltage drops or shorts in the wiring.
6.2. Using an OBD-II Scanner
An OBD-II scanner can read diagnostic trouble codes (DTCs) from your Sprinter’s computer. These codes can provide valuable information about the source of the problem.
- Connect the Scanner: Plug the scanner into the OBD-II port, usually located under the dashboard.
- Read the Codes: Follow the scanner’s instructions to read the DTCs.
- Interpret the Codes: Research the codes to understand what they mean and how to fix the problem.
6.3. When to Seek Professional Help
If you’re not comfortable performing advanced diagnostics, or if you’ve tried everything and the window still isn’t working, it’s best to take your Sprinter to a qualified mechanic.
7. Maintaining Your Mercedes Sprinter’s Electrical System
Proper maintenance can help prevent electrical problems and extend the life of your Sprinter.
7.1. Regular Inspections
- Check Fuses Regularly: Inspect your fuses periodically to make sure they are in good condition.
- Inspect Wiring: Look for any signs of damage to the wiring harness, such as frayed wires or corroded connectors.
7.2. Preventative Maintenance
- Keep Connections Clean: Clean battery terminals and other electrical connections to prevent corrosion.
- Use Dielectric Grease: Apply dielectric grease to electrical connections to protect them from moisture and corrosion.
7.3. Upgrading Your Tools with CARDIAGTECH.NET
At CARDIAGTECH.NET, we understand the challenges you face in keeping your Mercedes Sprinter in top condition. Our range of diagnostic tools and equipment is designed to help you quickly identify and resolve issues, ensuring your vehicle stays on the road.
Addressing Customer Challenges
- Physical Demands: We offer ergonomic tools that reduce strain and improve comfort.
- Constant Learning: We provide access to the latest diagnostic software and training resources.
- Time Constraints: Our tools are designed for efficiency, helping you complete repairs quickly.
- Competition: Our advanced equipment allows you to offer superior service and stand out from the competition.
Services We Offer
- Enhanced Efficiency: Our diagnostic tools provide accurate and rapid assessments, reducing repair times and increasing throughput.
- Improved Accuracy and Safety: Our equipment ensures precise repairs, minimizing errors and enhancing safety.
- Cost Savings: By identifying issues early, you can prevent costly repairs and extend the life of your vehicle.
- Increased Revenue: Our solutions enable you to offer a wider range of services, boosting your revenue potential.
- Enhanced Reputation: Providing top-notch service with advanced tools builds trust and enhances your reputation.
8. Benefits of Using High-Quality Tools from CARDIAGTECH.NET
Investing in high-quality tools from CARDIAGTECH.NET can make a significant difference in your ability to diagnose and repair your Mercedes Sprinter.
8.1. Precision and Accuracy
Our tools are engineered for precision, providing accurate readings and reliable results. This helps you pinpoint problems quickly and avoid costly mistakes.
8.2. Durability and Reliability
We offer tools that are built to last, with durable construction and reliable performance. This means you can count on them to perform day after day, even in demanding environments.
8.3. Ease of Use
Our tools are designed to be user-friendly, with intuitive interfaces and clear instructions. This makes them easy to learn and use, even for technicians with limited experience.
8.4. Comprehensive Support
We provide comprehensive support for our products, including technical assistance, training resources, and troubleshooting guides. This ensures you have the help you need to get the most out of your investment.
9. Why Choose CARDIAGTECH.NET?
Choosing CARDIAGTECH.NET means partnering with a provider that understands your needs and is committed to your success.
9.1. Expertise and Experience
We have years of experience in the automotive diagnostic industry, and our team of experts is dedicated to providing you with the best possible solutions.
9.2. Wide Range of Products
We offer a wide range of diagnostic tools and equipment to meet your needs, from basic code readers to advanced scan tools.
9.3. Competitive Pricing
We offer competitive pricing on all our products, ensuring you get the best value for your money.
9.4. Customer Satisfaction
We are committed to customer satisfaction, and we go above and beyond to ensure you are happy with your purchase.
10. Frequently Asked Questions (FAQ)
Here are some frequently asked questions about Mercedes Sprinter window fuses and electrical systems:
10.1. Where is the main fuse box located in a Mercedes Sprinter?
The main fuse box is typically located under the instrument panel on the driver’s side.
10.2. How do I know if a fuse is blown?
You can visually inspect the fuse. If the wire inside is broken or the fuse looks burnt, it’s blown. You can also use a multimeter to test for continuity.
10.3. What size fuse do I need for my power windows?
The fuse size will depend on your specific Sprinter model and year. Refer to the fuse diagram for the correct amperage rating.
10.4. Can I use a higher amperage fuse if I don’t have the correct size?
No, never use a higher amperage fuse. This can cause serious damage to the electrical system.
10.5. What do I do if my power windows still don’t work after replacing the fuse?
There may be a more significant electrical problem, such as a faulty window motor or wiring issue. Consider seeking professional help.
10.6. How often should I check my fuses?
You should check your fuses periodically, especially if you experience electrical problems.
10.7. What is a fuse puller and why should I use one?
A fuse puller is a small plastic tool that makes it easy to remove fuses without damaging them. It’s safer and more effective than using metal objects.
10.8. Where can I buy replacement fuses for my Mercedes Sprinter?
You can purchase replacement fuses at most auto parts stores or online retailers.
10.9. Is it safe to work on my car’s electrical system myself?
Working on your car’s electrical system can be safe if you take the necessary precautions. Always turn off the ignition, use the correct tools, and follow the instructions carefully.
10.10. What other electrical components are important to maintain in my Mercedes Sprinter?
In addition to fuses, it’s important to maintain your battery, wiring harness, and other electrical connections.
Conclusion: Empowering You with Knowledge and Tools
Understanding the Mercedes Sprinter window fuse location and basic electrical troubleshooting is essential for any Sprinter owner or mechanic. By following this guide and using the right tools, you can quickly diagnose and resolve window issues, saving time and money. Remember, CARDIAGTECH.NET is here to support you with high-quality diagnostic tools and equipment to keep your Mercedes Sprinter running smoothly.
Don’t let electrical issues slow you down. Contact us today at +1 (641) 206-8880 or visit our website at CARDIAGTECH.NET to learn more about our products and how we can help you enhance your diagnostic capabilities. Our address is 276 Reock St, City of Orange, NJ 07050, United States. Let CARDIAGTECH.NET be your trusted partner in automotive diagnostics and repair.
Mercedes-Benz Sprinter Fuse Box Location
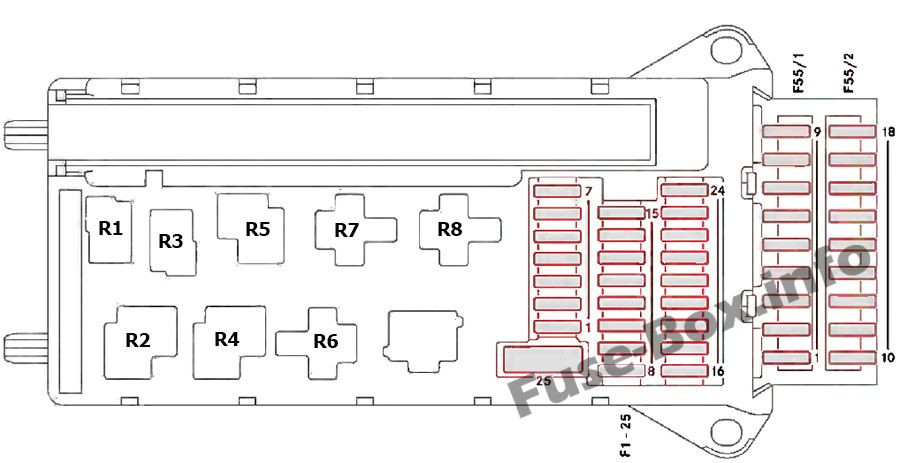 Mercedes-Benz Sprinter Instrument Panel Fuse Box Diagram
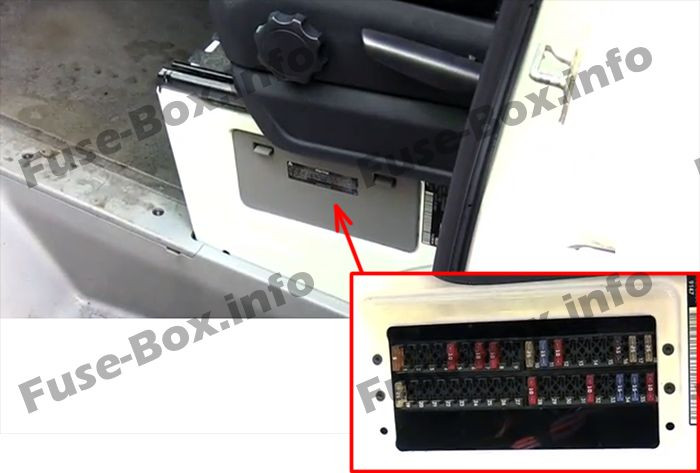 Mercedes-Benz Sprinter Fuse Box Under Driver Seat
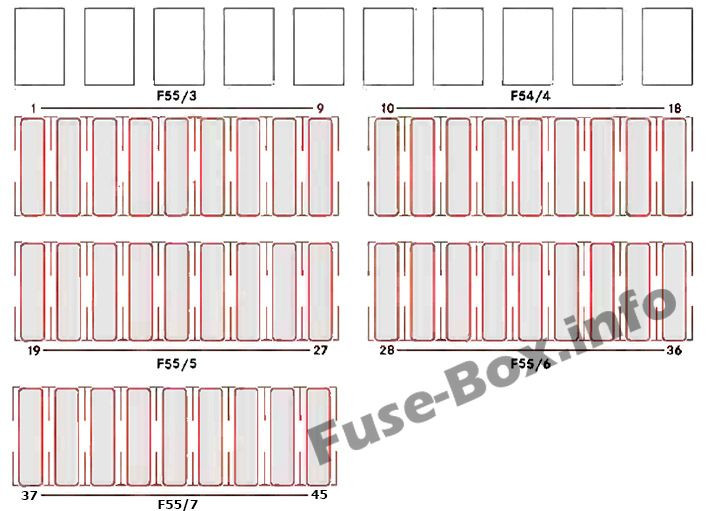 Mercedes-Benz Sprinter Under Driver Seat Fuse Diagram
Are you ready to take your Mercedes Sprinter diagnostics and repairs to the next level? Contact CARDIAGTECH.NET today! Our expert team is ready to assist you with all your diagnostic tool needs.
- Call us: +1 (641) 206-8880
- Visit our website: CARDIAGTECH.NET
- Visit us: 276 Reock St, City of Orange, NJ 07050, United States
Let CARDIAGTECH.NET help you keep your Mercedes Sprinter running smoothly and efficiently.