How to Fix Car Key Remote Buttons: A Step-by-Step DIY Guide
Over time, the buttons on your car key remote can wear out. This is a common issue where the internal “carbon” contacts degrade, leading to frustrating situations where you have to press the button multiple times for it to work. If you’re experiencing this problem, and cleaning the circuit board and button contacts isn’t helping anymore, this DIY fix might be the solution you need. Before I undertook this repair, my remote would sometimes require up to 30 presses to lock or unlock my car!
This guide offers a practical fix for worn-out car key remote buttons. Please proceed with caution and understand that any damage you might cause to your remote is your own responsibility. This method worked effectively for me, and I hope it can help you avoid the expense of a new remote and the hassle of reprogramming it for your vehicle.
(This guide assumes that battery solder joints are intact and not the primary issue. If you suspect battery connection problems, refer to resources detailing how to repair broken solder joints at the battery mount.)
Materials You’ll Need:
- Your malfunctioning car key remote.
- A precision razor knife or Exacto knife for detailed cutting.
- 100% Silicone adhesive – GE Silicone 1 is recommended. Avoid using alternatives like crazy glue or gorilla glue as they may not adhere properly to the silicone keypad. Silicone provides the necessary flexibility and adhesion.
- A toothpick for precise application of the silicone.
- A donor silicone keypad from an old or unused electronic device. A TV remote or an electronic label maker keypad can be a good source.
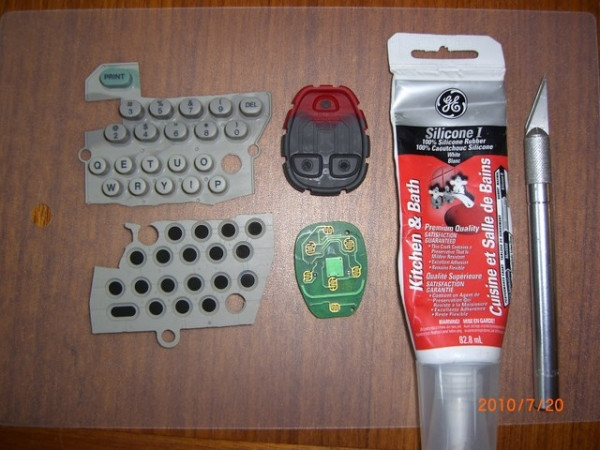
Step 1: Disassembling Your Key Fob Remote
Carefully take apart your car key fob remote. Lay out all the components along with your tools and materials on a clean workspace. This will help you stay organized throughout the repair process.
Disassembled key fob remote with tools
Step 2: Preparing the Replacement Button
From your salvaged silicone keypad, select a button that is similar in size and shape to the ones on your car remote. Use your razor knife to carefully cut out this button. Make sure to cut around the base of the button to remove it cleanly.
 Cutting a replacement button from a silicone keypad
Step 3: Trimming the Replacement Button
Now, you need to trim the “carbon” contact on the back of the button you just cut out. Using your razor knife, carefully slice off the carbon contact, making it thin but not too thin. Aim to retain a very thin layer of the gray or white silicone backing to support the carbon part. This layer is crucial for proper contact and button responsiveness.
 Trimming the carbon button contact
 Close-up of trimmed carbon button
Step 4: Removing and Preparing the Old Button Recess
This step requires careful handling. Gently push the worn button from the component side of the remote to make it protrude slightly. Use your razor knife to carefully cut off the old “carbon” button from the keypad. After removing the old button, refine the indentation where the button was located. Trim the recess slightly deeper to accommodate the new replacement button, which might be a bit thicker than the original. Once the recesses are prepared, trim your new button replacements to ensure they fit snugly within these indentations.
 Removed original buttons and prepared recesses
Step 5: Attaching the New Replacement Button
Take your toothpick and apply a small drop of the 100% Silicone adhesive into the prepared indentation. Carefully place one of your replacement buttons into this indentation. Press it down squarely and immediately wipe away any excess silicone that squeezes out. Crucially, avoid getting any silicone on the working surface of the new carbon button contact or the surrounding circuit board area. If silicone gets on these surfaces, remove the button, create a fresh replacement, and re-apply. Allow the silicone to set for a few minutes before proceeding to the next button to prevent disturbing the first one. Repeat this process for each button you are replacing.
 Applying silicone and placing replacement button
Step 6: Drying Time
Allow the silicone adhesive to dry completely. It’s recommended to let it dry for at least two hours, but ideally, leave it overnight to ensure a strong bond and prevent any shifting of the buttons during reassembly.
Step 7: Reassembly and Testing
Clean the electrical contacts on the circuit board. Using a lint-free microfiber cloth lightly dampened with isopropyl alcohol is effective for this. Reassemble your car key fob remote carefully. Go to your car and test the buttons.
If the buttons are still unresponsive, disassemble the remote again and carefully inspect the contact surfaces of the new buttons and the circuit board for any silicone residue that might be interfering with the electrical connection.
In a worst-case scenario, if the repair is unsuccessful, remember that you can still purchase a new remote and potentially swap the silicone keypads. This could save you the cost of programming a completely new remote in some cases.
Good luck with your repair!