How to Fix Car Dent and Scratch: Your DIY Guide
Dealing with car dents and scratches is an inevitable part of vehicle ownership. Whether it’s a minor scrape from a shopping cart or a small dent from a stray ball, these imperfections can detract from your car’s appearance. Fortunately, you don’t always need to resort to expensive professional bodywork. Many minor dents and scratches can be effectively addressed at home, saving you time and money. This guide will walk you through practical DIY methods to fix those annoying blemishes and restore your car’s pristine look.
Understanding Car Scratches and How to Repair Them
Before you grab your tools, it’s crucial to assess the depth of the scratch. This will determine the best approach for repair.
- Surface Scratches (Clear Coat Damage): If you run your fingernail lightly across the scratch and it doesn’t catch, you’re likely dealing with a surface scratch that has only affected the clear coat layer. These are often characterized by a white appearance.
- Deeper Scratches (Paint Coat Damage): If your fingernail catches in the scratch, it has penetrated the clear coat and reached the paint layer.
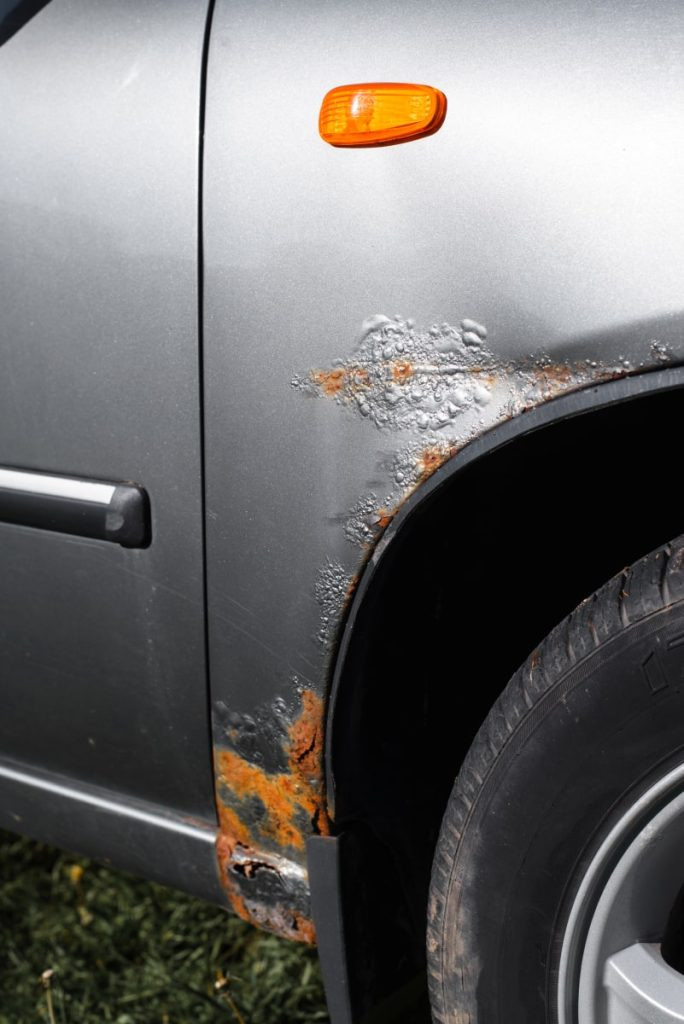
- Severe Scratches (Primer or Metal Exposure): If you can see primer (often grey or black) or bare metal within the scratch, the damage is more significant and requires more extensive repair to prevent rust.
For minor surface scratches, polishing is often sufficient. For deeper scratches that haven’t reached the metal, scratch removal pens or more intensive polishing techniques might be necessary.
Polishing Minor Car Scratches
Polishing is an effective first step for addressing light scratches and swirl marks. It works by gently removing a microscopic layer of the clear coat to level out the imperfection. Here’s how to polish out scratches:
- Thorough Cleaning: Begin by thoroughly cleaning the scratched area and the surrounding panel. Wash the area with car soap and water to remove dirt, grime, and any loose debris. Dry the area completely with a microfiber towel.
- Apply Polishing Compound: Apply a small amount of polishing compound to a clean microfiber applicator pad or a soft terry cloth. Choose a polishing compound designed for scratch removal.
- Gentle Polishing: Using circular motions, gently work the polishing compound into the scratched area. Apply light to medium pressure. Focus on the scratch, but blend outwards slightly.
- Buffing and Inspection: After polishing for a few minutes, use a clean, dry microfiber cloth to buff away the polish residue. Inspect the scratch. If it has diminished or disappeared, you’ve successfully polished it out. If the scratch is still visible, you may need to repeat the process or consider a scratch removal pen for deeper scratches.
Utilizing Car Scratch Remover Pens
For scratches that are slightly deeper than surface level but haven’t exposed metal, a scratch remover pen can be a useful tool. These pens contain touch-up paint that fills in the scratch. Here’s how to use a scratch remover pen effectively:
- Clean and Degrease: Clean the scratch thoroughly with a car-safe cleaner or isopropyl alcohol to remove any wax, polish, or contaminants. Ensure the area is completely dry.
- Apply Touch-Up Paint: Shake the scratch remover pen well. Carefully apply the paint along the scratch line, trying to keep the application within the scratch itself and avoiding the surrounding paintwork. Apply thin, even coats.
- Drying Time: Allow the paint to dry completely according to the pen manufacturer’s instructions. This usually takes at least 24 hours for proper curing.
- Leveling (Optional): Once dry, if the touch-up paint is slightly raised above the surrounding paint, you can gently level it using a fine-grit wet sandpaper (2000-3000 grit) wrapped around a sanding block or a rubber block. Wet sand lightly, checking frequently to avoid removing too much paint.
- Polishing: After leveling (if needed), use a polishing compound and a microfiber cloth to polish the area. This will blend the touch-up paint with the surrounding paintwork and restore shine.
When to Seek Professional Scratch Repair
While DIY methods are effective for many scratches, some damage is best left to professionals. If you have:
- Deep scratches that expose bare metal and are likely to rust.
- Large areas of scratched paint.
- Scratches in complex areas or on body lines where blending touch-up paint is difficult.
- Concerns about matching your car’s paint color perfectly.
Then seeking professional auto body repair services is advisable to ensure a high-quality and lasting repair.
DIY Dent Repair Methods for Your Car
Minor car dents, provided they are not in critical structural areas or have severely creased metal, can often be removed using DIY techniques. Here are a couple of methods you can try:
Dent Removal Using a Magnet
DIY fix dents
For shallow, easily accessible dents on steel or ferrous metal panels, a strong neodymium magnet can sometimes be surprisingly effective. The principle is to use the magnet’s pulling force to gently manipulate the dented metal back into its original shape.
- Preparation: Clean the dented area thoroughly.
- Magnet Application: Wrap a soft cloth around a powerful neodymium magnet to prevent scratching the paint.
- Gentle Pulling: Position the magnet near the edge of the dent and gently move it inwards towards the center. The magnetic force should help pull the dent outwards. Work slowly and patiently, moving the magnet around the dent’s perimeter.
- Controlled Force: Avoid applying the magnet directly to the paint without the cloth, and don’t use excessive force, which could potentially cause further damage or create a new dent.
- Practice (Recommended): Before attempting this on your car, it’s a good idea to practice on a piece of scrap metal with similar dents to get a feel for the technique and the magnet’s strength.
Dent Removal with Suction Cups
Suction cups designed for dent removal offer another DIY approach, particularly for larger, shallower dents. These tools create a vacuum seal that allows you to pull the dent outwards.
- Clean the Dent: Wash and dry the dented area and the surrounding surface to ensure good suction.
- Suction Cup Selection: Choose a suction cup with a diameter slightly smaller than the dent for optimal contact.
- Attachment: Firmly press the suction cup onto the center of the dent, ensuring a tight seal around the edges.
- Vacuum Creation: Depending on the suction cup model, you may need to pump out air using a built-in pump or lever to create a vacuum.
- Controlled Pulling: Once a strong vacuum is established, gently pull outwards on the suction cup handle in a straight, controlled motion. Avoid jerky movements.
- Release: Once the dent is pulled out (or as far as it will go), release the vacuum seal by pressing the release valve or following the tool’s instructions.
- Repeat if Necessary: You may need to repeat the suction cup process several times, repositioning the cup as needed, to fully remove the dent.
Limitations of DIY Dent Repair
It’s important to recognize that DIY dent repair methods are best suited for:
- Shallow, non-creased dents.
- Dents in easily accessible areas of steel or aluminum panels.
- Dents that haven’t stretched the metal excessively.
Dents that are:
- Deep or sharply creased.
- Located in areas with double-layered metal or reinforced sections.
- On plastic bumpers (different repair techniques are needed for plastic).
- Have damaged the paintwork significantly.
May be beyond the scope of DIY repair and require professional attention.
Conclusion: Take Control of Minor Car Imperfections
Fixing minor car dents and scratches yourself can be a rewarding and cost-effective way to maintain your vehicle’s appearance. By understanding the type of damage and using the appropriate DIY techniques – from polishing scratches to employing magnets or suction cups for dents – you can often achieve impressive results at home. Remember to proceed with caution, start with the least aggressive methods, and don’t hesitate to seek professional help when the damage is beyond your DIY capabilities. Taking proactive steps to address these minor imperfections will not only keep your car looking its best but can also help preserve its value over time.