How to Fix Little Dents in Your Car: An Easy DIY Guide
Car dents, even the small ones, are a frustrating reality of vehicle ownership. They can detract from your car’s otherwise sleek appearance, diminish its resale value, and if left unattended, increase the risk of rust. Fortunately, those minor imperfections, often referred to as “little dents” or dings, are frequently manageable at home without needing to visit an expensive auto body shop. This guide will walk you through effective DIY methods to fix those little dents and keep your car looking its best.
Understanding Little Dents: When DIY is Possible
Before you grab your tools, it’s important to understand what qualifies as a “little dent” suitable for DIY repair. Generally, these are minor indentations, often:
- Small in size: Think of dings from car doors, minor hail damage, or impacts from small objects.
- Relatively shallow: The dent isn’t deep or sharply creased.
- Without significant paint damage: If the paint is deeply scratched, cracked, or missing, DIY repair might be more complex and professional help may be needed for a flawless finish.
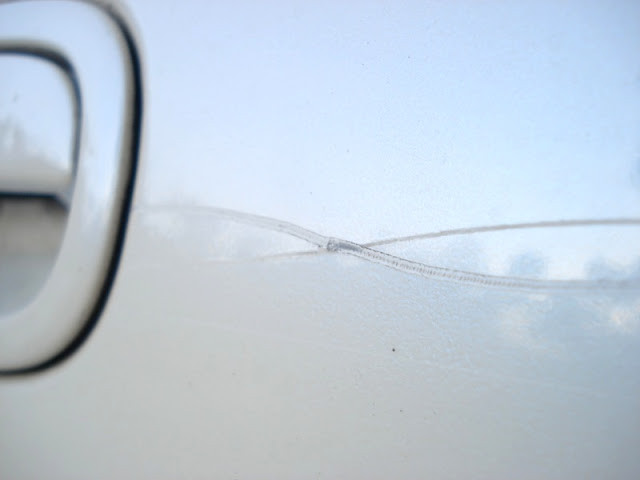
Examples of these “little dents” include door dings in parking lots, round dents from minor impacts, or the kind of shallow dents hail can leave behind. These are different from larger dents caused by accidents, deep crease dents from branches, or serious dents that suggest underlying structural damage. For those larger issues, professional repair is always recommended.
[Insert Image 1]
DIY Methods to Tackle Minor Car Dents
For these smaller, less severe dents, several DIY techniques can be surprisingly effective. Here are some of the most common and accessible methods:
Method 1: The Hot Water and Plunger Technique (Best for Plastic Bumpers)
Plastic bumpers are often more flexible than metal body panels, making them receptive to heat-based DIY methods. This technique uses hot water to make the plastic more pliable and a plunger to pull the dent out.
Steps:
- Heat the dented area: Pour hot water (not boiling, but hot tap water or heated in a kettle) directly over the plastic dent. The heat will help the plastic become more flexible and easier to manipulate.
- Apply the plunger: Immediately after heating, place a standard household plunger (make sure it’s clean!) directly over the dent, creating a seal.
- Pull firmly and steadily: Push the plunger firmly against the bumper and then pull straight out. You may need to repeat this process several times. The suction and pulling action can often pop the dent back into place as the plastic cools.
- Repeat if necessary: If the dent doesn’t fully disappear on the first try, reheat the area with hot water and repeat the plunging process.
This method is particularly effective for dents in bumpers as plastic has a degree of memory and can often return to its original shape when heated and manipulated.
Method 2: Hair Dryer and Compressed Air: Thermal Shock for Dents
This method utilizes thermal shock – rapidly heating and then cooling the dented area – to encourage the material to return to its original shape. It can work on both plastic and potentially minor metal dents.
Steps:
- Heat the dent gently: Use a hair dryer set to a high heat setting and direct the warm air over the dented area. Keep the hair dryer moving and hold it a few inches away from the car’s surface to avoid damaging the paint with excessive heat. Heat the area for several minutes until it feels warm to the touch.
- Immediately apply compressed air: Quickly switch to a can of compressed air (the type used for cleaning electronics). Turn the can upside down (this dispenses the cold propellant) and spray the cold air directly onto the heated dent. Hold the can close to the surface and apply short bursts of cold air.
- Observe and repeat: The rapid cooling can cause the material to contract and, in many cases, pop the dent out. You might hear a popping sound. If the dent improves but doesn’t fully disappear, repeat the heating and cooling process several times.
[Insert Image 2]
Method 3: Dent Puller Kits: Leverage and Suction for Metal
For slightly more stubborn small metal dents, a dent puller kit can provide the necessary leverage to gently pull the dent outwards. These kits are readily available online or at auto parts stores and are relatively inexpensive.
Steps:
- Clean the dented area: Thoroughly clean the area around the dent with soap and water and dry it completely. This ensures proper adhesion of the glue tabs.
- Apply glue to a puller tab: Dent puller kits come with various sized plastic tabs and a hot glue gun. Select a tab size appropriate for your dent and apply hot glue to the center of the tab.
- Attach the tab to the dent: Quickly press the glued tab firmly to the deepest point of the dent and hold it in place for a few minutes to allow the glue to cool and harden completely. Follow the kit’s instructions for drying time.
- Attach the puller tool: Once the glue is set, attach the dent puller tool (often a bridge puller or a slide hammer puller, depending on the kit) according to the kit instructions, hooking it onto the glued tab.
- Gently pull the dent out: Slowly and steadily turn the knob or slide the hammer on the puller tool to apply outward pressure. Work gradually, checking the dent’s progress frequently. The goal is to pull the metal out incrementally, not to force it all at once.
- Remove the tab and glue: Once the dent is removed or significantly improved, carefully detach the puller tool. To remove the glue tab, you can often use a heat gun or hair dryer to soften the glue, making it easier to peel the tab away from the car’s surface. Clean any remaining glue residue with an adhesive remover or rubbing alcohol.
- Repeat if needed: For deeper dents, you might need to repeat the process, repositioning the tab in slightly different spots around the dent to gradually work it out.
[Insert Image 3]
Method 4: Body Filler for Minor Imperfections (Finishing Touch)
Even after using dent removal tools, you might be left with minor surface imperfections or a dent that isn’t perfectly smooth. Body filler, like Bondo®, can be used to fill these remaining shallow indentations and create a seamless, paint-ready surface. This is more of a cosmetic fix for very minor dents or to refine the result after using other methods.
Steps:
- Clean and sand the area: Clean the area around the dent thoroughly and lightly sand the area with 80-grit sandpaper. This provides a “key” for the body filler to adhere to. You don’t need to remove all the paint, just roughen it up slightly.
- Mix the body filler: Body filler is a two-part system consisting of filler and a hardener. Mix a small amount of body filler with the hardener according to the product instructions. Mix only what you can use within a few minutes, as it hardens quickly.
- Apply the filler: Use a plastic spreader to apply a thin layer of body filler over the dent, pressing it firmly into the indentation. Apply just enough filler to slightly overfill the dent.
- Let it dry and harden: Allow the body filler to dry completely according to the product instructions. It will become hard and sandable.
- Sand to shape: Once dry, use 80-grit sandpaper to sand down the body filler, shaping it to match the contour of the surrounding car panel. Work gradually and check your progress frequently to avoid sanding too much.
- Refine the finish: Switch to finer grit sandpaper (180-grit, then 320-grit) to smooth out the surface and remove any scratches left by the coarser sandpaper. The goal is to create a perfectly smooth transition between the filled area and the surrounding paint.
- Prime and paint: Clean the area again to remove sanding dust. Apply automotive primer to the filled area, let it dry, and then apply touch-up paint that matches your car’s color code. Follow the paint manufacturer’s instructions for application and drying times.
[Insert Image 4]
Knowing When to Seek Professional Help
While DIY methods are effective for many little dents, there are times when professional intervention is necessary:
- Large or deep dents: DIY methods are less likely to be successful on larger, more significant dents.
- Crease dents: Dents with sharp creases or folds in the metal are complex and often require specialized tools and techniques.
- Paint damage: If the paint is severely scratched, cracked, or missing within the dented area, achieving a factory-finish repair often requires professional paintwork.
- Dents in critical areas: Dents in areas that are structurally important or involve safety systems might require professional assessment and repair.
- You’re unsure or uncomfortable: If you’re hesitant about performing DIY repairs or are not seeing the desired results, it’s always best to consult with a professional paintless dent repair (PDR) technician or an auto body shop.
Cost Considerations: DIY vs. Professional Repair
One of the biggest advantages of DIY dent repair is the cost savings.
- DIY: DIY dent repair for little dents can often be done for under $100, considering the cost of tools like dent puller kits, body filler, and touch-up paint. Many methods, like hot water and plunger, require only household items.
- Paintless Dent Repair (PDR): Professional PDR for small dents can range from $50 to $100, medium dents from $75 to $300, and larger dents from $300 to $500.
- Auto Body Shop: Traditional auto body shop repairs for dents, especially those involving paintwork, can easily cost hundreds or even thousands of dollars.
By tackling little dents yourself, you can maintain your car’s appearance and value without incurring significant repair bills.
Conclusion: Take Action Against Little Dents
Little dents, while seemingly minor, can detract from your car’s overall appeal and potentially lead to further issues if neglected. Fortunately, many of these small imperfections are easily addressed with DIY methods. By understanding the techniques and when they are appropriate, you can confidently fix little dents in your car at home, saving money and keeping your vehicle looking its best. Remember, for larger or more complex damage, professional auto repair services are always available to ensure a flawless and lasting repair.