How to Fix Car Interior Leather: A Comprehensive Guide
Leather car seats are a luxurious feature that adds style and comfort to any vehicle. However, like any material, car interior leather is susceptible to wear and tear, leading to issues like fading, cracking, scratches, stains, discoloration, peeling, and tears. Knowing how to properly fix car interior leather is essential for maintaining your car’s value and aesthetic appeal. This guide provides you with comprehensive steps and expert tips on leather car seat repair, ensuring your car’s interior remains pristine for years to come.
Common Leather Car Seat Problems and How to Identify Them
Before you start any repair, it’s crucial to accurately identify the type of damage your leather car seat has sustained. Different problems require different solutions. Here are some of the most common issues you might encounter:
Fading Leather
Fading is a common issue, especially in areas exposed to prolonged sunlight. You’ll notice the leather losing its rich color, becoming dull, and sometimes appearing dry. This is often the first sign of aging and sun damage.
Cracked Leather
Cracking occurs as leather ages and loses moisture. Small lines or fissures appear on the surface, which can worsen over time if not addressed. Flexing and constant use in high-stress areas like bolsters often exacerbate cracking.
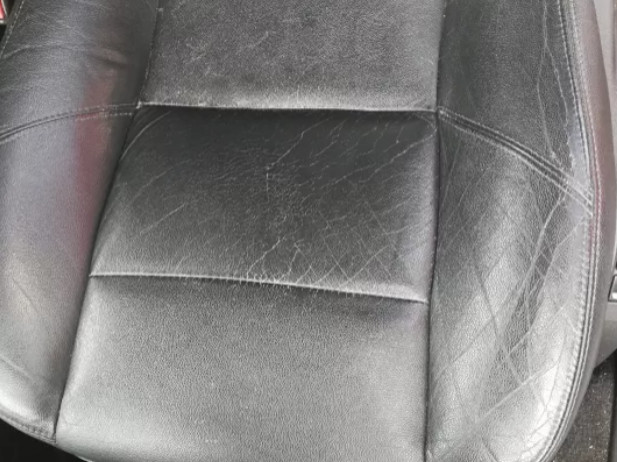
Cracked Leather Car Seats
Image: Example of cracked car leather seats, showing fissures and damage due to wear and age.
Scratched Leather
Scratches can range from minor surface marks to deeper gouges. They are often caused by keys, pets’ claws, or sharp objects rubbing against the leather. Even seat belts can cause minor scratches over time.
Stained Leather
Stains are caused by spills, food, drinks, dyes from clothing, or even sweat. Leather is porous, so stains can penetrate and become difficult to remove if not treated promptly.
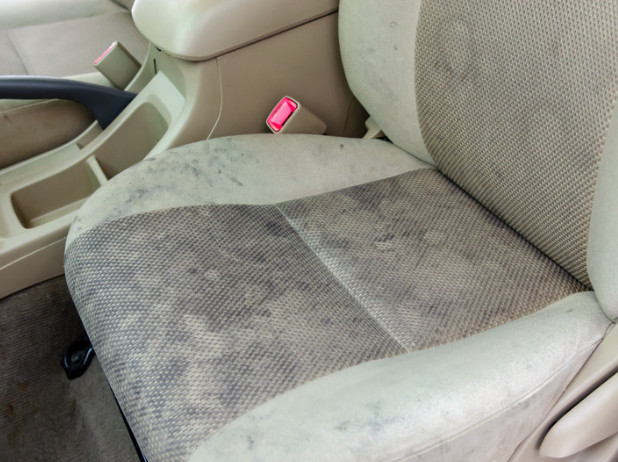 Stained on Car Leather Seats
Image: Car leather seats with visible stains from spills and general use, highlighting the need for proper cleaning.
Discolored Leather
Discoloration can be uneven fading or patches of color change, often caused by prolonged sun exposure or uneven wear. It can make the leather look patchy and inconsistent.
Peeling Leather
Peeling is a more severe form of damage where the top protective layer of the leather separates from the underlying material. This is often due to age, dryness, and wear, particularly in areas of high friction.
 Peeling Car Leather Seats
Image: Car leather seats exhibiting peeling, where the top layer is separating, indicating significant wear and tear.
Torn Leather
Tears can result from sharp objects, accidents, or simply stress on weakened leather. Tears can vary in size from small rips to larger, more significant damage requiring extensive repair.
Step-by-Step Guides to Repairing Common Leather Car Seat Issues
Once you’ve identified the problem, you can choose the appropriate repair method. Here are detailed guides for fixing each type of leather car seat damage:
Reviving Faded Leather Car Seats
Faded leather can often be restored with the right techniques and products. Here’s how to bring back the vibrancy:
- Clean the Leather: Use a mild leather cleaner to remove dirt and grime. This ensures the repair products can properly penetrate the leather.
- Apply Leather Re-Coloring Balm or Dye: Choose a leather re-coloring balm or dye that matches your original leather color. Apply a small amount to a sponge or soft cloth.
- Test in an Inconspicuous Area: Before applying to the faded areas, test the product in a hidden spot to ensure color match and compatibility.
- Apply Evenly: Gently rub the balm or dye onto the faded leather in circular motions. Apply thin, even coats, building up color gradually.
- Allow to Dry and Repeat: Let each coat dry completely before applying the next. You may need multiple coats to achieve the desired color restoration.
- Condition the Leather: After re-coloring, apply a quality leather conditioner to nourish the leather and protect the new color.
Restoring Cracked Leather Car Seats
Cracked leather needs more than just color restoration; it requires filling and sealing the cracks.
- Thoroughly Clean the Leather: Use a leather cleaner to remove all dirt and debris from the cracked areas.
- Trim Loose Fibers: Carefully trim any loose or frayed leather fibers around the cracks with sharp scissors or a leather trimming tool.
- Apply Leather Repair Filler: Use a leather repair filler paste to fill in the cracks. Apply it with a palette knife or applicator, working it into the cracks.
- Smooth the Filler: Level the filler with the surface of the leather using the palette knife. Remove any excess filler.
- Allow to Dry and Sand Smooth: Let the filler dry completely according to the product instructions. Once dry, gently sand the filled areas with fine-grit sandpaper to create a smooth surface.
- Re-Color if Necessary: If the filler is a different color, use a leather dye or colorant to match the original leather color.
- Condition the Leather: Finish with a leather conditioner to moisturize and protect the repaired area.
 leather repair filler paste
Image: Leather repair filler paste being applied to cracked car leather, demonstrating the crack filling process.
Fixing Scratches on Leather Car Seats
Minor scratches are often easy to fix, while deeper scratches may require a more comprehensive approach.
- Clean the Scratched Area: Clean the leather with a mild leather cleaner to remove any dirt or debris.
- Apply Leather Conditioner First: Sometimes, a good leather conditioner can minimize the appearance of minor scratches by hydrating the leather and smoothing out the surface.
- Use a Leather Scratch Repair Kit: For more pronounced scratches, use a leather scratch repair kit. These kits usually contain a leather filler or scratch remover and colorants.
- Apply Scratch Remover/Filler: Apply a small amount of scratch remover or filler to the scratch using a soft cloth or applicator.
- Buff Gently: Gently buff the area in circular motions. For deeper scratches, you might need to apply multiple thin layers and let each layer dry.
- Re-Color if Needed: If the scratch repair affects the color, use a leather dye or colorant to blend the repaired area with the surrounding leather.
- Condition the Leather: Finish by applying a leather conditioner to protect and moisturize.
Removing Stains from Leather Car Seats
Stain removal should be done as quickly as possible for the best results.
- Identify the Stain: Knowing the type of stain (water-based, oil-based, ink, etc.) can help you choose the right cleaner.
- Act Quickly: Fresh stains are easier to remove than old ones. Blot the stain immediately with a clean, absorbent cloth. Avoid rubbing, as this can spread the stain.
- Use a Leather Stain Remover: Apply a specialized leather stain remover according to the product instructions. Test in an inconspicuous area first.
- For Ink Stains: Use an alcohol-based leather cleaner carefully. Test in a hidden area first to ensure it doesn’t damage the leather’s color or finish.
- Gently Clean: Use a soft cloth to gently blot or wipe the stain remover. Work from the outside of the stain inwards to prevent spreading.
- Dry Naturally: Allow the leather to air dry naturally. Avoid using heat, as it can set the stain.
- Condition the Leather: Once dry, apply a leather conditioner to restore moisture and protect the leather.
 Leather Cleaner and Protection Kit
Image: A leather cleaner and protection kit, essential for removing stains and maintaining car leather interiors.
Restoring Discolored Leather Car Seats
Discoloration often requires both cleaning and re-coloring to achieve an even tone.
- Clean the Leather Thoroughly: Use a quality leather cleaner to remove any surface dirt and oils that may contribute to uneven coloring.
- Assess the Discoloration: Determine if the discoloration is due to surface issues or deeper fading.
- Use Leather Dye or Re-Coloring Balm: For uneven fading, apply a leather dye or re-coloring balm to even out the color. Choose a product that closely matches your original leather color.
- Apply in Thin Coats: Apply the dye or balm in thin, even coats, allowing each coat to dry before applying the next.
- Blend Carefully: Blend the color into the surrounding areas for a seamless finish.
- Condition and Protect: After re-coloring, apply a leather conditioner and a leather protector to maintain the restored color and prevent future discoloration.
Repairing Peeling Leather Car Seats
Peeling leather requires re-adhering the loose layers and protecting the area from further damage.
- Clean the Peeling Area: Gently clean the area with a leather cleaner to remove any loose pieces and debris.
- Apply Leather Glue: Use a specialized leather glue to re-adhere the peeling layers. Apply a thin, even layer of glue to both the underside of the peeling layer and the exposed leather beneath.
- Press and Hold: Carefully press the peeling layer back into place, ensuring it aligns correctly. Hold firmly for a few minutes or use leather clamps or weights to keep it in place while the glue dries.
- Fill Gaps if Necessary: If there are gaps or missing pieces, use a leather filler to fill them in.
- Re-Color and Condition: Once the glue is dry, re-color the repaired area if needed to match the surrounding leather. Finish with a leather conditioner to protect and hydrate.
Mending Tears in Leather Car Seats
Repairing tears depends on the size and location of the tear.
- Clean the Area Around the Tear: Clean the leather around the tear to remove dirt and oils.
- Trim Frayed Edges: Carefully trim any frayed or loose edges around the tear for a cleaner repair.
- Use a Leather Repair Kit for Tears: For small tears, a leather repair kit with a backing fabric and adhesive is ideal.
- Apply Backing Fabric (If Needed): For larger tears, insert a piece of backing fabric underneath the tear for added support. Use tweezers or a spatula to position it correctly.
- Apply Leather Adhesive: Apply leather adhesive to the edges of the tear and the backing fabric.
- Align and Press: Carefully align the edges of the tear and press them together. Hold or use tape to keep them aligned while the adhesive dries.
- Apply Leather Filler to Seam (Optional): For a smoother finish, apply a thin layer of leather filler along the seam of the tear after the adhesive is dry. Sand smooth when dry.
- Re-Color and Condition: Re-color the repaired area to blend with the surrounding leather and finish with a leather conditioner.
 Cleaning Car Leather Seats
Image: Cleaning car leather seats as part of the repair process, emphasizing the importance of preparation.
Essential Tools and Products for DIY Leather Car Seat Repair
Having the right tools and products is crucial for successful DIY leather repair. Here’s a list of essentials:
- Leather Cleaner: A mild, pH-balanced leather cleaner to remove dirt and grime.
- Leather Conditioner: To moisturize and protect leather after cleaning and repair.
- Leather Repair Kit: Kits often include fillers, adhesives, colorants, and applicators.
- Leather Filler: For filling cracks, scratches, and gaps.
- Leather Dye or Re-Coloring Balm: To restore color and blend repairs.
- Leather Adhesive/Glue: For re-adhering peeling leather and mending tears.
- Palette Knife or Applicator: For applying filler and dyes smoothly.
- Soft Cloths and Sponges: For cleaning, applying products, and buffing.
- Fine-Grit Sandpaper: For smoothing fillers and repairs.
- Scissors or Leather Trimming Tool: For trimming frayed edges.
- Backing Fabric: For reinforcing tears.
- Leather Protector: To protect leather from future damage.
Tips for Maintaining Your Car Interior Leather
Prevention is always better than cure. Regular maintenance can significantly extend the life and beauty of your car interior leather.
- Regular Cleaning: Clean your leather seats every 1-3 months with a leather cleaner.
- Condition Regularly: Apply leather conditioner every 3-6 months to keep the leather supple and prevent cracking.
- Protect from Sunlight: Park in shaded areas or use sunshades to minimize UV exposure, which causes fading and cracking.
- Promptly Clean Spills: Address spills immediately to prevent staining.
- Avoid Sharp Objects: Be careful with sharp objects that can scratch or tear the leather.
- Use Leather Protectors: Apply leather protectors to create a barrier against stains and wear.
Conclusion: Keeping Your Car Leather Interior in Top Condition
Repairing car interior leather might seem daunting, but with the right knowledge and tools, it’s a manageable DIY task. By understanding the types of damage and following these step-by-step guides, you can effectively fix common issues like fading, cracking, scratches, stains, peeling, and tears. Regular maintenance and prompt attention to problems will ensure your car’s leather interior remains luxurious, comfortable, and enhances your vehicle’s overall value for years to come. Invest in quality leather care products and take pride in maintaining your car’s interior to enjoy the beauty and comfort of leather for the long haul.