How to Fix Your Car AC Blower: A DIY Repair Guide

Is your car AC blower stuck on high, or not working on some settings? You might be facing a common issue with the blower motor resistor. For many car owners, especially models like the Honda Fit, a faulty blower motor resistor manifests as an HVAC fan that only operates at its highest speed. Instead of immediately replacing the entire blower fan assembly, you can often resolve this problem with a simple DIY repair focused on the resistor. This guide will walk you through how to fix your car AC blower by addressing the blower motor resistor, potentially saving you time and money.
Understanding the Problem: Symptoms of a Faulty Blower Motor Resistor
When your car’s AC blower only works on the highest setting (usually speed 4), it’s a strong indicator of a failing blower motor resistor. The blower motor resistor is responsible for controlling the fan speed by regulating the voltage supplied to the blower motor. When this resistor malfunctions, often due to a poor solder joint, it disrupts the lower speed settings, leaving only the maximum speed operational. This is because on the highest setting, the resistor is bypassed, and the motor receives full power.
This DIY repair focuses on addressing a common weak point in these resistors: the solder joints. Often, a simple re-soldering of a detached filament can restore functionality to all fan speeds, avoiding the need for a costly blower fan replacement.
DIY Repair Guide: Fixing the Blower Motor Resistor
Before beginning, ensure your vehicle is turned off and the keys are removed from the ignition.
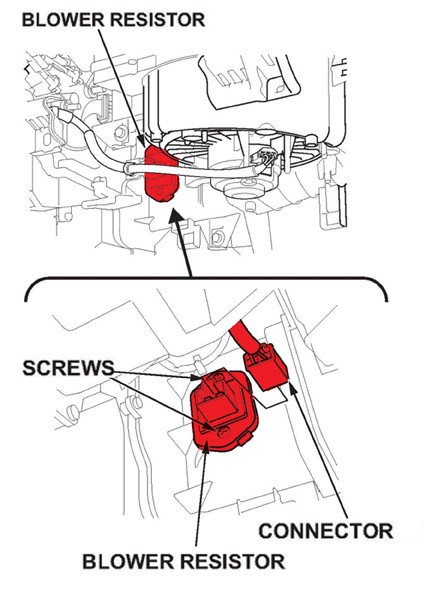
Step 1: Accessing the Blower Resistor
The blower resistor is typically located under the passenger-side dashboard. For a Honda Fit (and similar models), follow these steps to access it:
- Remove the Passenger-Side Dashboard Undercover: Gently pull down the front edge of the undercover panel located beneath the glove compartment. This will detach the clips holding it in place.
Dashboard undercover removal for accessing blower motor resistor
Once the clips are detached, pull the cover towards you to release the pins that secure it further back. This will allow you to remove the undercover panel completely, providing access to the blower resistor.- Locate and Remove the Blower Resistor: With the undercover removed, you will see the blower resistor unit. It is usually held in place by screws and has an electrical connector attached to it.
 Blower resistor location and removal steps
*   **Disconnect the Connector:** Carefully detach the electrical connector plugged into the blower resistor.  There might be a clip to press to release the connector.
*   **Remove the Screws:** Unscrew the two screws that secure the blower resistor to its housing.
*   **Remove the Blower Resistor:**  Once the screws are removed and the connector is detached, you can carefully take out the blower resistor unit.
Step 2: Disassembling and Repairing the Blower Resistor
Now that you have removed the blower resistor, you need to disassemble it to access the solder points for repair.
-
Remove the Black Plastic Base: Slide or carefully remove the black plastic base from the resistor assembly. This base is usually held by clips or friction.
-
Remove the Metal Screen Housing: The resistor element is protected by a square metal screen housing. Pinch together the metal tabs or tips that hold this housing in place and carefully slide the housing off the resistor. Refer to the arrows in the image below for guidance.
-
Inspect and Re-solder the Filament: With the housing removed, you can now access the resistor filaments and solder joints. The common issue is a broken solder joint on one of the copper filaments.
- Identify the Broken Solder Joint: Carefully examine the solder joints, especially where the copper filaments are connected. Look for cracks or separation in the solder.
- Re-solder the Joint: Using a soldering iron, re-solder the detached copper filament to its solder point. You will need to hold the filament in place as it might be under slight tension. Ensure a solid solder connection.
Step 3: Reassembling and Testing the Repair
-
Reassemble the Blower Resistor: Reassemble the blower resistor in the reverse order of disassembly.
- Slide the metal screen housing back onto the resistor and bend the metal tips to secure it, ensuring it’s as secure as it was before disassembly.
- Slide the black plastic base back onto the reassembled resistor unit.
-
Reinstall the Blower Resistor: Go back to the passenger side dashboard area and reinstall the repaired blower resistor.
- Install the Blower Resistor: Secure the blower resistor back into its location with the two screws you removed earlier.
- Reconnect the Connector: Plug the electrical connector back into the blower resistor unit, ensuring it clicks into place.
-
Reinstall the Dashboard Undercover: Reinstall the passenger’s dashboard undercover panel. Push the pins back into their holes and then push the front edge to secure the clips. Replace any damaged clips if necessary.
-
Test the Repair: Turn on your vehicle’s ignition and test the AC blower fan at all speed settings. If the repair was successful, your AC blower should now function correctly at all speeds.
Conclusion
By following these steps, you can often fix your car AC blower issue by repairing the blower motor resistor yourself. This DIY approach can save you from unnecessary expenses and get your AC blowing at all speeds again. If the problem persists after this repair, there might be other issues, and it’s advisable to consult a professional mechanic for further diagnosis.