How to Fix Bubbling Paint on Your Car: A Comprehensive Guide
Bubbling paint, also known as paint blisters, is a common yet frustrating automotive paint problem that can detract from your car’s appearance and potentially signal underlying issues. Whether you’re a seasoned car enthusiast or a daily driver, understanding how to address bubbling paint is essential for maintaining your vehicle’s value and aesthetics. This guide will walk you through the steps to fix bubbling paint and fisheye on your car, ensuring a smooth, professional-looking finish, and also provide preventative measures to avoid these problems in the future.
Identifying Bubbling Paint and Fisheye
Before diving into the repair process, it’s crucial to accurately identify bubbling paint and differentiate it from fisheye, another common paint defect.
Bubbling Paint: Characterized by raised blisters or bubbles appearing on the paint surface. These bubbles occur when the paint film lifts away from the underlying surface. They can vary in size and may appear individually or in clusters.
Fisheye: Identified by small, circular craters or depressions in the paint. These defects resemble “fisheyes” and are caused by contaminants like oil, wax, or silicone preventing the paint from adhering correctly, causing it to pull away and create these indentations.
While distinct, both issues can sometimes appear together or result from similar underlying causes, such as surface contamination or moisture.
To properly assess the damage, carefully inspect your car’s paint, looking for:
- Raised Bubbles: Small, dome-shaped protrusions that feel hollow or soft to the touch.
- Crater-like Spots: Depressions in the paint, often circular, indicating fisheye.
- Uneven Texture: Areas where the paint surface is no longer smooth and uniform, exhibiting bumps, craters, or dull patches.
- Poor Adhesion: In severe cases, you might notice areas where the paint is peeling or flaking away.
Step-by-Step Guide to Fixing Bubbling Paint
Once you’ve assessed the extent of the bubbling paint, you can begin the repair process. Here’s a detailed guide to fixing these blemishes and restoring your car’s paint job:
1. Thoroughly Clean the Affected Area
The first step is to meticulously clean the areas with bubbling paint. This removes any surface contaminants and ensures proper adhesion for subsequent repair materials.
- Wash the area: Use car wash soap and water to remove dirt and grime. Rinse thoroughly and dry completely.
- Degrease: Apply a wax and grease remover to eliminate any residual wax, oil, or silicone. These contaminants are common culprits for paint defects and must be removed for a successful repair. Wipe clean with a lint-free cloth.
2. Prepare the Surface by Sanding
Sanding is essential to remove the bubbling paint and create a smooth surface for repair.
- Start with coarse grit sandpaper: Use 320-grit sandpaper to carefully sand down the bubbling paint and surrounding area. The goal is to remove the blisters and feather the edges of the damaged paint into the surrounding good paint.
- Progress to finer grits: After leveling the bubbles, switch to 400-grit, then 600-grit sandpaper to refine the surface and eliminate scratches from the coarser grit. The area should be smooth to the touch and the edges of the sanded area should blend seamlessly with the surrounding paint.
3. Apply Body Filler (Bondo) if Necessary
If sanding reveals deeper imperfections or unevenness after removing the bubbles, body filler like Bondo can be used to create a perfectly smooth base.
- Mix the Bondo: Following the manufacturer’s instructions, mix a small amount of Bondo with the hardener. Work quickly as it sets relatively fast.
- Apply in thin layers: Use a plastic spreader to apply a thin, even layer of Bondo over the sanded area, filling in any imperfections. Avoid applying too much at once; multiple thin layers are better than one thick layer.
- Let it dry and harden: Allow the Bondo to fully dry and harden according to the product instructions.
- Sand the Bondo smooth: Once hardened, sand the Bondo with progressively finer grits of sandpaper (starting with 320-grit and moving to 600-grit) until it is perfectly smooth and level with the surrounding surface. Ensure a seamless transition between the filled area and the original paint.
4. Prime the Repaired Area
Primer is crucial for paint adhesion and corrosion protection.
- Apply automotive primer: Use a high-quality automotive primer compatible with your car’s paint system. Apply thin, even coats, overlapping each coat slightly.
- Allow primer to dry: Let each coat of primer dry completely as per the manufacturer’s instructions. Usually, 2-3 coats are sufficient.
- Lightly sand the primer: Once dry, lightly sand the primer with 600-grit sandpaper to create an ultra-smooth surface for painting. This step is important for achieving a flawless finish.
5. Repaint the Area
Now it’s time to repaint the repaired area to match your car’s original color.
- Match the paint: Obtain the correct paint color code for your vehicle (usually found on a sticker in the door jamb or glove box). Purchase automotive touch-up paint or aerosol spray paint in the correct color.
- Apply base coat: Apply the base coat paint in thin, even coats, overlapping each coat. Allow each coat to flash dry (become slightly tacky) before applying the next. Apply enough coats to achieve full color coverage, usually 2-3 coats.
- Blend the paint: To ensure the new paint seamlessly blends with the surrounding original paint, use blending techniques. Gradually fade out the new paint as you move away from the repaired area, lightly dusting the edges to soften the transition.
6. Apply Clear Coat for Protection and Shine
Clear coat protects the base coat and provides a glossy, durable finish.
- Apply clear coat: After the base coat is completely dry, apply 2-3 coats of automotive clear coat, following the manufacturer’s instructions for drying times and application. Apply in smooth, even coats, overlapping each pass.
- Allow to dry completely: Let the clear coat dry thoroughly, typically 24-72 hours for a full cure, depending on the product and environmental conditions.
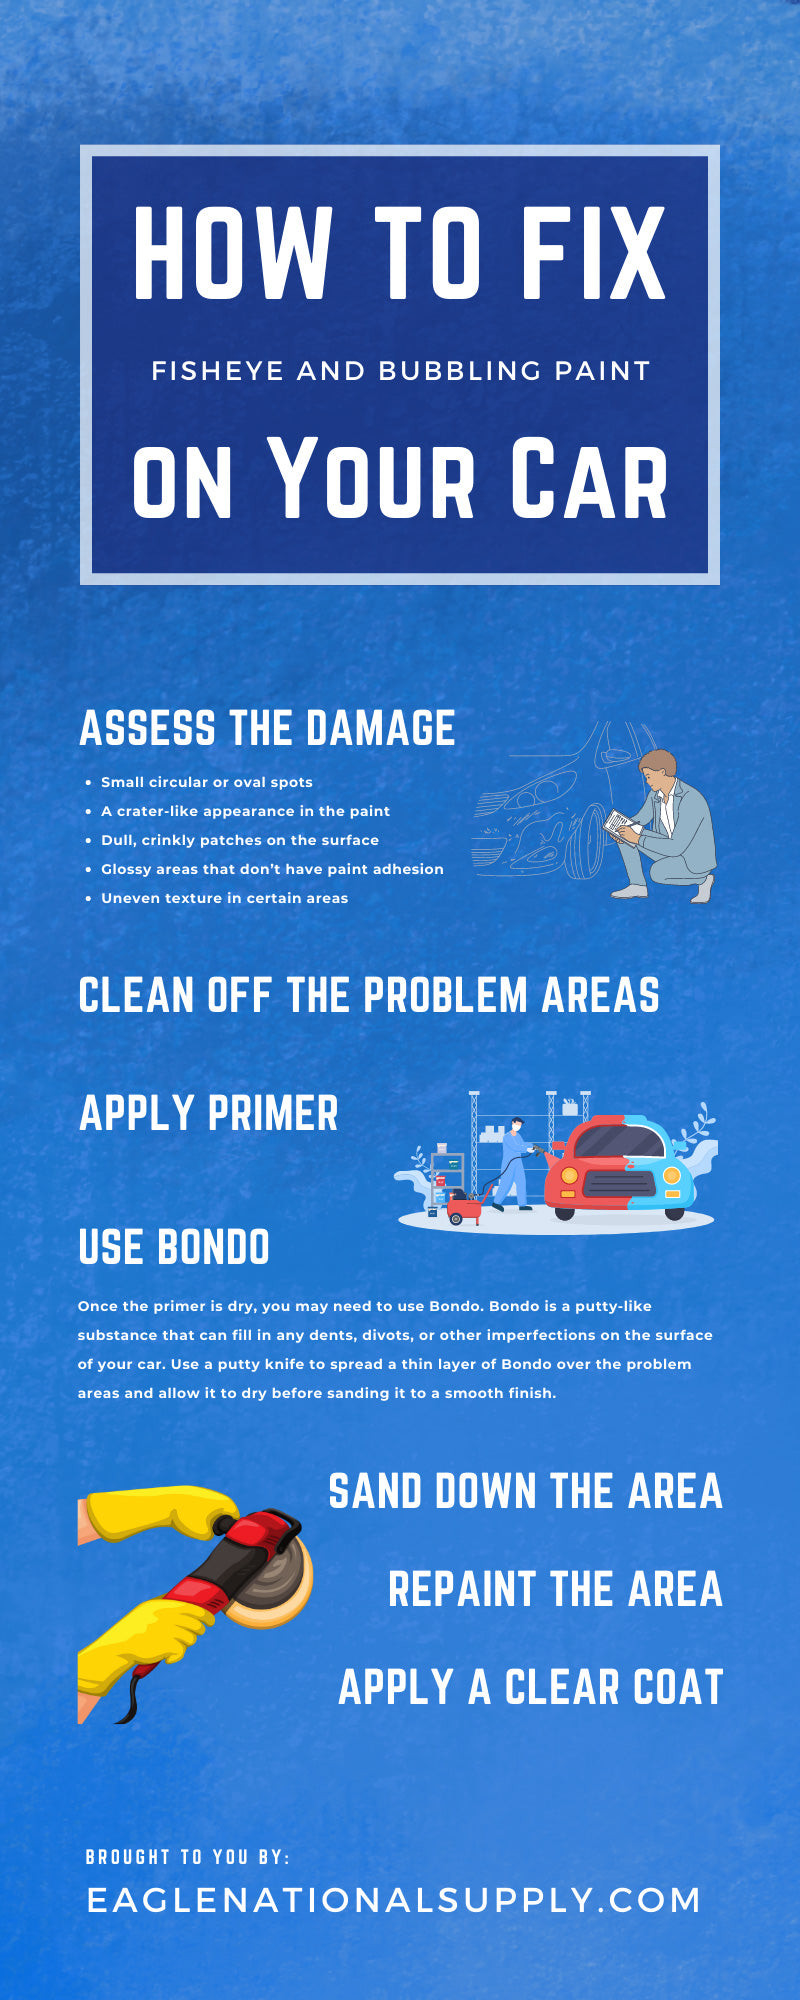
How To Fix Fisheye and Bubbling Paint on Your Car
Alt text: Step-by-step infographic illustrating how to repair bubbling and fisheye paint on a car, including cleaning, sanding, applying filler, priming, painting, and clear coating.
7. Polishing and Buffing (Optional but Recommended)
For the best possible finish, especially if blending was needed, polishing and buffing are recommended.
- Wet sand (optional): For minor imperfections or “orange peel” texture in the clear coat, you can lightly wet sand with 2000-grit and then 3000-grit sandpaper after the clear coat is fully cured. This step is for advanced users and should be done carefully.
- Compounding: Use a rubbing compound with a polishing pad on a rotary or dual-action polisher to remove any sanding marks and level the clear coat.
- Polishing: Follow up with a polishing compound and a polishing pad to refine the finish, remove swirl marks, and enhance gloss.
- Waxing or Sealing: Apply a high-quality car wax or paint sealant to protect the newly repaired paint and enhance its shine.
Preventing Bubbling Paint and Fisheye
Prevention is always better than cure. Here are key steps to prevent bubbling paint and fisheye from occurring in the first place, especially if you’re undertaking a DIY car painting project:
- Surface Preparation is Paramount: Thoroughly clean and degrease the surface before any painting. Remove all traces of wax, grease, oil, silicone, and dirt.
- Use High-Quality Products: Invest in quality automotive paints, primers, and clear coats from reputable brands. Avoid cheap, low-quality products that are more prone to defects.
- Proper Mixing and Application: Strictly adhere to the paint manufacturer’s instructions for mixing ratios, application techniques, and drying times.
- Control Environmental Conditions: Paint in a well-ventilated area with moderate temperature (60-80°F or 15-27°C) and humidity (40-70%). Avoid painting in direct sunlight, extreme heat, cold, or high humidity, as these conditions can lead to paint defects.
- Use a Tack Cloth: Before each coat of primer, paint, or clear coat, use a tack cloth to remove any dust or lint particles from the surface.
- Consider Paint Additives: For challenging conditions or paints known to be prone to fisheye, consider using a fisheye eliminator additive in your paint, following the product instructions carefully.
By following these repair steps and preventative measures, you can effectively fix bubbling paint and fisheye on your car and maintain a beautiful, long-lasting paint finish. Remember to take your time, be patient, and use quality materials for the best results.