How to Fix a Misaligned Car Door: Step-by-Step Guide

Is your car door sagging, sticking, or simply not lining up correctly with the body of your vehicle? A misaligned car door is a common issue, often stemming from worn-out door hinges. When your car door isn’t sitting flush, it can lead to a host of problems, from annoying drafts and water leaks to potential safety hazards. Fortunately, fixing a misaligned car door is a DIY task that many car owners can tackle at home with the right tools and guidance. This comprehensive guide will walk you through the process of diagnosing, preventing, and fixing a misaligned car door, ensuring your vehicle is secure and sound.
Understanding Why Car Doors Sag and Misalign
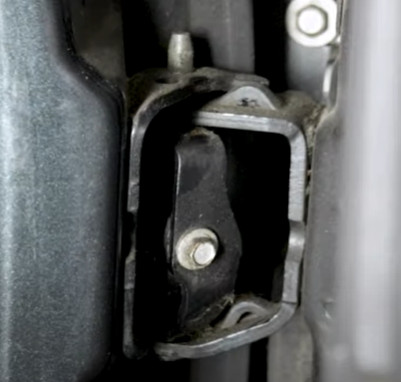
Close up of car door hinges showing wear and tear
The primary culprit behind a sagging or misaligned car door is usually the door hinges. These hinges are responsible for supporting the weight of the door and allowing it to swing open and closed smoothly. Over time, the pins and bushings within these hinges can wear down due to constant use, corrosion, and lack of lubrication. This wear and tear creates play in the hinge, leading to the door dropping or shifting out of its proper alignment. Think of it like the joints in your body – when they wear down, movement becomes stiff and misaligned. Similarly, worn-out door hinge components cause the door to lose its precise positioning.
Identifying the Signs of a Misaligned Car Door
Recognizing the symptoms of a misaligned car door early can prevent further damage and safety concerns. Here are common indicators that your car door might be suffering from misalignment:
- Sagging Door: The most obvious sign is a door that visibly sags or droops when opened. You might notice it doesn’t sit level with the adjacent panels of the car body.
- Difficulty Closing: A misaligned door often requires extra force to close properly. You might have to slam it harder than usual to latch it securely.
- Uneven Gaps: Inspect the gaps around the door when it’s closed. Uneven gaps, where one area is tighter and another is wider than usual, indicate misalignment.
- Wind Noise and Water Leaks: Gaps caused by misalignment can allow wind noise to enter the cabin while driving, particularly at higher speeds. Rainwater may also leak into the car, especially during heavy downpours or car washes.
- Door Popping Open: In severe cases, a severely misaligned door might pop open while driving, posing a significant safety risk to you and other drivers.
How to Test for Car Door Misalignment
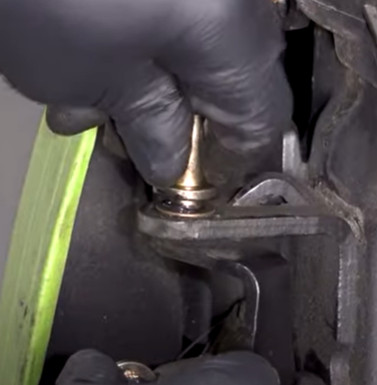
 Mechanic demonstrating how to lift a car door to check for hinge looseness
Before you jump into repairs, it’s crucial to confirm that the issue is indeed with the door hinges. A simple test can help you diagnose the problem:
- Open the Door: Open the suspected misaligned car door about halfway.
- Grip the Door’s Edge: Grasp the lower edge of the door firmly with your hands.
- Lift and Observe: Gently lift the door upwards, applying slight pressure.
- Check the Hinges: Watch the door hinges closely as you lift. If the hinges are loose or worn, you’ll notice movement, play, or shifting in the hinges themselves. A healthy hinge should remain solid and not exhibit any noticeable movement when you lift the door.
If you observe movement in the hinges during this test, it confirms that worn hinge pins and bushings are likely the cause of your misaligned car door.
Step-by-Step Guide: Fixing a Misaligned Car Door by Replacing Hinge Pins and Bushings
 Hands replacing car door hinge bushings
The most effective way to fix a misaligned car door caused by worn hinges is to replace the hinge pins and bushings. This process involves removing the old, worn components and installing new ones, restoring the hinge’s functionality and realigning your door. While the specific steps may vary slightly depending on your car model, here’s a general guide to follow:
Tools and Materials You’ll Need:
- New door hinge pin and bushing kit (specific to your car model)
- Socket and ratchet set
- Wrench set
- Hammer
- Punch or drift pin
- Flat-blade screwdriver
- Jack and jack stands or door support tool
- Penetrating oil
- Grease
- Vise grips or pliers
- Safety glasses
- Gloves
Steps to Replace Door Hinge Pins and Bushings:
- Prepare the Door: Open the car door fully. To prevent the door from dropping and causing damage or injury during the repair, use a jack and jack stands or a specialized door support tool to securely hold the door in the open position. Alternatively, enlist a helper to support the door throughout the process.
- Disconnect Wiring (If Applicable): For power doors or doors with electrical components, carefully disconnect any wiring harnesses running to the door. Usually, these are located in the door jamb and can be disconnected by unclipping connectors.
- Remove Door Hinge Bolts: Locate the bolts securing the door hinges to both the door and the car frame. Use a socket and ratchet or wrenches to loosen and remove these bolts. Start by loosening all bolts, then remove them completely, leaving one or two bolts loosely in place until the door is fully supported to prevent sudden dropping.
- Remove the Door (Carefully): With the door securely supported and hinge bolts removed, carefully detach the door from the car frame. If you have a helper, they can assist in lifting and removing the door. Set the door aside in a safe location where it won’t be damaged.
- Remove Old Hinge Pins and Bushings: Now that the door is removed, you can access the hinges more easily. Place the hinge in a vise for stability. Use a punch or drift pin and hammer to drive out the old hinge pins. You may need to apply penetrating oil to loosen stubborn pins. Once the pins are removed, use a flat-blade screwdriver or pliers to remove the old bushings from the hinge.
- Install New Bushings: Clean the hinge thoroughly to remove any dirt or debris. Apply a small amount of grease to the new bushings and press them into place in the hinge. Ensure they are seated correctly and flush with the hinge surface.
- Install New Hinge Pins: Apply grease to the new hinge pins. Align the hinge parts and insert the new hinge pin. Use a hammer and punch (or vise) to gently tap the pin into place until it is fully seated and secure within the hinge.
- Reinstall Hinges to Door (If Removed): If you completely removed the hinges from the door in step 4 (sometimes necessary for easier access), reinstall them onto the door now, tightening the hinge bolts securely.
- Reinstall the Door: Carefully lift the door back into position and align the hinges with the mounting points on the car frame. Reinstall the hinge bolts, starting with a few loose bolts to align everything, then tighten them securely.
- Reconnect Wiring (If Disconnected): If you disconnected any wiring in step 2, reconnect it now, ensuring connectors are properly seated and locked.
- Test Door Alignment and Operation: Carefully close and open the door, checking for proper alignment and smooth operation. Ensure the door closes flush with the car body and latches securely without excessive force. Adjust hinge bolt tightness slightly if necessary to fine-tune alignment.
- Final Check: Once satisfied with the door alignment and operation, perform a final check to ensure all bolts are tightened securely and wiring is properly connected.
Preventing Future Car Door Misalignment
Prevention is always better than cure. To extend the life of your car door hinges and prevent future misalignment issues, consider these maintenance tips:
- Regular Lubrication: Periodically lubricate your car door hinges with a quality rust penetrant or white lithium grease. This will keep the hinges moving smoothly, reduce friction, and prevent corrosion. Apply lubricant to the hinge pins and bushings at least a couple of times a year, or more frequently in harsh climates.
- Avoid Overloading Doors: Be mindful not to overload your car doors with excessive weight, such as hanging heavy items from door pockets or allowing doors to swing open forcefully and repeatedly against their stops.
Consequences of Neglecting a Misaligned Car Door
Ignoring a misaligned car door can lead to more than just cosmetic issues. Here are some potential consequences of driving with a sagging or misaligned door:
- Increased Wear and Tear: Misalignment puts extra stress on door latches, weather stripping, and even the car frame over time.
- Water Leaks and Rust: Gaps from misalignment allow water to enter, potentially leading to rust and corrosion inside the door and cabin.
- Drafts and Noise: Wind noise and drafts can make driving uncomfortable, especially at higher speeds.
- Safety Risks: As mentioned earlier, in severe cases, a misaligned door can pop open while driving, creating a dangerous situation.
- Reduced Vehicle Value: Neglecting bodywork issues like door misalignment can negatively impact your car’s resale value.
By addressing a misaligned car door promptly, you not only improve the functionality and appearance of your vehicle but also prevent more serious problems down the road. With this guide, you’re well-equipped to tackle this DIY repair and restore your car door to its proper alignment.