BMW ECU Validation Service: Step-by-Step Guide for MGU, ATM2, and Dkombi4
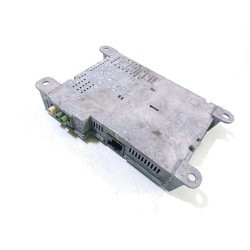
Modern BMW vehicles incorporate advanced security measures to protect against unauthorized modifications and tampering. A key aspect of this security is the requirement for BMW ECU Validation Service, particularly when replacing specific control modules like the Media Graphics Unit (MGU HU-H3), Telematic Communication Box (ATM-02), and instrument cluster (DKOMBI4/KOMBISP18). This article provides a comprehensive, step-by-step guide on how to perform BMW ECU Validation Service per VIN using ISTA after replacing these critical components.
Understanding BMW ECU Validation Service
The introduction of the Headunit HU-H3 (MGU) brought a heightened level of security to BMW systems. This means that replacing certain modules – notably the MGU, ATM (TCB), Rear Seat Entertainment (RSE), or the instrument cluster (DKOMBI4/KOMBISP18) – necessitates re-establishing a secure communication link between these components. This secure link is achieved through an electronic certificate generated by the BMW backend and imported into your vehicle.
Why is this validation necessary? After replacing one of these modules, it will lack the necessary certificate to communicate correctly with other vehicle systems. The BMW ECU Validation Service process rectifies this by providing the replacement module with a valid certificate, ensuring seamless and secure operation within the BMW ecosystem.
Starting with ISTA version 4.14.1x, BMW has streamlined the process for generating these ECU validation service certificates, offering both automatic and manual options. This guide focuses on the manual steps, ensuring you can confidently perform this crucial procedure.
Image: A table listing BMW models that require ECU validation service for components like MGU, ATM2, and Dkombi4, emphasizing model coverage for BMW ECU validation.
Step-by-Step Guide to BMW ECU Validation Service with ISTA
Follow these steps to successfully perform the BMW ECU Validation Service using ISTA:
-
Initiate Control Unit Exchange in ISTA: Begin by navigating to “Vehicle management” and then select “Control unit exchange” within the ISTA diagnostic software.
-
Identify the Replaced Module: In the “After” tab, choose the control unit that has been replaced. Subsequently, calculate the measures plan. ISTA is designed to automatically incorporate the control unit validation into this plan.
-
Handle Automatic Validation Warnings (If Applicable): If ISTA cannot automatically perform the validation, a warning message will appear, indicating the absence of control unit validation. This is normal for certain scenarios and requires manual intervention.
-
Generate the Validation Request File: Click “Next.” ISTA will then generate a
ValidationRequest_VIN_xxx.jsonfile. A file dialogue box will open, prompting you to save this file. Choose a location where you can easily access it later, as this file needs to be uploaded via DCSnet. -
Confirmation of File Saving: ISTA will display a confirmation message indicating that the
ValidationRequest_VIN_xxx.jsonfile has been successfully saved. At this stage, you can safely exit the ISTA process by clicking “Cancel.” The session can be closed after the measures plan processing is complete. -
Access DCSnet and ECU Validation Service: Open DCSnet and navigate to the “Service” section. Look for and select “ECU Validation Service.” Here, you can initiate the BMW ECU validation service for MGU, ATM2, Dkombi4 per VIN. If you are unable to locate the ECU Validation Service Menu, it’s essential to verify your Access Roles in DEMS. If the ECU validation Service Role is missing, contact your DEMS Administrator to request the necessary access.
-
Upload the Validation Request File: Upload the
ValidationRequest_VIN_xxx.jsonfile that you previously generated and saved from ISTA. -
Download the Validation Response File: The system will process the uploaded file. After a short period, a new file named
ValidationRequest_VIN_xxx_response.jsonwill be available for download. This response file is crucial for the next steps in ISTA. Initiate a new ISTA session.
Image: A screenshot from ISTA software highlighting the ECU Validation Service menu, guiding users through the initial steps of the validation process.
-
Navigate to ECU Validation in ISTA: Within the new ISTA session, go to the “Additional Software” tab and select “ECU Validation.”
-
Import the Validation Response File Manually: Choose the option “Import control unit validation file manually” and confirm by clicking “OK.”
-
Select and Import the Response File: In the file dialogue, locate and select the
ValidationRequest_VIN_xxx_response.jsonfile that you downloaded from DCSnet. Confirm your selection by clicking “Continue.” -
Certificate Writing and Verification: ISTA will now write the certificate from the response file into the vehicle’s system and perform a verification check to ensure successful validation.
Image: An ISTA screen confirming successful ECU validation, showing a checkmark and status message indicating the completion of the BMW ECU validation service.
Summary
The BMW ECU Validation Service is a critical procedure when replacing specific control modules like the MGU, ATM2, and Dkombi4 in modern BMWs. This security measure ensures component integrity and proper system functionality. By following this step-by-step guide using ISTA and DCSnet, technicians can confidently and effectively perform the necessary validation, restoring full operational capability after module replacement. This process is essential for maintaining the security and performance standards of BMW vehicles.