Upgrade Your Mini Cooper CIC OEM Navigation with Mr12Volt P2000 CarPlay/Android Auto

For Mini Cooper owners and BMW enthusiasts looking to modernize their in-car entertainment, the Mr12Volt P2000 offers a compelling solution to upgrade your OEM Test Bench Navigation System, specifically the CIC (Car Information Computer) Head Unit. Released in August 2021, this CarPlay and Android Auto interface box provides a significant leap in audio quality and functionality compared to older AUX-based options. Early adopters have praised its digital audio output and enhanced user experience, making it a noteworthy upgrade for compatible BMW and Mini models equipped with the CIC system.
The standout feature of the Mr12Volt P2000 is its digital audio output via the MOST (Media Oriented Systems Transport) bus. This is the same method used by factory OEM CD Changers, ensuring pristine sound quality. The unit cleverly simulates a CD changer on CD1 source, allowing for seamless integration with your existing CIC system. This digital connection results in a substantial improvement in Sound Quality (SQ) compared to the analog AUX inputs or Quadlock Aux typically found in similar aftermarket boxes.
However, like any new product, the Mr12Volt P2000 has its pros and cons. Let’s delve into a detailed overview:
Mr12Volt P2000 Interface: Pros & Cons for CIC Navigation Upgrade
Pros:
- M.O.S.T. Fully Digital Audio Output: Enjoy crystal-clear, digital audio directly to your CIC system, leveraging the superior MOST bus for an unparalleled listening experience.
- Lossless Audio Support: Experience high-fidelity audio through Wireless CarPlay and Apple Music, unlocking the full potential of lossless audio formats in your car.
- Faster and More Responsive UI: Benefit from a smoother, quicker user interface compared to previous generation CarPlay/Android Auto solutions, ensuring a lag-free and enjoyable interaction.
- Streamlined Harness: The less bulky harness, eliminating the need for a quadlock connection, simplifies installation and reduces cable clutter behind your CIC unit.
- Backup/Front/360 Camera Support: Expand your vehicle’s safety and convenience with support for aftermarket backup cameras, front cameras, and even 360-degree camera systems.
Cons:
- Initial Setup Complexity: While Mr12Volt claims no coding is necessary, user experiences indicate that coding CDMM_CHANGER_3 to mp3_cdc is often required for the unit to function correctly.
- Aftermarket Microphone: The inclusion of a separate aftermarket microphone, instead of an OEM mic splitter cable, might be considered a slight inconvenience. While OEM mic splitter cables can be sourced separately, their availability may vary.
- New Product Quirks: As a relatively new product, initial software bugs might be present. However, Mr12Volt has shown commitment to updates, and the initial release is already considered more refined than competitors like Joyeauto, Andream, and Kremersino.
- Bass Output Concerns (Original Model): Early user reports indicated a reduction in low-end bass compared to direct CIC audio. Mr12Volt acknowledged this limitation as hardware-related and unfixable in the original P2000 without hardware revisions.
Mr12Volt P2000 CarPlay Android Auto Interface Box Contents
Addressing Bass Concerns: The Updated P2000 CICMD Model
Recognizing the bass issue, Mr12Volt released an updated model, the P2000 CICMD, featuring an improved DSP (Digital Signal Processor). This new iteration specifically addresses the reported lack of low-end bass, providing a more balanced and richer audio experience. The P2000 CICMD also incorporates a revised LVDS cable, requiring users to re-run this connection from the CIC head unit during installation. To acknowledge early adopters, Mr12Volt offered a credit to previous P2000 buyers for upgrading to the CICMD version (offer details and expiration may vary, check the official Mr12Volt website for current promotions).
This proactive response from Mr12Volt demonstrates their commitment to customer satisfaction and continuous product improvement, making the P2000 CICMD a more refined and desirable option for enhancing your Mini Cooper CIC OEM Test Bench Navigation System.
Installation Tips for Mr12Volt P2000 in CIC Systems
Important Note (2024 Update): Newer Mr12Volt P2000 units feature a modified harness that connects behind the head unit. This change can prevent CIC coding after installation. Therefore, it is strongly recommended to complete any necessary CIC coding steps before installing the new unit.
The following provides general installation guidance and assumes familiarity with basic car audio and dash disassembly. If you are not comfortable with these procedures, seeking professional installation is advised. Always proceed at your own risk.
-
Preparation and Disassembly:
- Begin by removing the center trim, carefully disconnecting the start button and hazard switch connectors. Consider reconnecting the start button temporarily for testing purposes later.
- Remove the climate control panel and its connectors, setting it aside safely.
- Detach the CIC trim and then the center trim containing the CIC controller, placing them aside.
- Protect the shifter and surrounding area below the CIC head unit to prevent scratches during removal.
- Carefully remove the CIC head unit from the dashboard.
-
Connections:
- Disconnect the Quadlock connector and the LVDS screen cable from the CIC unit.
- Locate the MOST fiber optic connections within the Quadlock connector. Release the small clip securing it to remove it.
- Disassemble the plastic housing from one end of the Mr12Volt splitter harness. Attach this housing to the OEM MOST connection and plug it into the splitter harness. Connect the other end of the splitter harness into the Quadlock connector.
- Route the CIC controller splitter harness to the area behind the CIC unit.
- If desired, run cables for optional backup, front, or 360 cameras.
- Route the microphone cable and position the microphone in your preferred location. (Alternatively, install an OEM microphone splitter cable if you have one available).
- Run all necessary cables to your chosen mounting location for the Mr12Volt unit.
- Connect all harnesses and cables to the Mr12Volt P2000 interface box.
-
Testing and Reassembly:
- Before fully reassembling the dashboard, reconnect the CIC controller and test the Mr12Volt unit to ensure proper functionality.
- If everything is working correctly, carefully reinstall all trim pieces, panels, and connectors in reverse order of removal.
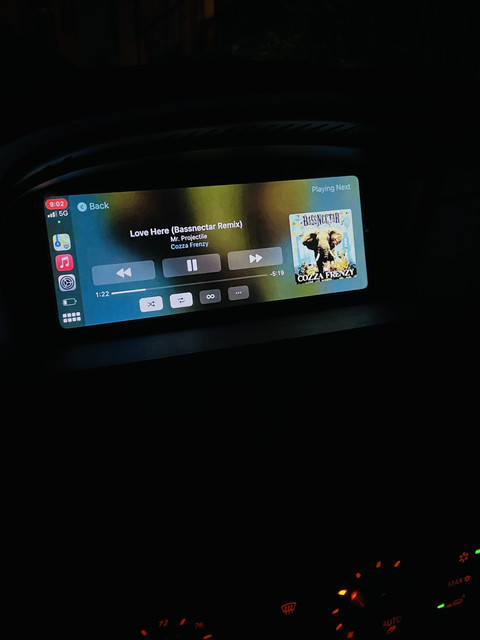 BMW E92 with Mr12Volt P2000 CarPlay UI
 BMW E92 Mr12Volt P2000 CarPlay Interface Main Menu
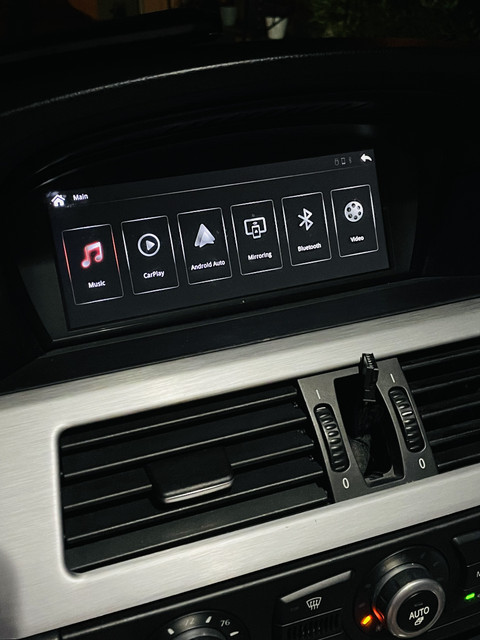
 BMW E92 Mr12Volt P2000 Android Auto Interface
Mounting the Mr12Volt P2000 Unit
While Mr12Volt suggests tucking the unit to the right side of the CIC, alternative mounting locations can offer easier access and a cleaner installation. One popular option is mounting the P2000 unit above the glove box. This location generally provides more space and allows for relatively easy removal if future access is needed.
To secure the unit and prevent rattling:
- Wrap the metal dash frame in the chosen mounting area with foam packing material.
- Apply OEM-like Tesa electrical harness tape around the foam-wrapped frame.
- Use zip ties to securely mount the Mr12Volt unit to the frame, ensuring it is firmly in place and cannot rattle.
- Neatly wrap and organize the wiring harness to maintain a clean and professional installation.
For optimal Bluetooth and Wi-Fi signal strength, consider mounting the antennas in a location with minimal obstruction. The plastic dashboard components should allow for good signal transmission within the car cabin and towards the center console area where your phone is typically placed.
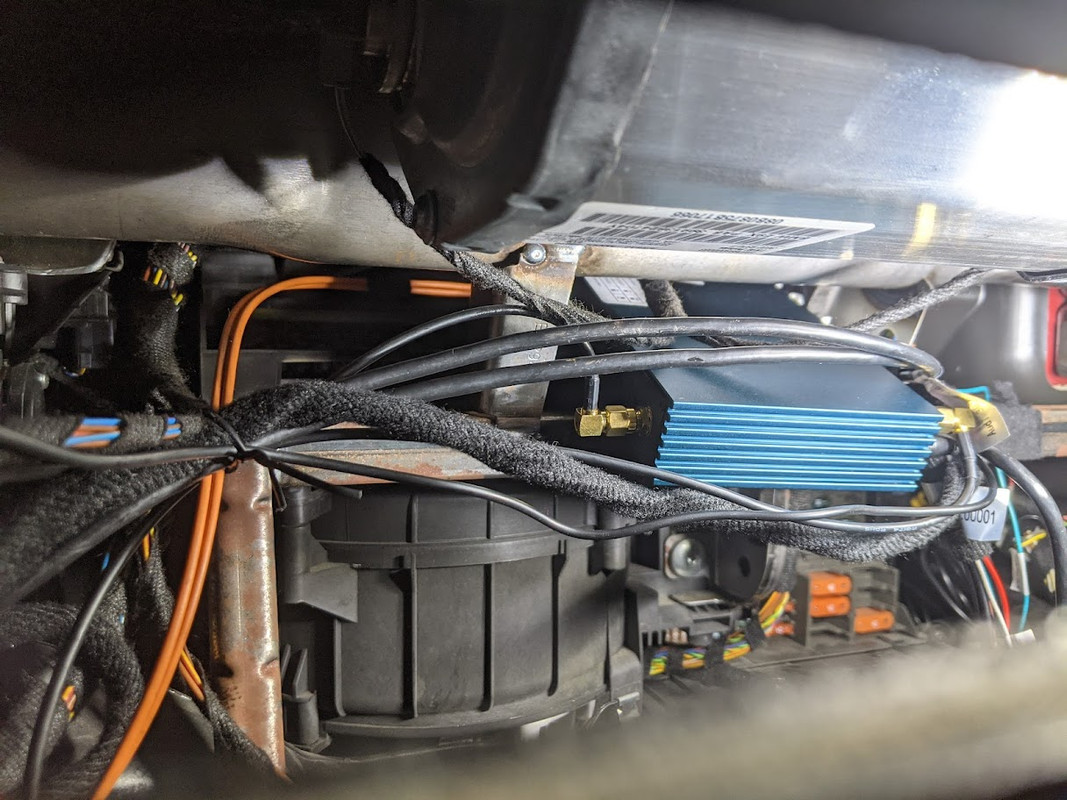 Mr12Volt P2000 Unit Mounted Above Glove Box in BMW
 Mr12Volt P2000 Wiring and Mounting Detail
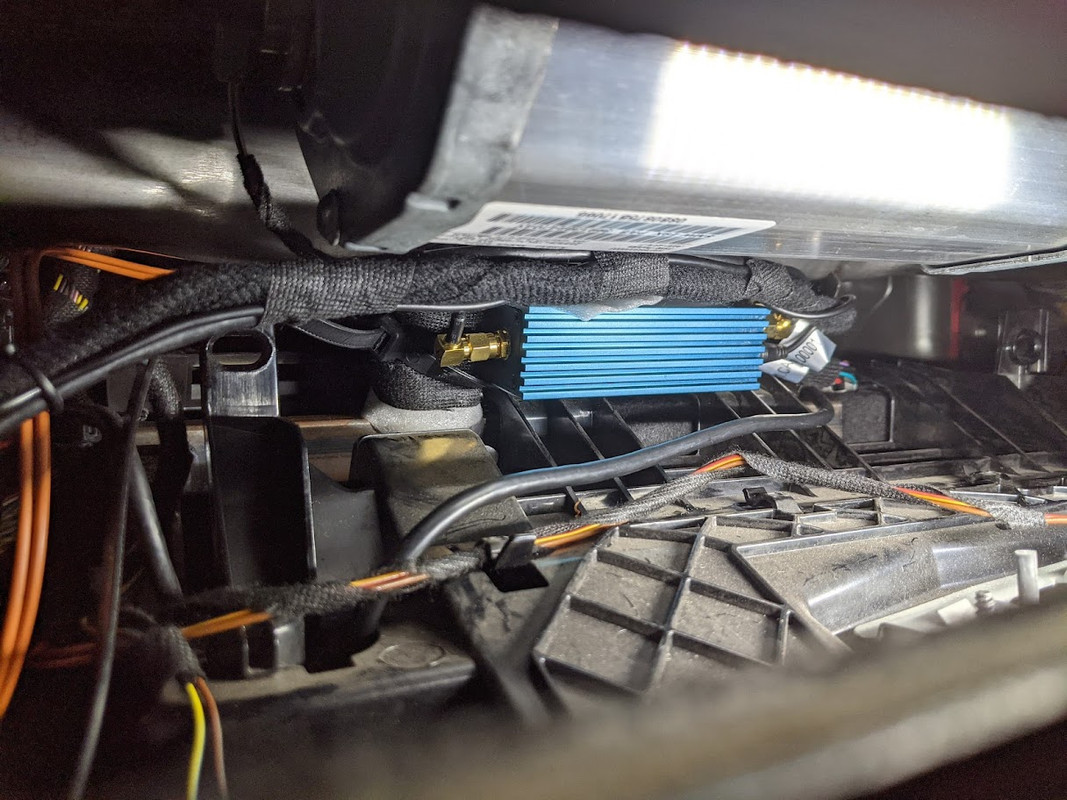 Mr12Volt P2000 Unit Securely Mounted
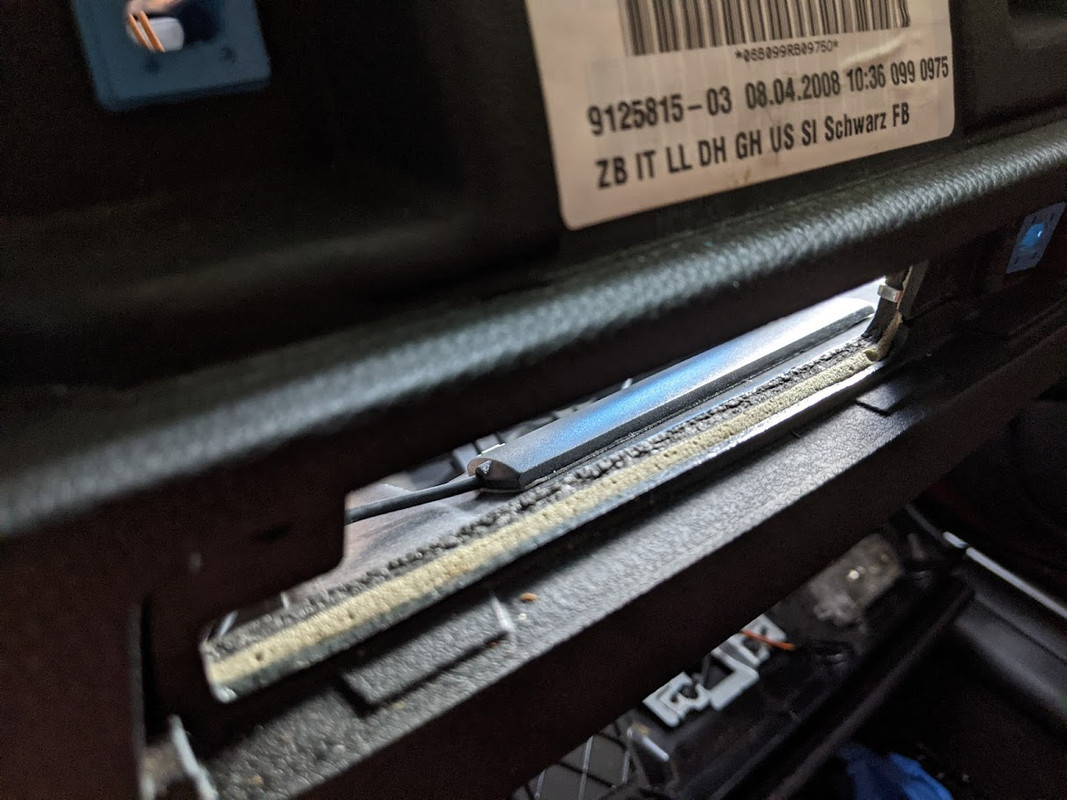 Mr12Volt P2000 Bluetooth and Wifi Antenna Mounting Location
Initial Setup and Coding Considerations
Early users encountered setup issues, highlighting a discrepancy with Mr12Volt’s claim of a coding-free installation. While instructions may state coding is unnecessary and the unit will automatically activate the CD changer, practical experience suggests otherwise. For many users, coding is required to enable the CD changer function and recognize the Mr12Volt unit.
Coding Requirement:
- CDMM_CHANGER_3 to mp3_cdc: Coding this setting is frequently necessary for the Mr12Volt P2000 to function correctly and for the CD1 source option to appear on your CIC system.
Coding with Bimmercode (Example):
- Navigate to the Headunit module in Bimmercode.
- Enter Expert Mode.
- Access the
3000 HMIsection. - Locate the
CDMM_CHANGER_3option. - Change the value to
mp3_cdc. - Execute the coding process by selecting
CODEand thenSTART CODING.
Accessing the Admin Menu:
For advanced settings and customization, the Mr12Volt P2000 includes a password-protected admin menu:
- Go to
Settingswithin the CarPlay/Android Auto interface. - Select
System. - Choose
Factory Mode. - Click on
Advanced Setting. - Enter the password “688612” when prompted and press
OK.
Conclusion: Enhancing Your CIC OEM Navigation System
The Mr12Volt P2000 (and the updated P2000 CICMD) represents a significant upgrade path for owners of BMW and Mini Cooper vehicles equipped with the CIC OEM Test Bench Navigation System. By providing digital audio output, seamless CarPlay and Android Auto integration, and a host of modern features, it effectively bridges the gap between classic car aesthetics and contemporary infotainment expectations. While initial setup might require minor coding adjustments and early models had bass output limitations, the overall user experience and audio quality improvements make the Mr12Volt P2000 a worthwhile investment for those seeking to modernize their in-car technology without sacrificing the original OEM system’s integrity. Always refer to the latest product documentation and online resources for the most up-to-date installation procedures and compatibility information.
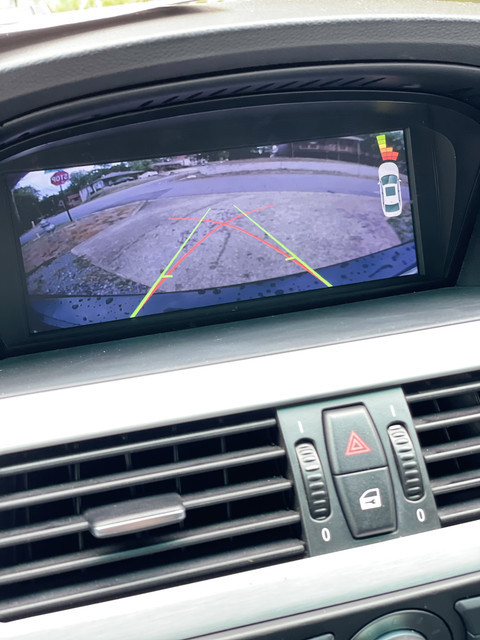
 BMW E92 Front Camera Installation with Mr12Volt P2000