Firmware Upgrade V3.5.6 for PT3G VCI: Restoring Your PIWIS3 Driver

Encountering connection issues between your PIWIS3 software and your VNCI PT3G scanner, or the original PT3G/PT4G device? This often indicates that your PIWIS3 driver has been compromised or replaced. Fortunately, restoring the original PIWIS3 OEM driver is a straightforward process, ensuring seamless communication and optimal diagnostic performance for your Porsche vehicles. This guide will walk you through the necessary steps to reinstate your driver to version 3.5.6 and get your system back on track.
VNCI PT3G Automotive Diagnostic Tool
The key to resolving connectivity problems lies in replacing the tampered driver with the authentic PIWIS3 OEM driver. This restoration process is simplified into two essential steps, designed for a quick and efficient resolution.
Step-by-Step Guide to Restore PIWIS3 OEM Driver
Restoring your PIWIS3 OEM driver is a simple two-step procedure. Follow these instructions carefully to ensure your VNCI PT3G or original PT3G/PT4G device communicates correctly with your PIWIS3 software.
Step 1: Driver File Replacement
First, you need to download the correct original PIWIS OEM driver files. The current driver version required for Firmware Upgrade V3.5.6 compatibility is version 3.5.6.
- Download the original PIWIS OEM driver here. This download provides the necessary files to revert your driver to the authentic version 3.5.6.
- Navigate to the PIWIS3 driver location on your computer. The standard path is:
D:/PiwisApps/VCI/Actia_64/XS_D_PDU_API_64/. - Delete all existing files within this folder. This is crucial to ensure no conflicting or corrupted files remain.
- Copy the downloaded original driver files into this now-empty location. This replaces the potentially tampered driver with the correct OEM version.
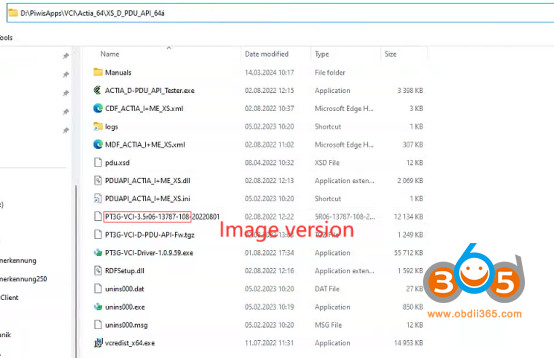 PIWIS3 Driver Location Path for VNCI PT3G Firmware Upgrade
Step 2: Execute PIWIS OEM Driver Registry
After replacing the driver files, you need to update the Windows Registry to correctly register the restored driver.
- Copy the following registry content:
Windows Registry Editor Version 5.00

[HKEY_LOCAL_MACHINESOFTWAREACTIA I+ME GmbHPT3G-VCIModule VersionsXS_D_PDU_API_64]

[HKEY_LOCAL_MACHINESOFTWAREACTIA I+ME GmbHPT3G-VCIModule VersionsXS_D_PDU_API_643.5.6]
"Image Version"="3.5r06-13787-108"
"Image File"="D:/PiwisApps/VCI/Actia_64/XS_D_PDU_API_64/PT3G-VCI-3.5r06-13787-108-20220801"
"Module Version"="3.5.6"
"Module File"="D:/PiwisApps/VCI/Actia_64/XS_D_PDU_API_64/PT3G-VCI-D-PDU-API-Fw.tgz"
"Image Boot Timeout"=dword:0001d4c0
"Update Timeout Default"=dword:00003a98
"Update Timeout Image"=dword:00030d40
"Update Timeout Module"=dword:0000afc8
"Module Name"="D-PDU-API"- Open a text editor (like Notepad) and paste the copied registry content.
- Save the file with a
.regextension (e.g.,PIWIS_driver_registry.reg). - Double-click the
.regfile to execute it and merge the settings into your Windows Registry. Confirm any prompts to allow the registry update.
Verifying Driver Restoration
To confirm that the PIWIS OEM driver has been successfully restored and is functioning correctly for Firmware Upgrade V3.5.6:
- Connect your VNCI PT3G or original PT3G/PT4G device to your computer.
- Run the
ACTIA_D-PDU_API_Tester.exeprogram, typically found within the PIWIS3 installation directory. - Click “Start” in the tester program.
- Observe the results. If all communication protocols pass completely, this indicates that the original device driver has been fully restored to its normal working state.
By following these steps, you can effectively restore your PIWIS3 OEM driver to version 3.5.6, resolving connection issues and ensuring optimal performance for your VNCI PT3G VCI and PIWIS3 diagnostic system.